I have spent something like 40 total hours of labor over the entire summer and spent ~$250 to build the most over complicated raised garden bed boxes within a four mile radius. I have obsessed over the design & materials, changed the layout and location no more than 4 times and used child labor (my 9-year old son) during construction. We now have Garden Boxes that can support the weight of our entire house and my wife mentioned that I might need an intervention.
It all started when we decided to grow some veggies and I didn’t want to use treated lumber from Home Depot. I considered landscape bricks, but the total project cost would be over $700 for three 8X3X2’ beds. I wanted to use 3-inch thick cypress beams, as that particular wood is rot proof for 50+ years, but that type of wood is outrageously expensive here in the Pacific Northwest ~$1000 for the needed lengths. I considered redwood, but it was also too pricy to be left out in the yard, half covered with dirt. The predicament was solved for me when I happened upon a bunch of 4”X10”X8’ fir beams that were end cuts from a beam roof construction project in the neighborhood. As they were “scrap” I picked them up for a song.
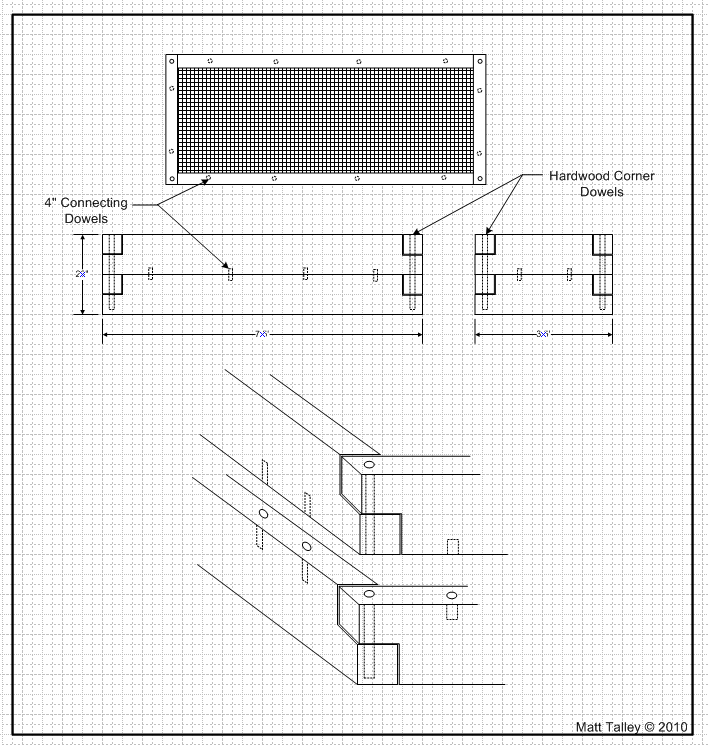
In addition to the boxes, there will be an espalier apple tree and two columnar apples on that side of the yard. I wanted the garden boxes to mesh with that plan and still be functional, pretty, and to fit in with the style of our house & yard. To help with that goal, I decided to lap joint the corners of the boxes and use hardwood dowels to both keep the joints together and as homage to the period craftsmanship of our home. I know I have OCD. Since I was already using dowels, I wanted to marry the planks together (see drawing) so that the whole structure would be stronger and resist and bowing in the middle as the dirt pressed on the sides of the beds. I felt it might also be nice to add replaceable cedar top rails to shed water and to take the brunt of any abuse. I may have over-thought the concept and might have been better off just using concrete cinder blocks…
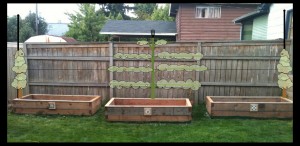
The finished product with espalier apple trees cartooned in.
Here are the exact steps to take in building raised garden boxes just like ours:
Plan obsessively
Re-design twice
Buy lumber – get great deal
Bring home and cover with tarp
Let sit for a month
Measure and layout each joint with son’s help
Let son drop board on your shin
Try REALLY hard not to say curse words
By son ice cream.
Limp for a couple of days
Carefully cut all end notches with son
Tell him no when he wants to run the circle saw
Tel him no when he asks again every 10 minutes
Lit it all sit for 2 more weeks
Find really expensive combination square your son left in the grass
Smile because you love him anyway
Drill all dowel holes in the middle of the individual sections with spade bit
Let sit for a week in rain because you forgot to tarp it
Assembly all sections dry for 1st box
Realize that the pieces are now warped and twisted more than a bit
Say a LOT of curse words
Hand-fit each joint with a mallet and chisel
Cuss some more
Purchase ¾” X 2’ auger bit
Assemble 1st box with glue and dowels
Get HUGE splinter in palm
Say hurtful, mean things to the lumber & loudly question the legitimacy of its parentage
Cry a little while digging the jagged hunk of wood out with utility knife
Use Super Glue creatively as first aid supply
Spend a full hour getting 1st box square using one hand
Call it a night
Make sure the thing didn’t move while you were sleeping
Drill corners for dowels
Almost burn up drill
Look at sky and count to ten
Run out of waterproof wood glue
Say dirty words all the way to Home Depot
Buy bigger drill, glue, and more dowels
Apply glue and hammer in dowels with wooden mallet
Look over to see puppy chewing on your hat
Say the F-word
Retrieve soggy hat
Clamp box up with 8 huge pipe clamps
Let joints dry/sit for a week
Construct next two boxes with minimal dirty words
Let sit a further week
Ask 15 year old daughter if she wants to help
She will look at you like you are insane for the mere suggestion
Try not to break her phone when she returns to texting
Look up and count to twenty – repeat
Spread out boxes in yard and turn over
Apply two coats of white primer to bottoms of boxes
Get paint on favorite pair of shorts
Let wife help paint over primer with green outdoor paint
Look up and notice that wife has painted halfway down the box…
Take paint brush from wife
Say sweet things to her and laugh about the extra paint coverage
Let boxes sit for two days
Finish painting bottoms green (keep ground moisture out and blends with grass)
Let sit a week
Position in yard where they should finally go
Ask visiting friend for his opinion
Take his advice (as it is better than your plan) and reposition
Let wife see
Move 3 more times to make wife happy
Move back to position friend suggested
Let sit for a week
Get married to wife a second time and almost loose mind to stress
Have house full of guests for a week
Try not to kill Ross when he makes fun of your yard
Drink lots of beer
Buy gravel and hardware cloth for box foundation
Cut sod from under box locations and move to bare patch in front yard
Wife will work hard in front planting lavender and arranging sod
Lay hardware cloth and pour gravel footings
Spend Saturday with wife finally placing boxes
Drink beer and wine until you hurt the next day in celebration of your hard work
Let sit another week
Cut top rail on table saw
Decide to really complicate things by adding hardwood splines to top rail joint
Devise special spline jig for table saw
Cut last rail too short
DO NOT throw anything, close eyes and count to ten
Revert to cussing
Trip to Home Depot for extra cedar
Re-rip and re-miter last rail
Glue joints of rail and try not to glue rail to box
Wait 3 days and cut away spline waste
Find “cute” little ceramic tiles from the 1920’s that wife will love for boxes
Spend 2 nights in shop making custom cedar frames for the tiles
Add corner splines to match boxes just because
Measure twice to find box center
Attach tiles to front of the boxes with proper outdoor screws
Coat top rails with food-safe clear coat
Wait 2 days
Apply another coat and repeat
Show wife your handy-work and wait for her to swoon
Point out the joint details and all the thought that went into the build
Wait for batting of eyelashes and the swoon…
Mention the period tiles and their perfect symmetry
Keep waiting…
Waiting……………


Matt, the boxes turned out great! I love the period tiles and the fact that you jointed the frames “just because”. Can’t wait to see some plants in them next year.
Thank you! They were a labor of love and will age beautifully. I have to be careful of “just because” It seems to get me into trouble with projects. Our hutch has taken FOREVER because I decided to do a full strip, hand mix the stain to match to the original, and apply 8+ coats of hand rubbed finish – just because. It was the “right way” to refinish and it will last until my grand kids sell the house, but I might should have just done a finish strip/sand, spray caned stain and then sprayed a couple coats of Spar varnish.