Earlier this year, while we were finishing the attic, I took a weekend and built a cherry and ash laminated canoe paddle at the Camp Beach Center For Wooden Boats shop – as my own wood shop was in full use for the attic/storage. It was a little bit of a rush build and after paddling with it once, I decided to rebuild and reform it into a better performing paddle. This video will take you through all the steps of the initial build and the refit. The next video in in this series will show the finish steps and some on-water testing.
Category: Carpentry
Fitting and refinishing a walking cane – the video
As a follow-up to the knee surgery recovery and how it is all going:
After 36 years or so, I finally fit, cut, and refinished my grandfather’s oak walking cane to my dimensions and need. I have used it every time I broke an ankle/leg or had hip/ankle/knee surgery – there have been a lot of all of those due to a misspent, but exciting, youth. It was never sized right for me though and I just made due, not wanting to cut his cane. The latest knee surgery/rebuild will require me to use a cane for an extended period of time (~4 months), so I finally decided to just get it done.
This fitting is not a shot in the dark or a “..I watched a video once…” sort of a thing. I have literally fit a 100+ canes for other people – I was a PT technician at one point during college – but for some reason never got around to taking care of my own. The fact that is was my grandfather’s makes it extra special for me.
Film Friday – BEES!!
My wife bought me a package bee hive box kit for Christmas last year, which reinforces the fact that I have a wife that is kind and considerate and pretty damn adorable.
Anywho, I thought that installing a new hive would be a terrific opportunity to document all the steps to install bees into a new hive box. I went with a nuc hive instead of packaged bees and a new queen. That is for a later video. The whole process of bringing a new hive into the apiary also allowed me to show all the steps in prepping the pre-built hive boxes/parts and I was able to build and showcase a couple of steel hive stands that I have been thinking about and designing in my head for years. I will also make a video on the design and build of the hive boxes and parts, but that will have to wait until this winter.
I love bees and I love being a beekeeper. The honey isn’t bad either…
Catching up and writing more
I have not been writing as much in the last few months as I should. I have lots of excuses:
- House Remodel
- Hectic Work Schedule
- Jeep Rebuild
- A focus on film making and growing my YouTube presence
- Lawn and Garden care – seriously, this takes up a lot of my time.
- Too much TV and interwebs…
- Blah, Blah, Blah…
When you get to the base of it all though, the answer is that I have made time for all the other things that keep me sane/make me crazy except for writing. I am renewing my focus and will be posting more words to go along with all of the pictures and video.
Let’s start with an update of current stuff:
The Attic
We are so close to being done with the attic conversion. I have to put a couple of coats on the closet door and one on the stair railing and paint the 4 walls with a couple coats of the almond eggshell that my wife picked out. The new hardwood flooring is being delivered today and it will be installed on Friday. I will spend the weekend installing the stair treads and kickers/risers. The receptacles, switches and lights are the last serious items that will go in before I touch-up a little paint here & there and I will be done and can focus on the basement.
Basement
We are 75% there. All tiled laid, grout done and a functioning toilet!! I need to finish the trim install, hang two doors and then paint EVERYTHING! I am having a custom shower rod TIG welded together and will be building the double sink vanity. I have to tack together & paint the medicine cabinet door and mirror frames as well. After all is in, we will have a plumber come out for the sink install and shower hook up. I don’t plumb. I am afraid of flooding my house with water or sewage. I leave that job to the professionals.
Main Level Bath
The tube tile surround is being replaced in two weeks with 6” subway and small hex tile. The new bathroom mirror will be going in this week, and I have to have the exhaust fan switch rewired.
Jeep
I had a solid weekend working on the Jeep. The taillights are installed, the winch is re-wired, mirrors installed, windshield back on with new gasket and PLENTY on extra silicone. The upper KC spotlights are re-installed, and an issue with the front speakers if fixed. I still need to paint and install the spare tire rack, as well as the CB, megaphone speaker, 2nd battery, air compressor, lower KC spot lights, passenger headlight, rub rails, whip antenna, headlight trim rings, and polish the rear tube bumper.
The current plan is to leave the top COMPLETELY off until fall when I re-install the soft top. I need to finish the Hi-Lift Jack rebuild project, have the speedometer serviced, and replace my tube pads as well before the cold winter wind blows.
Garage
The shop of me dreams is packed full of everyone else’s crap right now. It is all leaving by the last weekend in July if I have to put it all out on the road. I need to finish wiring in my 40K lumens of LED lighting, a 50AMP plug, a couple of 220/30amp plugs and have an electrician connect all into my service panel.
House Exterior
- Downspout in back needs attention
- A section of soffit need looking at and possibly repaired
- I need to weld together the Juliet Balcony outside the dining room
- Weld railing for rear steps
- The new front windows need a little trim and paint
- Dining room window needs trim and paint
- The rear steps need to be painted
- The chimney needs to be repointed before fall/winter
- Basement railing needs to be installed
- Both front railings need to be sanded and repainted.
- External security alarm siren need to be installed
- A tiny bit of concrete need to be pouted
- Two security cameras need to be swapped out for the lower profile ones
The yard
Man, the front yard is good, a little weeding and bush trimming maybe. The back yard though… It is still a disaster, or at least ½ a disaster. I want to fill 3-4 gabion baskets with all the rocks left over from a previous owner’s attempt at pond-scaping and make benches around out fire pit. We will be adding a steel arbor from the garage to the patio this fall that I am welding up on-site. The patio table and chairs will get a proper sanding and oiling this weekend and we need/want an umbrella of it this year. I want to add a tool shed and additional firewood racks to the side yard. And finally, the small yard next to the garage is my makeshift apiary and I would like to make that both permanent and presentable with some additional hives, gravel and flower plants in narrow garden boxes.
Health
Stamps-With-Foot, my mom, and the kids are good. I am feeling all of my 40+ years lately though. My hip is still painful a full year after reconstruction. I may have torn the meniscus in my left knee, AND I have Fucking Tennis elbow from chopping firewood!! Not being able to run and bike, coupled with my love of cookies, has left me with a classic “Dad-bod” and even my fat pants are tight right now. Eating better now. Trying to get between 7 and 10K steps in a day, having the knee looked at, and working on the elbow. We are going to Hawaii in February and I need at least a 2-pac as there will be MANY shirtless days in and under the water, for my arm to feel better, and my knee and hip to be like 70%.
Other
Work is work, but I have really traveled at all this year and that is awesome! Still wish I was building cabinets for a living, covered in man-glitter, smiling but that will have to wait. I will be traveling to Arkansas this fall to see my daughter and her family. My son will be here in Seattle for a couple of weeks this summer. I hope to tour a couple of colleges with him. My wife and I have a couple of road trips planned and I want to get out on my bike, kayak, and skate board a little (don’t tell my wife or knee Dr. about the board…) I have started recording for a monthly Podcast. A friend conned me into it after a few years of asking. I am going to just sit and tell stories without naming names or implicating myself in any illegal activities that are not past the statute of limitations. As a reward for losing weight I will go ahead and finish out both of my tattooed arm sleeves and my wife and I are planning matching bee tattoos for our anniversary. I still have not bought a boat or a motorcycle, so she will keep me for a while longer
Film Friday – Double Feature: Attic and Bath Remodel Status
I spent two FULL days, with a little help from my wife, instaling the baseboard, door, skylight, stair, and window trim in the new attic space. This video includes a few tips and tricks along the way. As this will be my wife’s studio space, she put in some sweat equity filling nail holes, doing a little sanding, and she chose the paint scheme. I will be painting next and will document that whole process as well.
This is Part 1 of our basement bathroom build/finish. We decided to add a basement bathroom when we replumbed the house a couple of years ago. 6 months of chaos insued and we took a two year break before diving back into the bathroom build. This time has been SO much better. We went with white subway tile for the walls, black and while hex tiles for the floor, and charcoal grout. The next step is trim, paint and fixture install.
Film Friday – Attic Remodel: Week 7
This is the last of the weekly updates for the Attic Remodel Project. The heavy work and drywall is complete and I will start trimming and painting the space this week (nights and weekends as I have a real J-O-B) so that my wife will have a studio that is full of light and opportunity. The next and final installment of the attic build will show all the paint and trim steps, some tips & tricks, and will be a few weeks away.
Hiring a contractor the right way
I have remodeled 3 homes while living in them and am the son, grandson, brother-in-law, and step-son of contractors. I once had my own general carpentry company and served as a subcontractor for a few small to medium sized home-builders. I have had some great experiences working both professionally and personally with contractors and subs and I have had & seen all the possible home renovation horrors. The advice written below comes from the experience noted above.
Once you have decided on the work to be done and your ability to pay for said work, get written itemized estimates from several firms. Don’t automatically choose the lowest bidder or throw out the highest. Carefully consider how and why they are the lowest or highest bidders. Does the lowest have lower overhead cost or are they missing something important to the job? Does the high bidder know something that the others don’t or does he have a bright shiny new truck to pay for? Never, never, EVER do business with friends, family, or neighbors. Seriously. The “deal” you are getting WILL NOT be worth the hard feelings at the end. Ignore at you own peril….
Some Questions to ask while you are gathering bids:
- How many projects like mine have you completed in the last year?
- Ask for a list so you can see how familiar the contractor is with your type of project.
- Will my project require a permit?
- If so, will you be taking care of the Permitting process?
- If no, why not?
- Does the contractor have any BBB, State Licensing Board, or labor relations board findings?
- Call and check.
- Use the online tools and forums. Even if there is only one negative review. Read it.
- Will you be arranging both permits and inspections?
- A good contractor will get all the necessary permits before starting work on your project.
- Ask for copies of the permits and keep them handy/post on the job site.
- May I have a list of references?
- Any contractor should be able to give you names, addresses, and phone numbers of at least three clients with projects like yours.
- CALL THEM ALL!
- Ask each reference:
- How long ago the project was and whether it was completed on time?
- Were there any unexpected costs?
- Did workers show up on time and clean up after finishing the job?
- Is there anything that you would do different?
- Tell the contractor that you will be visiting the job-site, and will that be an issue?
- The answer should be: “No, you are welcome any time.”
- What types of insurance does the contractor carry?
- Answers should be:
- Personal liability
- Worker’s compensation
- Property damage coverage
- Ask for copies of insurance certificates, and make sure they’re current, or you could be held liable for any injuries and damages that occur during the project.
- Make sure there is an indemnity clause in your contract to relieves you of any liability in the case of injury or damage cause by or to a contractor’s employee or sub-contractor.
- Will you be using subcontractors on this project?
- If so, make sure to state in the contract that the subcontractors have to have current insurance coverage and licenses, if required.
- Will you be paying the subcontractor directly or will they be billing separately?
- Is there a fee added for their service fee by the contractor?
- Answers should be:
Payment Terms:
- Don’t pay cash, don’t pay cash… If a contractor will give you a “better deal” for paying cash, then walk away and go with another contractor.
- If they are willing to not declare income on their taxes, then they are willing to take other shortcuts on your job.
- Limit your down payment to 10-20% of the job cost. Some contractors will want the cost of materials and the 1st week’s labor upfront and that is fine as well.
- Make payments during the project contingent upon completion of defined amounts of work and not on calendar days.
- Example: ½ of project due when roof doors, windows installed and inspection passed. Final Payment due 7 days after final inspection pass and “punch list” items agreed to.
- This way, if the work isn’t going according to schedule, the payments to your contractor also are delayed.
Get a Written Contract:
It should be clear and concise and include the who, what, where, when, and cost of your project with very limited legal language flourish. Before you sign a contract, make sure it includes:
- The contractor’s business name, given address, phone, and state license number
- The payment schedule for the contractor, subcontractors, and suppliers
- The contractor’s obligation to get all necessary permits
- An estimated start and completion date
- Possible monetary penalty for (none weather related) missed dates: $50 off the total amount owed for missed milestone date due to say inspection failure and $50 for each day until Passed Inspection
- The payment schedule for the contractor, subcontractors, and suppliers
- A fully defined Scope of Work (SOW), which detail all work to be performed at a Time & Material rate or as a total bid cost.
- If work to be performed is on a Time & Material basis, then a weekly summation of all costs (labor, material, permits, etc.) and debits (payments or credits) shall be provided to the customer.
- A “Not to Exceed” amount or percentage for the job, say 5-10% of total unless due to noted and signed change orders previously outlining the expense.
- How change orders are handled.
-
- A change order is a written authorization to the contractor to make a change or an addition to the work described in the original contract. It could affect the project’s cost and schedule and that needs to be outlined in the written change order.
- A detailed list of all materials including each product’s color, model, size, and brand. If some materials will be chosen later, the contract should say who’s responsible for choosing each item and how much money is budgeted for it (this is also known as the “allowance”).
- Information about warranties covering materials and workmanship, with names and addresses of who is honoring them — the contractor, distributor, or manufacturer. The length of the warranty period and any limitations also should be spelled out.
- The inclusion of a lien release or lien waiver. See below.
- Notification time if Sewer, Water, Gas, Electrical services will be interrupted, normally 24 hours, and how long they will be off.
- Damage to Property: Negligent damage to property by contractor or subcontractors
-
- “Shall be repaired to previous condition at contractor’s expense.”
- What the contractor will and won’t do. For example, is site clean-up and trash hauling included in the price? Ask for a “broom clause” that makes the contractor responsible for all clean-up work, including spills and stains.
- You will want a broom clause. Trust me.
- Do not sign an Arbitration clause. This is for the sole benefit of limiting the contractor’s cost if things go wrong and if you report the contractor to a state labor board or a BBB in your state, this can be seen as a violation of this clause and the contract as a whole.
- Make sure there is a General Survival Clause:
- In the event any clause or provision of this contract shall be held to be invalid, then the remaining clauses and provisions shall never the less be and remain in full force and effect.
- A written statement of your right to cancel the contract within three business days if you signed it in your home or at a location other than the Contractor’s permanent place of business.
After You Hire a Contractor:
Keep Records!
Keep all paperwork related to your project in one place. If it didn’t happen on paper, then it didn’t happen. This includes:
- Speak directly to your contractor or your assign representative. Not the plumber, framer, or roofer.
- Copies of the signed contract
- Change orders
- Copies of all permits
- Follow up any in person conversations or phone calls with an e-mail detailing any agreed to points.
- Any correspondence with your contractor.
- Print out and keep e-mails for ready reference
- Keep all receipts of any material that you have purchased
-
- A record of all your purchases may be need receipts for tax purposes.
- Keep a log or journal of all phone calls, conversations, and activities. You also might want to take photographs as the job progresses. These records are especially important if you have problems with your project — during or after construction. And serves as a record for future construction or remodeling.
Once the job is “Done”:
Don’t make the final payment or sign an affidavit of final release until you’re satisfied
Besides being satisfied with the work, you also need to know that subcontractors and suppliers have been paid. Laws in your state might allow them to file a mechanic’s lien against your home to satisfy their unpaid bills to the contractor that used them on your job. Protect yourself by asking the contractor to secure a lien release or lien waiver from every subcontractor and supplier before final payment is made.
Know when you can withhold payment
If you have a problem with merchandise or services charged to a credit card, and you’ve made a good faith effort to work out the problem with the seller, you have the right to contact your credit card company and withhold payment from the card issuer for the merchandise or services. You can withhold payment up to the amount of credit outstanding for the purchase, plus any finance or related charges.
Before you sign off and make the final payment, check that:
- All work meets the standards spelled out in the contract
- You have written warranties for materials and workmanship
- You have proof that all subcontractors and suppliers have been paid
- The job site has been cleaned up and cleared of excess materials, tools, and equipment
- You have inspected and approved the completed work
- Use a Sign-Off Checklist/”Punch List”
Film Friday – Week 2 of the Attic Rebuild
I know… I have been posting a bunch of videos lately and not a lot of travel, Jeep, Puppy, garden, music, building, or other normal posts. That will change with the coming of Spring and the completion of our attic remodel/rebuild. In that vain, below is the short video documenting week 2 of the process. It looks like it will be a 5-part series.
Mid-week Update
So, this week has been crazy at work and at home. On the home-front, there were birthdays, shopping, it is Income Tax time, we have 3-4 guys showing up every morning at 7:00 with tools in hand to work in and on the attic.
My shop is full. I can’t even get to my table saw and my bench is stacked 5′ high with insulation. I need a little shop time to keep me sane or at least saner… So, I took a little me time and signed up for some classes for spring and early summer where I will get use other folks shops and build/make stuff:
- Canoe Paddle Making
- Claw and Ball Foot Carving
- A 10-Week Letter Press Workshop
- Woodcarving Figures
- Spoon Carving
- Block Printing
- Industrial Sewing: canvas and leather
Film Friday – Framing Double Feature
We are remodeling and rebuilding a 90+ year old attic into a master bedroom. This required completely rewiring to electrical in the attic, moving/fixing plumbing, building a complete floating floor, adding roof supports, etc… Below is thew documentation of the 1st week of the build.
Part I of a 2 part video on the replacement of a falling down 90+ year old shack of a carriage shed with a modern 24X24 garage. This was not a flat mono-slab, green field build. Lots of digging was required and a rebar-filled retaining wall and slab had to be poured in the middle of winter before the first wall could go up.
President’s Day 2018
President’s Day is here and it is time to prune the fruit trees, roses, and lavender. Or at least that was my plan for yesterday. Instead, I spent WAY TOO MUCH time on Twitter – ranting about sensible gun laws and the current US administration. I also spent a couple of hours cleaning the house, washing dishes, working on 2 videos, walking the puppies, and working in the shop. So the entire day was not wasted on-line.
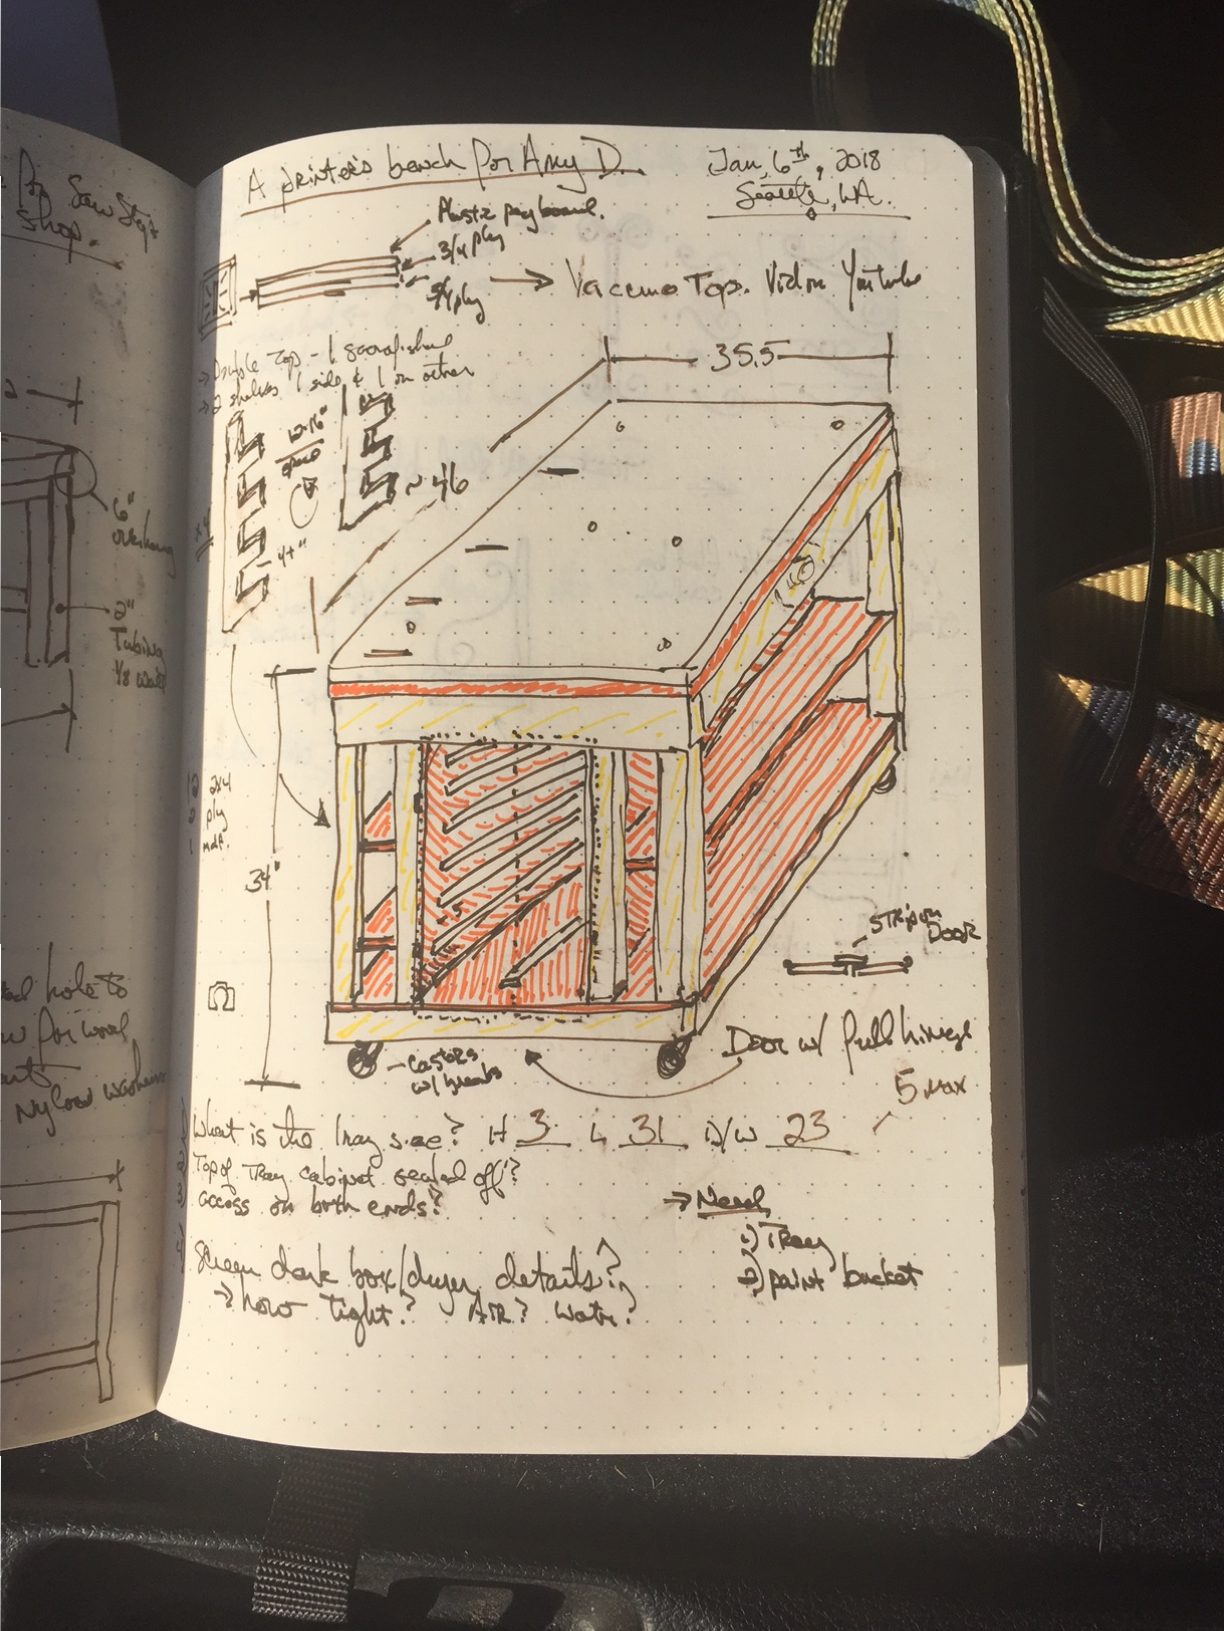
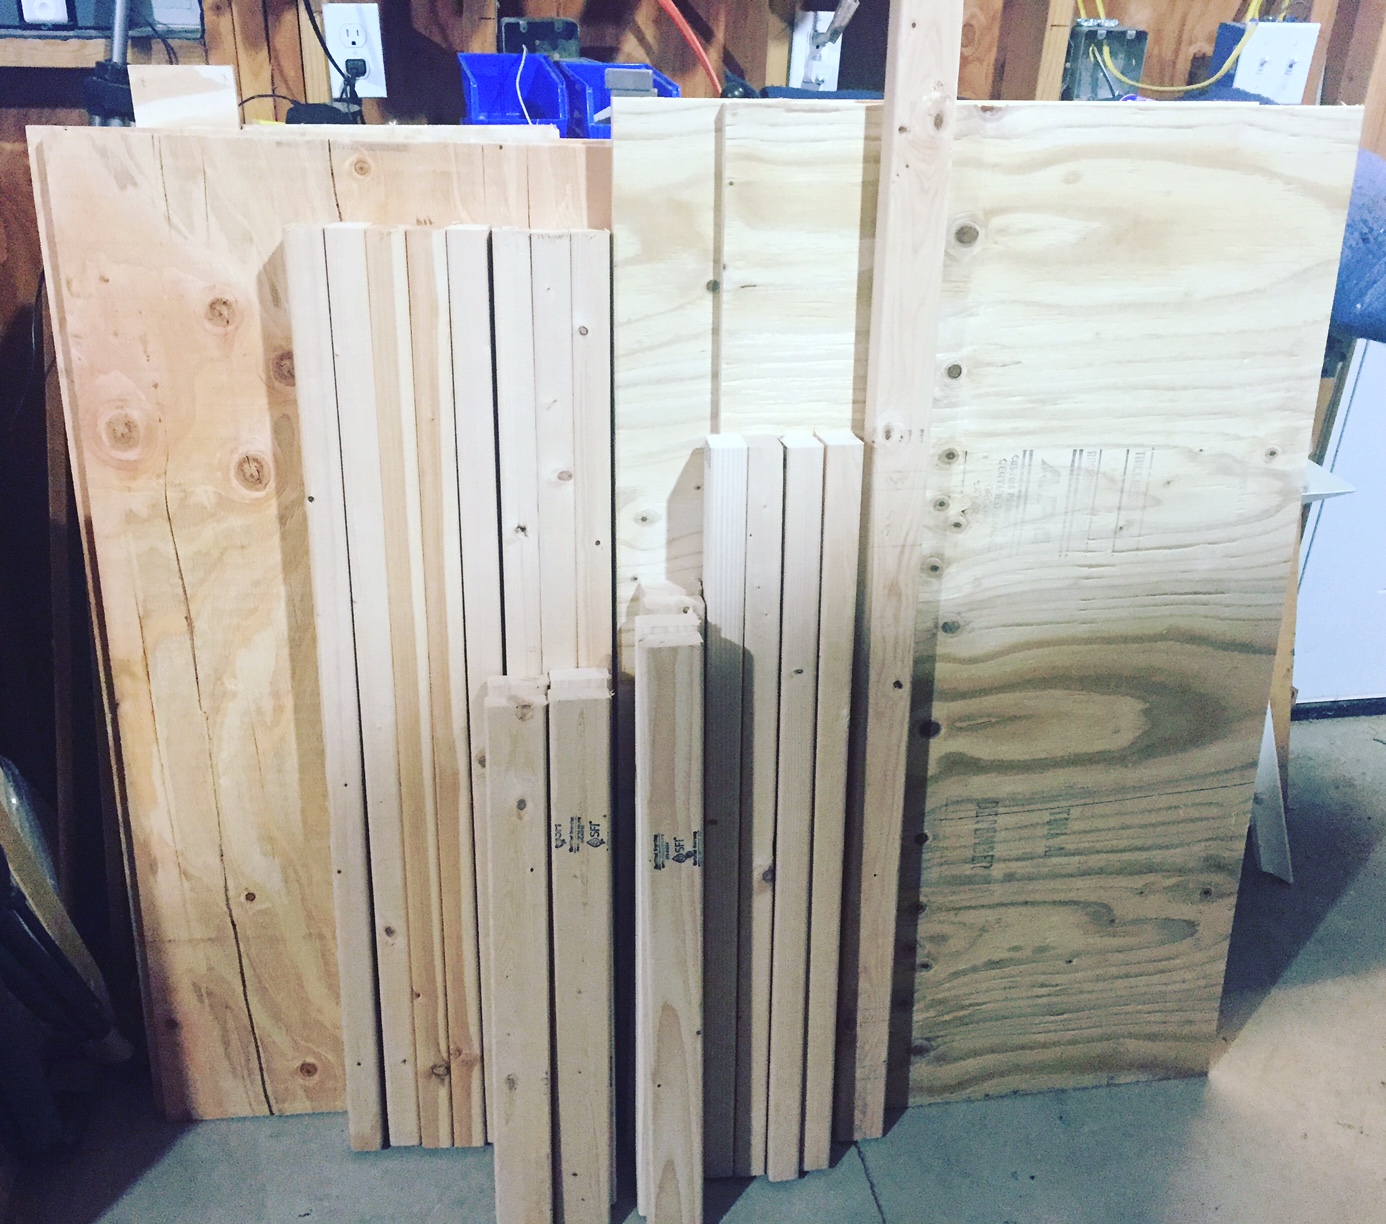
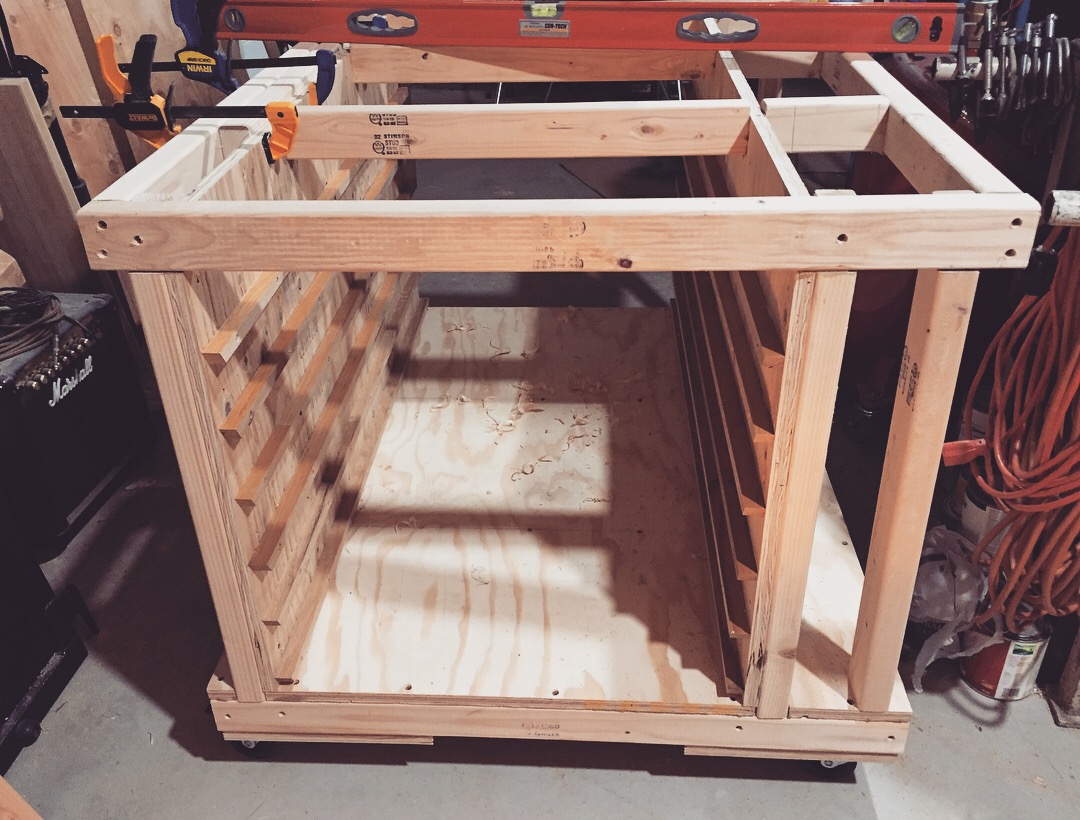
In the shop, I am building a Screen Printers Workbench for a local artist, Amy M. Douglas. She does some pretty amazing prints and oil/acrylic work. We are trading my time for art, so it is a win/win for both of us. Below are a couple of shots taken during the build and I will have a whole YouTube video about the build in a week or so.


I will spend an afternoon this coming weekend pruning, re-stacking firewood, and cleaning the yard – I see a dump run in my future.
3/4/2018 Update:
The bench is done and delivered.
2018 News Year’s Resolutions:
A year ago, to the day, I said that I would do a bunch of stuff in 2017. I did OK, but not great. I could blame it on my old man hip, the surgery, or the recovery time, but mostly not getting stuff on the list done was all me. All my own laziness, stuborness, or my A+ skill level of procrastination. These are the promises I made to myself that I kept:
Take a pottery class
Take a Blacksmithing class at the Pratt
Read 1 book every 2 weeks – minimum
Play my uke, banjo, and guitar with others
Give lots of $$ to Heifer and MFS
Make movies and post: Adventure, craftsmanship, and family.
Make Stuff!!
Ride my skateboard because I am not too old or too fat
Road trip in WA more
Take my wife on vacation
Plant a spring garden
Fix up the front and back yards
The following is what I am committing myself to do in 2018:
- Organize my chaos in the shop and basement.
- Sell, donate, recycle, or throw away shit that I do not use.
- Use my planner and notebooks as tools not as something that I “have” to use.
- Eat my veggies. Seriously. Salads in my future.
- Take my desk at home back and make it a conducive writing space.
- Cut WAY back on sugar and carb intake!
- Lose weight – back to 175! and put on 5-7lbs of muscle
- Go to the gym 3-4 time a week – minimum.
- Box more at the gym and at home
- Write more: Blog posts, REAL letters, Thank you notes, fiction, and non-fiction
- Take more great pictures
Fly my drones more- Take at least a 45 minute lunch at least 4 days a week at work
- Show up to yoga at least once a week
- Take another pottery class
- Finish my CJ-7 Jeep restoration
- Look into getting back into the judo dojo
- Sign up and compete in the Gambler 500 car race
Sign up for a letterpress class at SVC Downtown- Take another blacksmithing class at The Pratt
- Read 1 book every 2 weeks!
- Learn how to play the mandolin and banjo better!
- Play my uke, banjo, and guitar with others
- Build a skin-on-frame canoe for two
- Road and mountain bike
- Take the puppies to Lincoln Park for a walk at least once a week
- Ride the living shit out of my Single -Speed
- Bike to work at least 5 times this year (12 miles each way)
- Volunteer more at the Center for Wooden Boats
- Pay off all credit cards
- Go sailing in Puget Sound
- Turn some amazing and useful stuff on my lathe
- Give lots of $$ to Heifer and MFS
- Make at least 1 movie a week for YouTube and post: Adventure and craftsmanship
- Monetize my YouTube account and increase my presence and standing in that community
- Lessen my Twitter and social media activity…
- See my kids and grandchildren more
- Be involved in politics more: financally and with a time commitment
- Work on my Genealogy database and organize all my info.
- Finish the house remodel – even if I have to pay a contractor to do it (…shudder…)
- Finish the garage/shop/GROP build
- Make.More.Stuff!!
- Ride my snowboard and skateboard because I am not too old or too fat
- Road trip in WA and on West Coast more
- Have two hives of healthy, happy bees
- Kayak lots!
- See my friends more
- Take my wife on vacation
- Plant a spring garden and have a really bountiful fall harvest
- Have an awesome Griswald-like Christmas light display!
I am printing this list out and pasting copies in my notebook, work planner, in the shop, at my desk at work, on the fridge, and in the basement above my warranty voiding workbench.
Film Friday – Oak and Maple Pizza Peel Build
My Father-in-Law, The Chatty Buddha, wanted me to make him a pizza peel and while I have built cutting boards and boat paddles, I hadn’t yet made a peel. I agreed, sourced the lumber from a local salvege store. It used to be flooring, but after some magic with the table saw, jointer, some glue, and a hand plane or three – he has a pizza peel that I gave to him for Christmas. I hope to be enjoying pizza from it for years to come.
My Own Personal Take on Hand-planes: Buying Recommendations to Use

I use the bejesus out of my power tools. I LOVE my SawStop, my Bosch compound miter-saw is scary accurate, and my band-saw is magic, but there is room in my life and in my shop for lots of hand-tools. I am a child of both Norm Abram and Roy Underhill. I watched them both on PBS every Saturday after cartoons as a small child in 1981 until I was 44 or so. Their combined influence has made me value the old way of doing things without being a Luddite and I can appreciate modern cabinet shop/woodworking tools. Case in point: I have a 3HP Powermatic 3520 lathe and would not even want to think about turning a bowl or platter on a pole lathe with a forged hook knife. On the other hand, while I have not given up a single one of by 5 routers, I found years ago that it is sometimes faster to grab an old wooden molding plane from a shelf and take care of an edge detail or piece of trim. I can be done and dusted with the plane in the time it would take me to find the right bit an set up the router.
Because of my vocal love for hand planes, I get questions all the time from friends and acquaintances about what they should buy, where they should start, how to set something up, sharpening, truing a sole, etc… I thought I would take a minute to go over those things, stand on my soapbox a little, and give the world my opinions concerning hand planes.
.. Ascending my soapbox… Ahem…
- Buy a quality block and #4 smoothing plane – Lie-Nelson, Wood River, or Veritas are great options. Stay away from used hand planes or classics until you get used to how a hand plane SHOULD work. Setting up an older Stanley or Bailey plane, sharpening, replacing parts and flattening the sole will drive you insane if you don’t know exactly what you are doing and will make you want to throw the thing and swear off hand planes forever. Start with the known good and once you know how it should function, then you can pick up a used #2 bench rabbit or a #8 corrugated bottom jointer and tune them sweetly – maybe. I would go over any prospective purchase with a scornful eye and replacement the blade and/or chip breaker on an old plane is required about 50% of the time, in my experience anyway.
Here is my list of the initial planes and accessories you will want/need ( I like the low angle but to each his own):
- Stanley Low-Angle Block Plane
- Shoulder plane
- Smoother plane
- Plane chip-breaker Screwdriver I swear to God you need this, really! When you mare the screw an a $200 plane because you didn’t listen, it is your own fault for not listening.
- Sharpener: get two…
- Buy a nice set of Japanese water stones 1000 to 8000 grit. Watch the videos and keep your blades sharp.
- Also, Japanese planes, like Japanese pull saws and water stones, are FANTASTIC. They deserve their own diatribe, but for the purpose of this post I will stick to western planes with the exception of an edge-rounding plane. I use mine constantly.
Nice to have once you get serious about using hand planes:
- Jack Plane
- Jointer planeSpoke shave Get the flat first then the curved. You probably wont ever need the concave one.
- This Router plane but, if I were in the market for a new one, this Walke Moore version is the nicest I have ever seen!
- Scraper plane – get the toothed blade
- A combination plane, but be wary of used Stanley Record #45/#46s. They can be a beast to swap around and if they come with all the original parts they are spendy!
- if you are going to be doing a lot of drawers or insets, then both a Left and Right Plow Plane are really nice to have
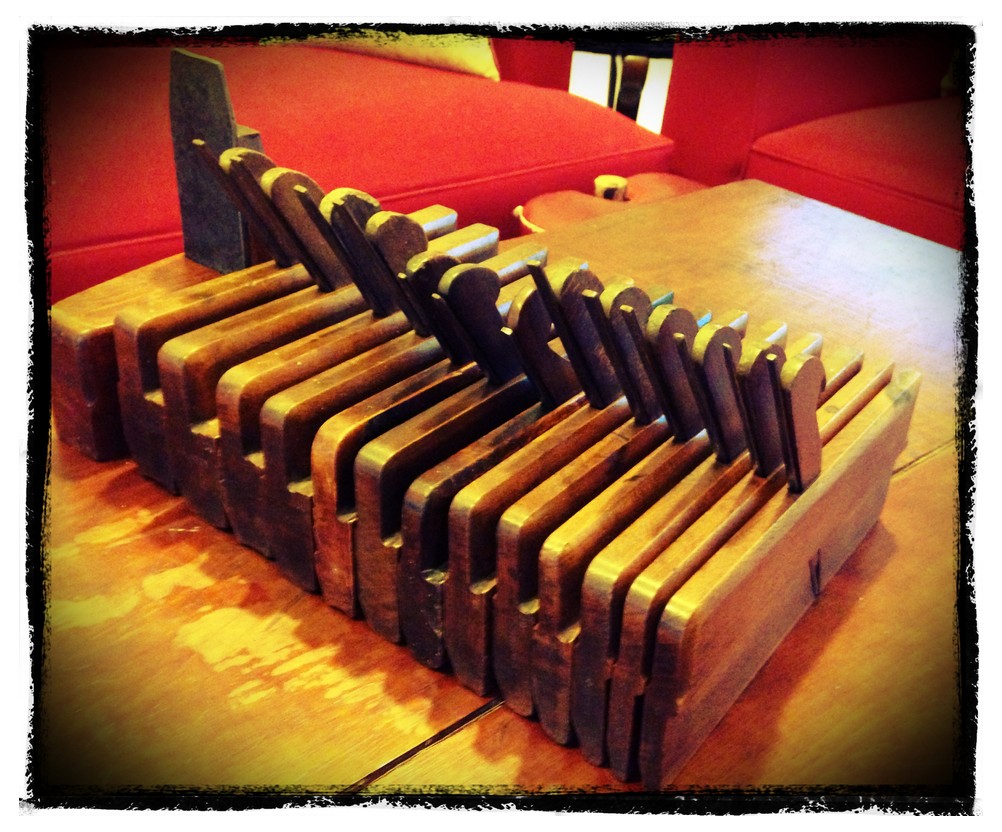
- Wooden molding planes : See below…
Once you have been bitten by the molding plane bug, you will want to run right out and buy a 1/2 or full set. Good luck. There are not a lot of makers out there and the ones that are doing it have a long wait list and are not cheap. Some people, like myself, invest is an older set. My molding planes include a 3/4 harlequin cove and round set (mixed from various makers and time periods) that I have carefully built over the last 9-10 years. The dates for my planes run from 1956 to 1930s to 1850s/70s and I have one from the 1790s that has an uncommon roman ogee shape that I use on boxes and 6-board chest lids. This collecting takes time as there has never been a set standard for what a #8 is, for instance, so there is a lot of variance in sizes between makers. I have replaced a few irons as well.


I often defer to people that are smarter than me and Matthew Bickford and Chris Schwartz recommend a set of #4 and #8 and a set of #6 and #10 hollows and rounds as an initial starter set. I would add that a 3/16 beading plane is a wonder to have as well if and when you start down this road.
To my own set, I have added some additional beading planes – up to 1/2″, tongue & groove planes for 1/4″ – 1″ stock, specialized profile molders, 1/4 rounds, scrapers, etc., but those is my own personal obsessive tendencies.
I failed miserably at finding a classic matched set of snipe-bills and half rounds (NEEDED for linen-fold panels). I have resigned myself to buy new ones from Old Street Tools, but I have to warm my wife to the idea of me spending serious cash on blocks of wood and iron that I will use 5-6 times a year. I have been working on her for 3 years and they are on my Christmas and birthday list every year. No luck yet.
Read Bickford’s Moldings in Practice (if you have bled with me or we have swapped spit, you can borrow my copy) and take a look at the video of the same name before jumping in. Molding planes can be sourced from the following, in no special order:
New planes:
- Caleb James
- Matt Bickford
- Old Street Tools
- Made in England Philly Tools
- J. Wilding Planemaker
Classic:
- Jim Bode Tools for reliable planes
- Liberty Tool has great molding and fine steel planes as well
- I have made some decent finds on Inchmartine Tool Bazaar
…and now I will dismount my soapbox…
Film Friday – Another Hammer Re-Work/Repair
I had a tired, old, home-made, second-hand chipping hammer that was broken and had been so for years. So, I MIG-welded the busted joint, ground the transition, and added a reclaimed hickory handle, which came from a hatchet rebuild shown in a previous video that I posted on YouTube. With the re-weld and addition of copper handle rivets, it should last a few decades now.
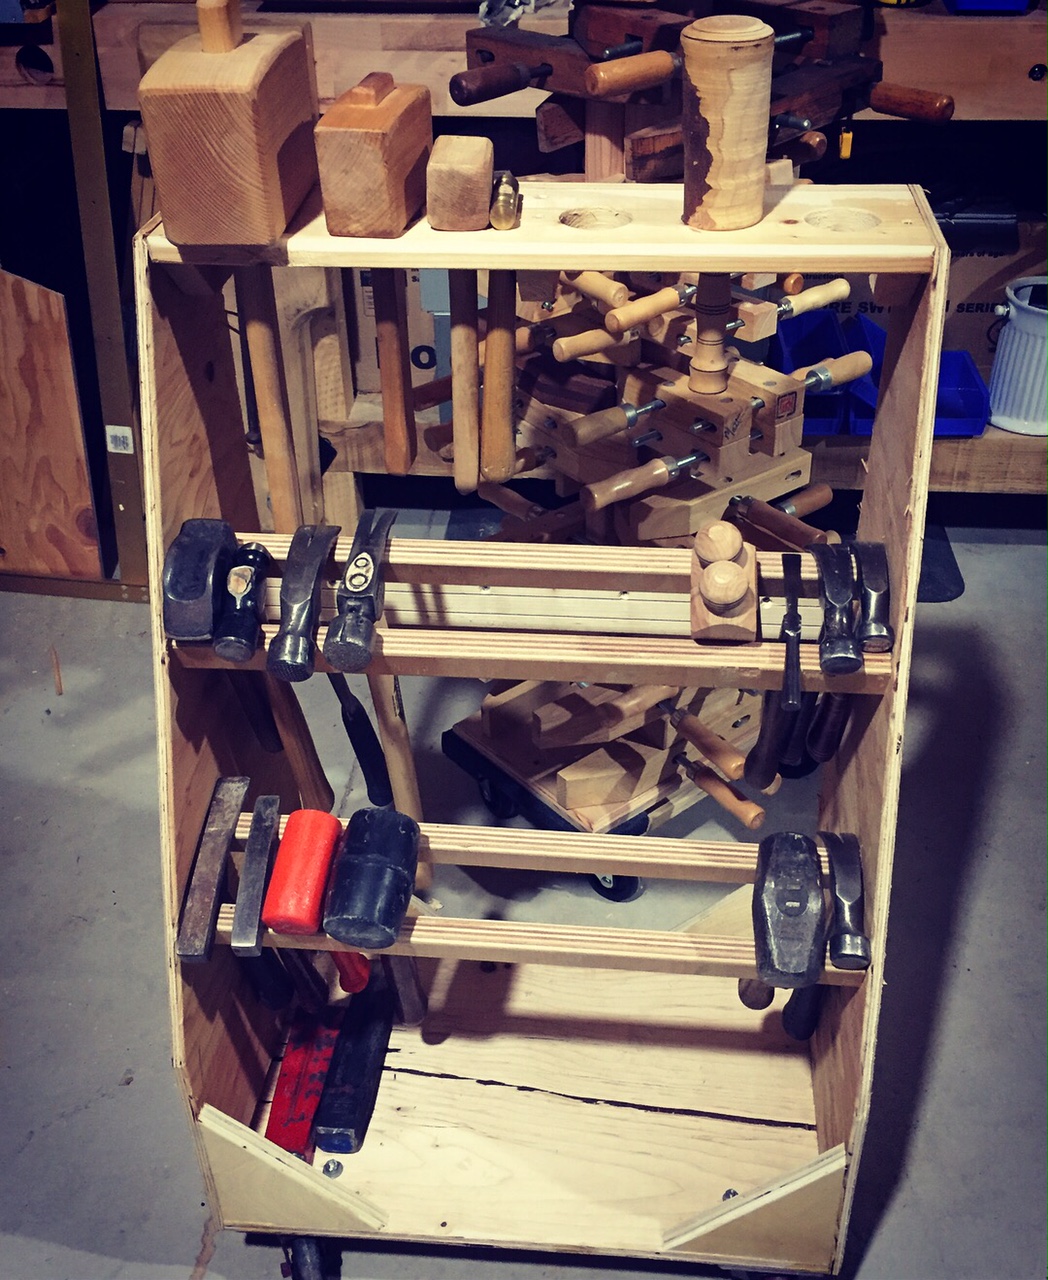
Weekend in the shop
I got some serious crap done in the garage and at home this weekend:
Cleaned, swept, and put away tools for over an hour Saturday morning
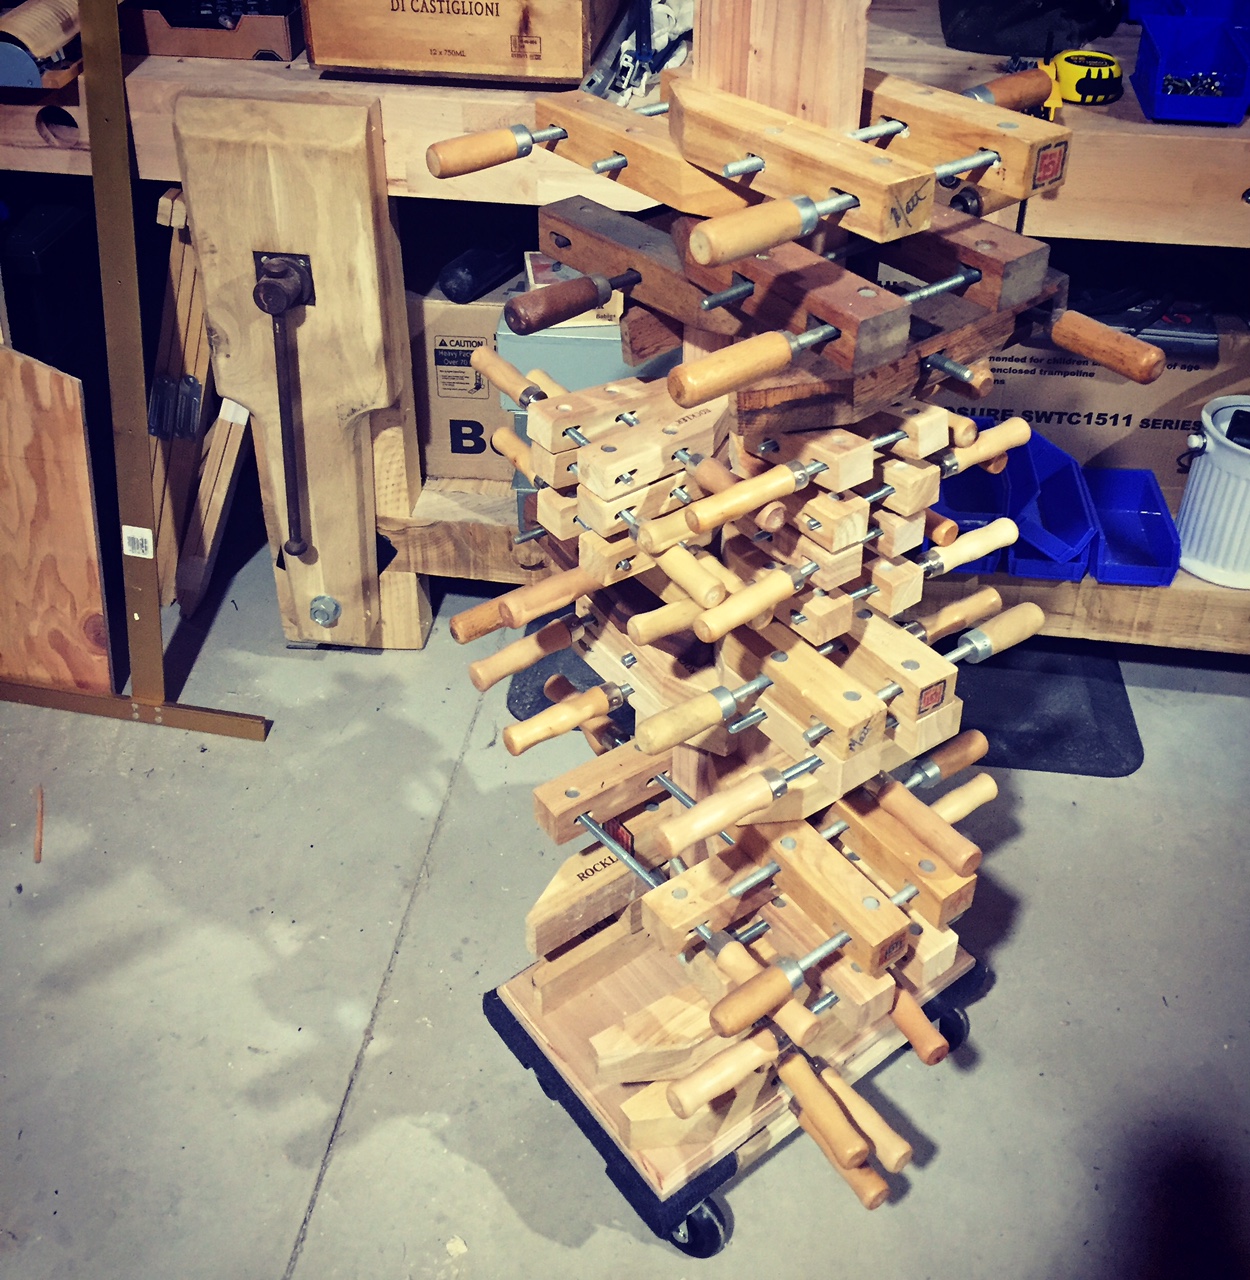
Added wheels to my screw-clamp stand
Built a hammer stand – I have a lot of hammers
Organized 4 drawers on my tool cabinet
Organized a drawer for just camera mounts and cables
Hung 22 small blue U-Line organization bins
Cleaned off table saw
Installed new table saw blade
Re-tensioned bandsaw
Cleaned off bench for 1st time in MONTHS!
Put all the miscellaneous screws, bolts, and hardware in the proper organization bin
Sanded the carcass for a bathroom cabinet installation
Moved some angle-iron into the metal storage rack
Carried 2 of the 3 cabinet sections in the house
Cranked on the lathe to reduce the diameter of a dowel
Blew 30 amp breaker
Said the f-word at least 3 times
Took a look and original electrician did not fully terminate one of the “hot” wire legs, which led to the failure.
Said dirty words
Drove to Home Depot and back for breaker
Swapped out a blown breaker
Ran 75 linier feet of 12-2 Romex wiring
Installed 12 electrical boxes
Only dropped 1 on my head/face
Installed a couple of runs of CAT-6 ethernet cable for the PoE camera system
Jesus, CAT-6 is expensive!!
Moved some firewood into the house
Built and installed butcher paper roll noteboard on a cabinet front
Re-set wall clock
Worked on chipping hammer re-build
Shot a couple of videos
Sanded a couple spots on the jeep under windshield
Wished I had a bathroom in the garage at 3 different points during the weekend
Started on pizza peel build for Father-in-law

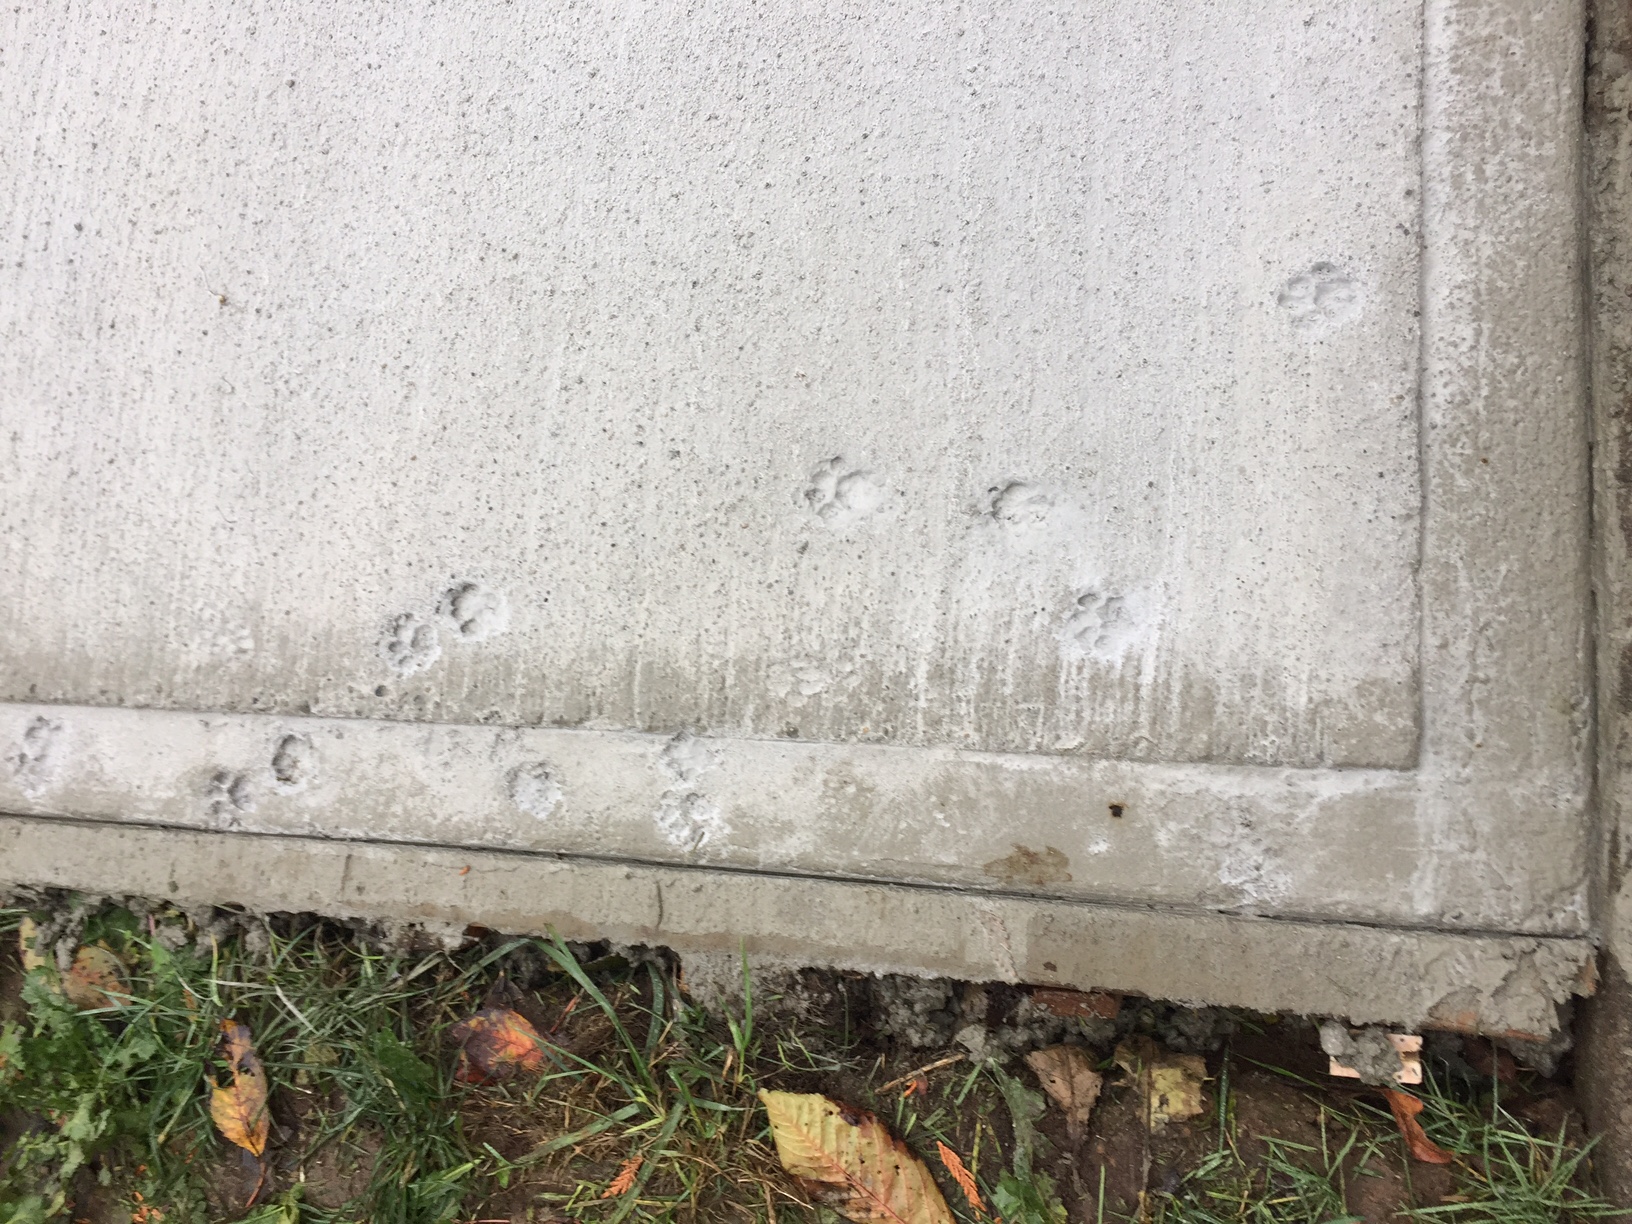
Film Friday – The Garage Sidewalk Pour
Below is a short film documenting all the steps taken in pouring a walkway between our existing patio and my garage/shop, as also discussed in less detail in a previous post. I MAY have overbuilt it… a little… maybe…
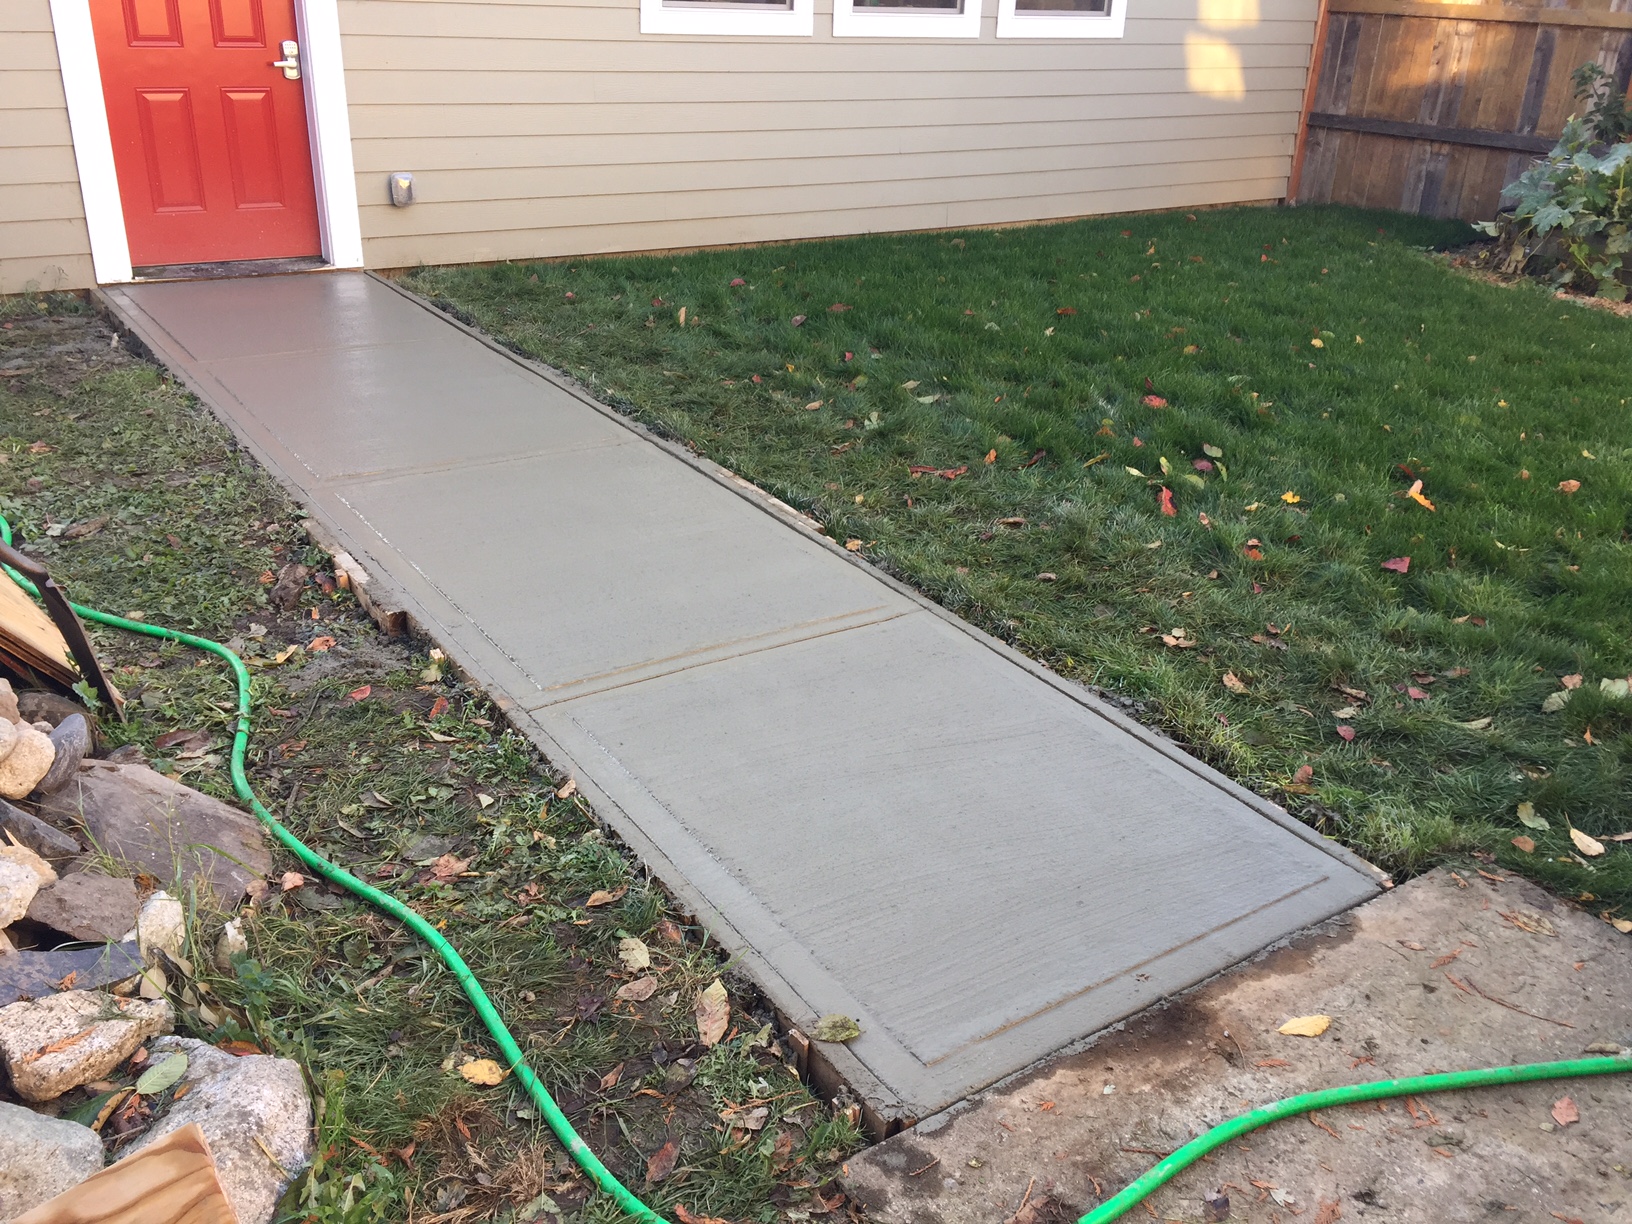
Garage sidewalk now poured with a side of cat-related drama
The sidewalk to the garage is finally poured – 8 weeks after I put the forms in… To recap, it is 20’X4′ and 4″ deep. I used 3500PSI with fiber added and lots of steel, because I hate cracking sidewalks. I paid a guy working on the house next door give me a hand with the wheel barrow concrete moving and to move-hold the other side of the scree board. It took two hours from the minute the truck rolled up until I was cleaning up my tools and I saved >$1500 doing it myself, even with the cost of material, delivery and a couple of new tools.
I was super happy with the results when I went inside at 5:30. When I went back out to check on it at 9:30, the cat had walked up one side all the way to the garage, walked across, and back down the other side. I now have cat prints in my “perfect” sidewalk until the end of days…
I am not anthropomorphizing, she did it as a “Fuck You bald monkey!” because I would not let her in the house. It was too dry to re-float. This morning, to add insult, the hate-cat dropped a giant turd in the middle of the thing up by the garage door. I said such dirty words! This is the last straw!
Who would like an overweight white fluffy cat that is passive aggressive and shits on the things I love? I will throw in 2 bags of food, a carrier, shot records, box of band-aids, half eaten mouse, and 3 cat-nip impregnated toys. It is an awesome deal! Won’t last! Act now before someone else snatches her up!
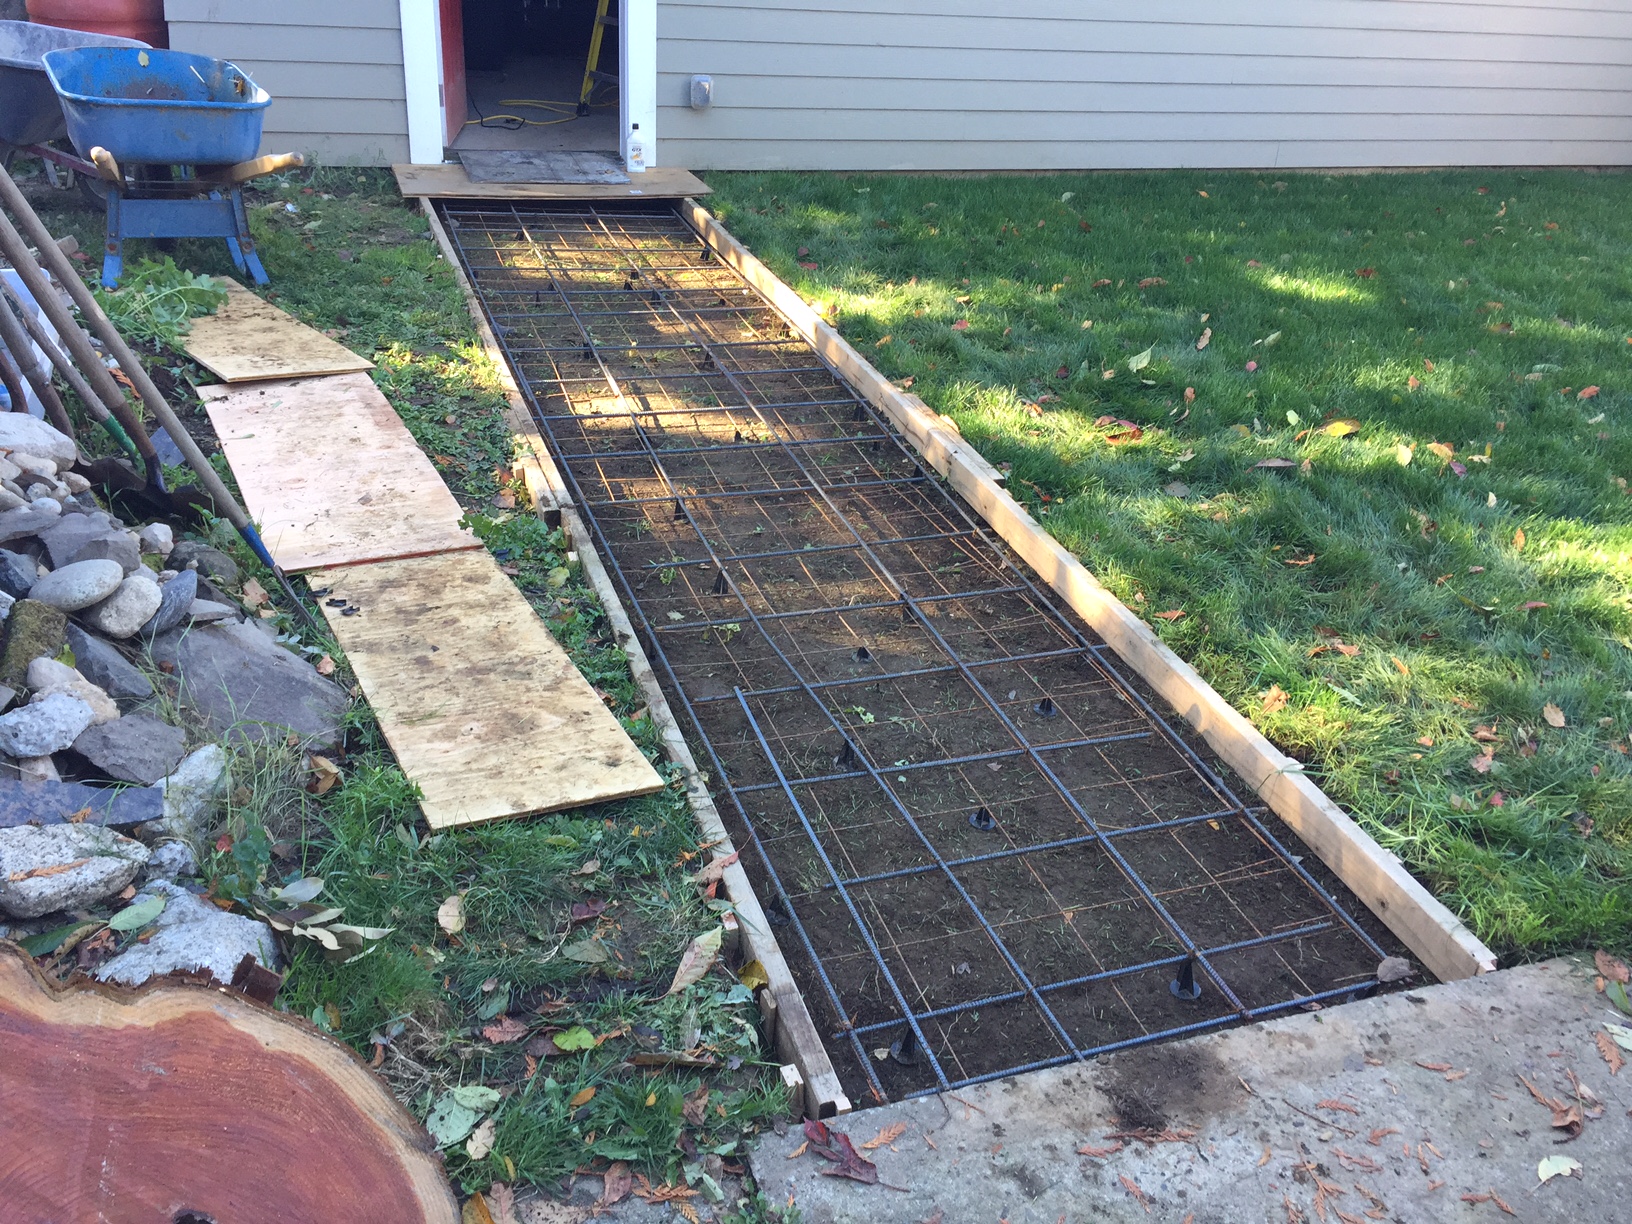

Labor Day Weekend – 2017
I was at home for Labor Day weekend this year and spend the time working on the house and yard. I dug up a cubic yard+ of dirt where the garage walkway will be and then built concrete forms, added rebar, and welded wire for a 20′ X 4′ sidewalk pour next week.


I also took a couple of hours to rebuild a 10′ section of fence on our south side. A 40′ (12.2m) tree had grown through it from the neighbor’s yard. He let me cut it down a couple of weeks ago and rebuilding the fence was required. Note: Stamps-With-Foot did not see me roped up, hanging in the harness, topping the tree, so I didn’t get in trouble for being a “stupid man” until later 🙂


Garage, lawn, and house work this weekend
Worked in the basement a bit to make Stamps-With-Foot’s sewing room/project space usable.
Made two trips to the dump.
Built screw clamp holder.
Did a little Amazon shopping for a gift and a part that I needed.
Went shooting at the range – shot like a blind squirrel.
Cleaned pistol, muttering disappointment in self whole time.
Hip super-hurt all weekend.
Went to see Atomic Blond for date night. Great movie.
Bought two bookshelf cabinets for garage at Second Use – got a super good deal (hard to do these days at Second Use)
Picked up 2 cases of oil at discount from NAPA
Put down a little 1/4 round trim in dining room.
Washed Stamps-With-Foot’s car.
Filled the washer fluid.
Worked on a couple of films.
Cleaned lighting contacts on the trailer light harness.
Took a load of recycling to the dump.
Organized shop a little and hung the two cabinets.
My shop now has all the storage I will ever need – until I fill it all up 🙂
Consumed some rosé while sitting in sunshine in back yard.
Snuggled wife and puppies.
Installed my welding cabinet and filled it with helms, jacket, gloves, sticks, and welding tools.
Made a happy face.
Did not mow lawn…
Ran two lighting circuits and one 220VAC circuit in garage.
Need to install the 4 florescent lights.
One 220VAC circuit to run and all shop wiring will be complete!
Flew drone a bit to work out new firmware update.
Took a few macro photos with camera
Spent too long on Instagram and Twitter.
Ignored the grass some more.
Changed oil in my father-in-law’s truck.
Picked-up/was given wrong oil filter!
Said dirty words…
Made it to parts store 3 minutes before they closed for new filter.
41 more oil changes and the lift pays for itself!
Film Friday – Hatchet Handle Replacement
I seem to be keeping with a theme – another Handle replacement. I promises that this is the last one for a while 🙂 My next film will be from an adventure in China or a snowboarding mishap.
This hatchet was given to me by a neighbor a little while ago. It had a hard life: the handle was chipped and split and the heel had been used for driving God only knows what and had mushroomed out a bit. Twenty minutes of my time, $12.00 in total cost, and I have a repaired tool that will outlast me. It is destined for a kindling chopper and glamping chores when my wife and I venture into the wilds “roughing it” with a camper trailer.
Film Friday – Hammer fix
We are well on our way to becoming a doomed and disposable society. Example: After trying in vain to buy a handle replacement locally for my broken framing hammer, I had to buy one online and have it shipped to Seattle from the East Coast. I didn’t need the fancy matching OEM handle. Most any would have worked with a little shaping using a rasp and file. Neither Home Depot nor Lowes sells replacement handles for hammers or hatchets anymore – just handles for garden tools. I had four people try to sell me a new hammer while searching though. Apparently, just spending $80+ is easier than fixing a tool with a replaceable part designed into it. Lazy mother f….. Son of a …
The hammer holds no special value or spot in my heart or personal history. It wasn’t smuggled into the US 300 years ago by a ancestor who built and defended his home with it… Nope, just a framing hammer that someone gave me once. It had already been used and abused for years before it fell into my hands. The point was/is the thing is mine. A tool that I use to make stuff with. A tool that is MADE to have the handle replaced and somehow there are not enough people with the skill and drive to do such a simple task to keep them stocked on the shelves of multiple large national chain building supply stores. I stand by my statement that the movie Idiocracy is a documentary filmed by time travelers.
The whole replacement cost me $12 for the handle and shipping + 20 minutes of my time. A lot better deal than $80+ for a new hammer. As an added bonus, I get to rant a little and make a slide show 🙂
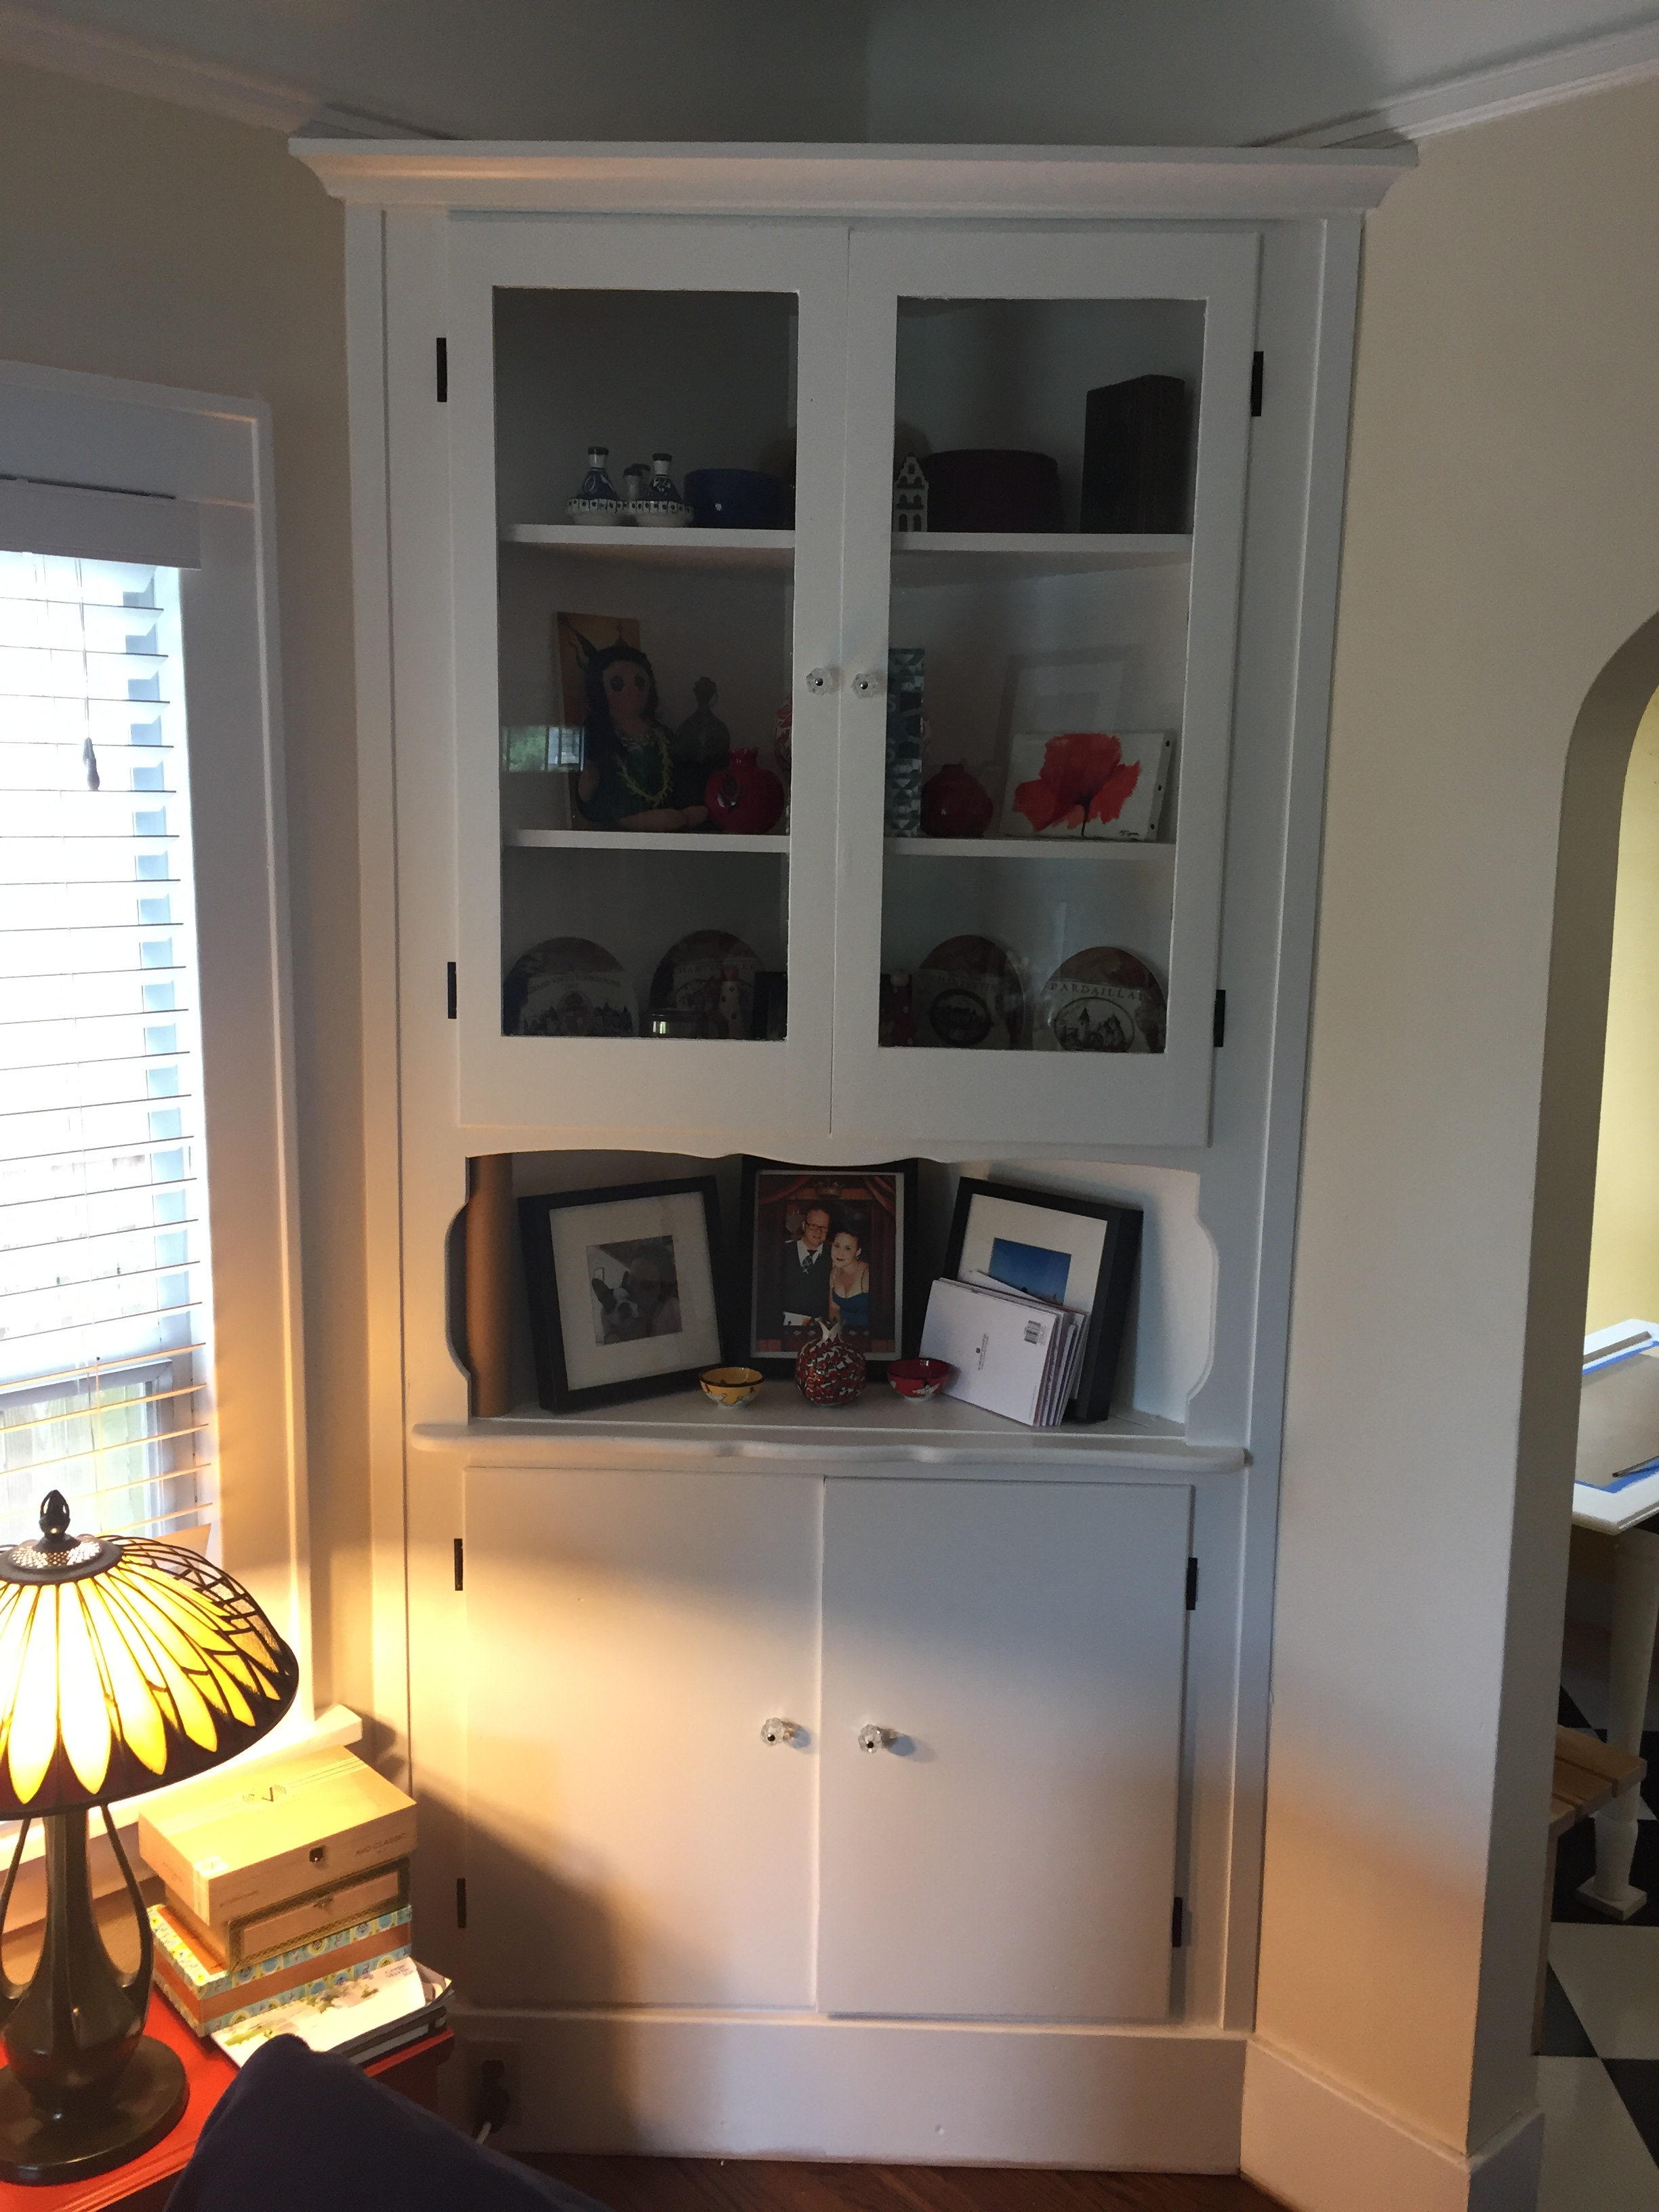
Film Friday – Corner Cabinet Up-Cycle/Rebuild
Way back in November of 2015, just after our return from living abroad for two years, I bought a set of hard used, little loved corner cabinets from a local salvage place. I have spent an hour and there installing, building trim, sanding, de-gunking, stripping old paint, priming, painting, and more painting. It has only taken 18 months, but they are now installed and look like they have been in our living room since the very first day.
Here is a slideshow/video tale of the steps taken in the project: What it was to what it became.
My Week in Review
This past week has been a week of mish-mash happenings:
90-day Post-surgery hip appointment: Could have gone better.
Fruit tree pruning
I built a lid for the compost boxes
A rat didn’t like my lid and chewed through the side to get at the worms in the compost bin
I said dirty words
Mounted 7 up-cycled cabinets in the garage
Finished painting 80 liner feet of 1/4 round trim.
Sweep and cleaned GROP
Organized some stuff into new shelves and cabinets.
Finished painting the corner shelf doors – 5 total coats of fresh paint
Installed the hinges and hung the doors on wrong cabinets
Said dirty words
Re-hung doors on the correct cabinet.
Scratched paint
More dirty words
Touched up paint
Finished corner cabinet install
Did some Physical Therapy for my Old Man hip
Mowed and edged the yard
Read a book
Made a few Instagram and Twitter posts
Amazon sent me a new tool!
Flew drone one afternoon after J-O-B
Planted the boxwood shrubs
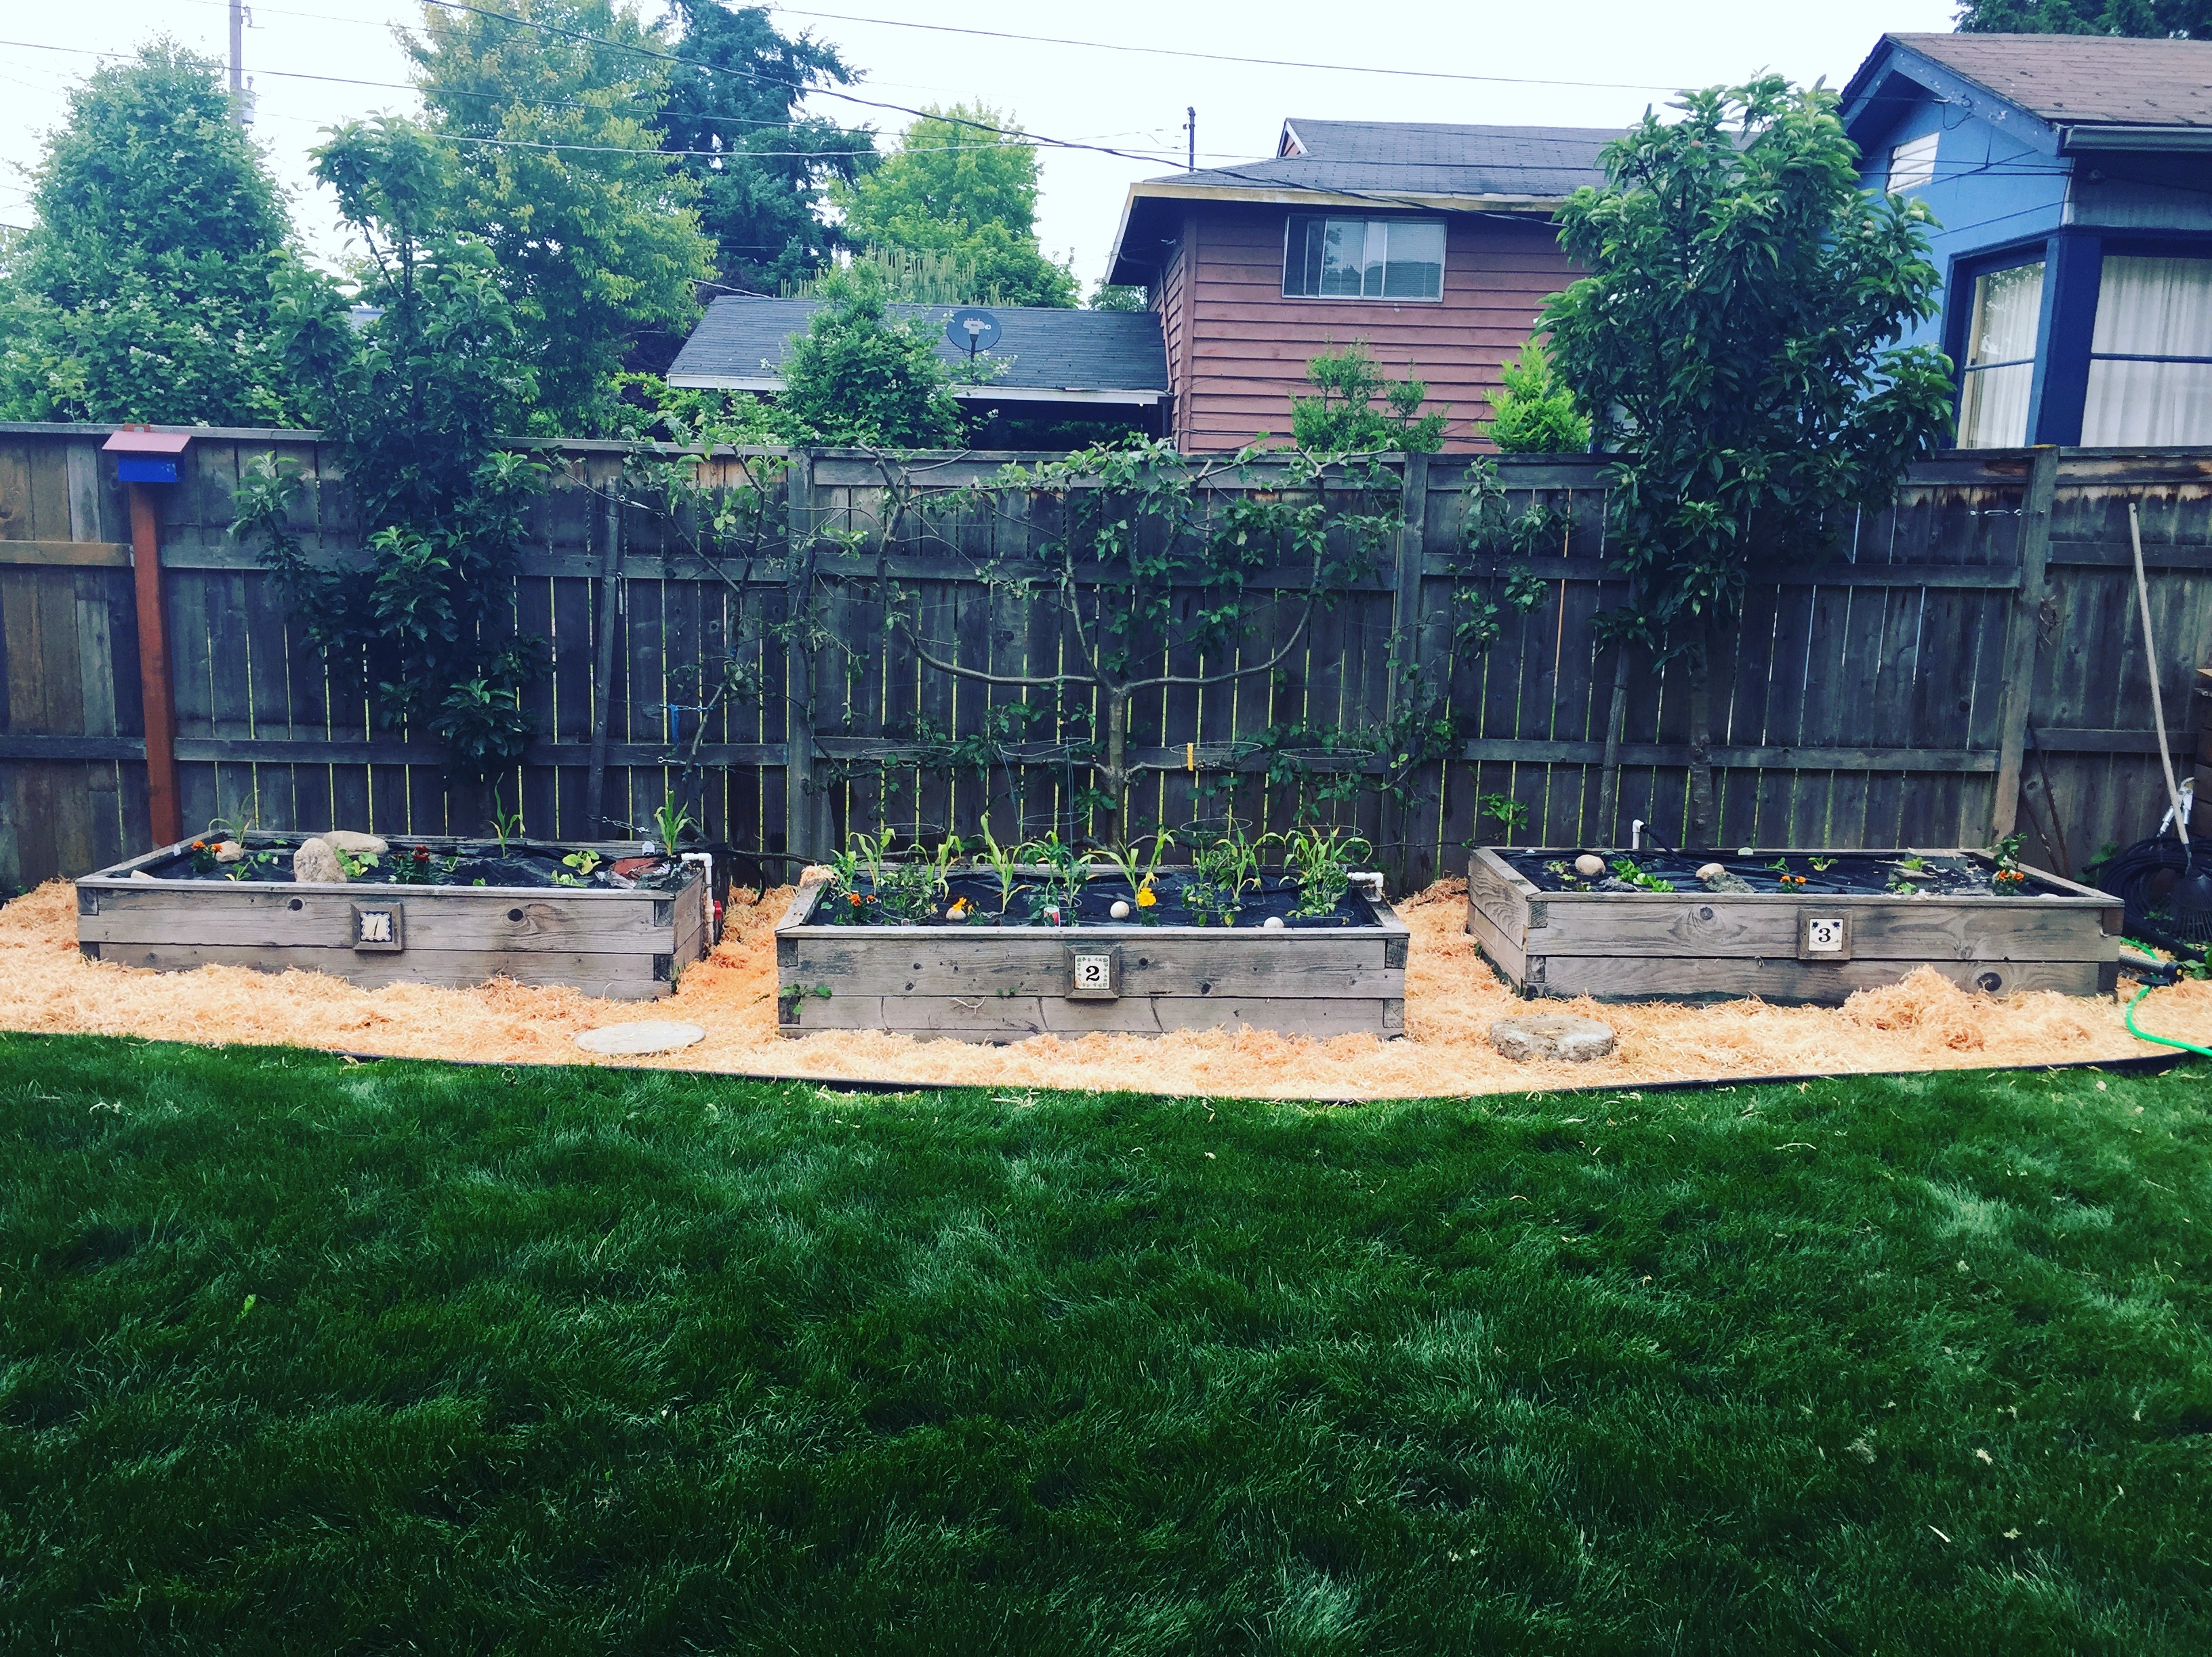
Bought garden starts at Nursery: tomatoes, corn, squash, zucchini, peppers,herbs, lettuce, etc…
50+ hours at my J-O-B, hustlin’ to keep us fed and the lights on
Watched about 2 hours of NetFlix
Gave away a bed in our home office
Had to delver it to new owner
Drank some French wine
Worked on cedar log garden table
Bought couch/guest bed for the office/TV room
Braved the gauntlet at IKEA – three hours to pick up a pre-ordered couch 🙁
IKEA gave me a $50 discount for the trouble
Had to source clear glass Victorian-style pull knobs for the corner cabinet doors
Spoke to both of my children for Father’s Day
Heart Happy
Planted summer garden
There was some coffee drinking and puppy snuggling
Took top off of Jeep for the first time in 1.5 years
Started Raining the second I took it out of the Garage
Made grumpy noises
Had coffee and listened to a bluegrass jam session at favorite coffee shop
Watched a movie
Was prolific on Twitter and Instagram
Murdered some dandelions
Rode around neighborhood on errands in topless Jeep when it stopped raining
Made happy noises
Sent some J-O-B e-mails from home
Started reading American Gods out loud with my awesome wife
Went to bed to start it all over again on Monday morning

A Year Later – The Garage is Finally Legal and Inspected
Holy crap… I got notice from our former garage contractor that the city permit for the build was about to expire. WhAt tHe FUCK!?!? Apparently, he had never called for the final inspection. It just never ends with this guy and the inattention to detail.
After a flurry of calls and e-mails, the city inspector came out yesterday and looked at the framing, roof, gutters, paint, electrical final. He signed off thew garage as legal and conforming but, said that we should have not moved in and started the insulation and drywall until the final was signed and in hand. He was the guy that did the initial inspection and remembered us and the build, so I didn’t have to tear anything out. While I appreciate the contractor letting me know about the expiration, I would have preferred that the inspections were done a year ago when the structure was done.
Update:
The day after the Final Inspection was signed off, I got a notice that a Waste Diversion Report (WDR) needs to be submitted to Seattle Public Utilities (SPU) for all demolition projects as well as any new construction and alteration permits where the project value is $30,000 or greater. Normally this falls to the party that pulled the building permit, but as I did the demo myself it got forwarded to me. Links to the forms are below in case anyone in Seattle needs them.
SPU Waste Diversion Report Manual Form
Seattle WDR Letter 2016
Apparently, if you live in Seattle, our local utility company wants to make triple-extra sure you did not dump any building or demo waste inappropriately. I have the receipts from the equipment company and the hauling company, so there should be no issue.
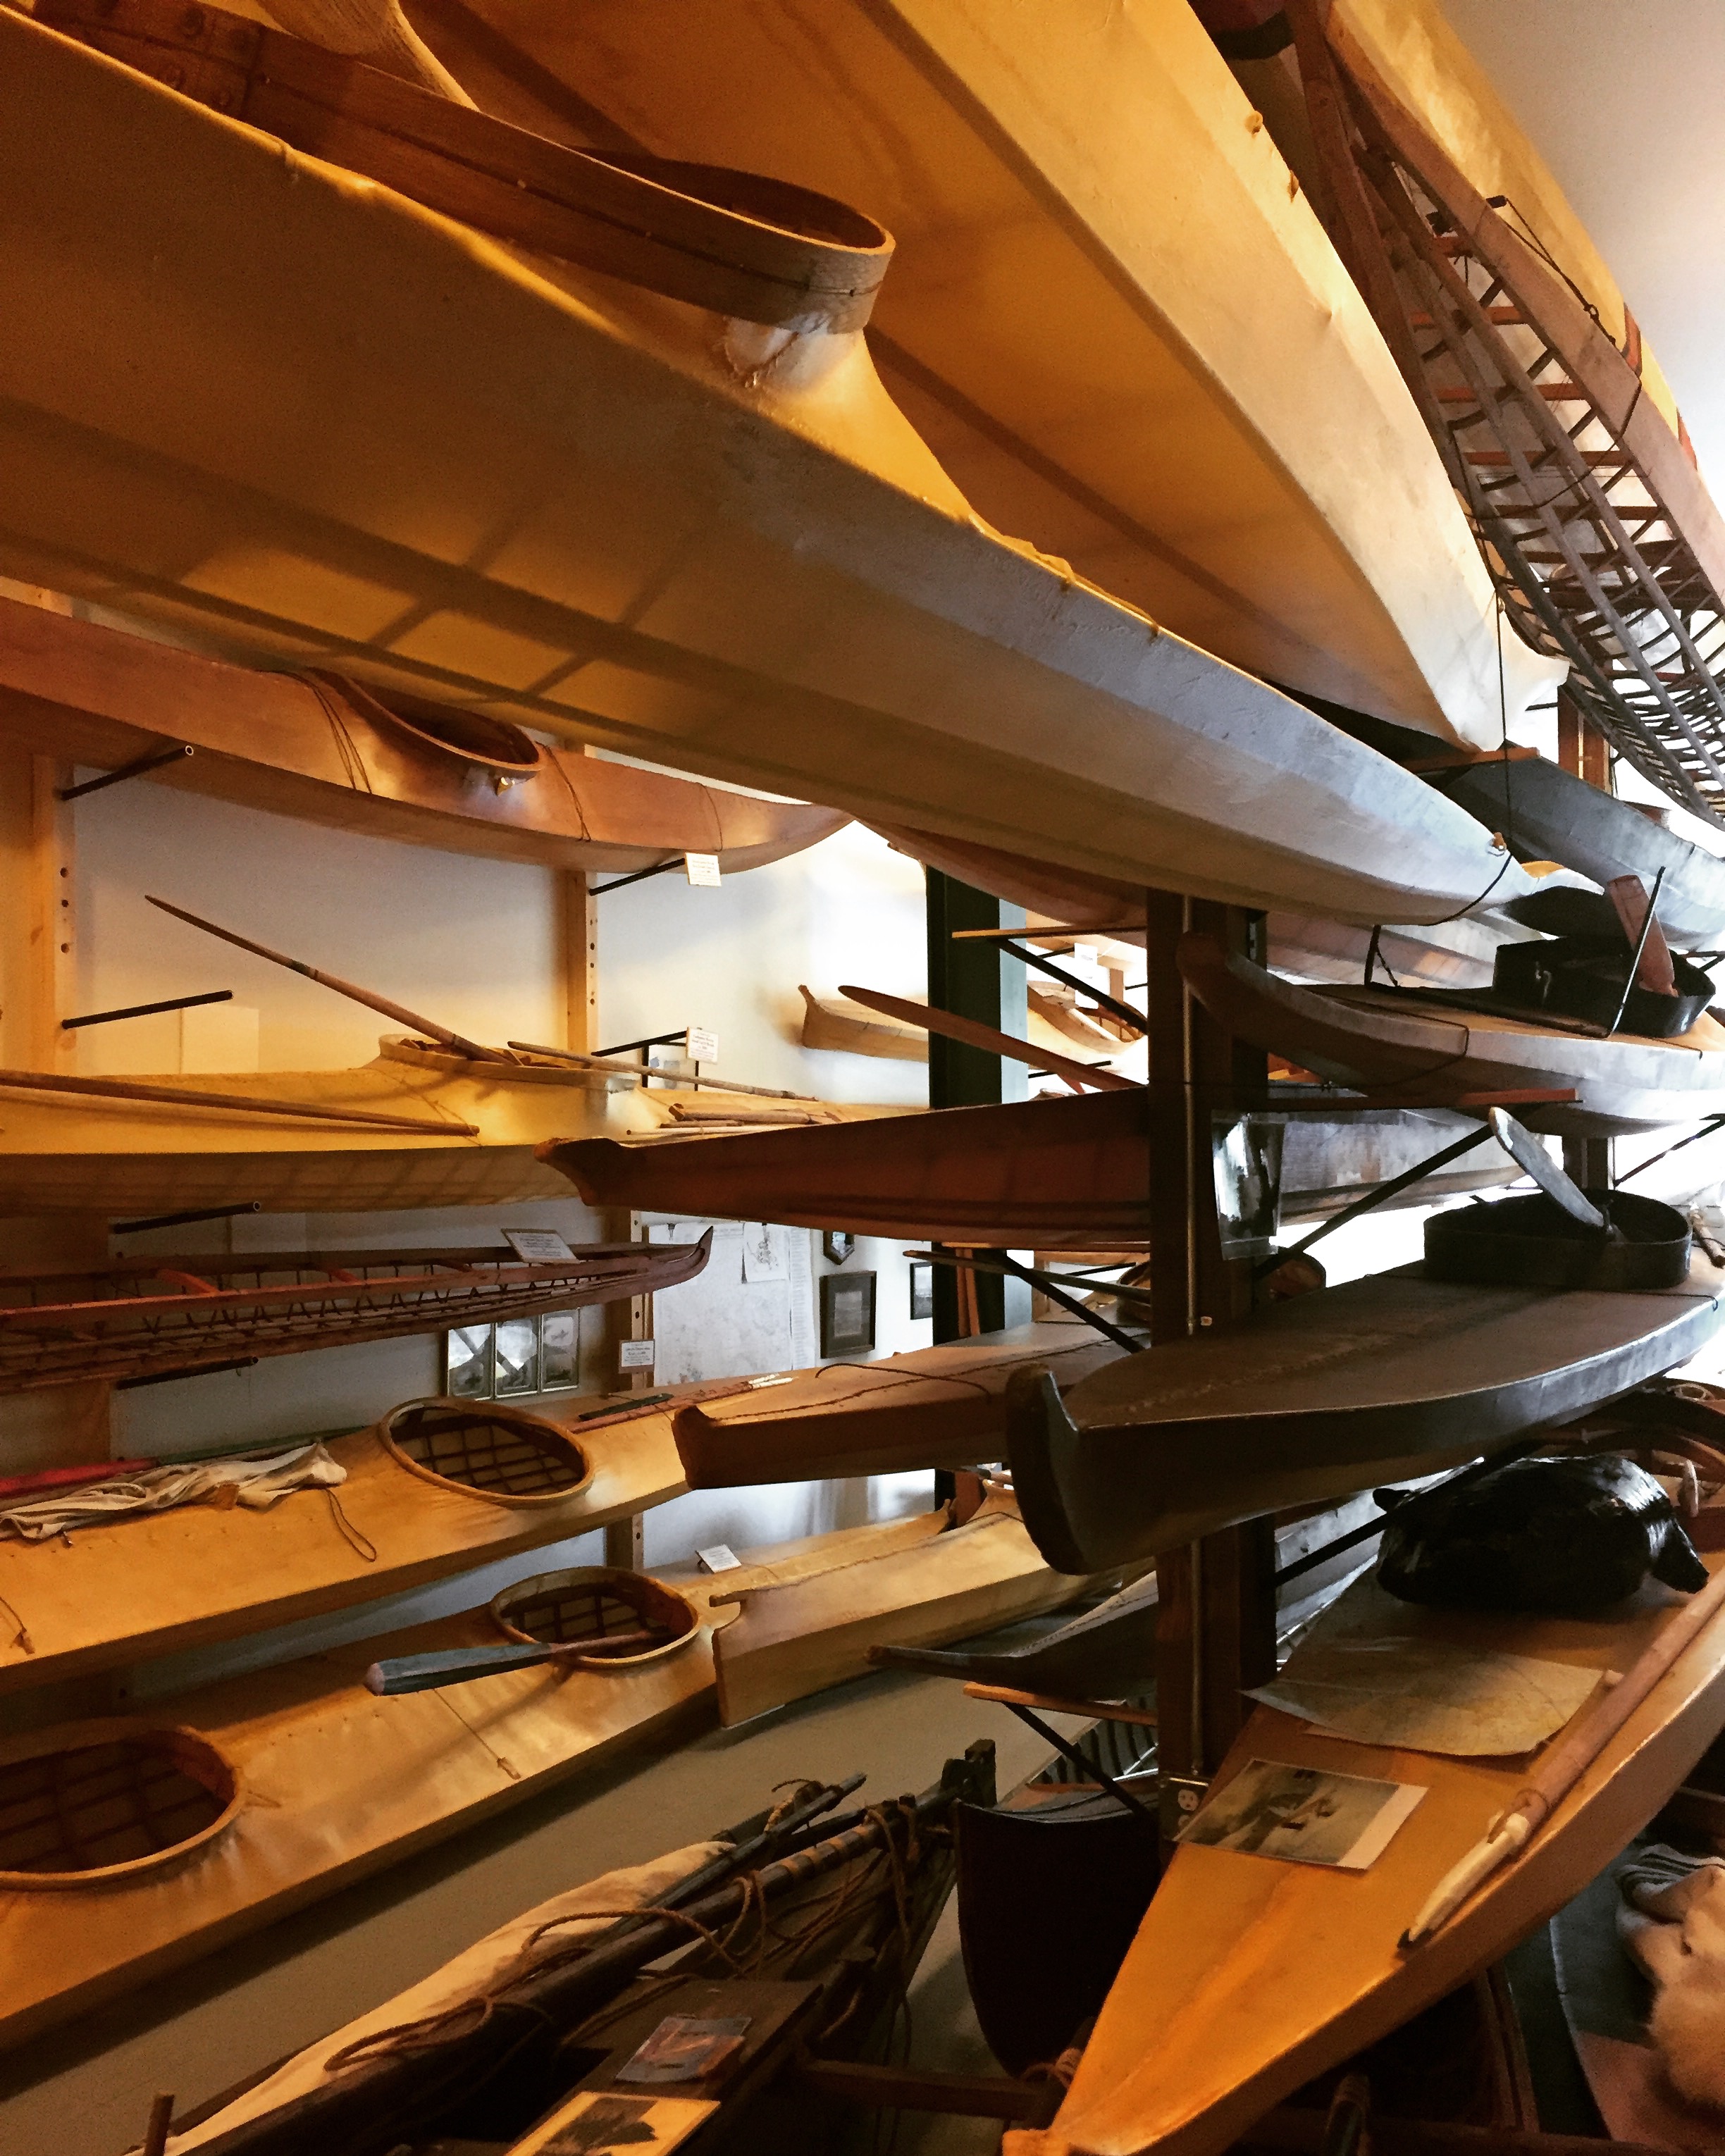
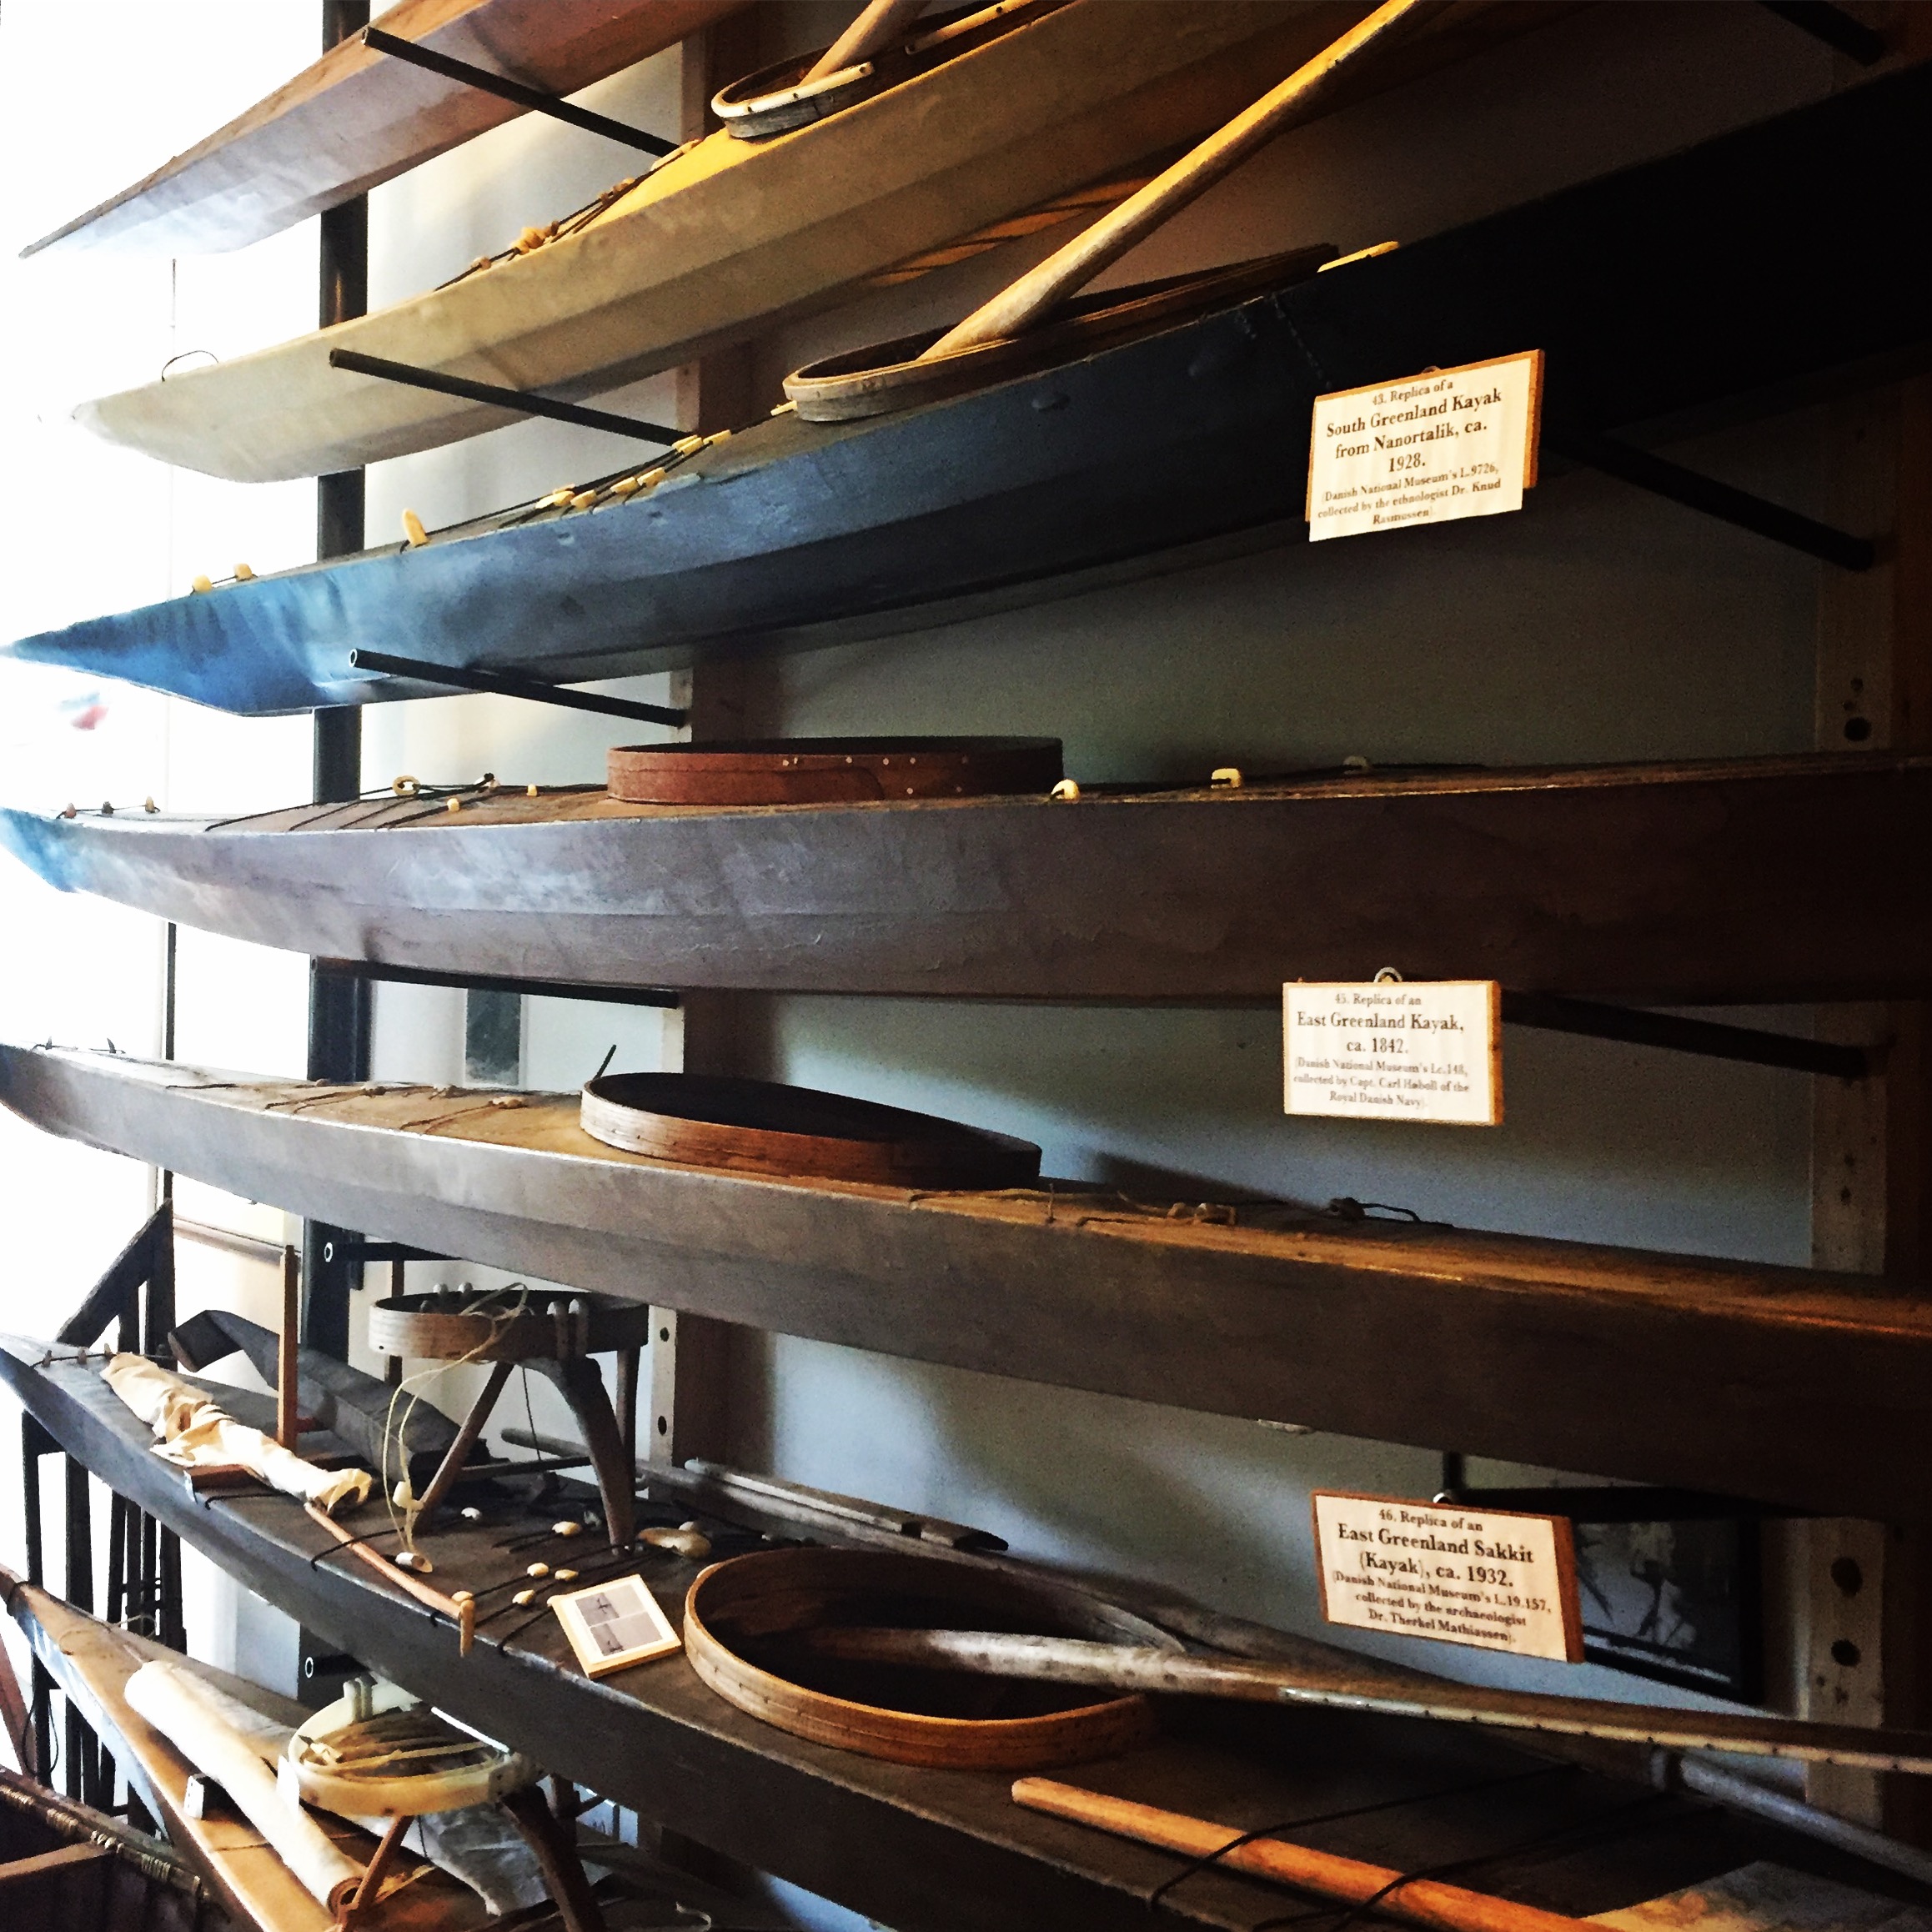
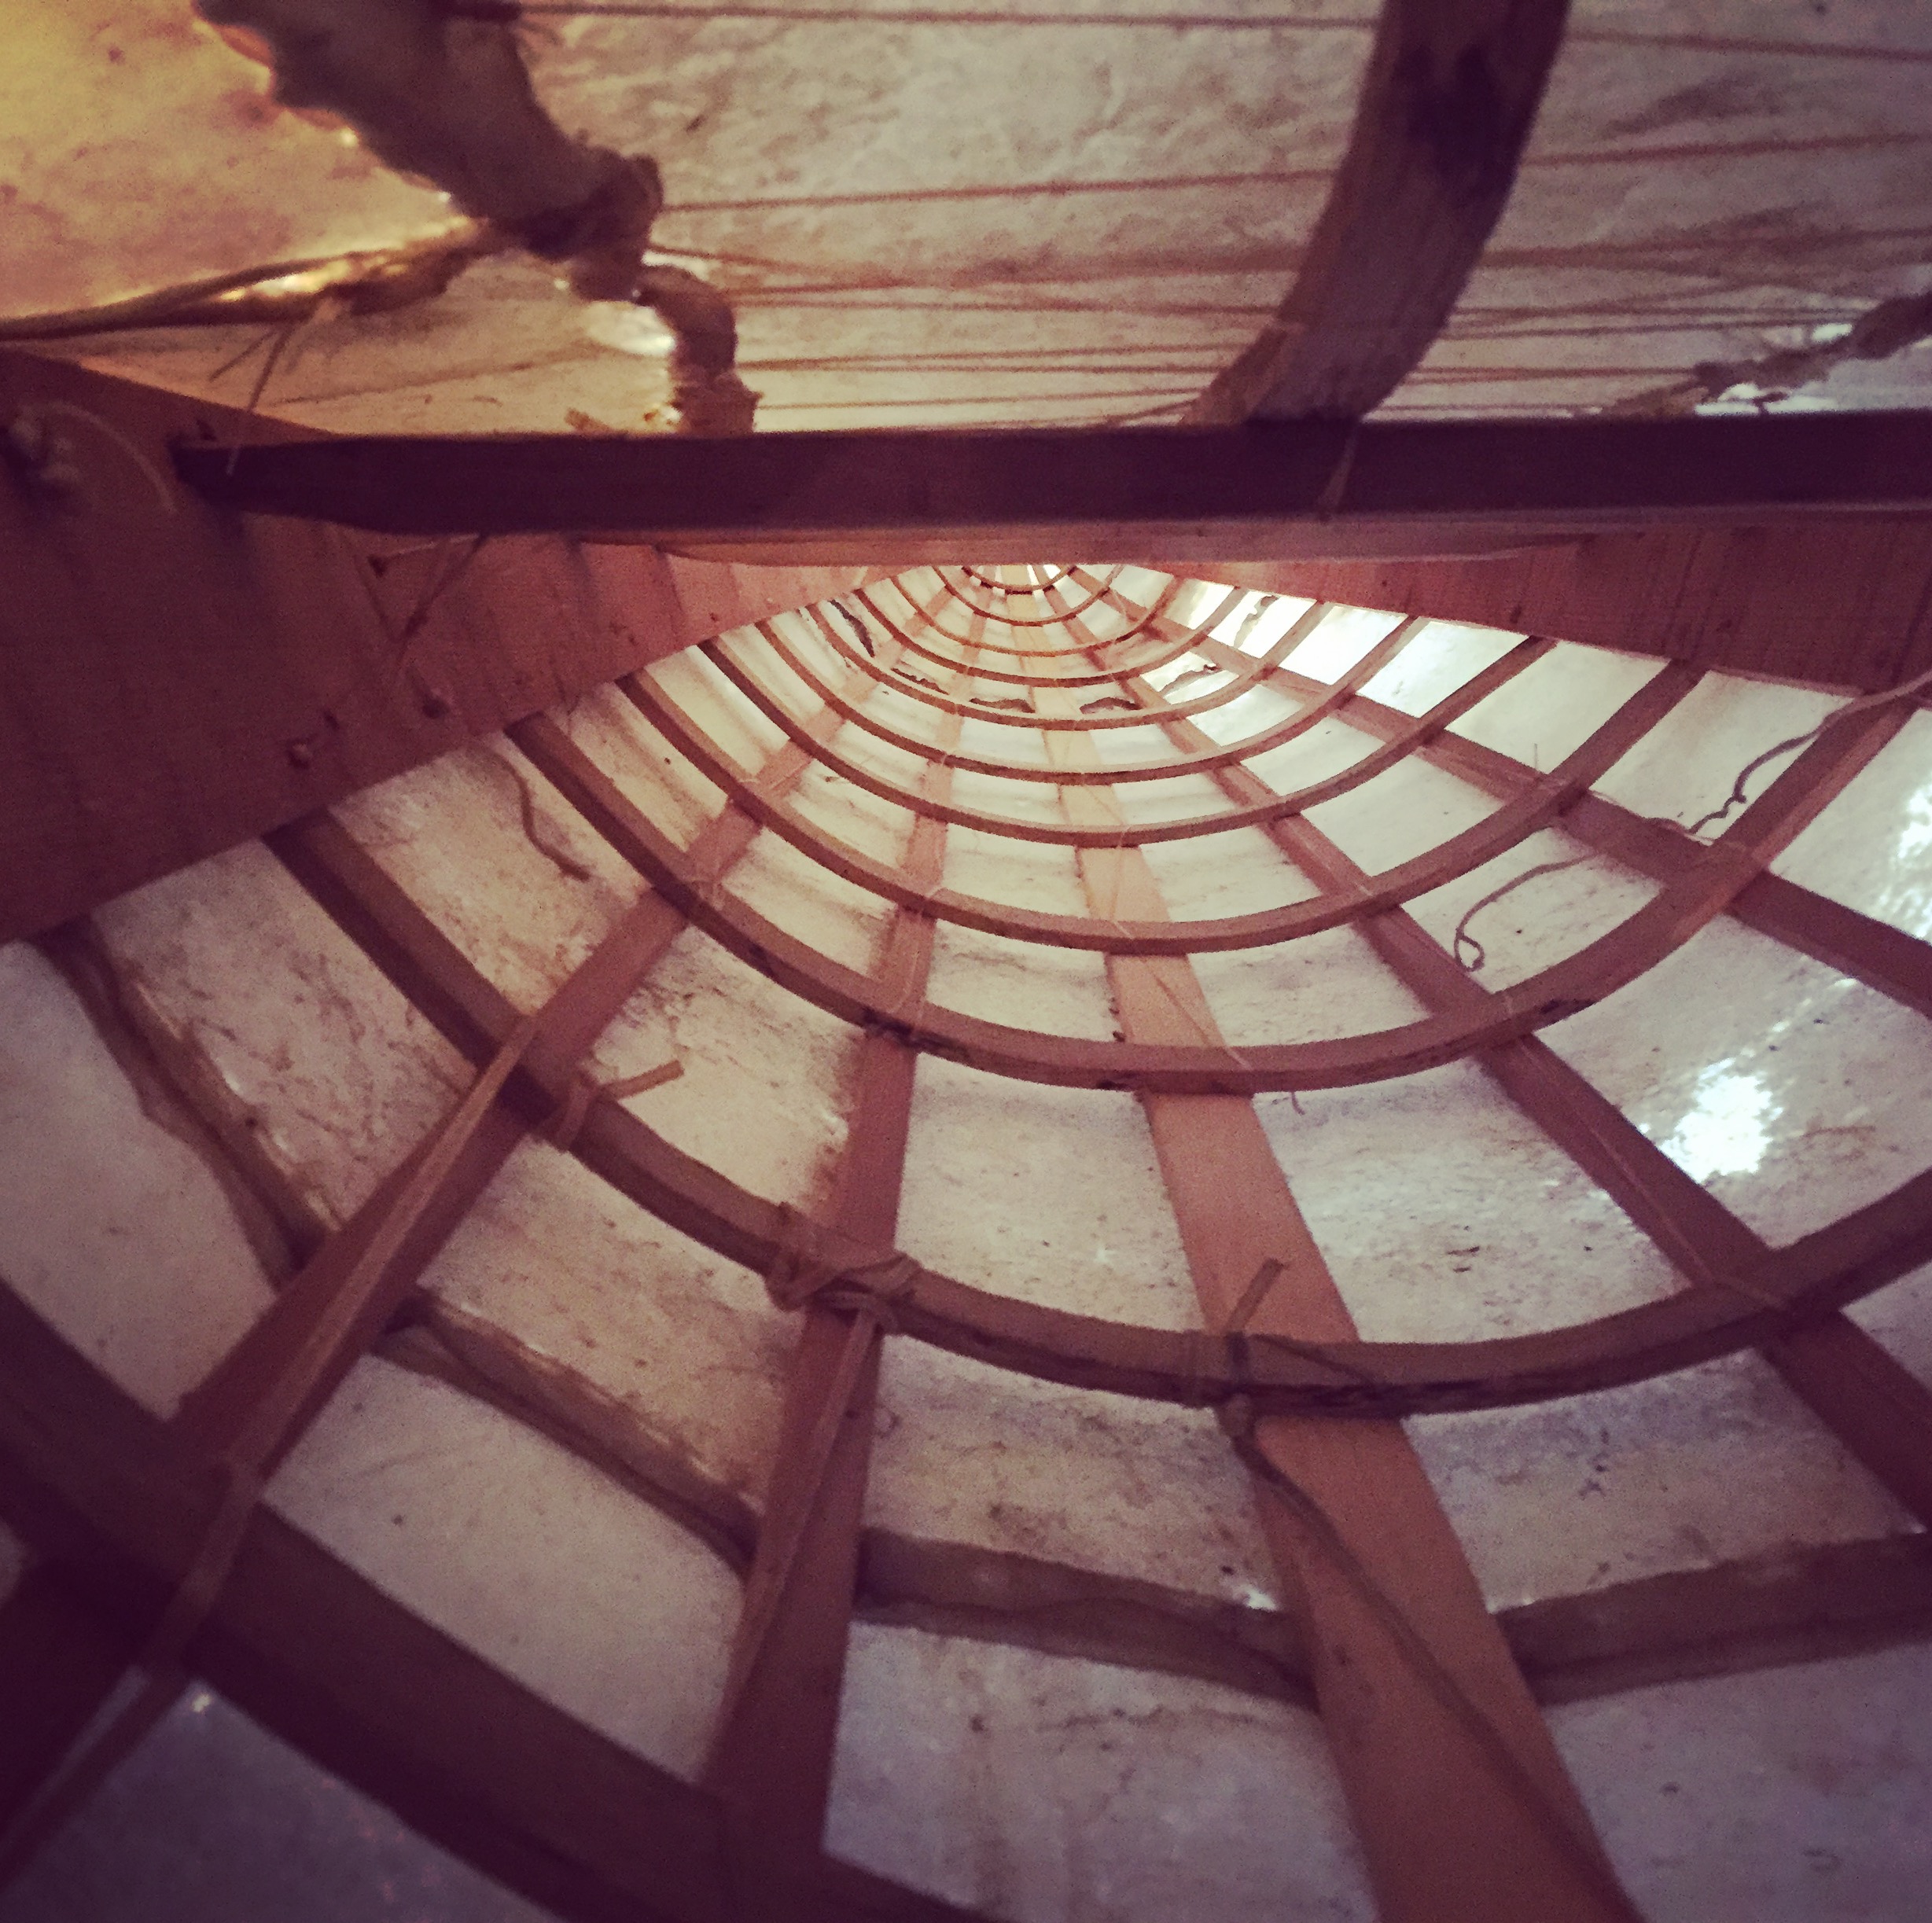
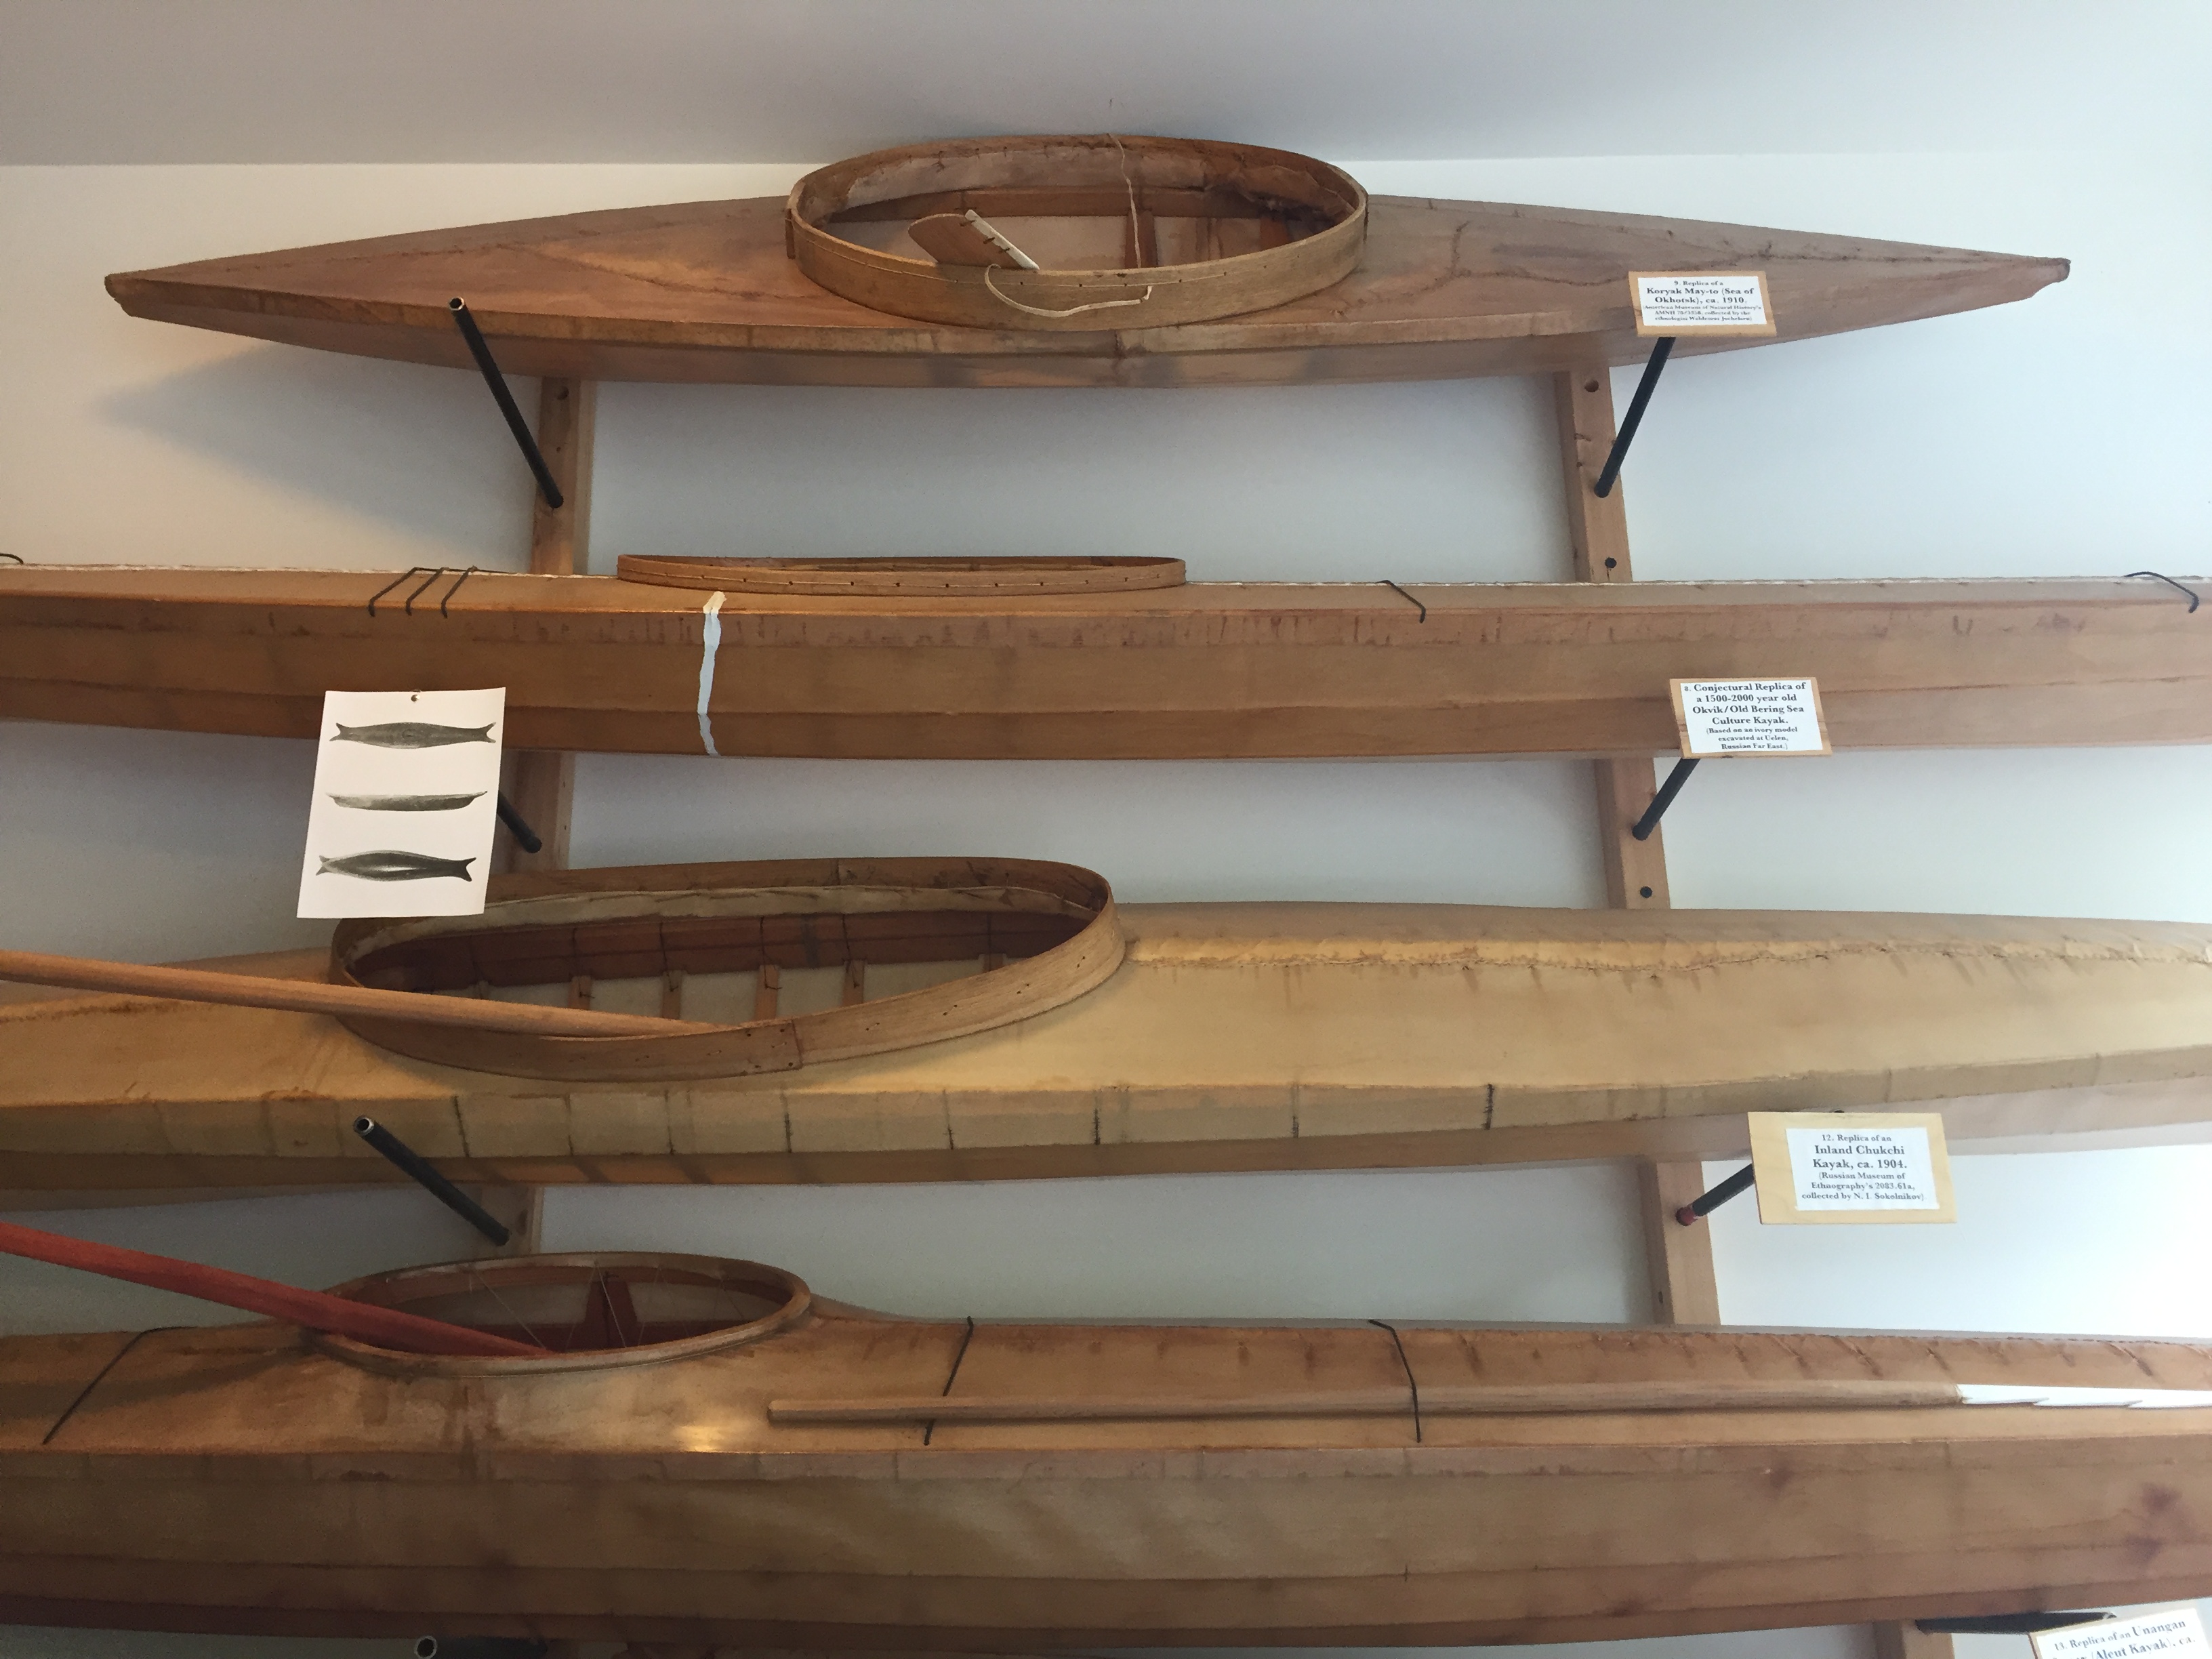
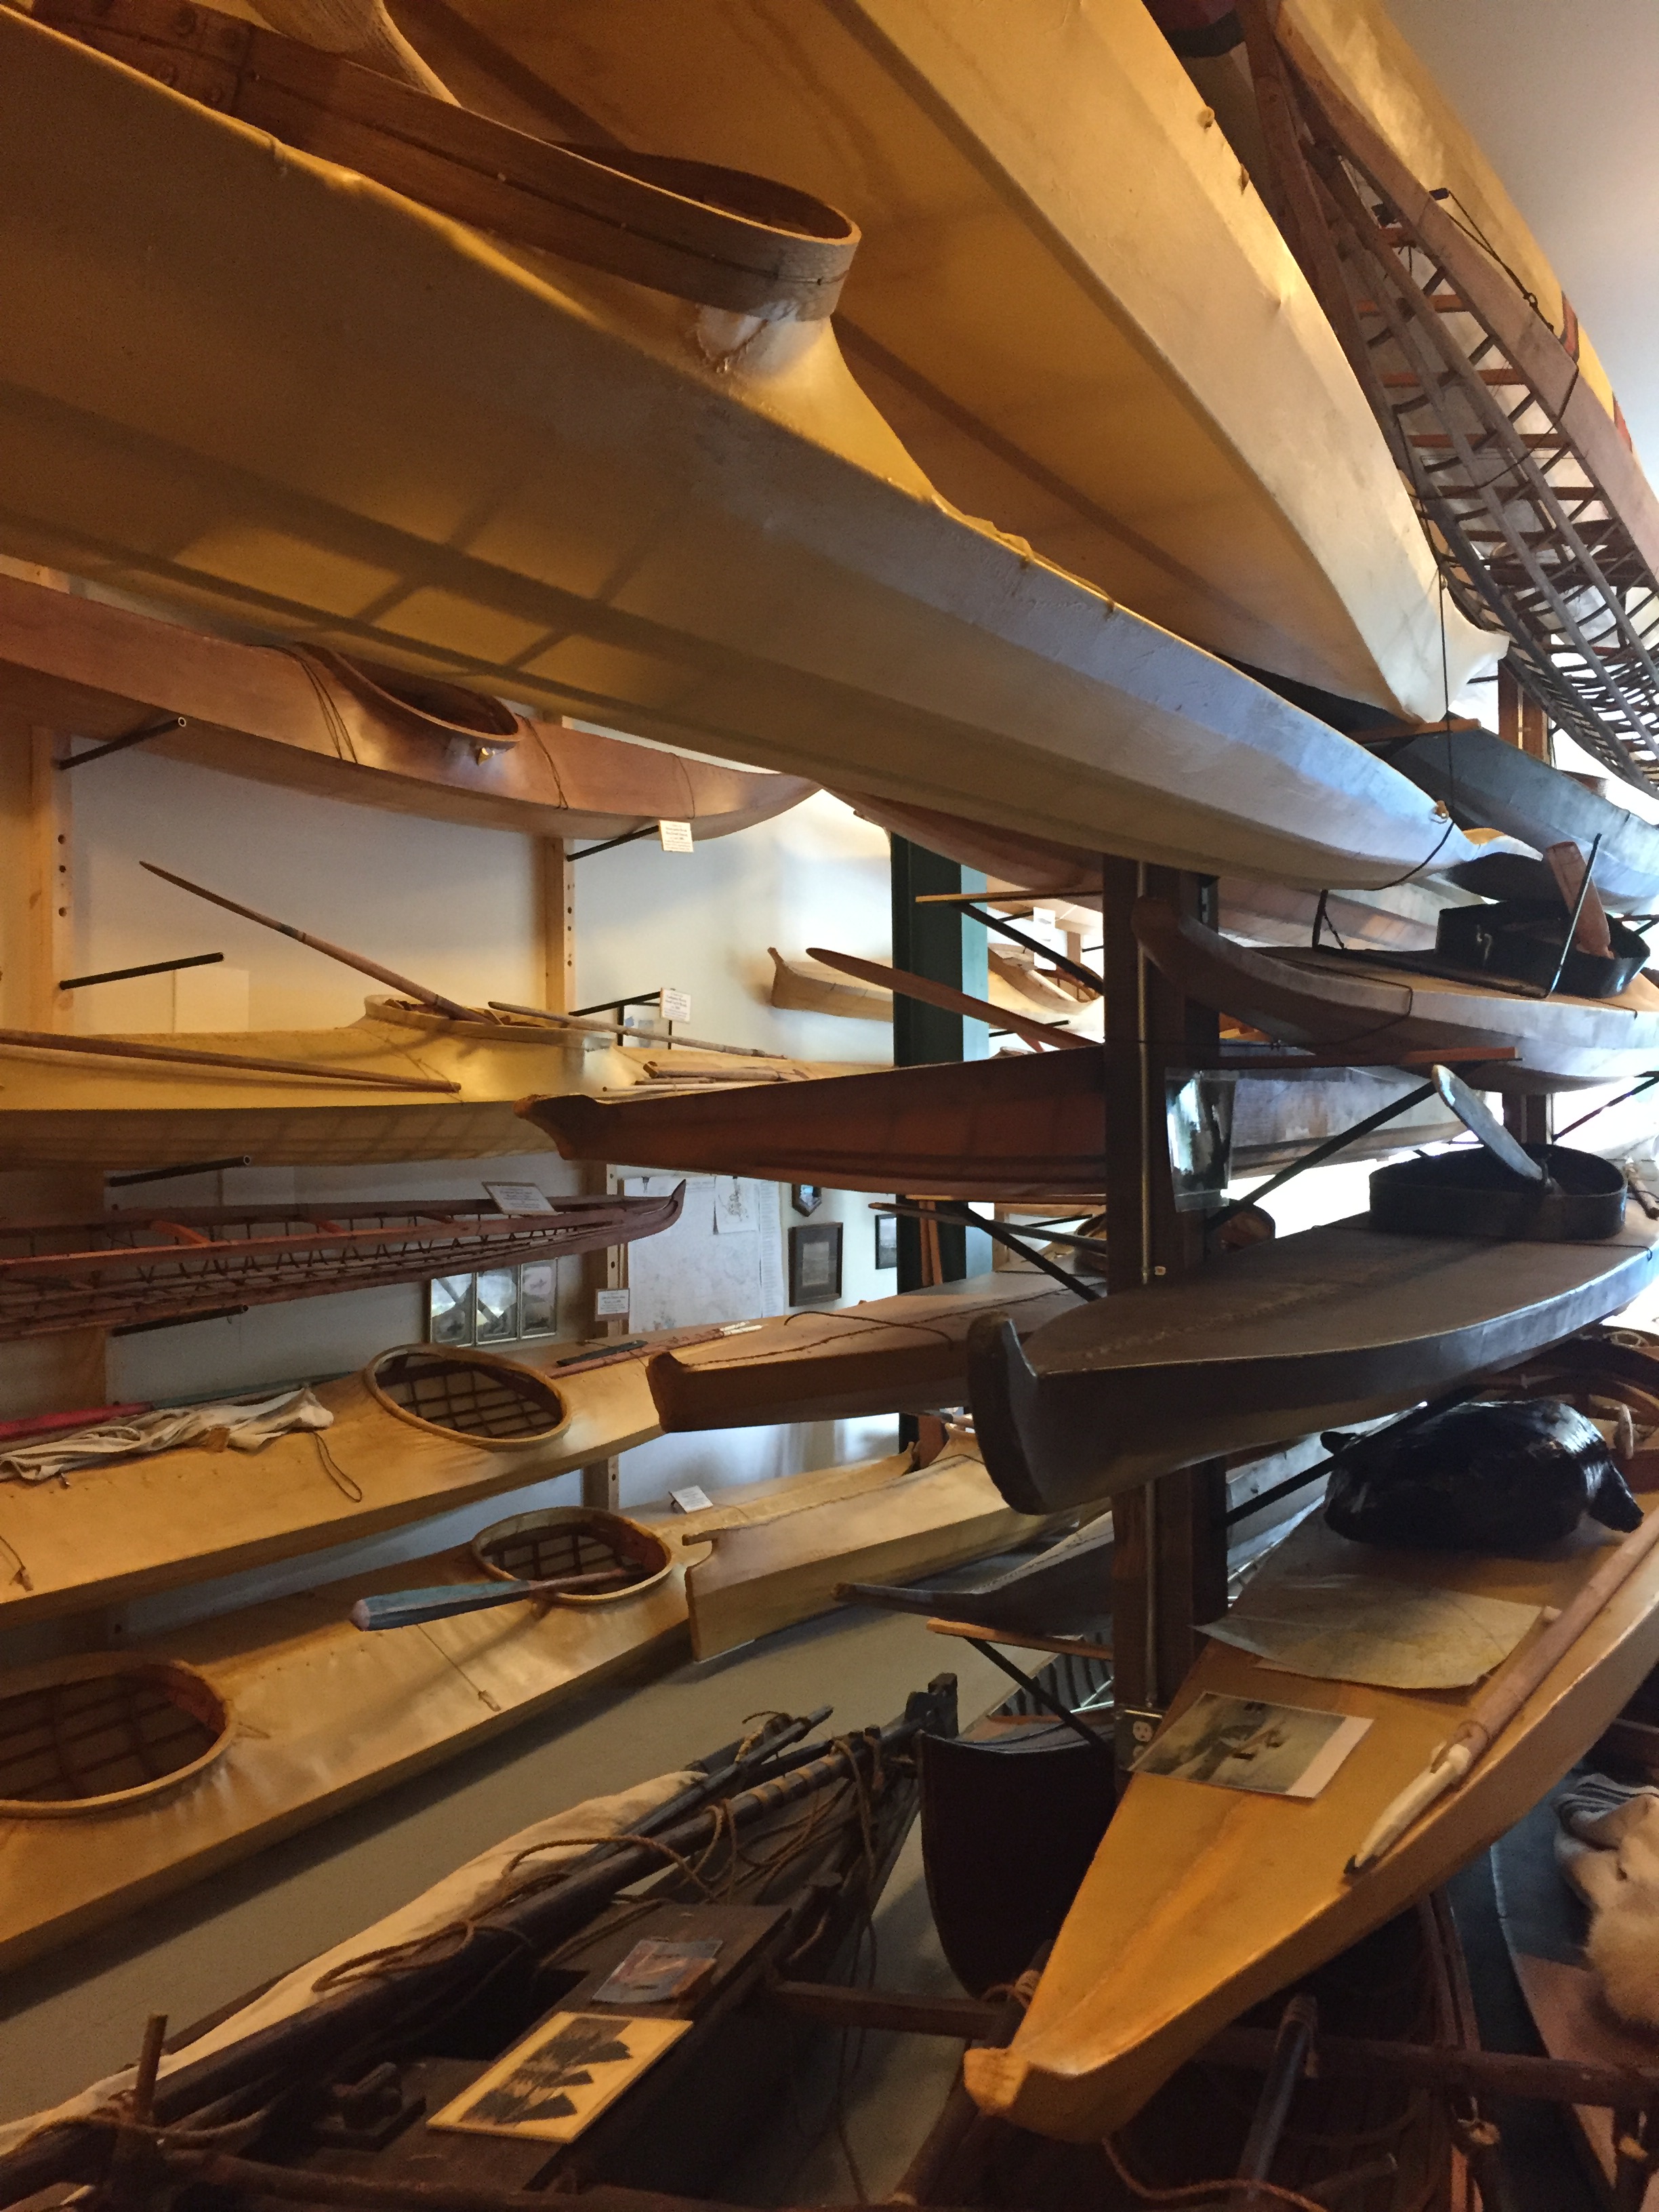
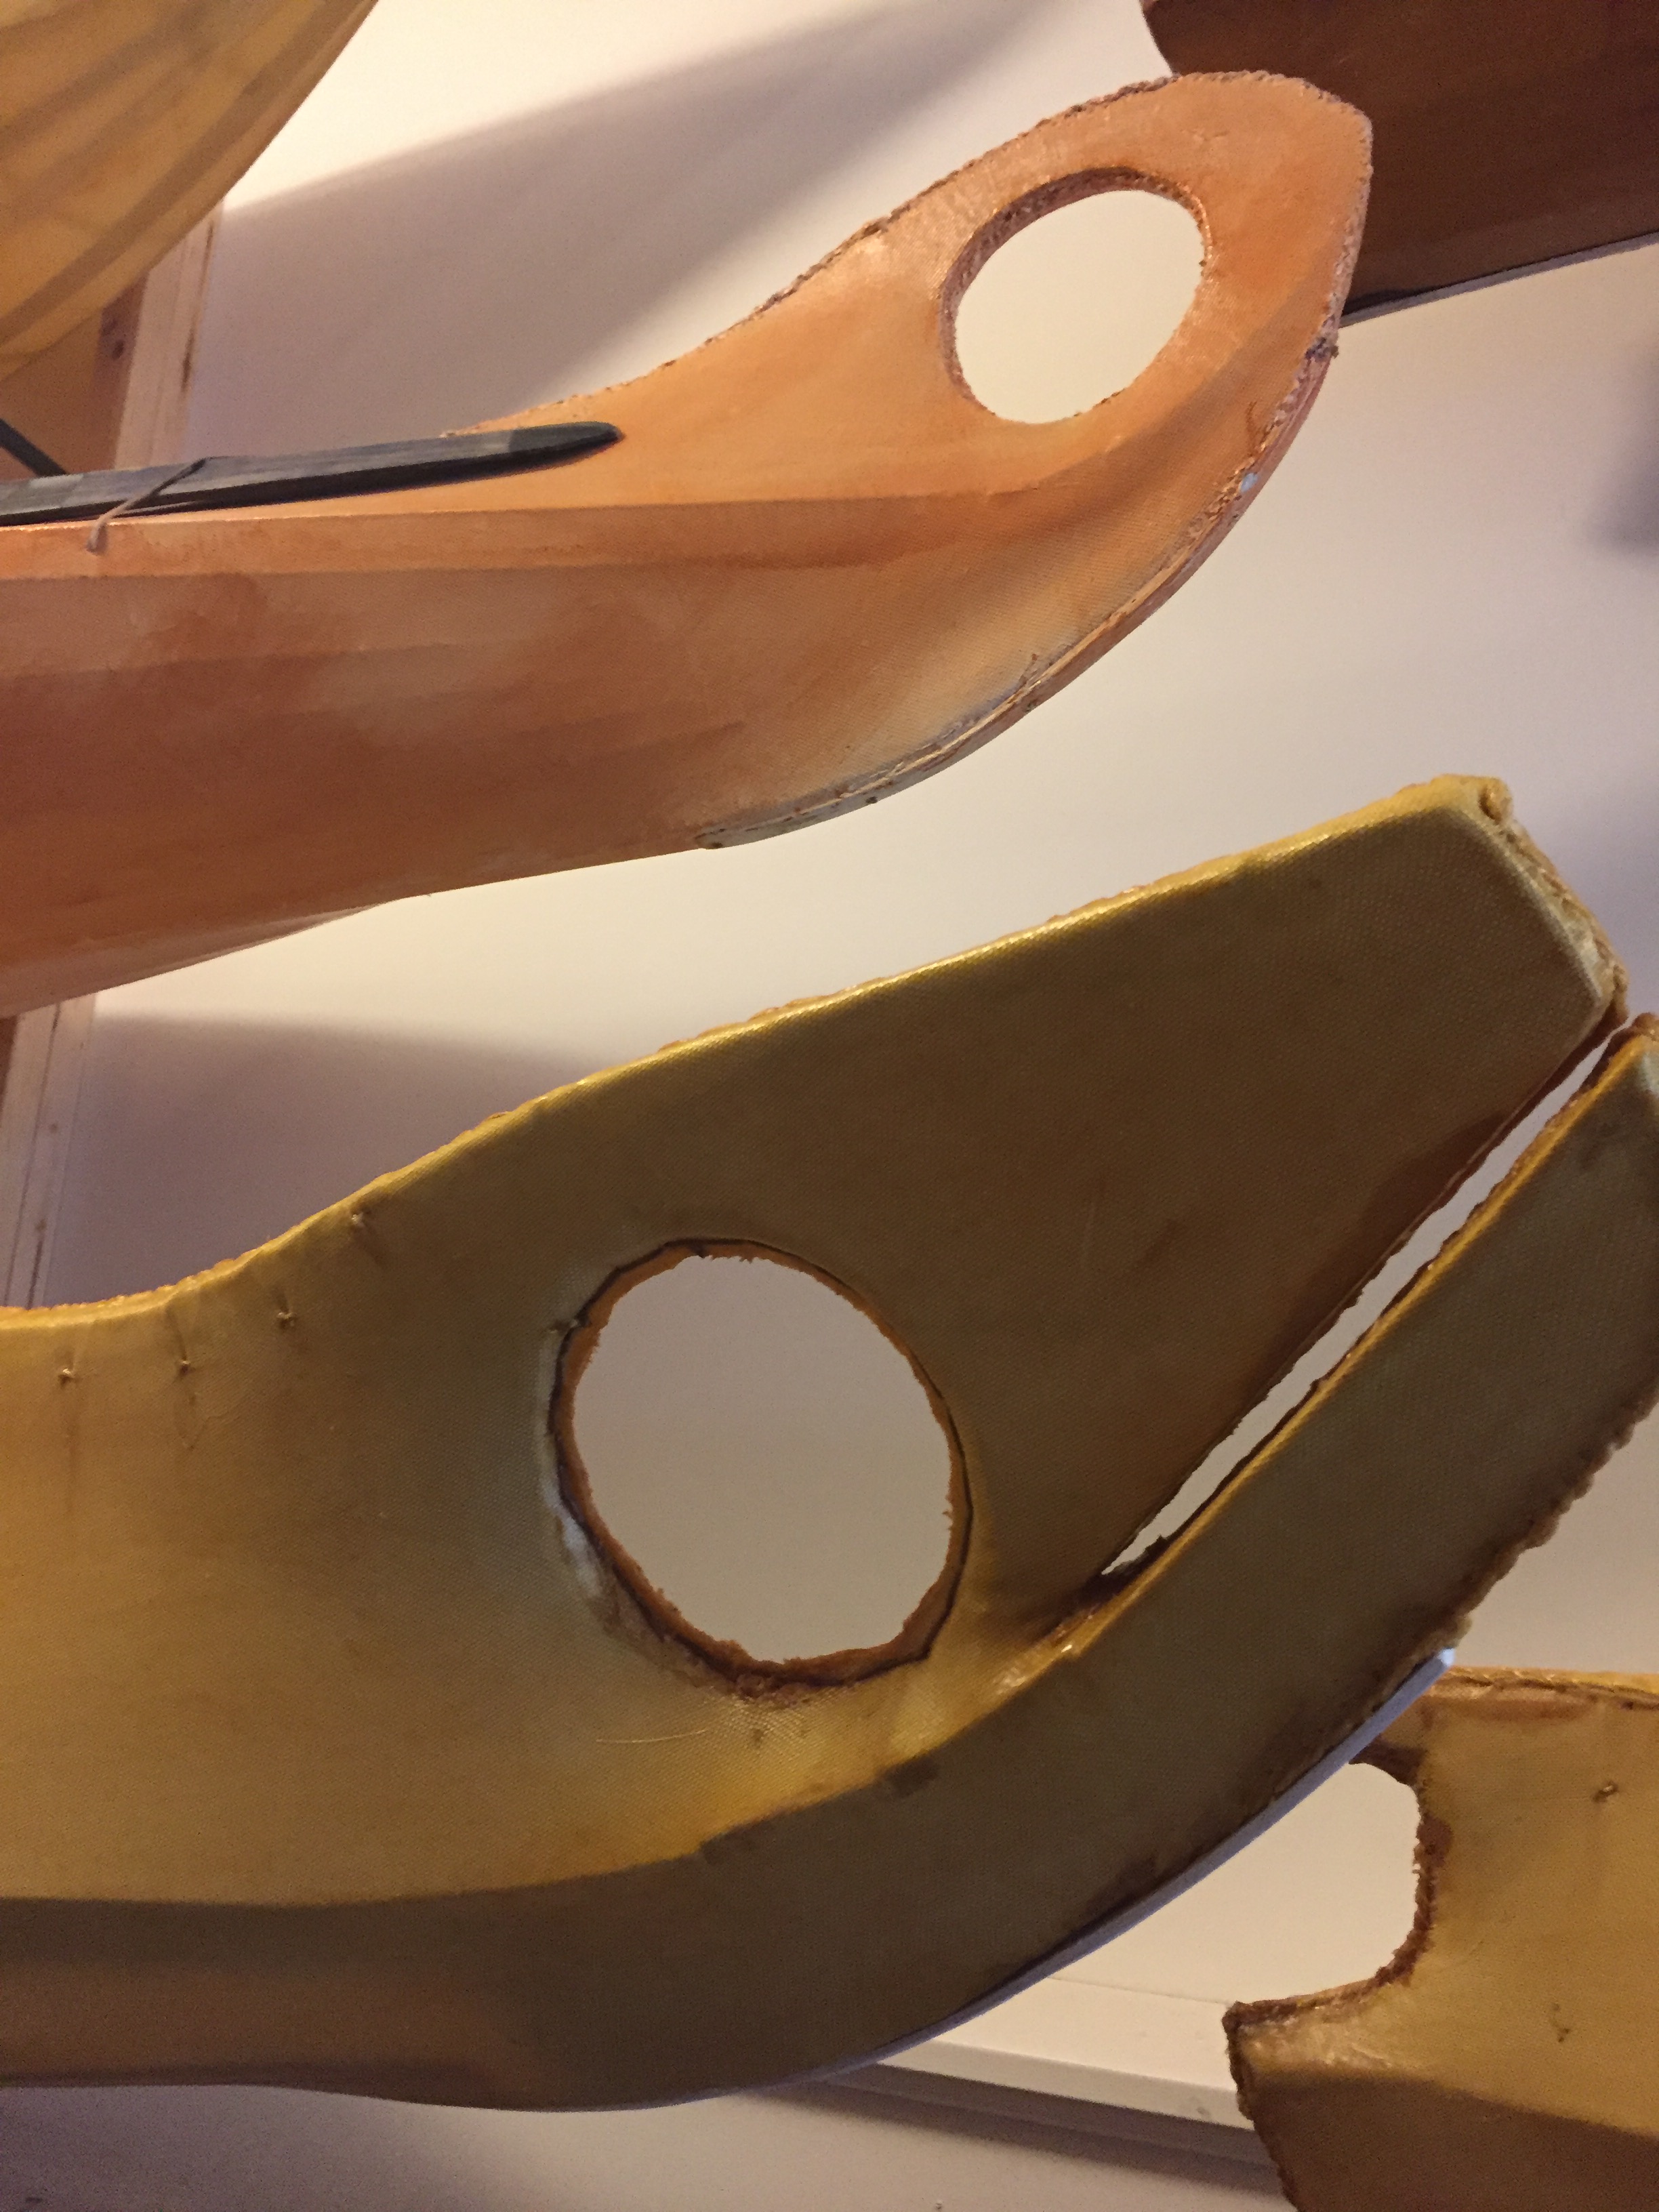
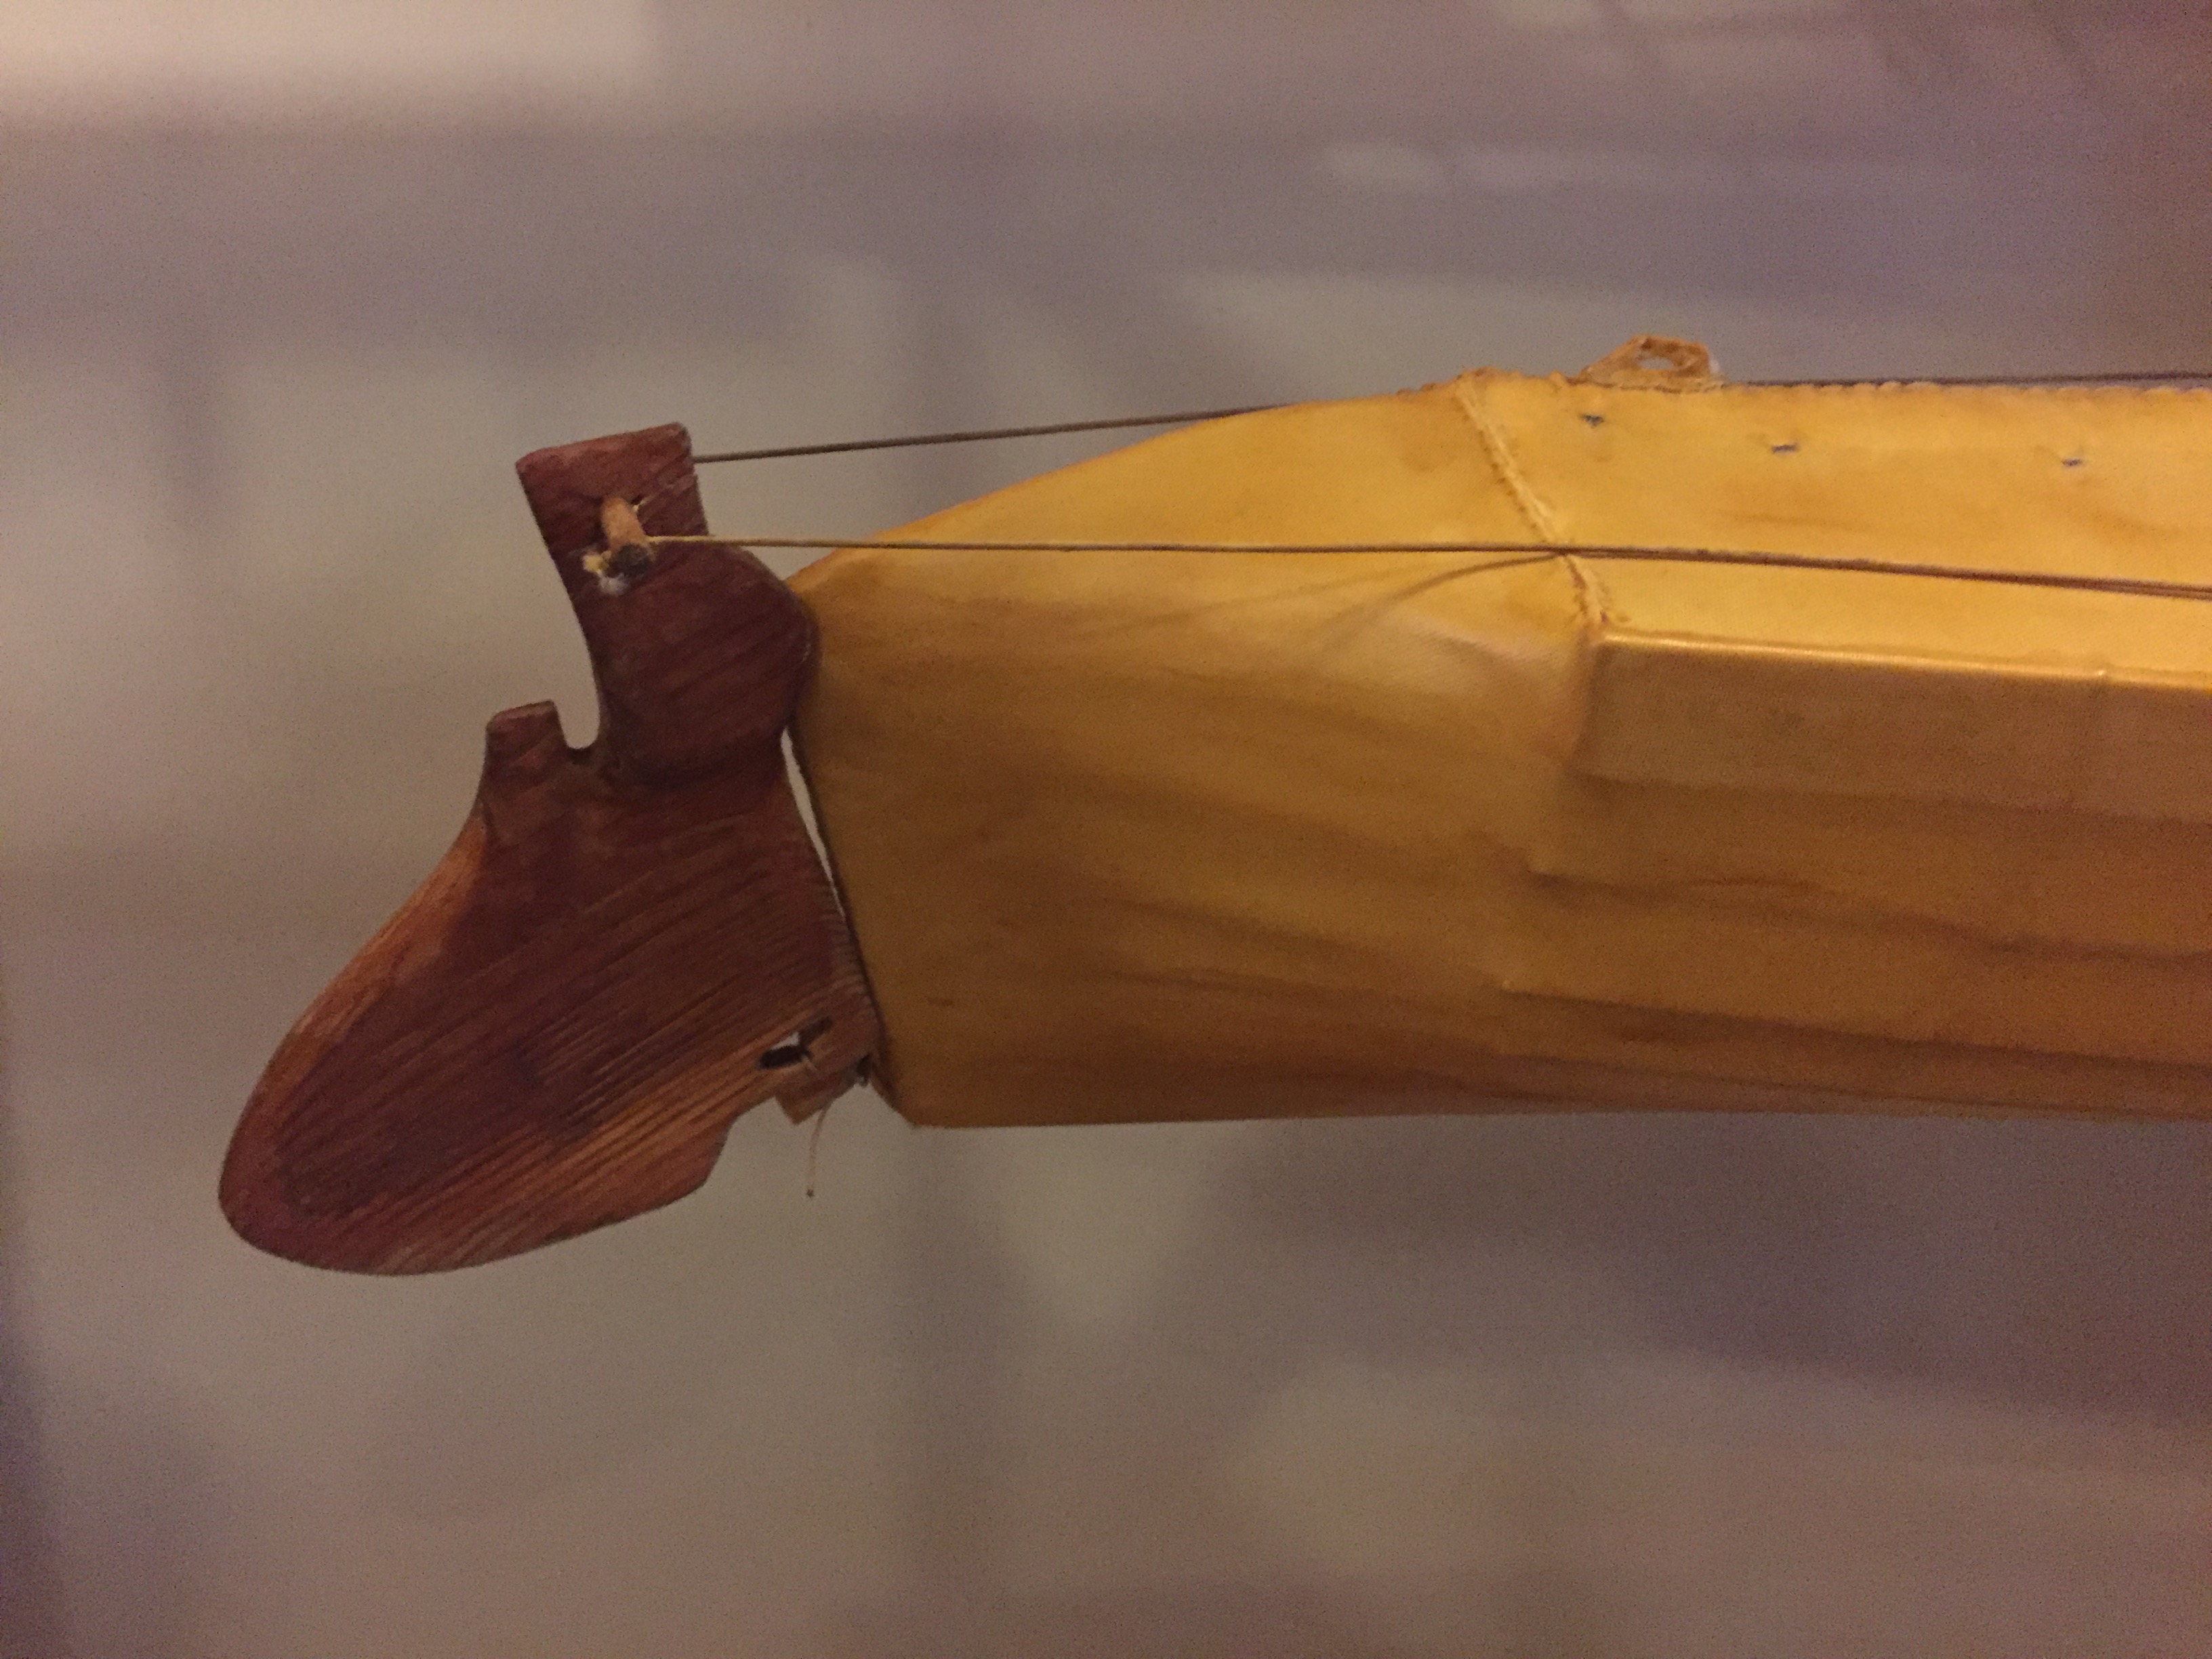
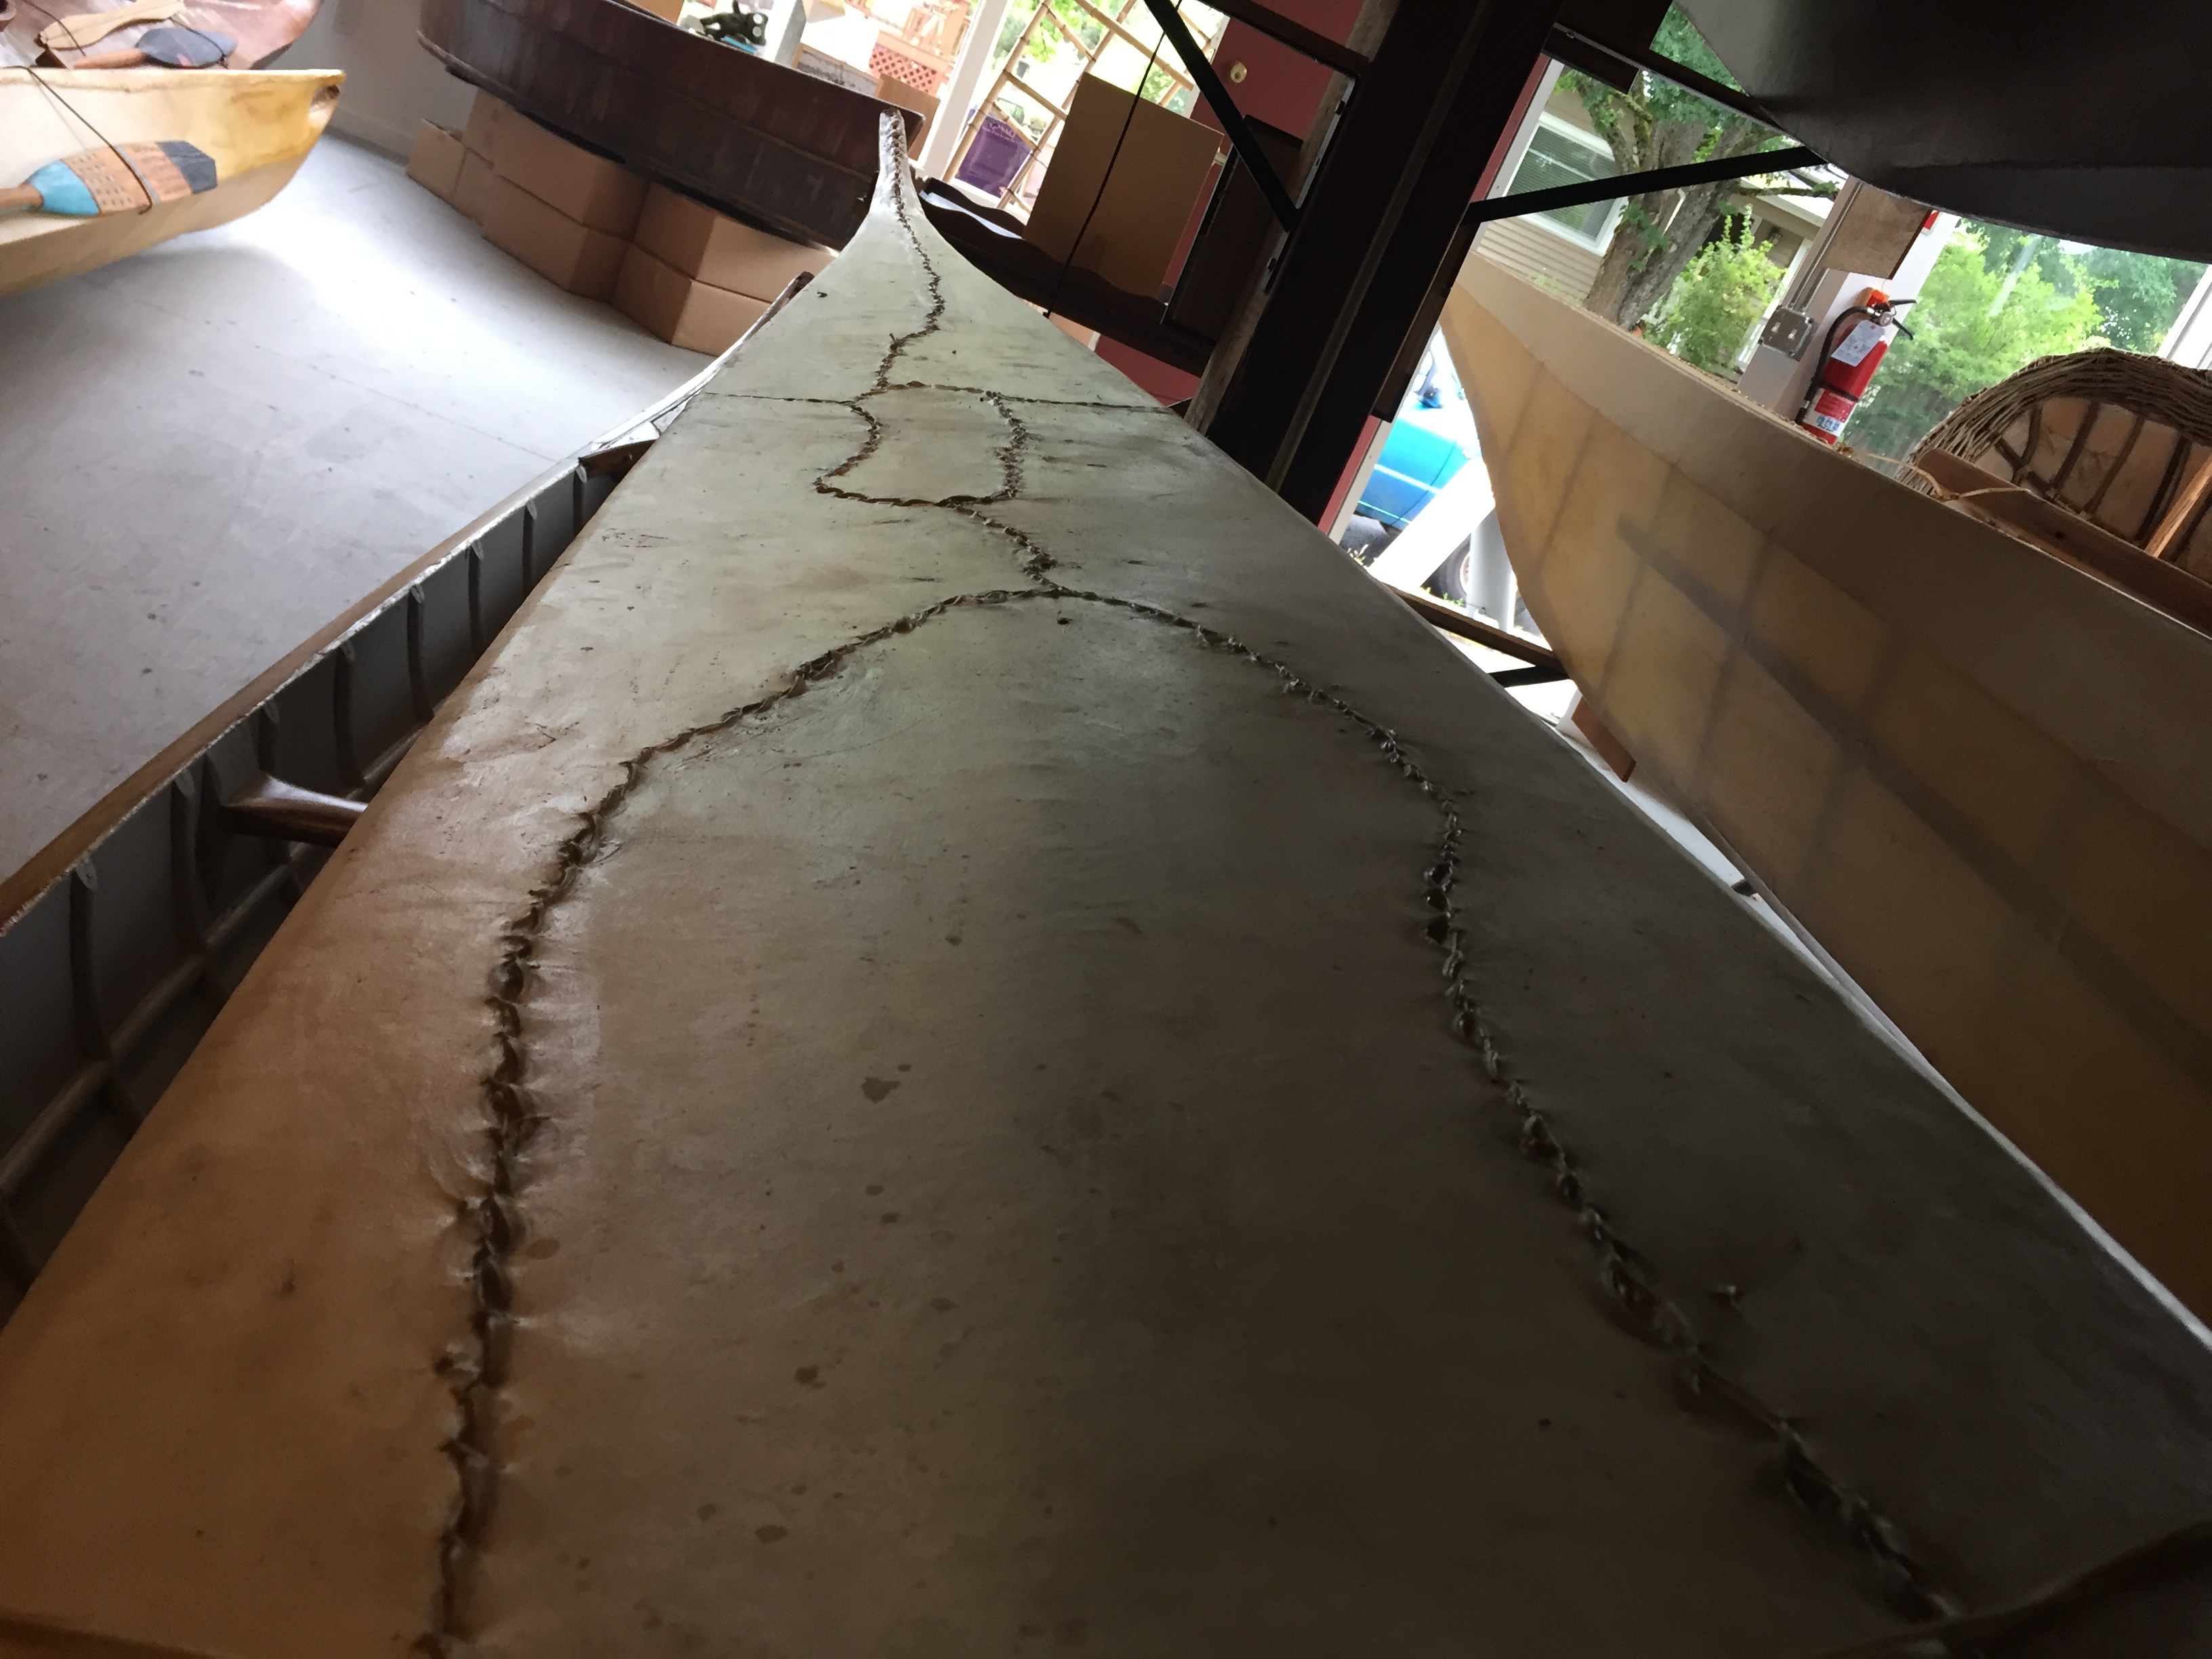
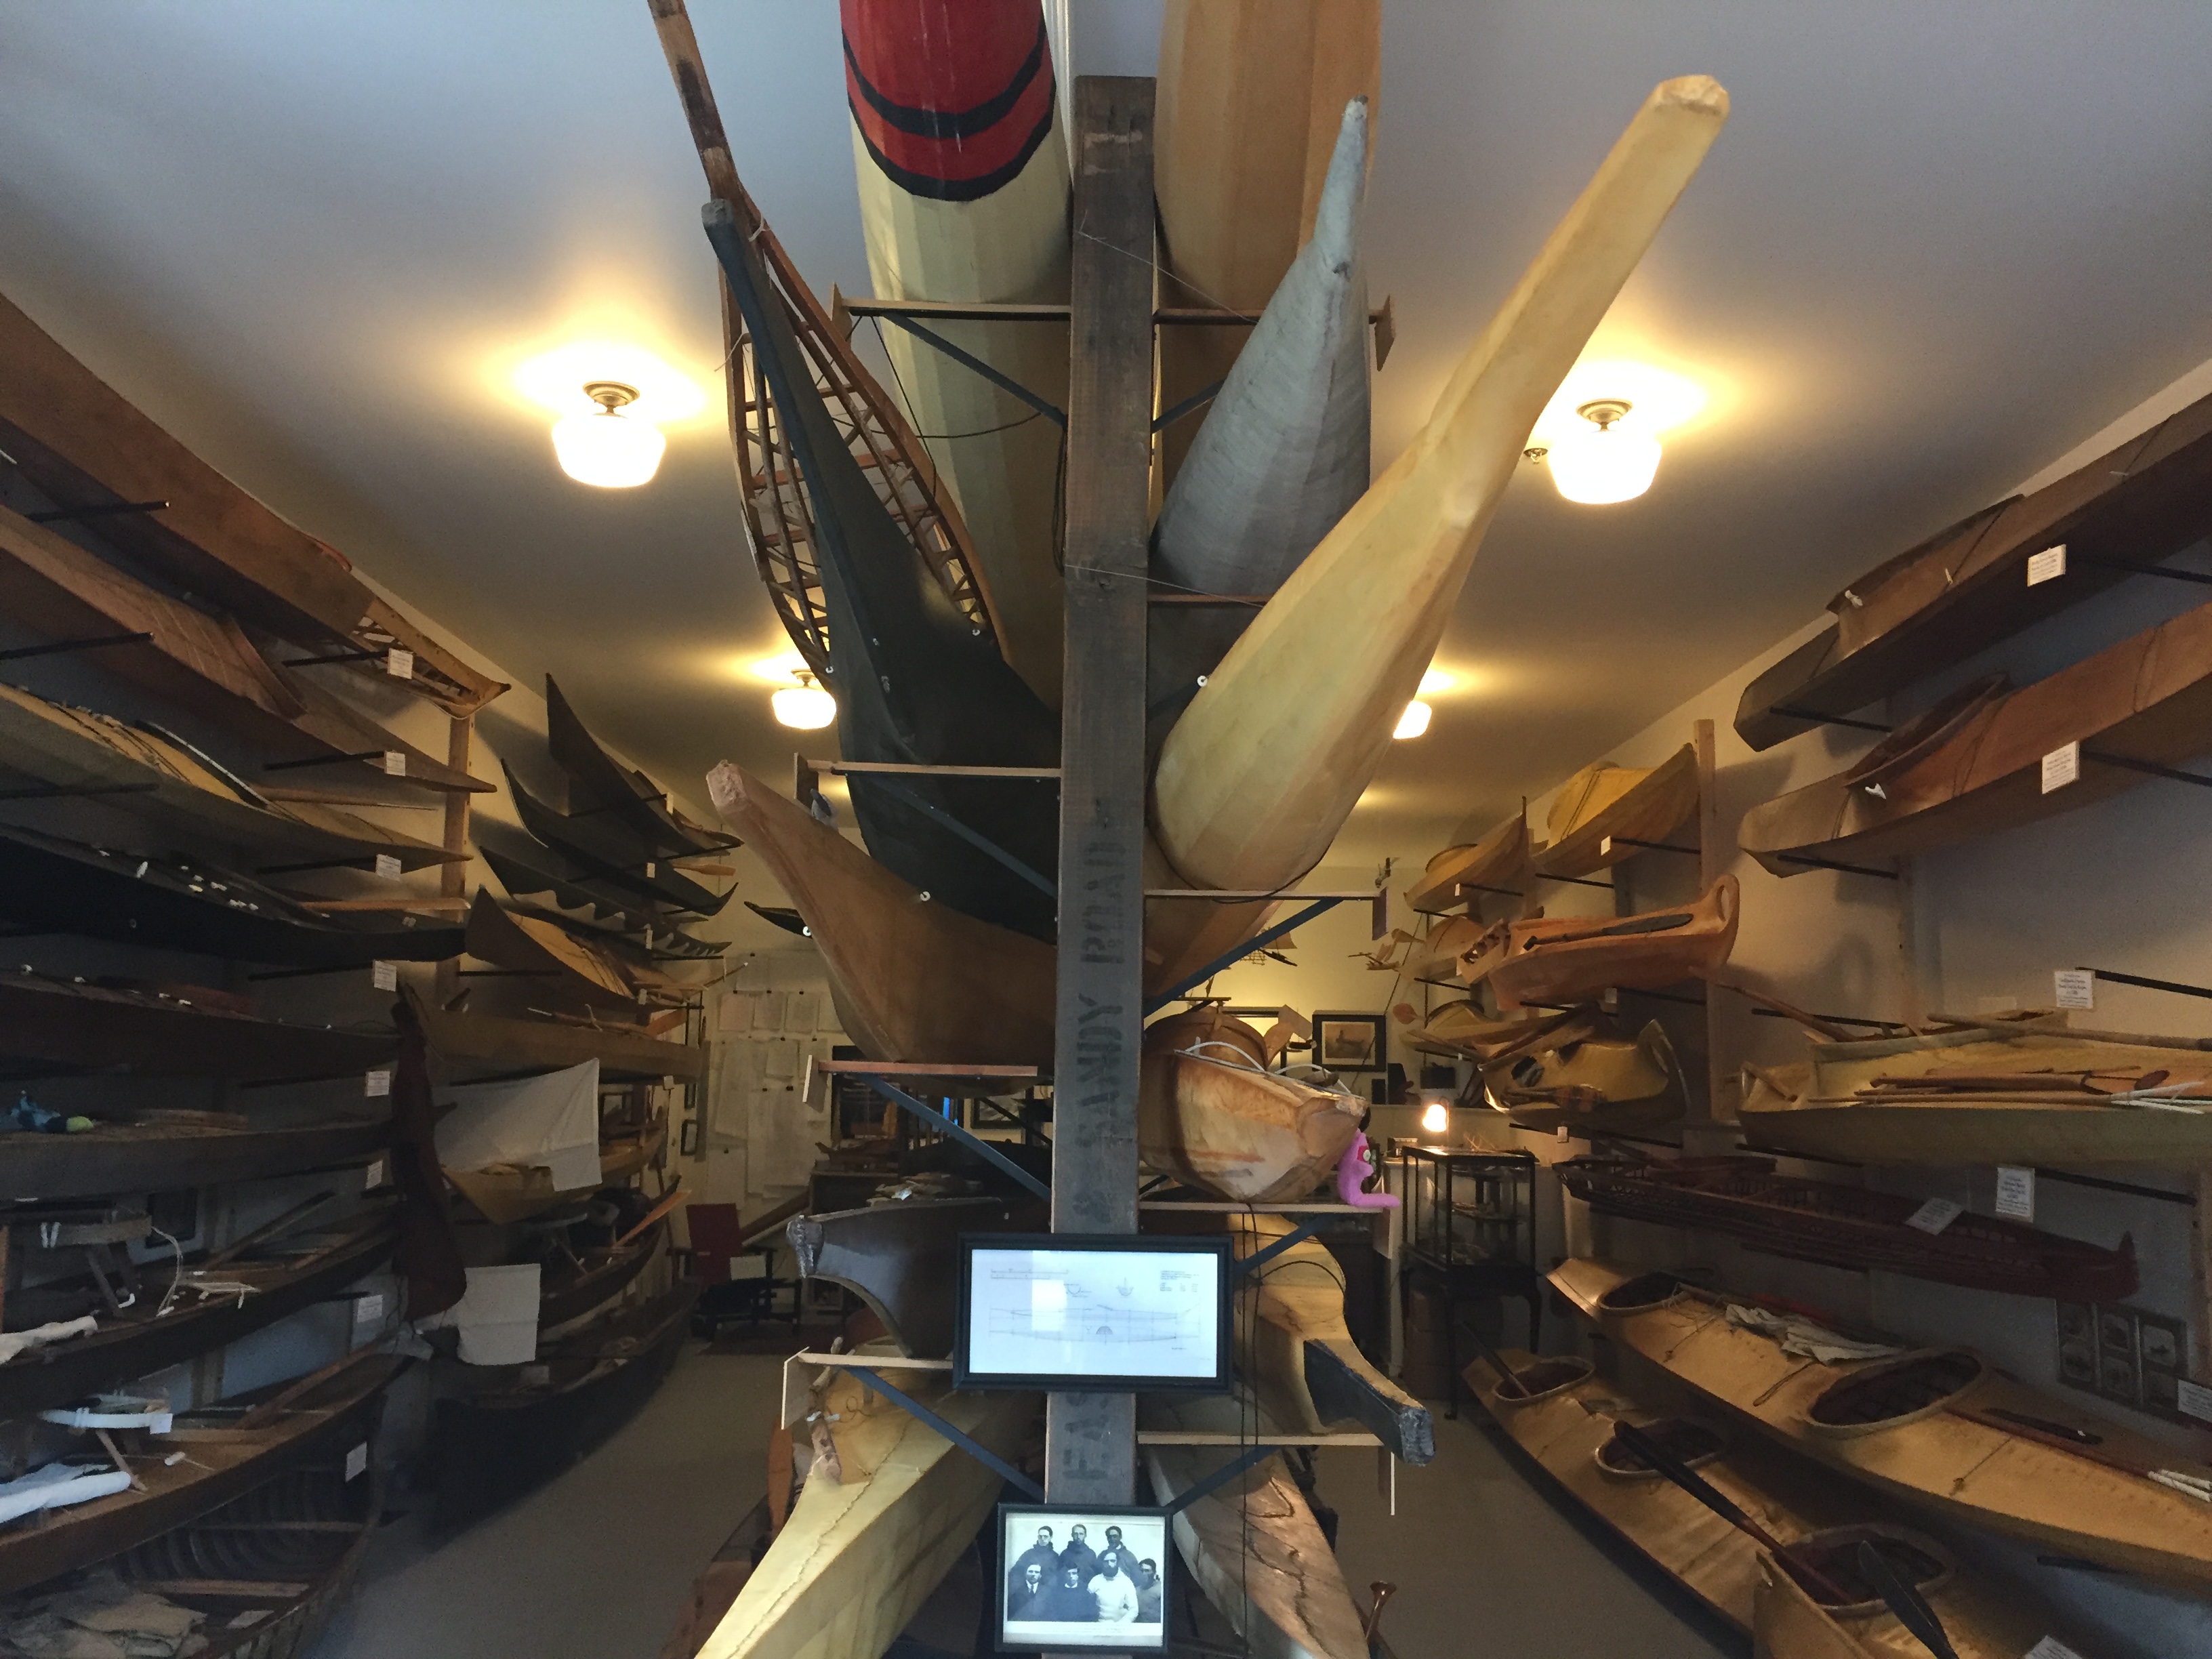
Visit to a Kayak Museum in Portland
I read about a supposedly gem of a kayak museum in Portland maybe 18 months ago. Hmmm… Skin on frame kayaks… A museum… Huge collection… Quirky hours… Hmmm….
After a little inter-web research, I found that the Lincoln Street Kayak and Canoe Museum is the work of one man, Harvey Golden, and the collection is made up mostly of boats that he has hand built after surveying traditional native boats all over the world. I was in!
Mr. Golden uses the museum as a repository for his boat collection and as the home of his publishing house, White House Grocery Press. The museum is open to the public here and there as he is in the office and has set hours from 5-7 on Wednesdays. Knowing all that, I was almost vibrating to get a peek at his boats and paddles. I had stopped by the museum a couple of times when visiting Portland, but the timing was always off and I was never in town during the posted open time Wednesday afternoons. I was going going to be in The Rose City for a long holiday weekend and sent Mr. Golden an e-mail asking if he might, by chance, be around when I was in the city and to my great surprise, he got right back to me and agreed to let me stop by one Tuesday morning – I brought him a coffee when I showed up at the planned 10:00 on the dot.
His collection of boats, paddles, gear, accessories, and models is amazing – as are his books on the subject of kayaks. Here is the kicker though and why I am spending some time discussing a specific museum visit: he was amazingly generous with his time and spent over an hour and a half with me to explain the collection, bits & bobs, details, accessories, etc… I really, really appreciated it. His generosity of time is not something I see a lot of these days.
If you are into kayaks or boats in general, stop by the free museum and take a look at his books as well. I am about 70 pages into the super-detailed and annotated Kayaks of Alaska and want to build them ALL…


Film Friday – Recycling Sawdust and Wood Chips
I spent last weekend in Portland, Oregon and happened by a custom furniture shop downtown called The Joinery. The workmanship of their wares was terrific and the sales staff was really accommodating. They knew I wasn’t going to buy any of their very nice pieces and yet still explained their ethos and process, details of the builds, and even let me wonder around taking a couple of pictures. If Mid-Century to Japanese Fusion to 21st Century Modern is your thing and you are as allergic to IKEA pressed wood crap furniture as I am, them look them up and see if they have a piece of furniture that you have to have to fill that void in your living-room/soul.
Aside from their furniture, they had a display of pressed hardwood sawdust pucks – making furniture produces some waste and normally this sawdust goes to landfills or in my case, used for mulch and compost roughage. Their display piqued my interest and I started asking questions. The Joinery and like establishments produce exponentially more sawdust than my little shop does, so their way of dealing with it is that they have invested in a sawdust briquette press that makes these hardwood hockey-puck-ish sized briquettes that are burned in pellet stoves, regular wood stoves, or fireplace inserts to provide heat. There is no glue or bonding agent used, just pressure from a hydraulic ram-press keeps the pucks together. The shop goes a little beyond expectation though and GIVES THEM AWAY FOR FREE to the public at their other sales location and workshop (48th and Woodstock in Portland). I can’t even tell you how happy it makes me to see a company do this. The shear fact that this is part of their business model makes me want to buy a small occasional table or some such item just to support what they are doing.
I am so turned on by this that I am looking into a small briquette press for my shop. The ROI time for the model that meets the size/cost requiremnet for me (a UK made press, a couple of Chinese machines, and one Canadian model) would be like 2 years for my limited use, but it would be worth it to me as there is only so much mulch that I and my neighbors can use. I would like to use the briquettes for some house heat and to heat the shop and green house in the winter, giving away what I didn’t use. Stay tuned for updates in my hunt and go by The Joinery’s website of shop and support them if you can.
Film Friday – The Garage Build Film Part 2
Below is Part 2 of a 3-Part series documenting our garage/shop build. Like Part 1, this film is made from pictures taken during the build with a voice over commentary. Part-3 will be a mix of videos, stills, and some drone shots.
There is a “hidden track” at the end…
Film Friday – The Garage Build Film Part 1
I’ve had a number of people on various web forums, 6 sets of neighbors, a few friends, and a ton of folks in our area ask me some detailed questions about our garage build: size, foundation, demo, siding, wiring, roof, the car lift, etc… As I have been making some videos while rehabbing the hip, I thought that I would turn my garage build into a three part YouTube series to answer most of the questions and have all of the information documented in one spot. The first one is done and up now and the second should be done in a few weeks.
This one and the next are from pictures taken during the build, with a voice over. The third will be a mix of videos, stills and some drone shots. I learn something every single time I put a video or slide show together, so my hope is they get more and more watchable.
I didn’t have the time or facilities to do it in this video, but I would like to use my own guitar, banjo, ukulele, fiddle, and mandolin picking for the soundtrack on future videos. My son, brother-in-law, and any friends I can con into it will also be future soundtrack contributors.
Film Friday – Baidarka (Skin on frame Aleut kayak) build movie
With the hip related bed rest, I have had some time to catch up on some film-making and finally finished this little slideshow film documenting the entire process of a 9-day father/son traditional kayak build that I blogged about this past summer. The next build will be either a small motorboat or a wood-strip cedar canoe.
Let me know if you have any questions about the video.