Link to the red storage bins he uses are here and Kaizen foam as well
Tag: Tools
A Walk-in Closet for My Wife
As part of the now 10 month rehab, remodel, rebuild of our house my wife wanted some space to hang her clothes and put her shoes and boots that was not an afterthought. A place that, for once was not crammed or disorganized and was purpose built. It was decided that we turn a small bedroom/office into a walk-in closet.
I sketched out a few ideas in my notebook and went over them with her. She removed a large shoe rack and opted for more clothes bar space. She also wanted a bunch of drawers to store smaller stuff in. I initially drew everything with a built in dresser, but changed it a little and made room for a free-standing French dresser made in Revel in the 1930’s that we acquired while living in Toulouse. There is 27 feet of linear hanging space using iron pipe (no sag), 24+ shoe cubbies, shelves, drawers, storage, and two full length mirrors.
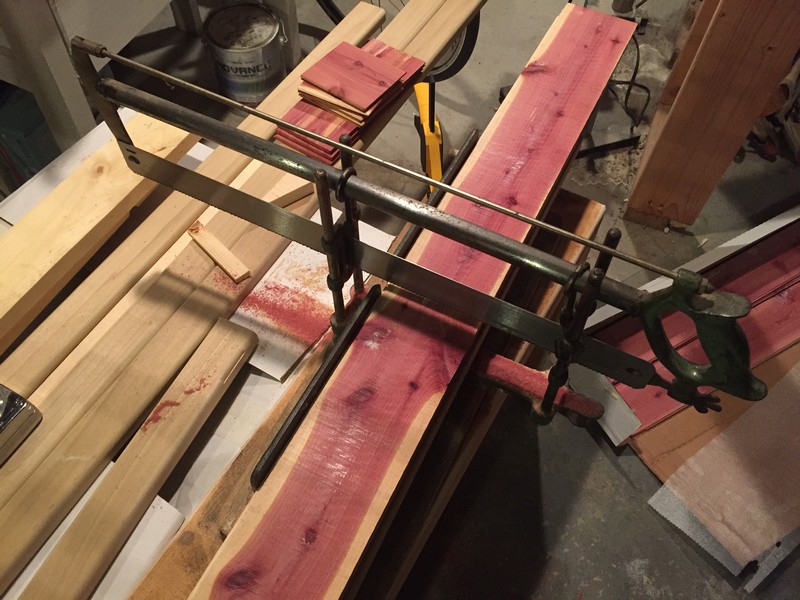
I spent most of this past weekend getting the flat panel section dividers up, installing the clothes bars and adding top shelves. There are three areas that are made for off-season storage: coats in the summers/short sleeves in the winter. For these spaces, I decided to line one wall each with cedar. While some people might line the whole closet with cedar, I would advise against it unless you and your significant other wants to smell like a lumberjack constantly. Too much and the smell, while pleasing for me, pervades everything.
I lined two of the three spaces this weekend and got to use my old-school hand miter saw. While manual, it is faster to use in the closet – no dragging in a stand and cords and creates a LOT less dust than my big power Bosch miter saw.
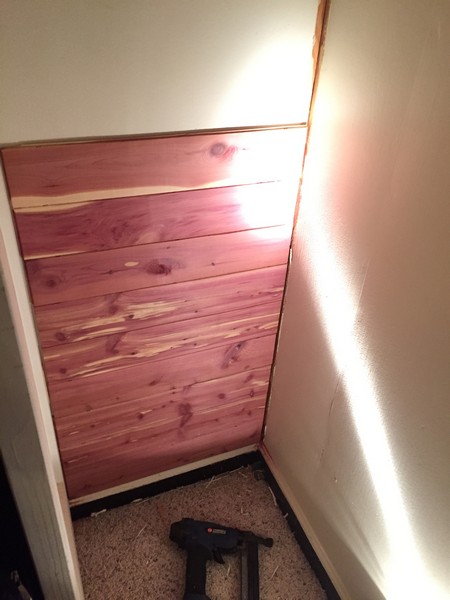
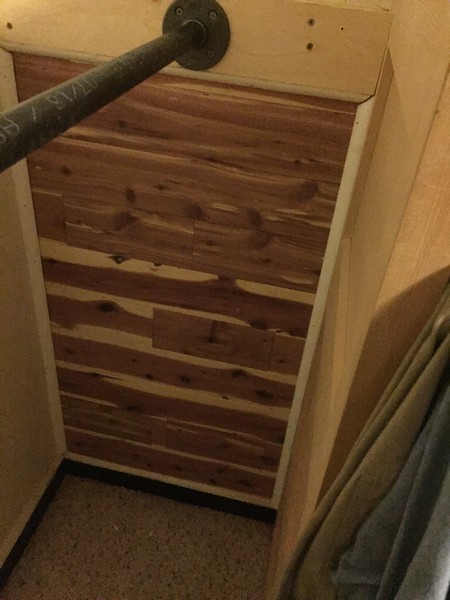
I still need to add shelving on one side, put up all of the upper and lower panel trim, fill my nail holes, sand, paint, and bring the dresser in, but the space is usable and has allowed us to unpack all the boxes that have sat in our bedroom full of clothes. I will take the clothes back out on the day that I sand and paint.
Here is the progress to this point:


Using My Dad’s Tools
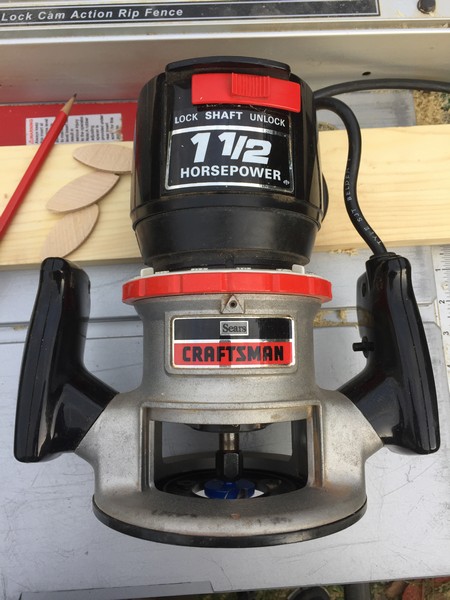
In 1982 or 1983 my dad made me a ball, bat, and glove rack for Christmas. I was super into baseball and it was cool to have your gear up on the wall ready and waiting for you to be able to grab it all and run out the door to a game at a moments notice. Getting the pocket for the ball cut correctly and rounding over all the edges and corners took him forever. He decided that he HAD to have a router and for that same Christmas, my mom bought him a Craftsman 1-1/2 HP, Model #315.17492 Double Insulated router. He was as happy as a puppy with a new bone and looked for stuff to round over, “ease the edge…” everywhere in our lives for months. He was so proud of that router and for years a wood project around the house wasn’t complete until it had been kissed by a 1/4′ shank bit, whirling at 25,000 RPM.
When my dad passed, I got all his tools and the router was part of the deal. I have used it for years and while it is a little funky to adjust and has a base that isn’t perfectly round, it still does a fine job of “easing the edge” on shelves and cabinets. For the most part I use a 1/2 or 3/4 round-over bit in it and use my trim router for 1/4 and 1/8 round overs. Technology has much improved since the early ’80s and I have other routers to do fancy stuff these days but, Daddy’s still gets used a good bit.
I few years ago I had a garage break-in and a bunch of tools were stolen. I lost a lot of Daddy’s wrenches, power tools, my grandfather’s chisels, all sorts of stuff, but the big funky router happened to be in the basement where I had left it sitting for weeks on a long undone project. I am thankful it didn’t end up in a pawnshop somewhere and I am still able to use it to do a little work and connect with my dad, all these years later, just by using the router that he so badly wanted. I used Daddy’s router today, while building a walk-in closet for my wife. I thought about my dad, his smile, his quiet manner, and his patient love for his small son.
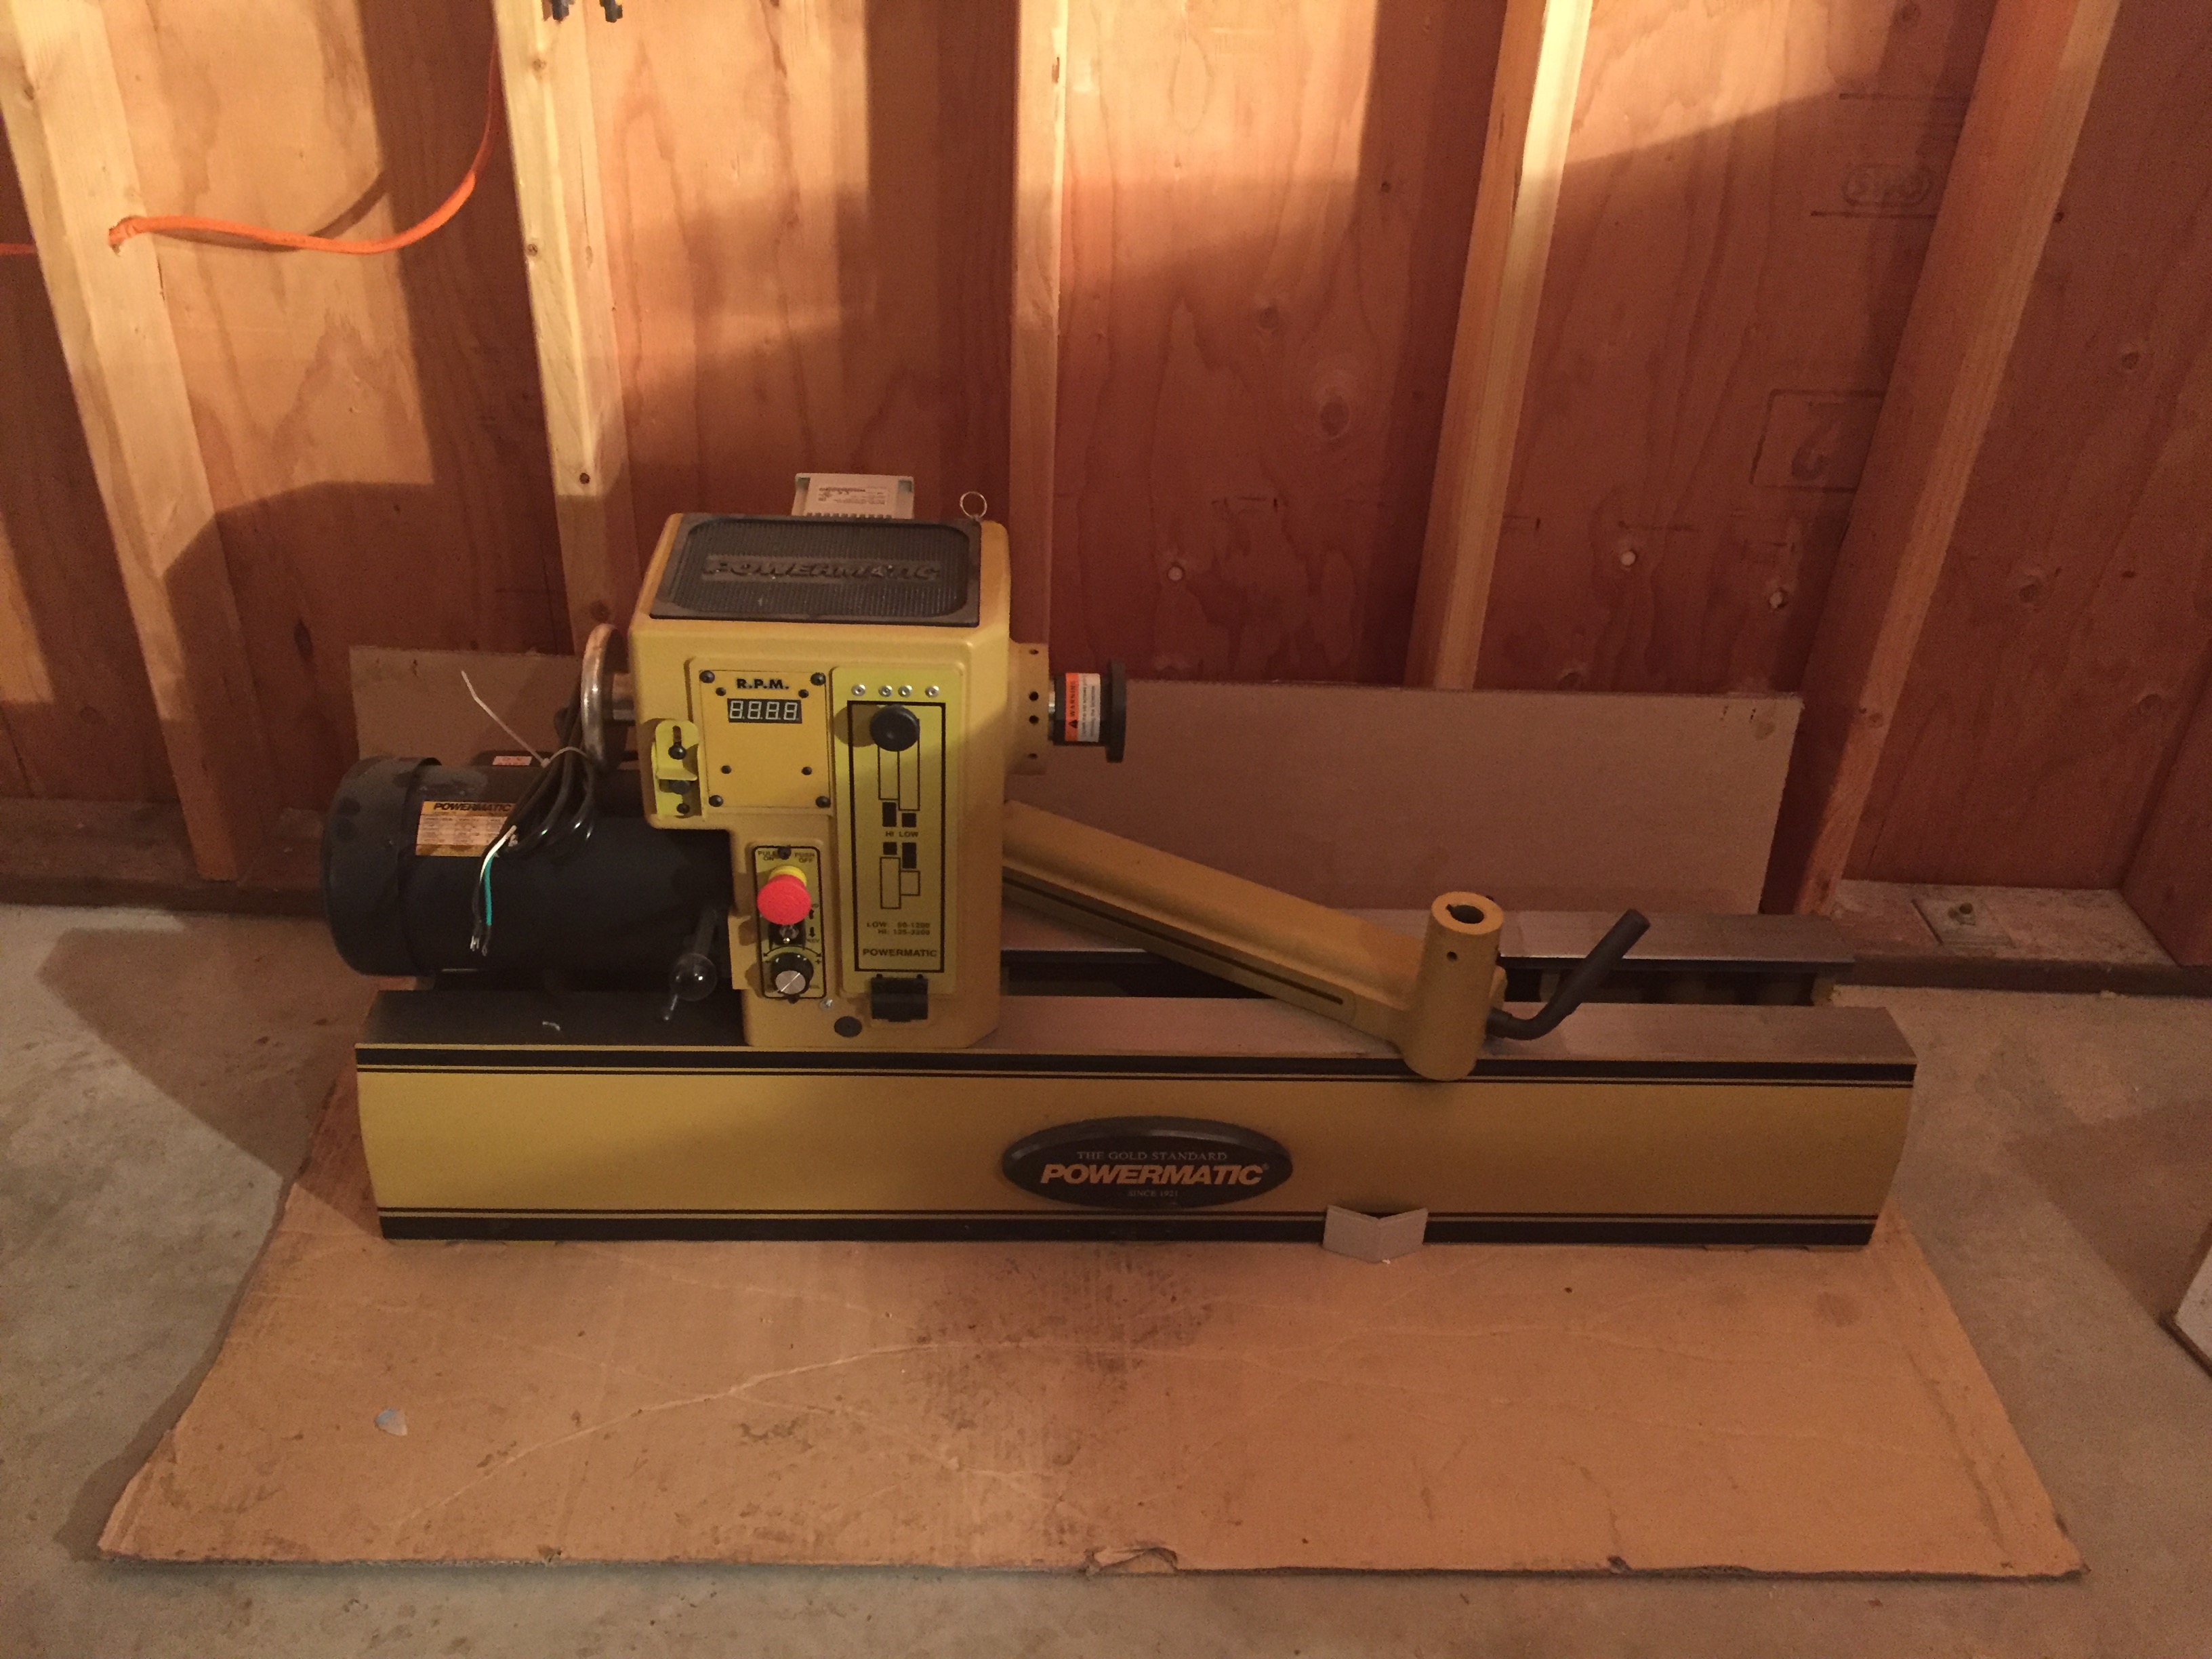
New yellow Mustard-Monster Lathe up and running
When building The F-Bomb Garage, I bought some new tools in which to fill it. One of those hunks of iron delight was a Powermatic PM3520b wood lathe with a bed extension and lots of accessories. It was a replacement for the three lathes of varying sizes I had sold before the original garage was torn down. I didn’t have the room or desire to store equipment that I wanted to upgrade anyway. The new lathe had been boxed up for 4 months waiting for me to clear some room, unpack boxes, and for the power to be hooked up.
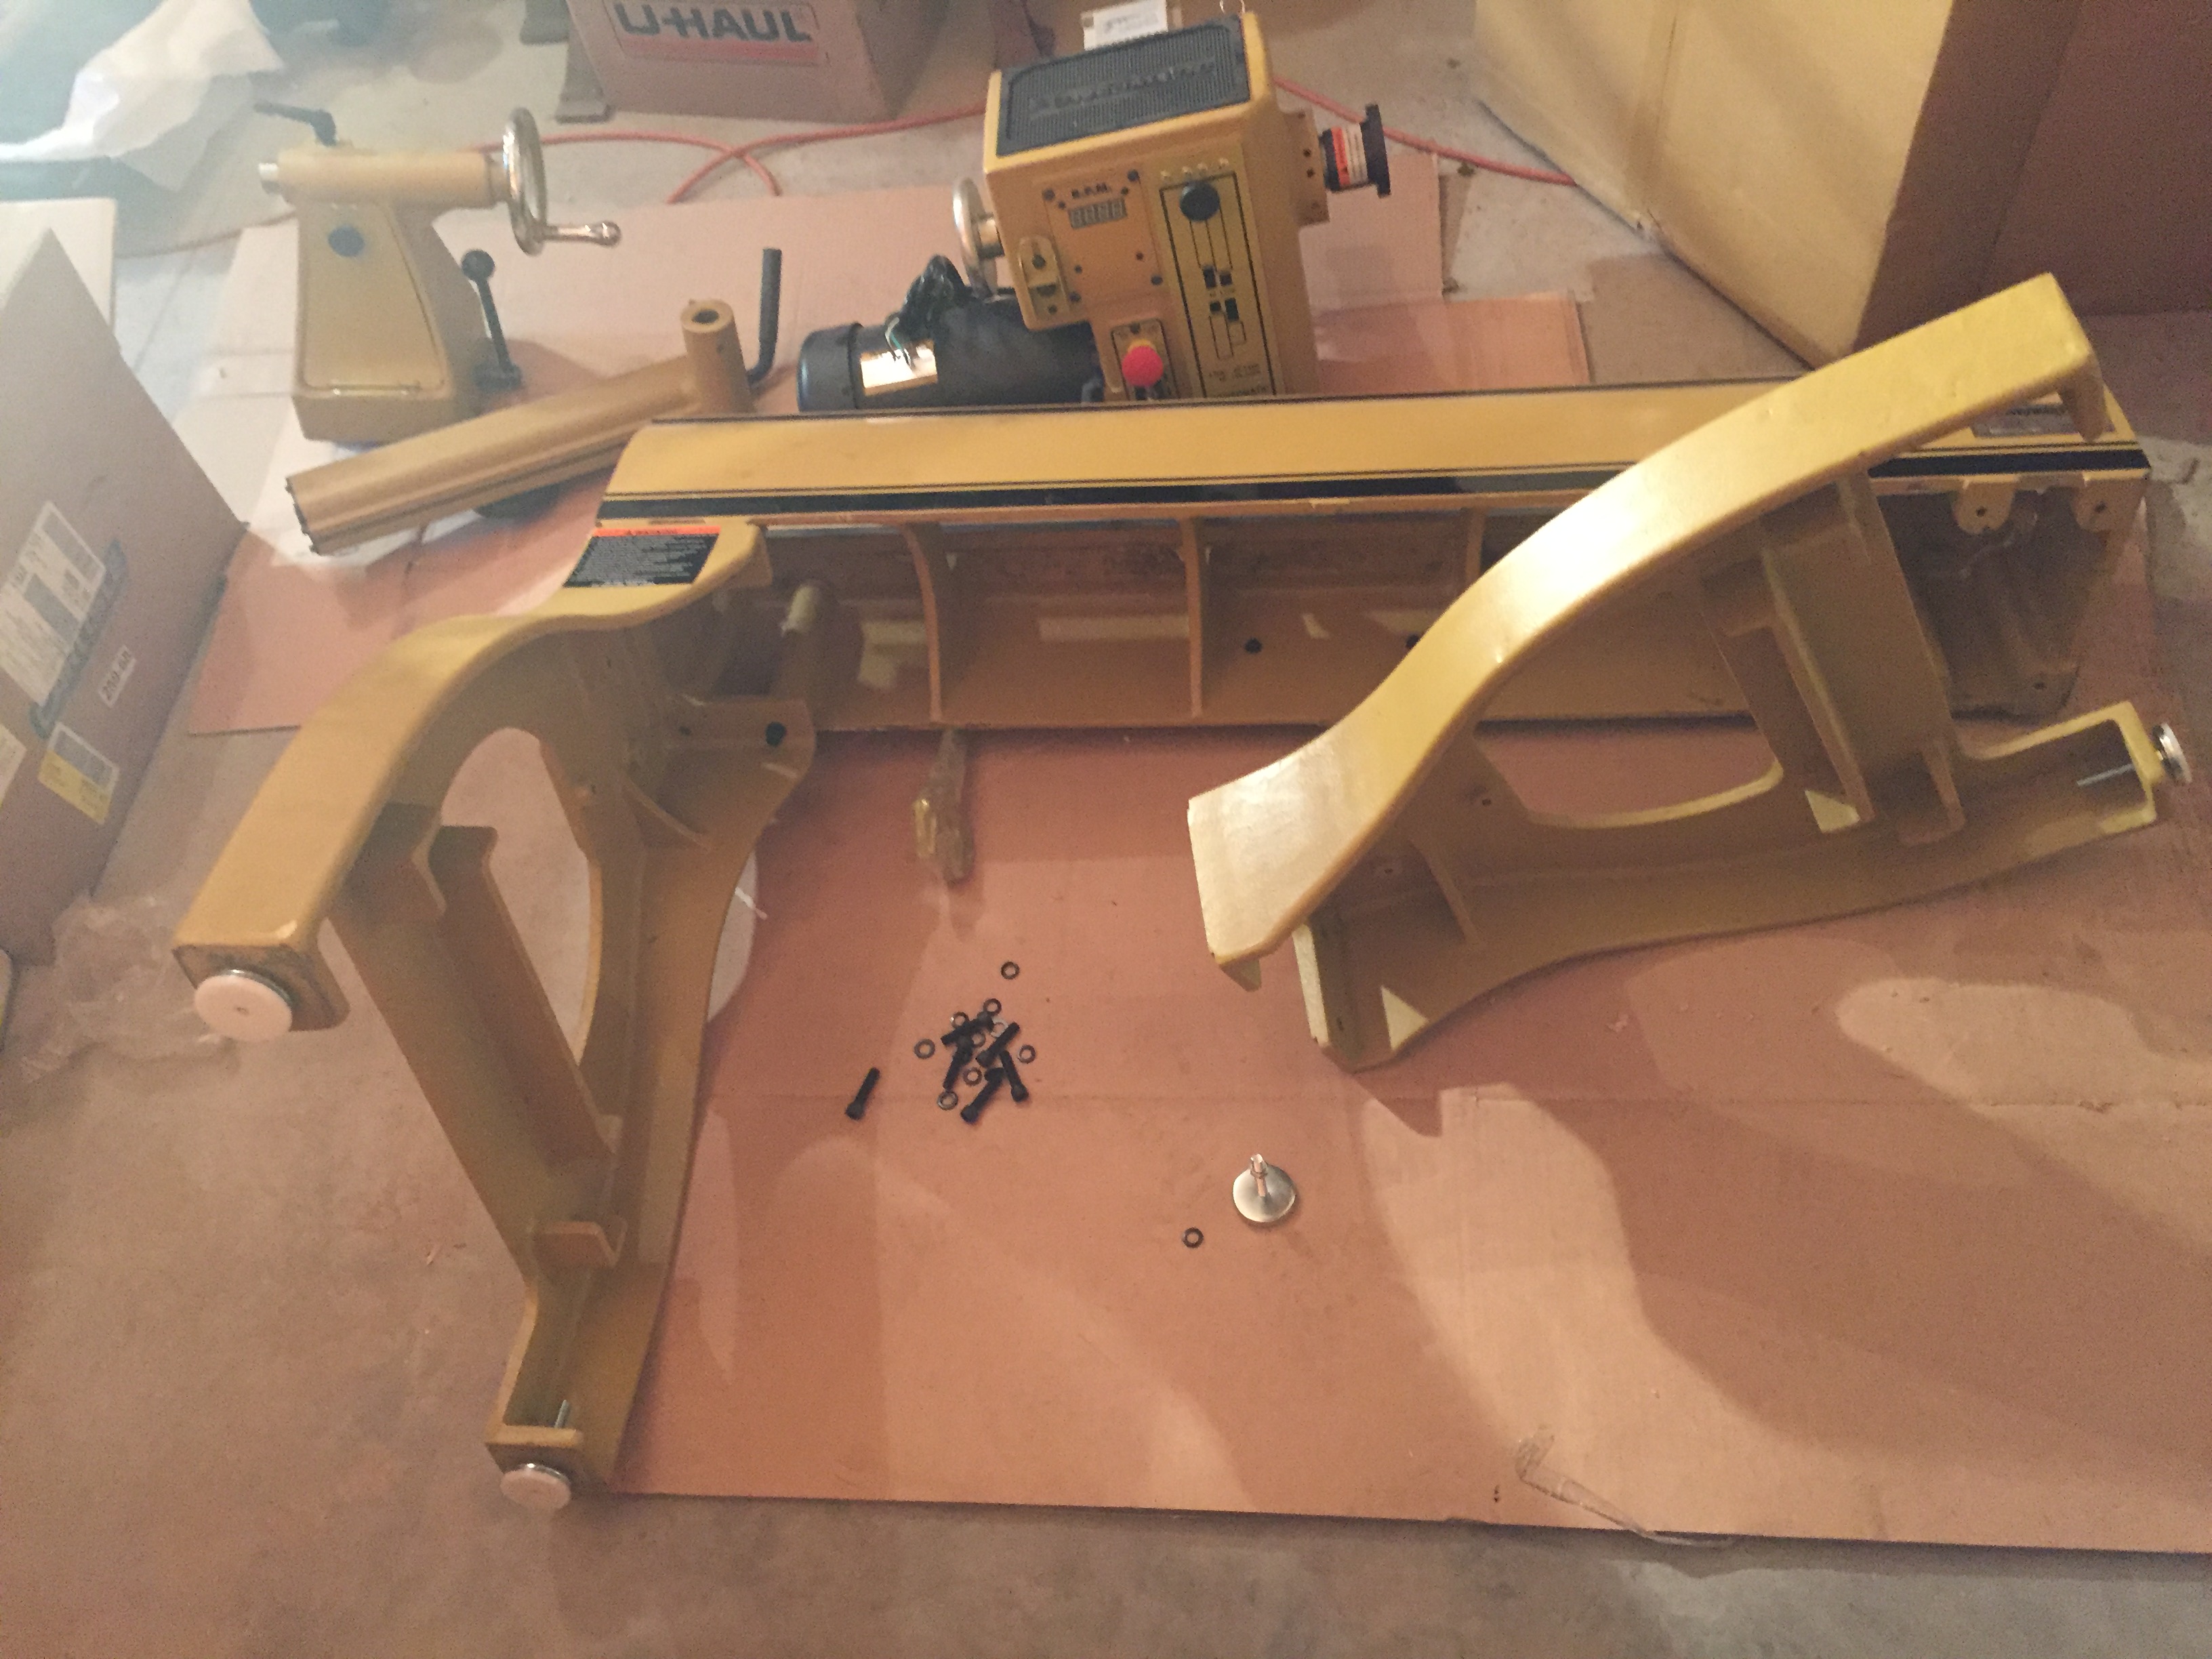
I spent all of Saturday afternoon, the weekend after power was finally turned on, putting together my sweet lathe. The thing is a beast, so I had to start out with the bed upside down and install the legs. I carefully rolled it on its side after all the leg bolts were torqued down and girded up my loins for some heavy lifting. Now, what I should of done was hook a block and tackle to the rafters and pulled it up right, but I am hard-headed, so I put on wrist straps and dead-lifted the bed onto a 2′ wood block. Then, after psyching myself up a little, I lifted it the rest of the way vertical. If my sweet wife would have caught me, she would have said dirty words and i would have been in serious – grounded form the shop – trouble.
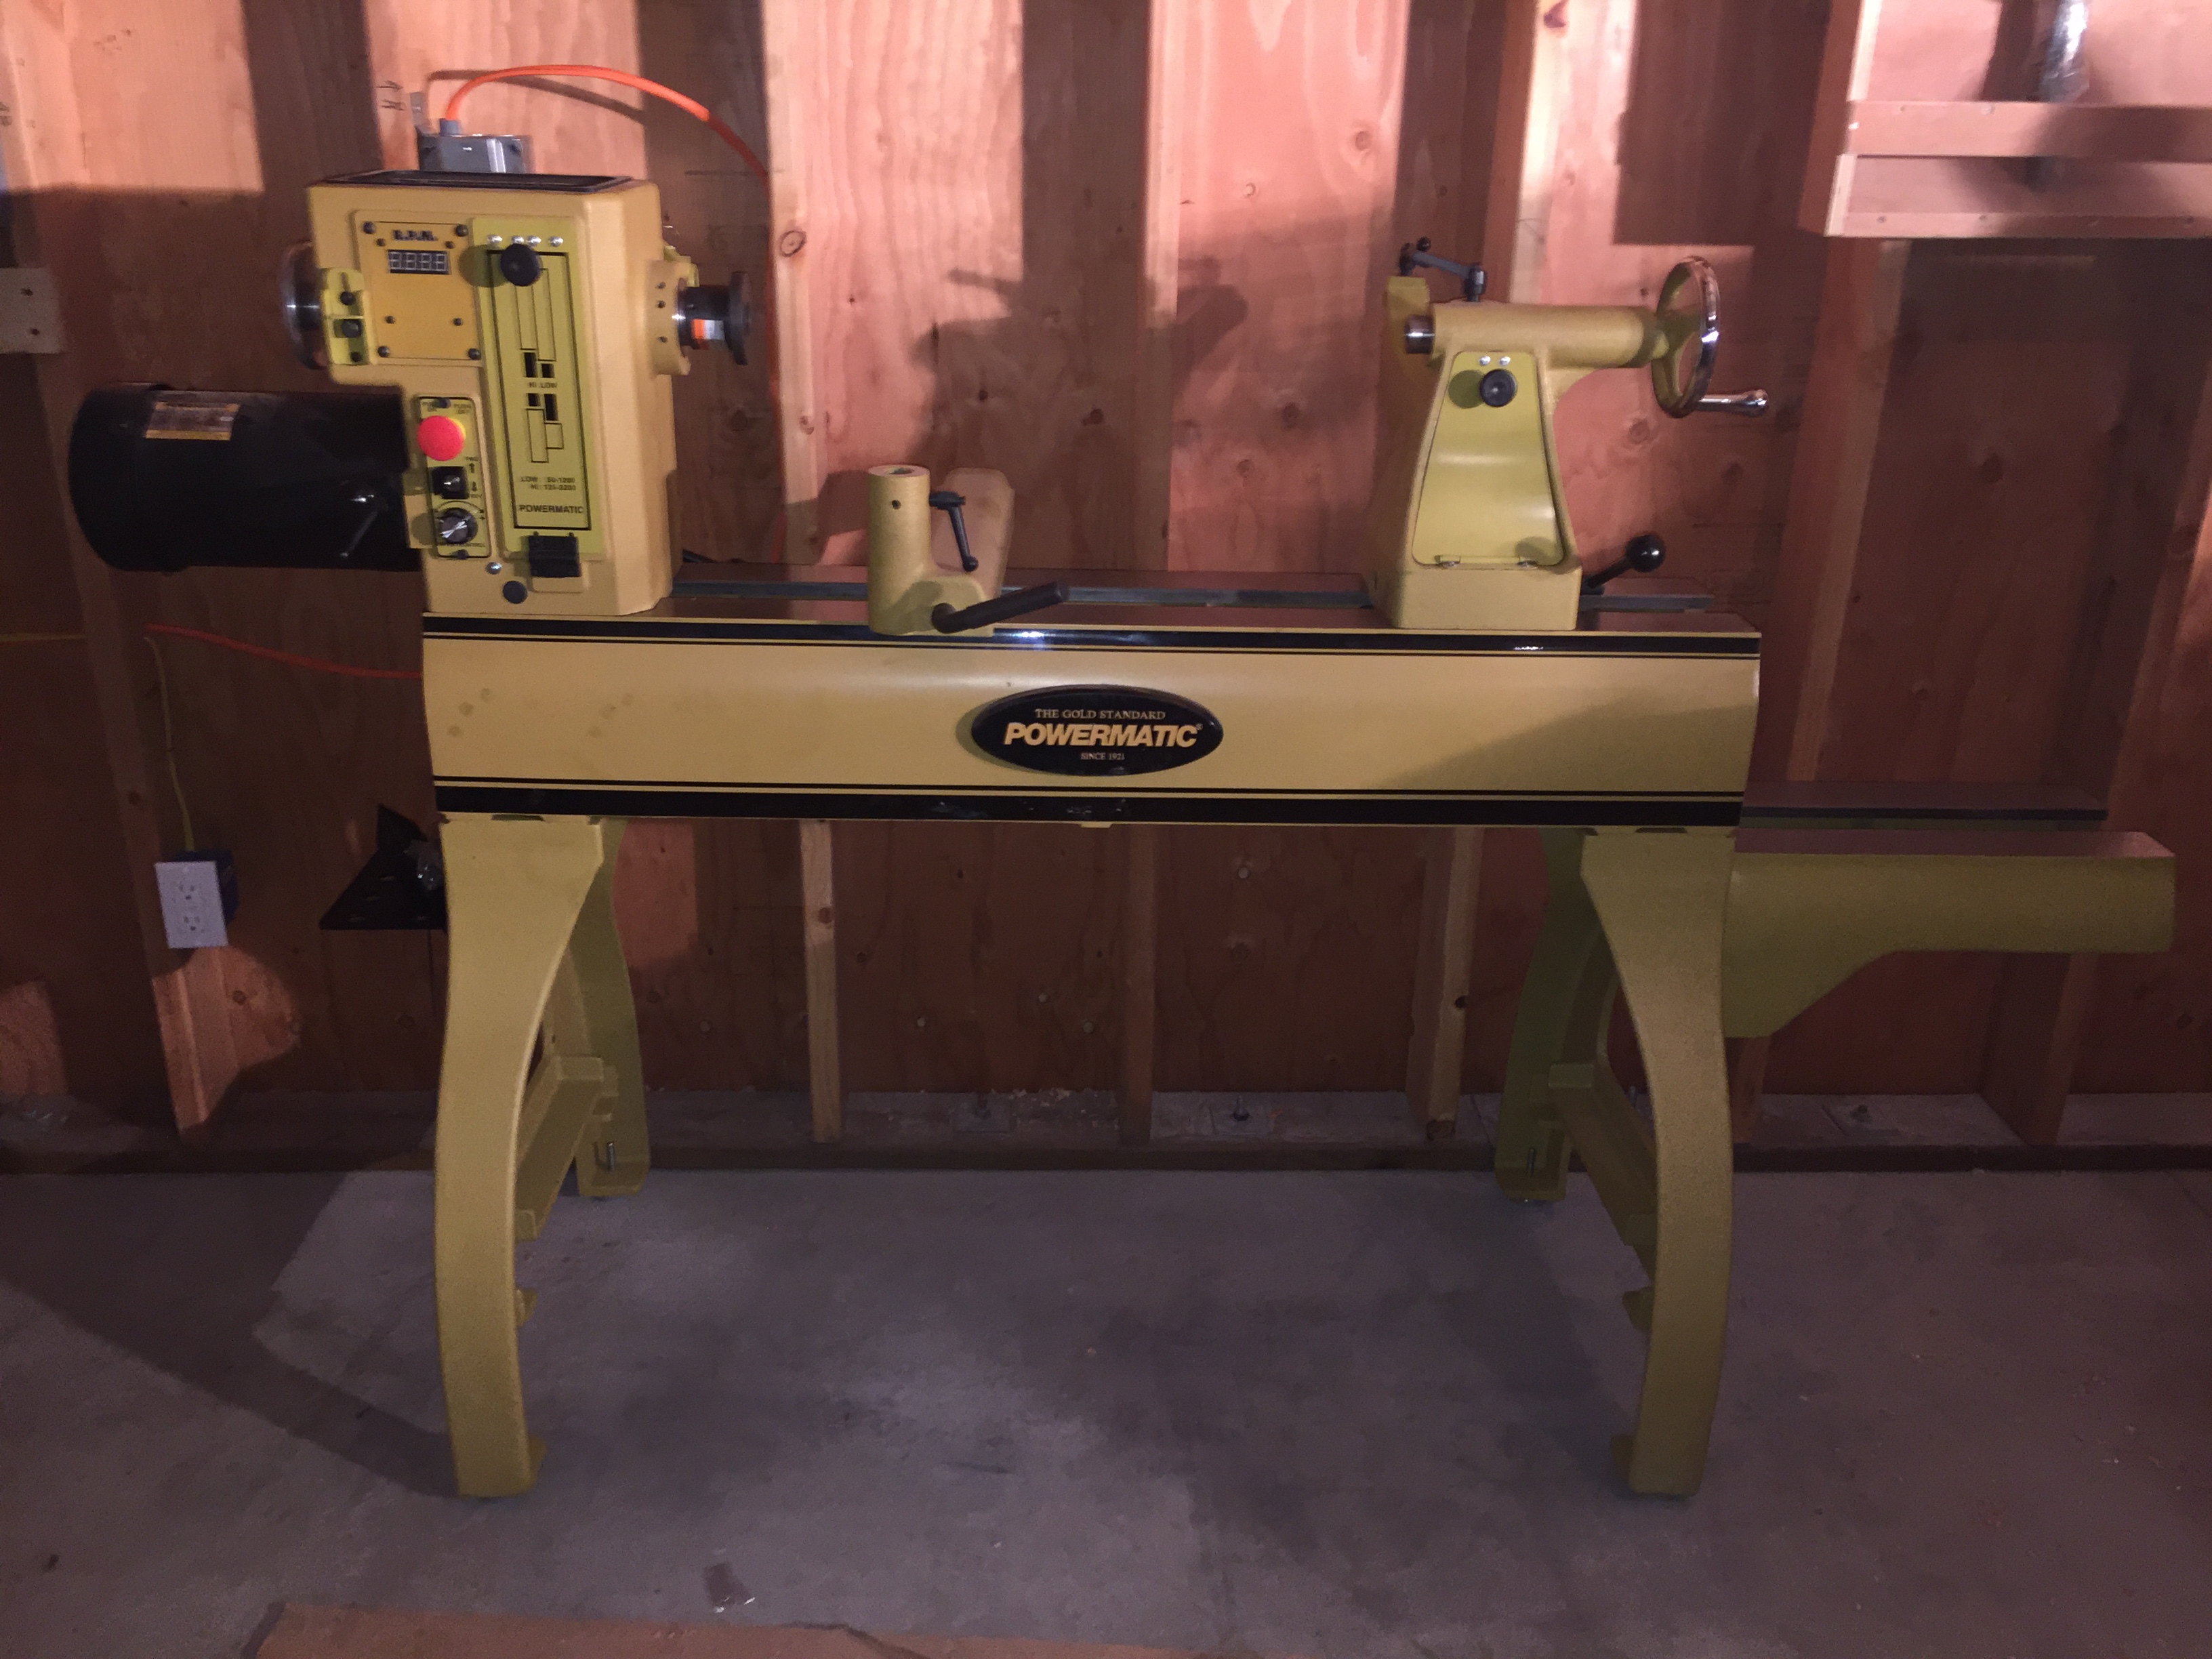
Anyway, after the base was upright, the head-stock/motor, banjo (tool rest holder), and tail-stock went on. I installed the 18″ bed extension while I was at it and made sure to check everything over one more time.
It is 710lbs of mustard-yellow sexy.


We Have LIGHTS!!!
HOLY Bejesus… I have Electricity in the F-Bomb Garage!! Only 4 months after permit pulled and 9 months after garage build began. I have lights that are not hooked up to an extension cord, the auto door openers work, there are five 110VAC plugs ready for power tools, and my lift is now working without the aid of a 220VAC extension cord running from the drier plug in the basement of the house.
I just had the bare minimum done to get the panel and transfer switch in place and have the city sign off on the garage. Now, that is not to say that all is well in the electrical department: I am still waiting for final permit sign off for the work already done, which is on hold. Apparently, my electrician screwed up the wire routing in the meter box and SCL cannot install a meter. Thankfully they are letting me keep the lights on until my current electrician can come back and address.
I am now prepping in all the other 110 plugs myself – at 4′ high, putting in 2 additional 220 plugs and a 50amp plug for my welder. There is no way I am going to pay an hourly fee to have romex run, holes drilled, staples put in, and plugs & switches wired in. Nope. I will be paying electrician that my company contracts for industrial work to sign off on my install and run the lines into the panel and install breakers – already arranged and the price isn’t too bad at all. While I can do this in my sleep, I am not licensed and my insurance would not pay a dime is something happened, regardless of fault.


Additionally, My J-O-B was getting rid of a huge organizer bin cabinet: 1/8″ steel, 72″X24″X84″ and 350+ lbs. There was no way I was going to watch that beast go to the recycling center, so I asked if I could have it. Yep, the facilities guy said “load it up” and btw “I have a pallet jack that is wonky if you want it…” Yes, please. Got them both home and the cabinet fits perfectly and will be amazing for climbing, boarding, camping gear organization – keeping all the shop dust and debris off of my gear and making it so I don’t have to dig for small parts ever again.
The pallet jack was low on hydraulic fluid. I filled it up, put a weighted pallet on it overnight and this morning I found the pallet still in the air and no fluid on the floor. Win-win.

Film Friday – Forging Double Feature
Hand Tool Tuesday – First Post
Last week, I was a little off for two days – a pissed off sort of sad. I thought I had left my hammer out while fence building and it had walked away with someone else. I found it Thursday evening in the garage and I almost did a little jig. This hammer is special to me: I bought it brand new and shinny when I was 12 because my dad said ‘Estwing was the best’ long before they were in Big Box stores and when you had to drive to a particular store in town to buy them. I think it was like $26 and I paid part of the total with rolls of dimes and nickels.
I used it to build my first wall, lay sub-floor, hang countless pictures, install everything from siding to cabinets to trim to roof trusses. It has fed me and my children. I have other hammers including a matching 16oz trim hammer and 4 blue elastomer handled Estwings, but this one has been my constant companion for 30 years and will out live me. Maybe my children or grandchildren will use and appreciate it and think of me when I am gone.
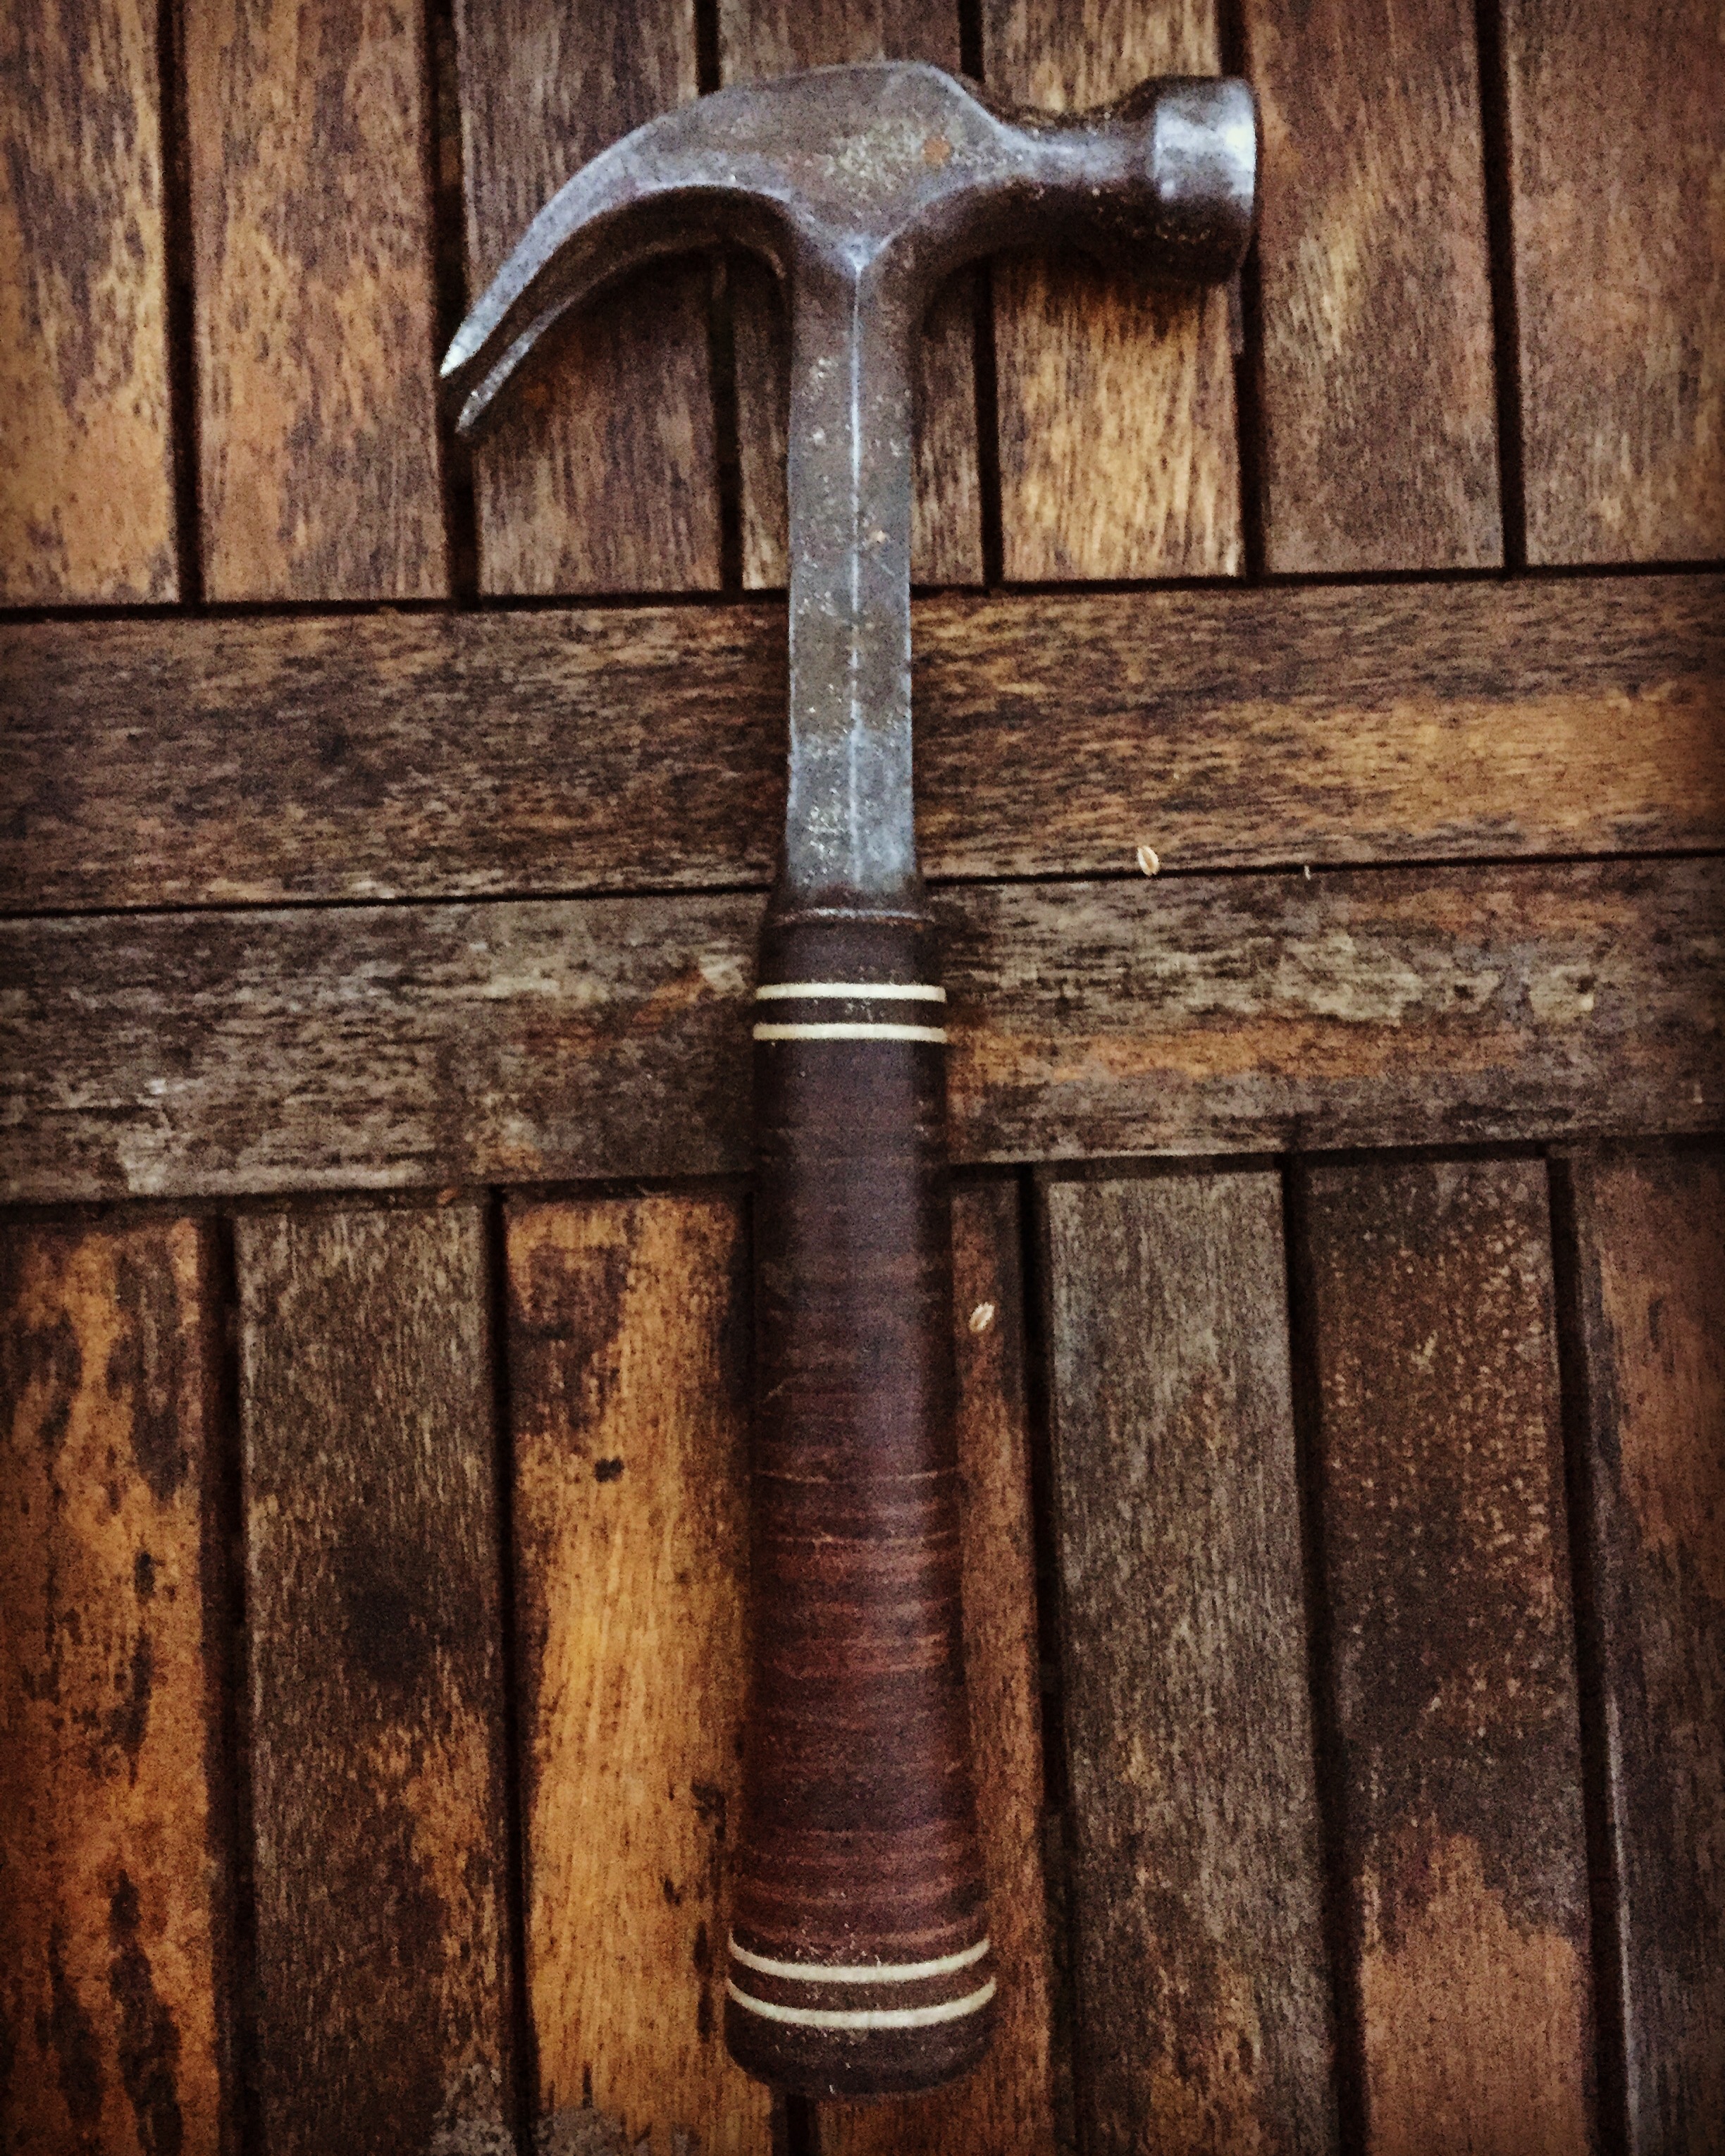
There was a book written in 1990 called “The Things They Carried” by Tim O’Brien. It is fictionalized account of one man’s experience in during the war in Vietnam told in part as a discussion about what he and his companions carried with them. I read it in college and it changed my perception and appreciation for the often mundane things we carry in our pockets, in our bags, and out tool belts. Those simple objects often come to have powerful associations and meaning for us. I have decided to start a new weekly post covering the tools and things that I share my day and life with.
Painting The F-Bomb Garage
The Garage build is coming along. Still waiting for Seattle City Light to connect the power from the transformer. 5 weeks now…Delay has been just a factor of this build. I would have more patience with City Light if one of their crews hadn’t been sitting at a bikini coffee stand for 30+ minutes on Monday while I was eating a late lunch across the street. I like boobs and bikinis and coffee even more than the average bear, but come on – don’t tell tell everybody how swamped your crews are if they have time to have a philosophical discussion with a nearly naked barista…
(For those of you not in the PacNW – bikini coffee here is a thing and some stands are really open to the definition of what a bikini is – an eye patch and pasties are the rule and some stands.)
I can’t continue with the interior wiring until that connection happens and the electrical inspection is OKed. No insulation or drywall/T1-11 until it get the “OK to Cover” from the electric inspector. I am not one to sit on my butt, so I wheeled out the airless spray rig for the first time in like forever and put two coats of quality Benjamin Moore paint on the outside of the garage – matches the house. I will paint the doors and trim this weekend.

Birthday list – 2016
In about 4 weeks I will celebrate the 14th anniversary of my 29th year. I want cake (moist yellow cake with chocolate butter-cream frosting), snuggling, two fingers of a great scotch after lunch, lots of tiny cups of coffee all day, a nice glass of wine with a steak for dinner, laughter, and a few well thought out gifts. I will not be working that day and I plan to pamper myself with a haircut and a strait-razor shave.
Below is my birthday wish list for my wife, family and children.
Gifts that Keep giving:
- Heifer International:
- Doctors Without Borders/MSF
- Go give blood and send me a post card
- Habitat for Humanity
- Diabetes Research
Books:
Campaign Furniture by Chris Schwartz
Theodore Roosevelt: A Strenous Life
I could stand a Kindle Paperwhite
A volume on handplanes or a tome on traditional woodworking
Bees of the World by Mitchner
A Lost Art Press volume of The Essential Woodworker
Washington: A Life by Ron Chernow
James Krenov’s Cabinet Maker’s Notebook
Two Classic books on Shaker Furniture: here and here.
Stuff:
Forging class at the Pratt starting in October
Letters from my kids – written on actual paper.
A 3-Day Rally School Course
A bottle of Pre-Shave Oil from The Art of Shaving – Lavender
A couple of thoughtful cards
The iWatch 2. Simple black – the cheapest one
German Wheat Beer is always welcome
Zombie shooting targets
An Ash Pack Basket (Sling-style harness)
Amber 2ga. Plugs (bonus points if they have insect inclusions)
2ga. Dark Jade plugs
The AKcooltools Stainless/bronze Clamptite and the lg roll of stainless .041 wire
24 Provence lavender plants for my front yard
Tiffany blue silk tie and matching pocket square
These new bad-ass cufflinks
A Global Sashimi knife
Classic Cartoon DVDs (Wanrner Bros., Tex Avery, Bugs, Tom&Jerry, Loony Toons, Road Runner, etc…)
Christopher Ward Quartz Trident with black rubber strap
Booze:
A fine Anejo Tequila
Hakushu 12 Whisky
A bottle of Fronsac or Canon-Fronsac (Château Lafond, Château La Vieille Cure, La Dalphine…)
Jack Daniel’s Tennessee Honey
Porto (Cálem 2011 Vintage, Ramos Pinto, or a Taylor’s)
Glenfiddich 21
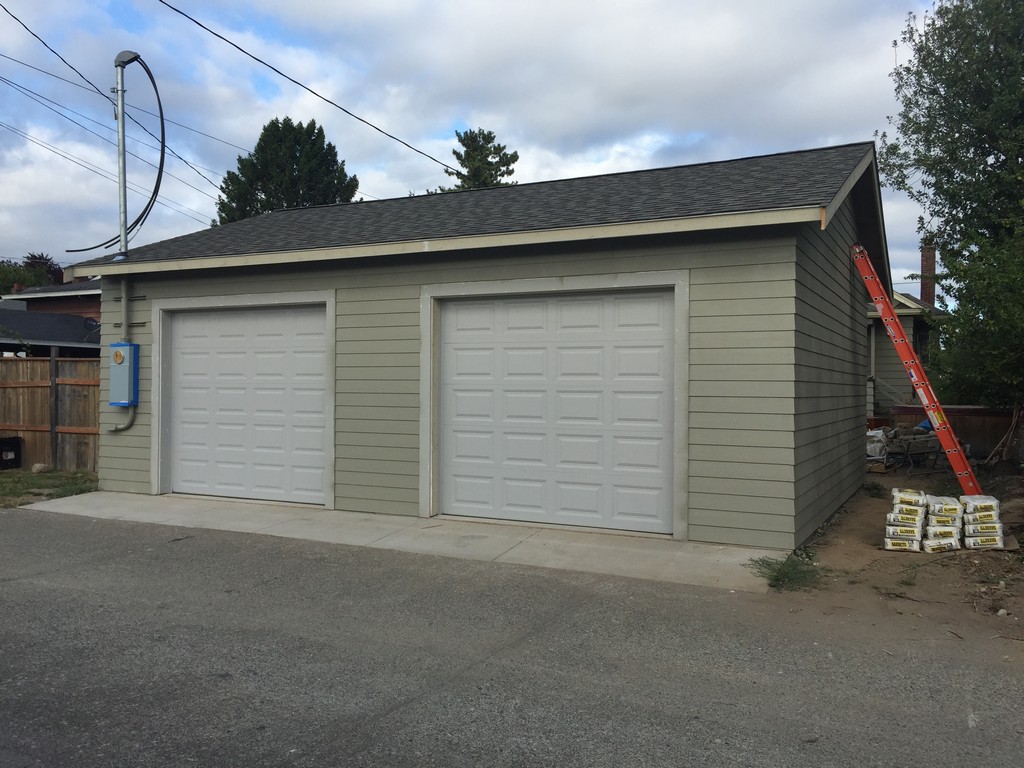
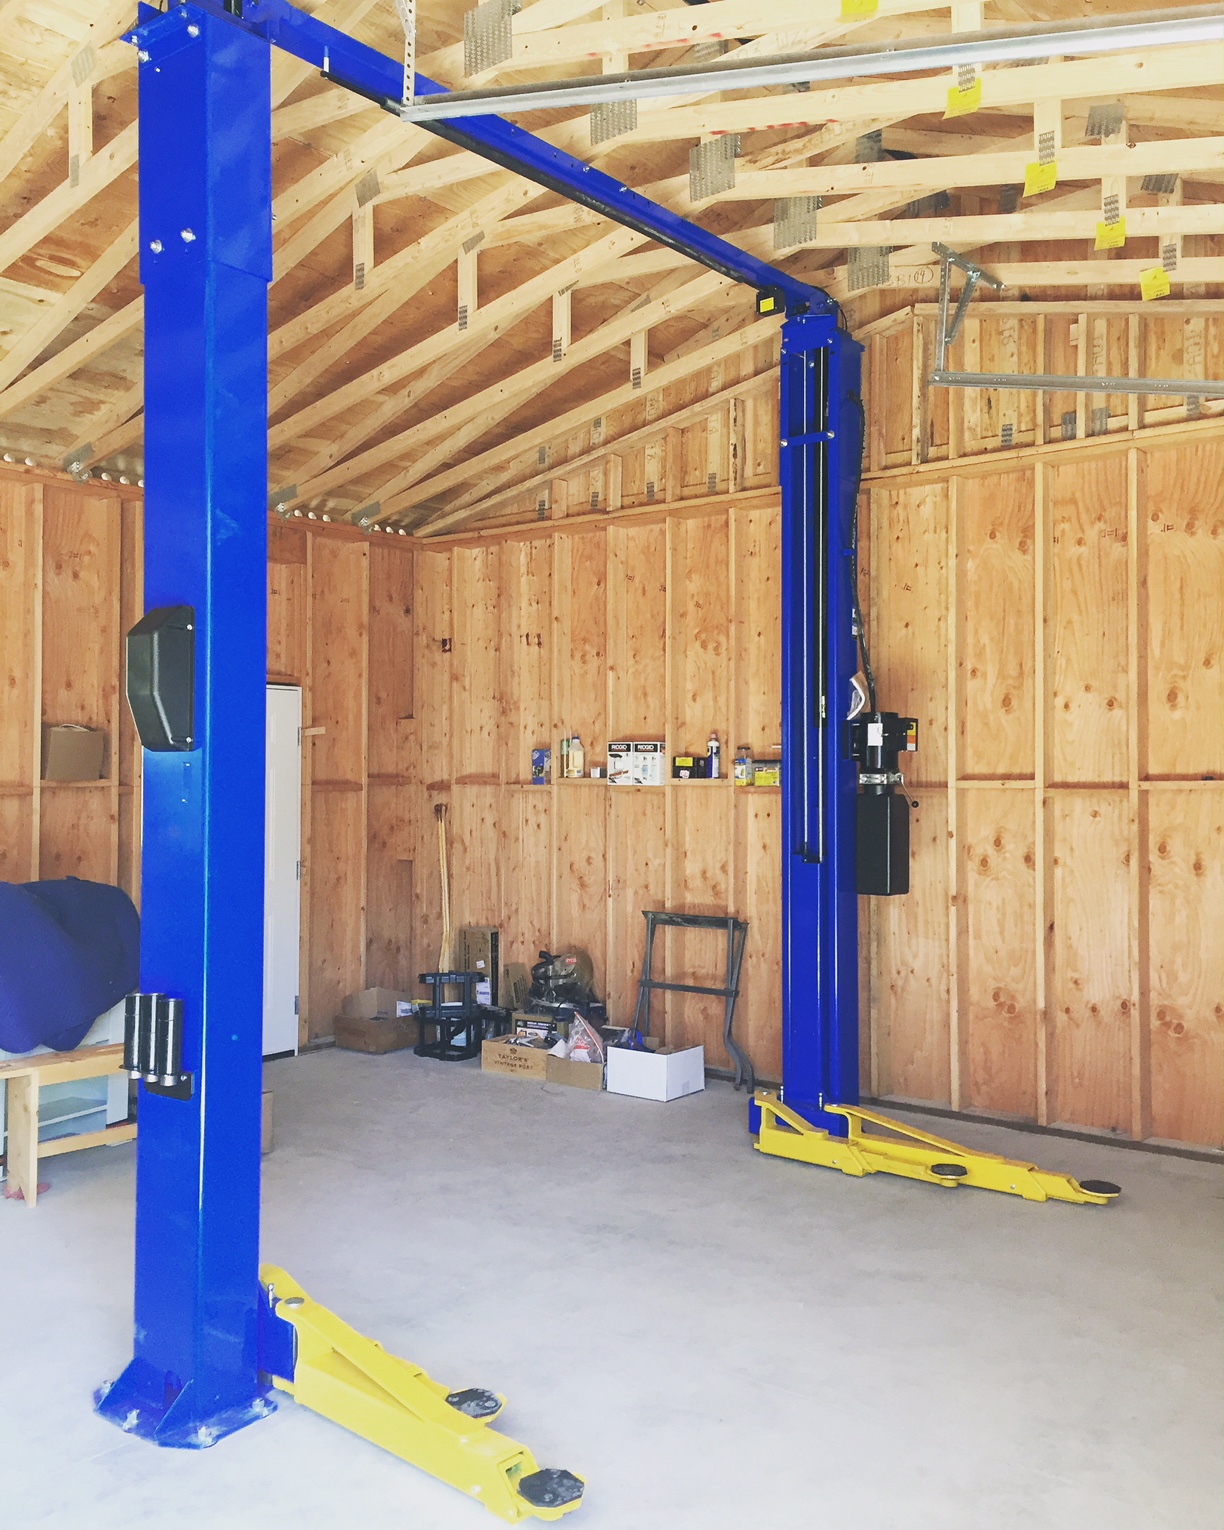
The F-Bomb Garage completion is getting closer!
I was out of town this past week on a work trip to merry ol’ England. I came home to a sweet surprise: I have a new 10,000lb two-post lift installed in the F-Bomb Garage. I got a decent deal on a . Went with the Rotary Revolution RPT10 because there is a local dealer, local support, I got a decent deal on the lift+install, and some experience that some friends and colleagues have had with this and other lifts.
We are getting closer to finally building some stuff inside/voiding warranties/modifying the jeep. My contractor had a foreman out last week to deal with the framing punch-list items: a couple of anchor bolts, some trim, loose siding, a funky corner, and I had him re-install my three windows with the proper flashing tape – I could see light in all the corners. A leaky window after I have stressed the importance of proper installation and showed them what I needed twice would throw me into fits. He also swapped the door trim, but not everything on the list got done and now there is more stuff that needs attention. I have the contractor stopping by to go over it all tonight. Very frustrating to spend this sort of cash and to deal with all the little things over and over.
The electrician is 3 weeks out – everyone is building and remodeling in Seattle and contractors are super swamped, so I am going to concentrate on the outside in the mean time: Paint and gutters as soon as the siding issues are dealt with.


The F-Bomb Garage Lives!!
My garage/shop now has a name, but first: Story Time.
I have agonized over what to call it since the early planning stages began almost 3 years ago: The Place Warranties Go to Die, The Jeep Warren, The Briar Patch, The Shiznit Garage, My Little ADHD Shed, etc…
I was out on the slab one night a few weeks ago moving around the poly-burlab curing cover, the boards holding it down, and rearranging the soaker hoses when I smacked myself in the side of the head with a wet 2X6 – really f’n hard, right behind the temple. I saw stars and staggered around holding the side of my head saying F%$#!! loudly, over & over in a machine gun staccato manner. It was all that would come out. This scene may have just lasted a few seconds or more than a minute – the timeline is a little fuzzy. My sweet wife, Stamps-With-Foot, did not see the initial head strike, just my wobbling around and apparent sudden affliction of turrets. I stumbled in the kitchen door a few minutes later and she said over her shoulder while standing at the sink: “I am sure the neighbors will be glad when your little playhouse is built so they will not have to listen to all the dropping of F-Bombs…” I was about to take gross offence to her characterization of physical culmination of my fabrication dreams as a “little playhouse” when I realized that she had provided the perfect name: The F-Bomb Garage.
I have searched the Garage Forum and the Fabrication Forums that I frequent and no one has claimed it and I have found no others, so it is mine, I call it. I found a few stickers and images that I like for a logo, but I will be making my own to apply to projects, the Jeep, the Jeep Trailer, tool boxes, etc.


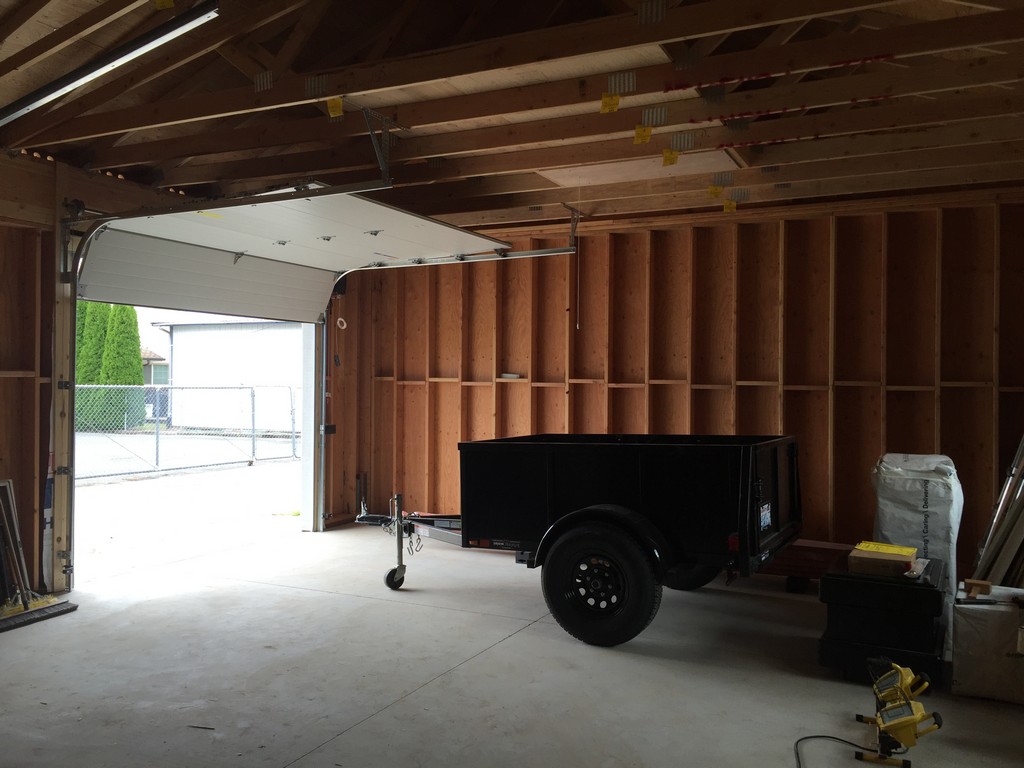
Jeep Trailer
I have been posting a LOT about our remodel and garage build in the last couple of months, so I thought I would mix it up and post something not remodel related – mostly not related…
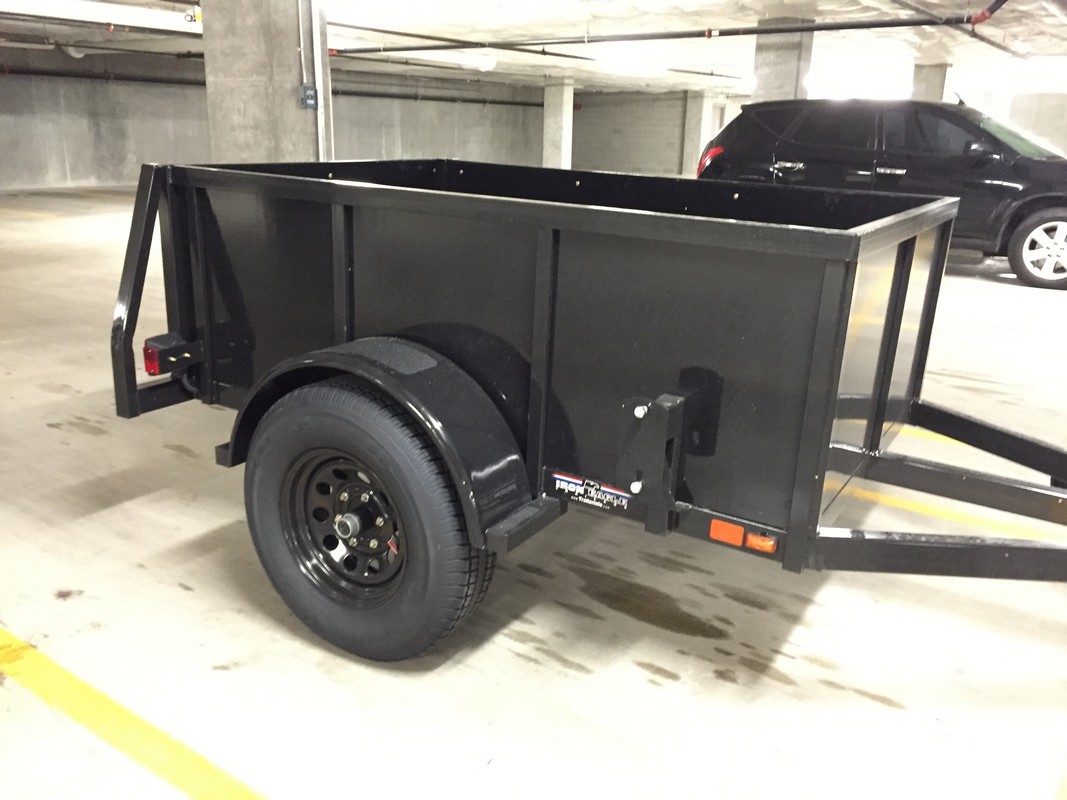
Simple and unassailable fact: A grown man needs access to a truck or a trailer. Since our move back to Seattle from France, I haven’t really had either and have been visiting U-haul for my hauling/dumping/moving/logistic needs, but that is getting both tedious and expensive. I finally bit the bullet and had a trailer made to match my CJ7 Jeep. I had it built because there wasn’t one available retail that matched what all I wanted to do with it – remodel work, hauling heavy loads of dirt and lawn debris, moving, climbing base camp set up, camping, SCA events, hauling firewood, etc. I also wanted a shorter and narrower trailer than the standard 5X8 utility trailer that you can find at the roadside truck and trailer dealers. I wanted it to both look good with the Jeep and I plan on hauling it places that a bigger trailer would be a hindrance so I took the opportunity to have a little customization done to get exactly what I want.
The specs for the new trailer are as follows:
- 4X6 tube steel frame with extended tongue
- Wheel base to match the Jeep’s so that it will track in the same ruts off-road
- 6 lug 225 wheels with grease zerts right on the hub
- Steel load-bearing fenders
- More ground clearance than the Jeep for dodging stumps and rocks on trails
- Long lasting LED brake and running lights
- Spare tire mount
- Treated wood bed with 6 D-Ring tie downs
- 3500lb rated axle, so I can load this thing up with dirt or concrete
- Black hardened acrylic paint to match the Jeep
- Swing rear gate that is also removable
- Welded lip for ramp mounts
- Swinging front wheel jack
- High replaceable wood sides to match the lines on the jeep.
- I will be adding:
- Uni-strut interior rails on the sides and bed.
- A triangular tongue tool/storage box.
- Three Jerry can holders for gas and water on the outside.
- One propane bottle holder for the grill/heater when camping
- Load-bearing torsion box cover
- Removable rack for carrying sheet goods and lumber
I used it the first day I owned it to haul some granite and paint for the bathroom and it will be full of doors and windows on Friday.


Project built for my truck – the one I sold 2+ years ago…
So this post is a little bit delayed. It has been sitting in my draft folder for almost three years. It may be time to publish it…
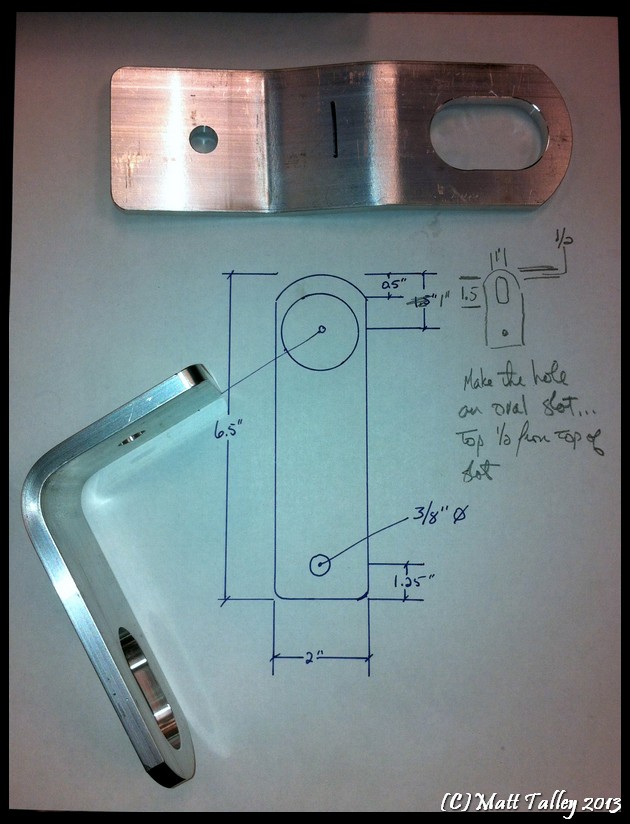
My 2011 Nissan truck had a very cool really system for holding gear in the back of the truck: an extruded aluminum track along the side rails and two in the bottom of the bed. They made sliding tie points for use on the rails that were great for some stuff, but I needed more to really strap a load down when hauling brush and debris to the dump. I looked at buying more from Nissan, but they wanted >$200 for the set of 4. No thank you! I did what any engineer would do: Designed my own and went into the machine shop and made a few prototypes out of aluminum scrap that was laying about.
I made one version with an offset bend for the side walls and the other with a 90 degree bend for use on the bed floor rails. I might change the latter a little as I found that while a standard small ratchet strap or rope had no effect on it, if I used a large ratcheting load strap, I could bend it.
I also found that the rails were the exact same dimension as commercial uni-strut (standardized formed metal structural system used in electrical, plumbing and HVAC installations for structural support). Parts are available at all the Big-Box home stores and I was able to pick up a bag of 10 threaded nut plates for ~$8.00 and 1/4″ hex-head bolts of various lengths for another $5.00. The prototypes worked so well that I made more and with my hold down solution and the OEM tie points, I could haul anything I really wanted and make sure it was securely fastened: Refrigerators, lumber, yard trimmings, fire wood, trash, you name it.
I added the side walls of a wooden shipping crate to my new truck bed system, bolted directly to the side rails using the uni-strut nut plates and then strapped over the whole load with 2″ straps. I found the installation took me 15 minutes from start to finish and it made dump and material runs super simple. It was even faster to remove and store in the garage so I didn’t drive around town like I worked for Sanford & Son.


I sold the truck in December of 2013, but I kept the OEM Nissan tie points as well as the ones I made. I will use them on my next truck, or possibly my next trailer. I will just install uni-strut on the sides and on the deck and I will make it that much more useful.
What I Want Thursday – Febuary 2016 Edition
Below are the things that I really want and that are present for me today:
More time with my children and family.
I want to stick to my diet and workout schedule and not fall off the wagon and back into the cookie/café Mocha/lethargic/big-belly/back-hurting abyss.
For the house remodel to be done
For my Garage build to be 100% and my new lift and tools installed and waiting for me.
Growler or two from West Seattle Brewing Co.
Letters – written on actual paper – from my kids.
A longboard skateboard
I could stand a new Kindle
A handsome tweed vest – or two
Brown Redwing Engineer’s boots
Huge antique pattern lathe found in a barn or a PM4224 with all the add-ons.
A pair of 1/2 round and a pair of Snipe Bill molding planes
A 1.75 – 3Hp SawStop Table Saw
One fine compound sliding miter saw
>8″ joiner/planer
A Grizzly G0752 Benchtop Lathe and G0801 Vertical Mill
Another one has left the nest…
I sold my midi lathe last week. It was the last one of 3 and I am now lathe-less. It made me more than a little sad. We made such cool shiznit together, but I am making room for the new shop build where I will have a huge 3HP gap-bed pattern lathe with +26″ swing ad huge bed. I won’t have a place to turn and have zero room left in storage. It was time to let it go to a good home and get many more years of use. That is a better life for a lathe then sitting is a dark storage room surrounded by boxes and plastic containers. It still makes me sad to both see it go and to not have another yet.
Getting a new garage in 2016!!!
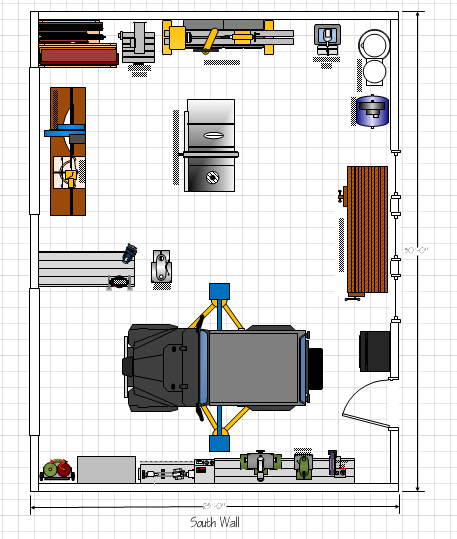
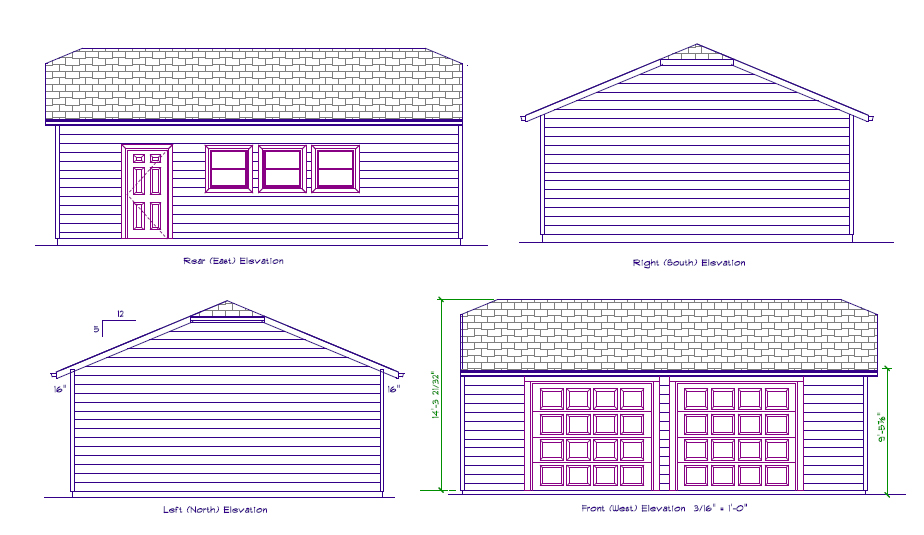
Woohoo!! It looks like we are a go for a new garage and some needed updates to our heat, plumbing, and wiring at the house. I am meeting our builder this weekend and passing him a check (two checks actually, one is for the City of Seattle permit office…) and I will have a real garage and wood-shop by spring. I will have room for a big lathe, cabinet saws, wood storage , my joiners workbench, room to assemble projects/furniture, a real dust collection system, and all my planes/saws/chisels/hand tools on one side. On the other side of the shop will be a mini-machine/fabrication shop with a two post lift, lathe, end mill, welder, mobile paint booth, and work table…
I cannot tell you how stoked I am! Seriously, I am all giddy about it. I plan to make cool stuff, descend into super-nerdy, and will be voiding the shit out of warranties!
Here are the prelim drawings that are being submitted and a lay out of the shop floor.

Update:
Drawings sent to the city. Cross your fingers and pray with me that Planning is having a good day/week/month and these babies get a stamp.


Christmas list for Santa – 2015
I already have a bunch of crap, so my first request is that people give to a worthy cause and send me a note about it. My three favorites and where our charity funds go:
- Heifer International:
- Doctors Without Borders/MSF
- Go give blood and send me a post card
- Habitat for Humanity
- Diabetes Research
Books:
Campaign Furniture by Chris Schwartz
Theodore Roosevelt: a Strenous Life
A copy of Chris Schwartz’s The Anarchist’s Tool Chest GOT A SIGNED COPY!! I have a fantastic wife!
I could stand a Kindle Paperwhite
Mahogany: The Costs of Luxury in Early America by Jennifer L. Anderson
A volume on handplanes or a tome on traditional woodworking
Twilight at Monticello
Bees of the World by Mitchner
A Lost Art Press volume of The Essential Woodworker
Washington: A Life by Ron Chernow
James Krenov’s Cabinet Maker’s Notebook
Two Classic books on Shaker Furniture: here and here.
Stuff:
Growler from West Seattle Brewing Co.
Letters from my kids – written on actual paper.
German Wheat Beer is always welcome
A fine bottle of Anejo Tequila
Porto, a good bottle of Porto – Tawny or Ruby.
a Beekeeping Smoker
Zombie shooting targets
An iPad mini – lots of storage (with this you can delete the Kindle)
An Ash Pack Basket (Sling-style harness)
Permission to buy a sweet Faber-Castell Classic fountain pen/Perfect Pencil set
Amber 2ga. Plugs
2ga. Dark Jade plugs
A longboard Skate Board
A handsome tweed vest – or two
Tiffany blue silk tie and matching pocket square
An Electric Violin
Brown Redwing Engineer’s boots
These new bad-ass cufflinks
A Global Chef’s knife, Sashimi knife, and bread knife
Classic Cartoon DVDs (Wanrner Bros., Tex Avery, Bugs, Tom&Jerry, Loony Toons, Road Runner, etc…)
Tools:
A huge antique pattern lathe found in a barn on a dirt road 🙂
A pair of 1/2 round molding planes
A Pair of Snipe Bill molding planes
A 1.75 – 3Hp SawStop Table Saw
A Grizzly G0602 Benchtop Lathe
12/28/15 UPDATE:
I had a great Christmas: A full stocking, books, beer glasses, stuff from my list (noted above), my family got great stuff, I got to see the kids and my grand-daughter, we were all warm and safe, and I gave a little to charity. I couldn’t have asked for or hoped for more.
Film Friday – Tattoo Machine
What I want Thursday – Birthday Addition 2015
In about 4 weeks I will celebrate the 13th anniversary of my 29th birthday and the current plan is to spend the weekend in Rome and Venice or Florence. While there, I want cake (moist yellow cake with chocolate butter-cream frosting), snuggling, a nice glass or 6 of fine wine and lots of tiny cups of Coffee, laughter, and a few well thought out gifts. I will NOT work that day – just not going to happen – and I plan to pamper myself with a haircut and a strait-razor shave if it can be found.
Below is my birthday wish list – mostly for my wife, family and children, but feel free to peruse and suggest.
I already have a bunch of crap, so my first request is that people give to a worthy cause.
- Heifer International:
- Doctors Without Borders/MSF
- Diabetes Research
If you DO happen to maybe want to get me a little tangible token of your love and appreciation:
Updated after the occasion with strike-throughs for the stuff I got 🙂
Books:
A signed hardbound copy of Campaign Furniture
Theodore Roosevelt: a Strenous Life
I would like a signed copy of Chris Schwartz’s The Anarchist’s Tool Chest
Founding Foodies
Mahogany: The Costs of Luxury in Early America by Jennifer L. Anderson
Benjamin Franklin by Edmund S. Morgan
A volume on handplanes or a tome on traditional woodworking
Twilight at Monticello
Bees of the World by Mitchner
Bees of N. America Santa got this book and two others for me early
A Lost Art Press volume of The Essential Woodworker
Washington: A Life by Ron Chernow
James Krenov’s Cabinet Maker’s Notebook
Two Classic books on Shaker Furniture: here and here.
Stuff:
A yearly subscription to Monocle Magazine My wife is Awesome!! I have wanted this for YEARS!
Permission to buy a sweet fountain pen
Amber 2ga. Plugs
2ga. Dark Jade plugs
A handsome tweed vest
a large Isle of Lewis Chess Set I got this set after-the-fact and my wife is now playing chess with me weekly! Win-Win
Brown Redwing Engineer’s boots
A banjo mute Found for cheap in a local Toulouse shop
These new bad-ass cufflinks or these My wife had these made for me with a sweet message on the reverse. Love her.
New House Shoes My mom is cooler the yours! She sent me these house-shoes and I have worn them almost every day since!
A Global Chef’s knife, bread knife, and ceramic sharpener Another score from Mom.
Classic Cartoon DVDs (Bugs, Tom&Jerry, Loony Toons, Road Runner, etc…)
Tools:
A pair of 1/2 round molding planes
A Pair of Snipe Bill molding planes
A Grizzly G0602 Benchtop Lathe
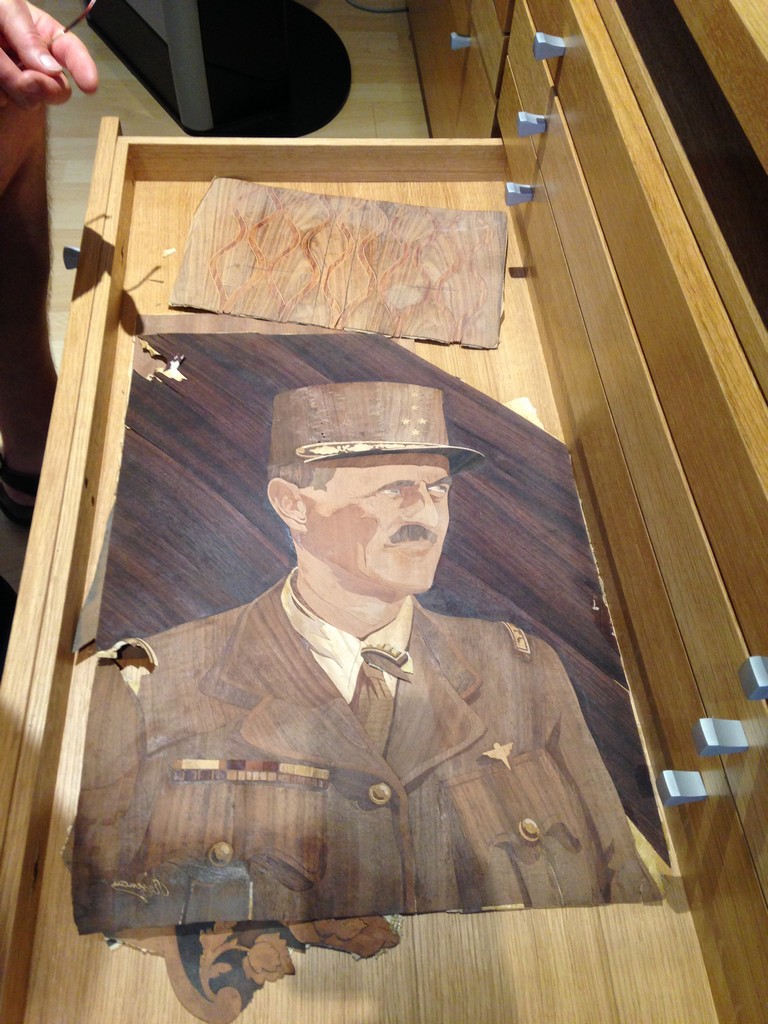
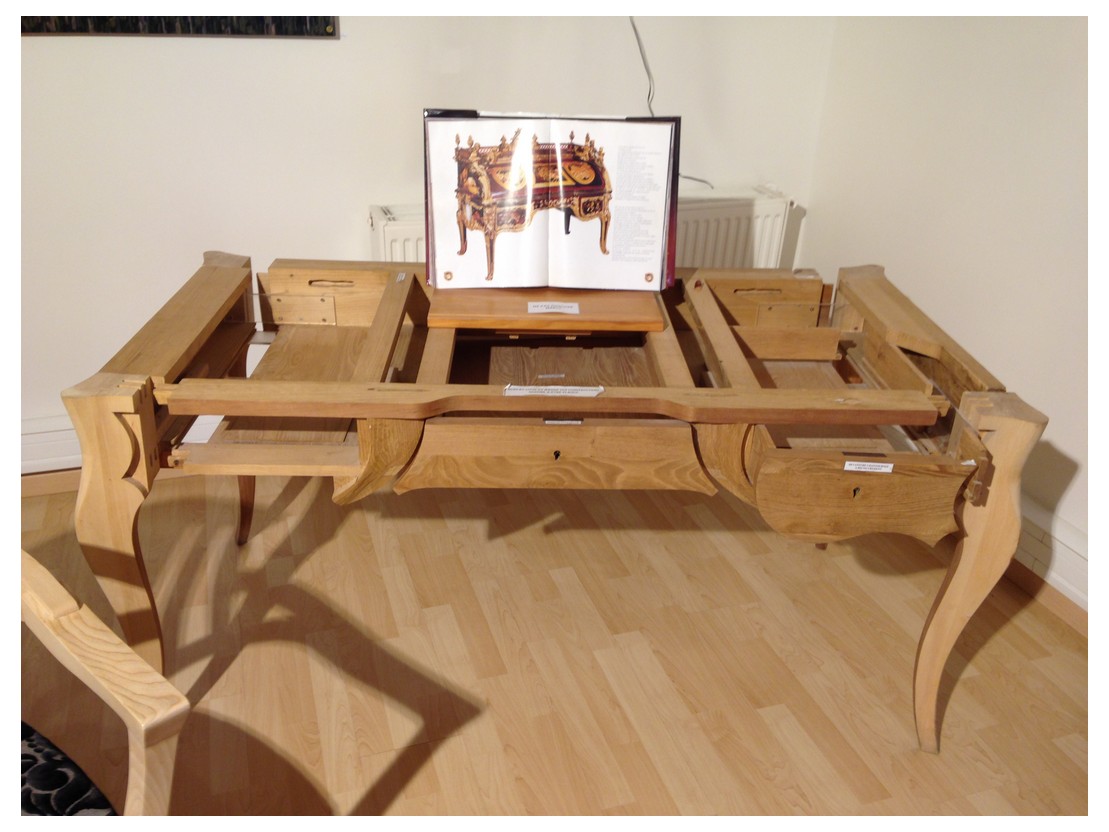
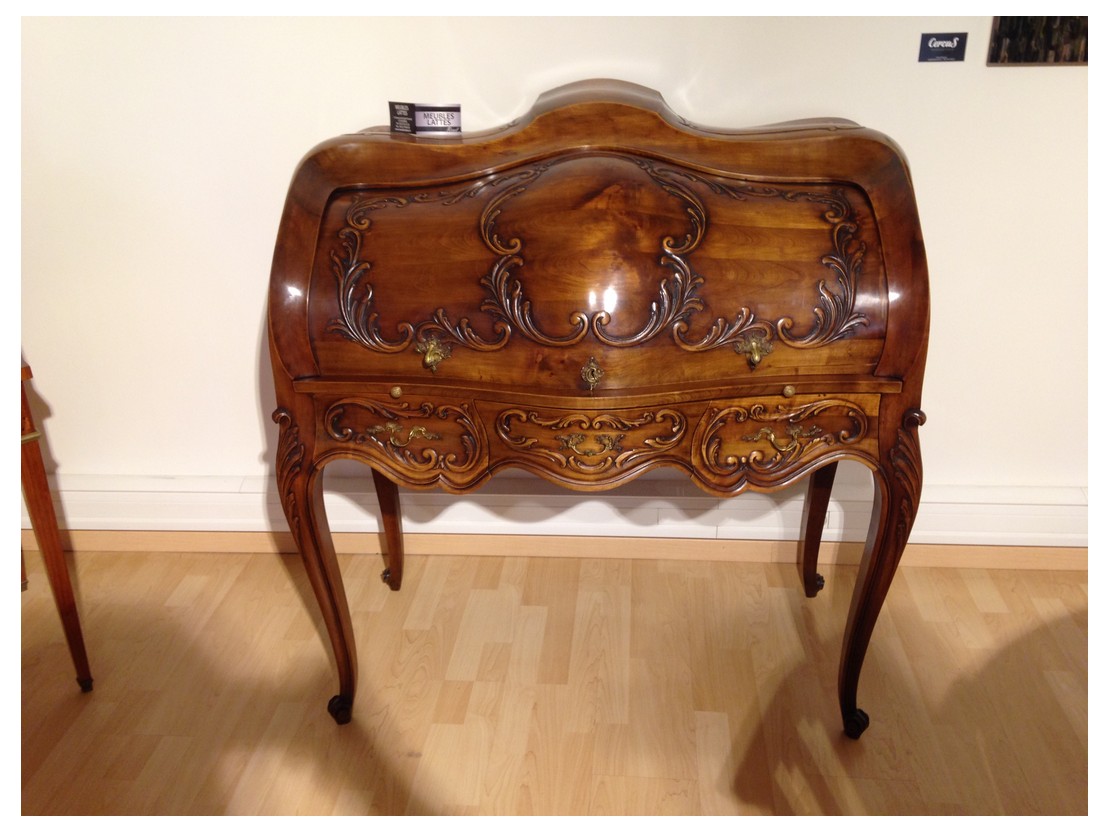
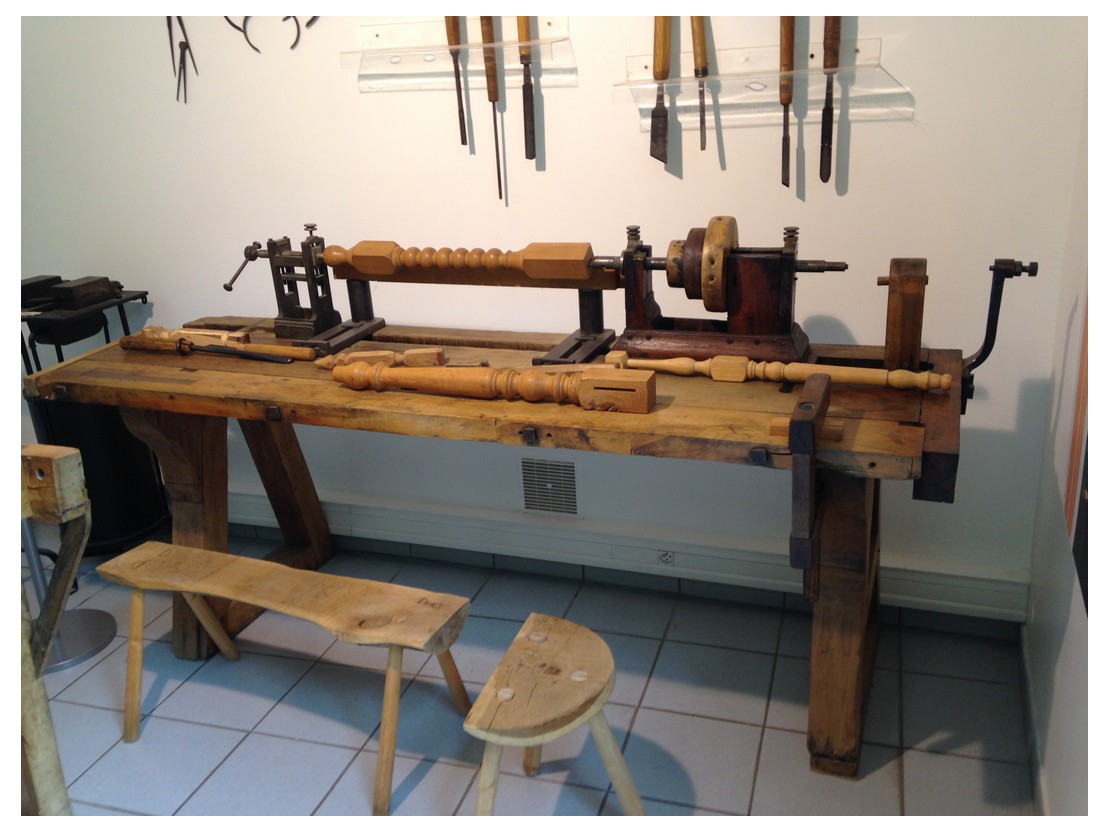
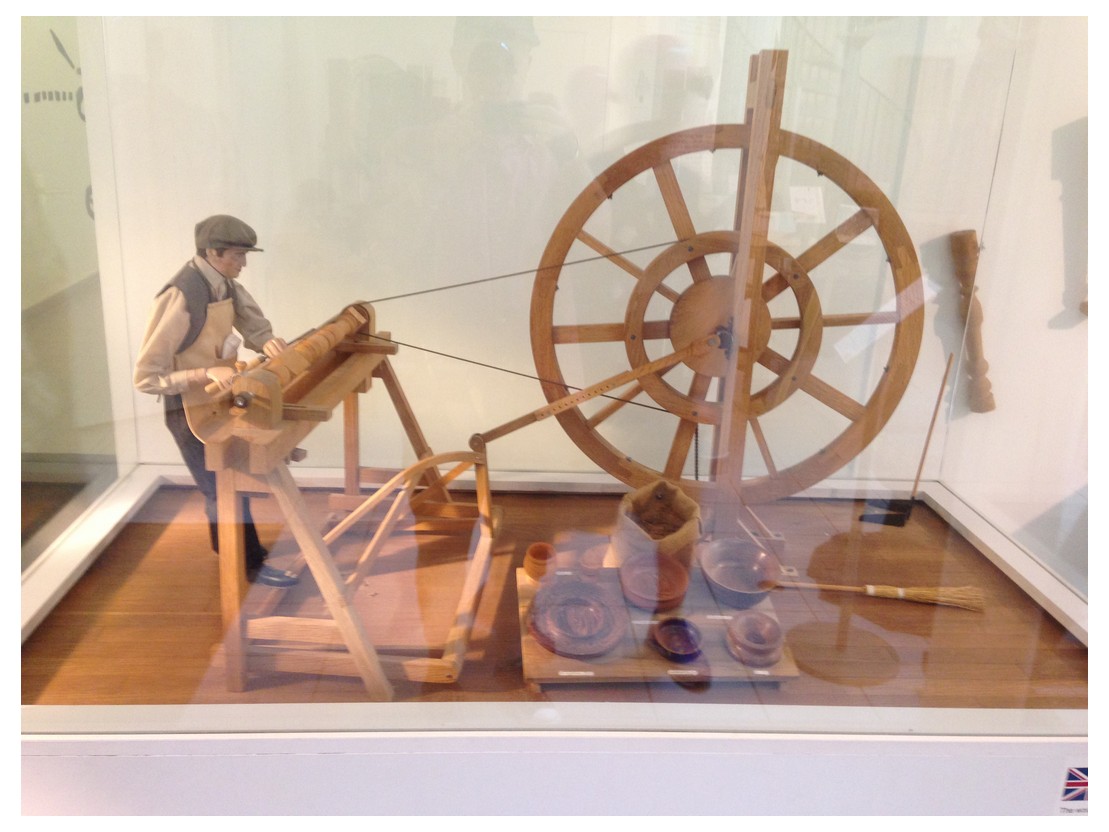
Musée du bois et de la Marqueterie in Revel, France
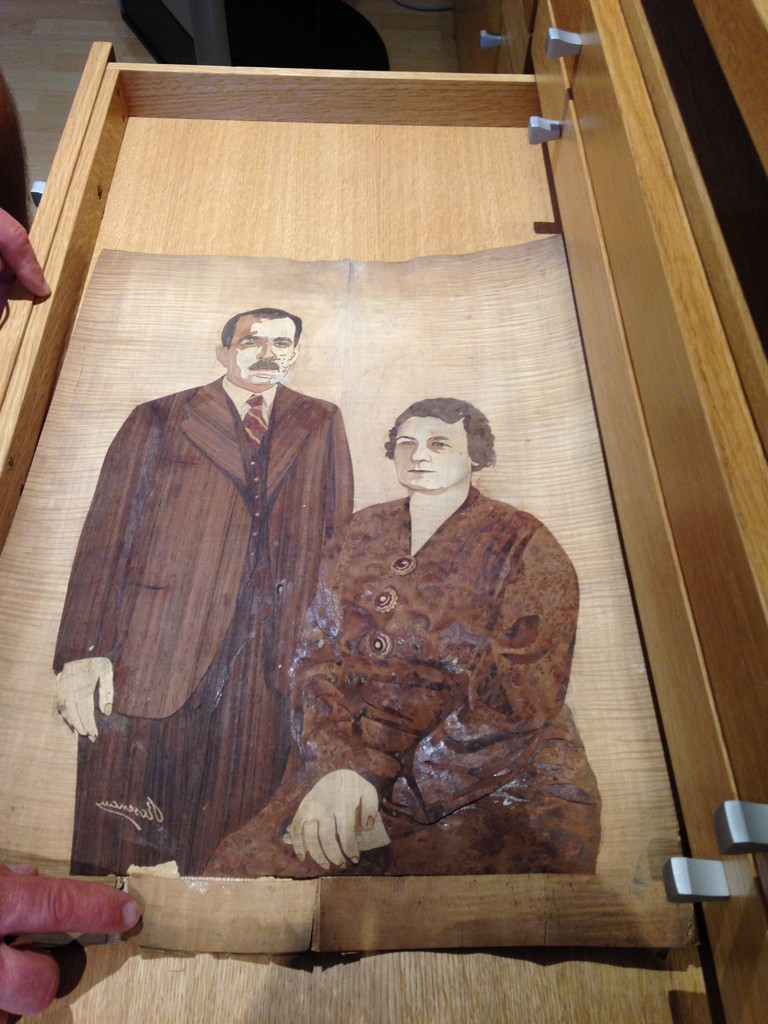
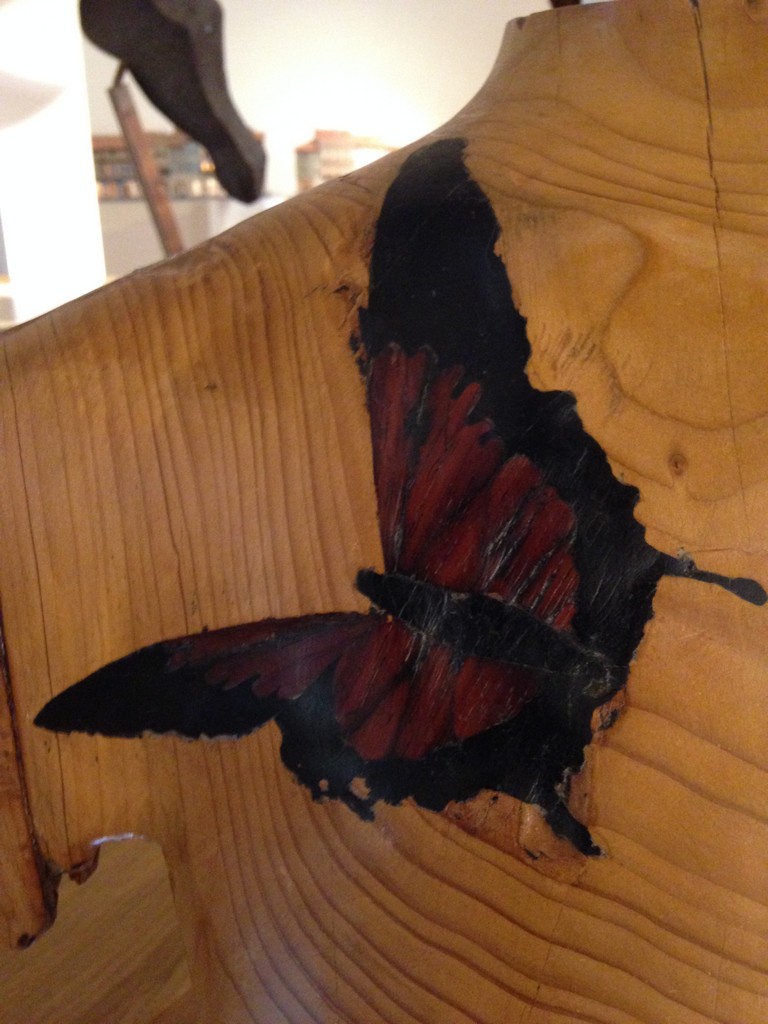
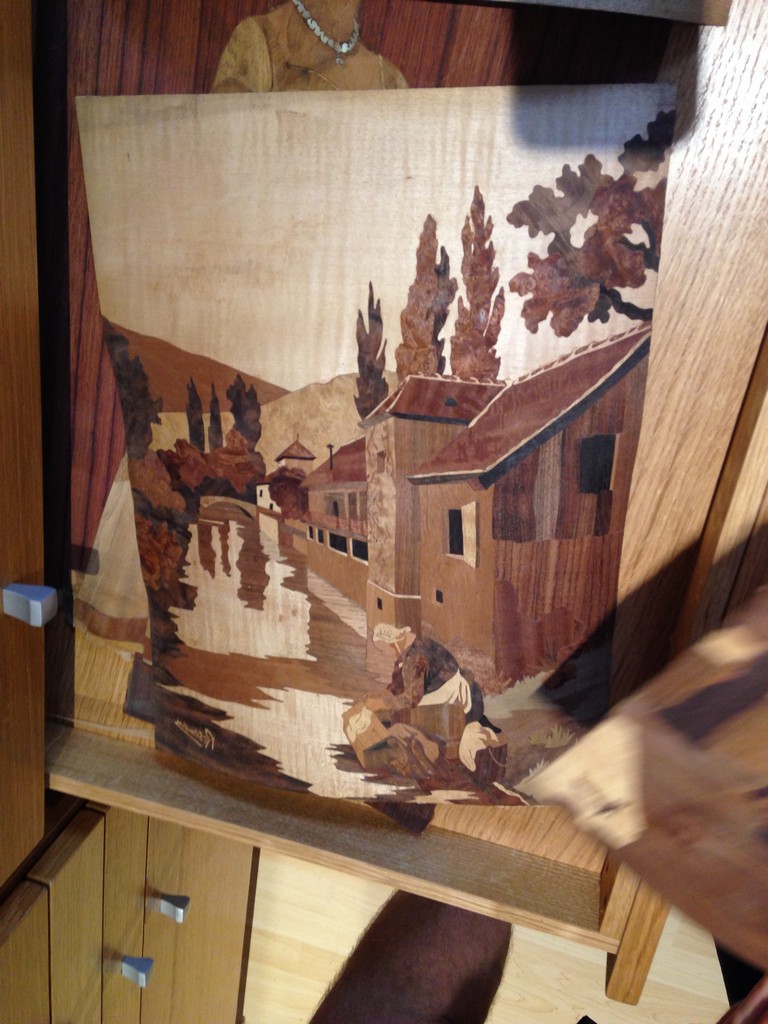
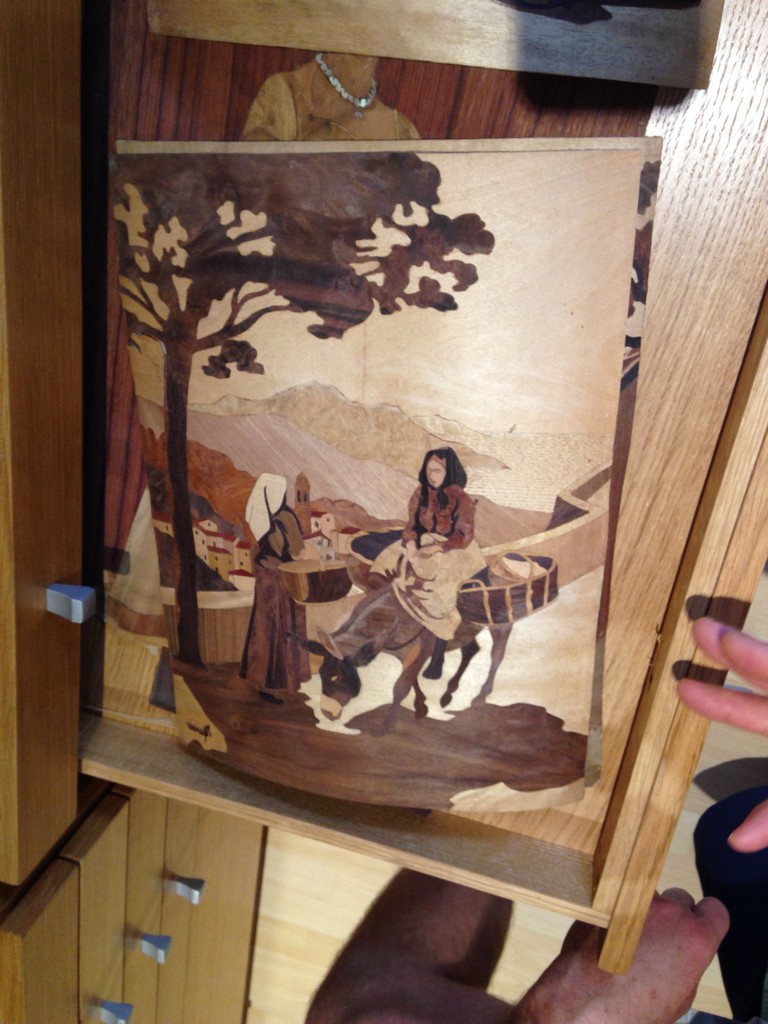
Last summer My Father-in-law, my son, and I made a road trip to the Musée du bois et de la Marqueterie (Museum of Wood and Marquetry) in Revel, France (about an hour from our house if you don’t get lost or almost run out of gas…). The town is one of the noted centers of high quality furniture production and has historically specialized in wood marquetry. It goes back to 1888, when Alexandre Monoury – a master cabinetmaker – left the workshops of Versailles and settled in Revel. Under his influence, several workshops were set up there and many of those origional shops are still going strong today.
The museum highlights the work of the area, new and old, and we spent a couple of hours marveling at the tools, example pieces and shear artistry of furniture, sculptures and marquetry examples on the second floor of the facility.
As a note – this part of France is stunning with sunflower and wheat fields(the Tour du France rides through or by every year) and the town has an stunning 13th century market square and a beautiful central market hall with a quadrangle of historic buildings around it that are home to restaurants, a fabulous bakery/pastry shop and antique shops.


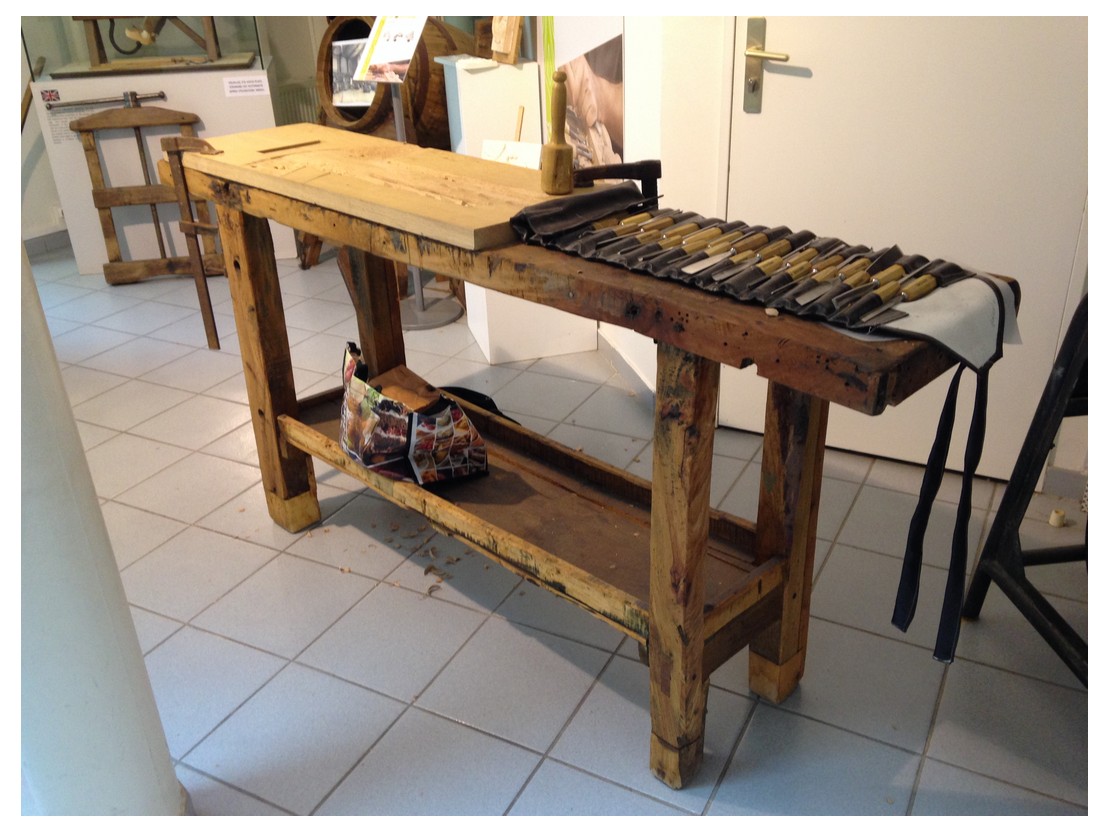


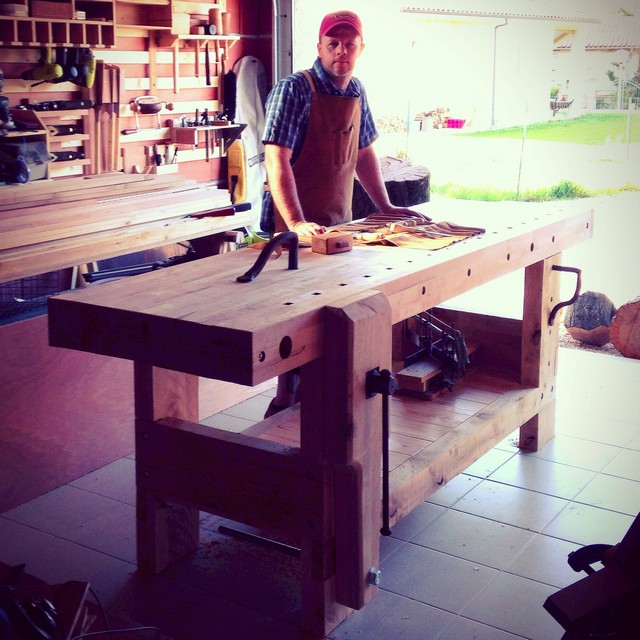
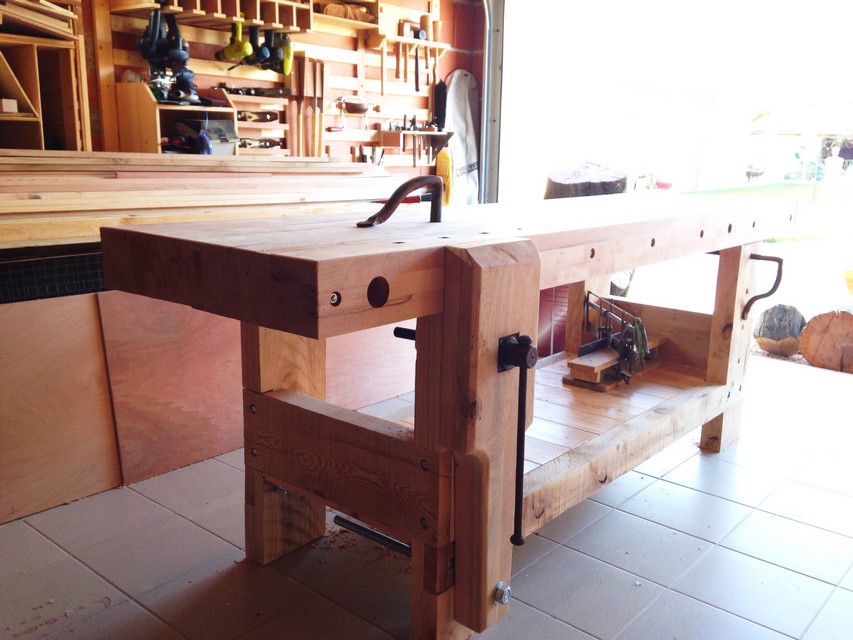
My workbench is DONE!!
I am about a month late in posting this – life and my J-O-B got in the way – but the Cornebarrieu Bench is done. Completely done! All bells and whistles added. It seems like it took me forever, but it fits perfectly in the shop and I started using the bench even before it was finished. I am very happy with the outcome and am currently working on projects that have been piling up all winter. Just in case you haven’t been following along for the past year and a half or so:
My GROP (garage and shop combo) in Seattle was too small for a proper joiner’s bench. I made due with a slim, high, wall-mounted work counter, a bolted on machinist-vise, Quick Clamps, and the top of my table saw. It worked – mostly/sort of – but was a pain in the ass a good bit of the time: I never once planed a board on a stable, solid surface. My GROP here in France is roughly the same size as the one in Seattle, but is absent the huge cast iron machines and saws. I have some room to move and finally have the space for a big, heavy, proper work bench as well as some time to build one – or so I thought.
It is an amalgamation of benches by M. Roubo, Roy Underhill, Chris Schwartz, and Bill Schenher. I am calling it the “Cornebarrieu Bench” after the small village in southern France where we live, where the lumber has been sourced, and where the bench was made and first used.
For anyone interested, here is a documented build process, build notes, and step by step guide – 115 steps – to build this beast.

Let down by an online tool seller with GIANT balls.
So, I am a little tweaked… I got a small bonus at work and sent a little money to my mom and daughter, got something for my wife, paid to have a tree taken out, sent Heifer and MSF some funds, paid off my last student loan (FREEDOM!!), put a little money back for a rainy day, and with the last bit decided to do a little something small just for me: I bought a few beech molding planes and 3 mortise chisels from a guy with a web store in the Scotland. I will call him UK Tool Guy. I have bought twice from him before and it all went really smooth and my purchases were exactly as expected. I bought a toothing plane from him at a good price that was in perfect working order and arrived exactly as pictured on his site.
My experience this time around was different. The order part was normal, but when I received my stuff it was all kinds of wrong. Painted parts, broken pieces, condition received was NOT as advertised, etc… I spent 4 hours cleaning and fixing and will have to spend another 4-5 repairing 2 chisels and 2 of the planes. 8-9 hours is a lot of time to unexpectedly fix stuff that I just bought. I am not super-important in the grand scheme of things, but my time is worth something to me.
Anyway, I took a few pictures and wrote the guy to let him know about the issues, asking about the possibility of some remuneration. He sends me back a mail offering me a little credit instead of a refund. I take him up on it, not knowing what the shipping will be I choose a couple of items from his web store that equals to less than £50 (~$78) that he offered up. I think my time and frustration was worth more, but I didn’t press the point.
He sent me a response that informed me that I had gone over budget and that he would “…let me off for now…” Seriously‽‽ Was this guy born with an extra set of balls? This is the third time I have done business with him. I check his site regularly for stuff I am looking for – I am even on his MF mailing list. The bottom line is that I got an unexpected crappy deal, I was gracious and completely undemanding and he will “…let me off for now…”. It took over three weeks for him to send the stuff two new items out. So much for the “Shortly” time frame he referenced in his last mail. I believe that this is the last time I will be doing business with the UK Tool Guy
For the sake of Transparency, I have included the whole chain I sent below – only deleting names and contact info.
___________________________________________________________________________
Hi Matt
Thanks for your response.
Those two items actually come to £63.50 with postage which is a bit over
£50 but I’ll let you off for now, we can maybe adjust slightly with any
future order. I will get these off to you shortly.
THANKS
> On 17 March 2015 at 11:20, drivenoutside wrote:
Hi _____,
Sorry, I didn’t mean to come off as someone that can’t be pleased. It is
not that at all and my two previous purchases were really spot on.
Thank you for your immediate response and offer for credit. I would love
to have the boxwood rule and the upholstery hammer if you are OK with that.
Thank you and regards,
Matt
> On March 16, 2015 at 4:18 AM UK Tool Guy wrote:
Hi Matt
Thanks for your e-mail and I am sorry you had so much to complain about.
Not that it is an excuse on my part but I have a funny feeling I didn’t
pack your order up as otherwise I would have picked up on some if not all
of these points as I check everything properly when I am packing it. I
understand your frustrations when you get something that is not quite what
you were expecting and once again I am sorry for this. Rather than
refunding you some monies why don’t you instead have a look at the site and
see if there is something there around the £50 mark including postage that
you might like FREE. If there is just drop me an e-mail with the product
number so I can remove it off the site and send it over to you.
THANKS
> On 15 March 2015 at 20:36, drivenoutside wrote:
Hi _____,
I received the molding planes and chisels a couple of weeks ago, but as I
travel a good bit for work, I just this weekend had the time to open the
packaging up and take a look. What I found was a little surprising as I
have ordered a couple of planes from you before and condition was spot on
as advertised. I did not expect like-new condition as some of this
material is over 200 years old, but some of it was not as stated.
Two of the collars on the sash chisels are cracked, one completely. I am
going to have to tear them apart and replace the collars. I guess I will
either see if I can source from Marples or turn down some brass stock on
the lathe.
I spent most of yesterday flattening, polishing, sharpening, and oiling
the plane blades. There is a good deal of pitting on some of them and I
will need to replace two. Most of the plane bodies were fine, but the #12
was painted red and the #16 had a screw holding a crack in the body
together. I drilled it, filled with hide glue and inserted a beech dowel.
The #1 round’s wedge is cracked in half and has been glued back together
by a previous owner. I am going to have to make a copy of it and replace.
When I unwrapped the #9 there was wood worm in the packaging. Not just old
holes, but a live worm in the plastic. There was damage to the plane and
the wedge. I took the whole lot to our local vet and had her x-ray the box
4 times. It is a Luthier’s trick and it kills any worm/moth larva.
Take a look at the attached pictures and let me know what you think and if
you think it is fair to refund me a little of the purchase price and
shipping.
Thanks,
Matt

On 23 February 2015 at 15:51, drivenoutside wrote:
Hi _____,
The ship to address is: __________
My phone number is: ___________
Please send me the tracking number so that if there is a problem with the
shipper or customs, I can call right away
Thank you again,
Matt
——– Original message ——–
From: UK Tool Guy
Date:02/22/2015 2:30 PM (GMT+02:00)
To: Driven Outside
Cc:
Subject: Re: Tool Order
Hi Matt
Just written out your invoice for the tools ordered. The grand total
including postage comes to £metric shit-ton. An invoice / receipt will be included with the tools. I’m in the shop today until 4:30pm if you want to ring with card details for payment.
MANY THANKS
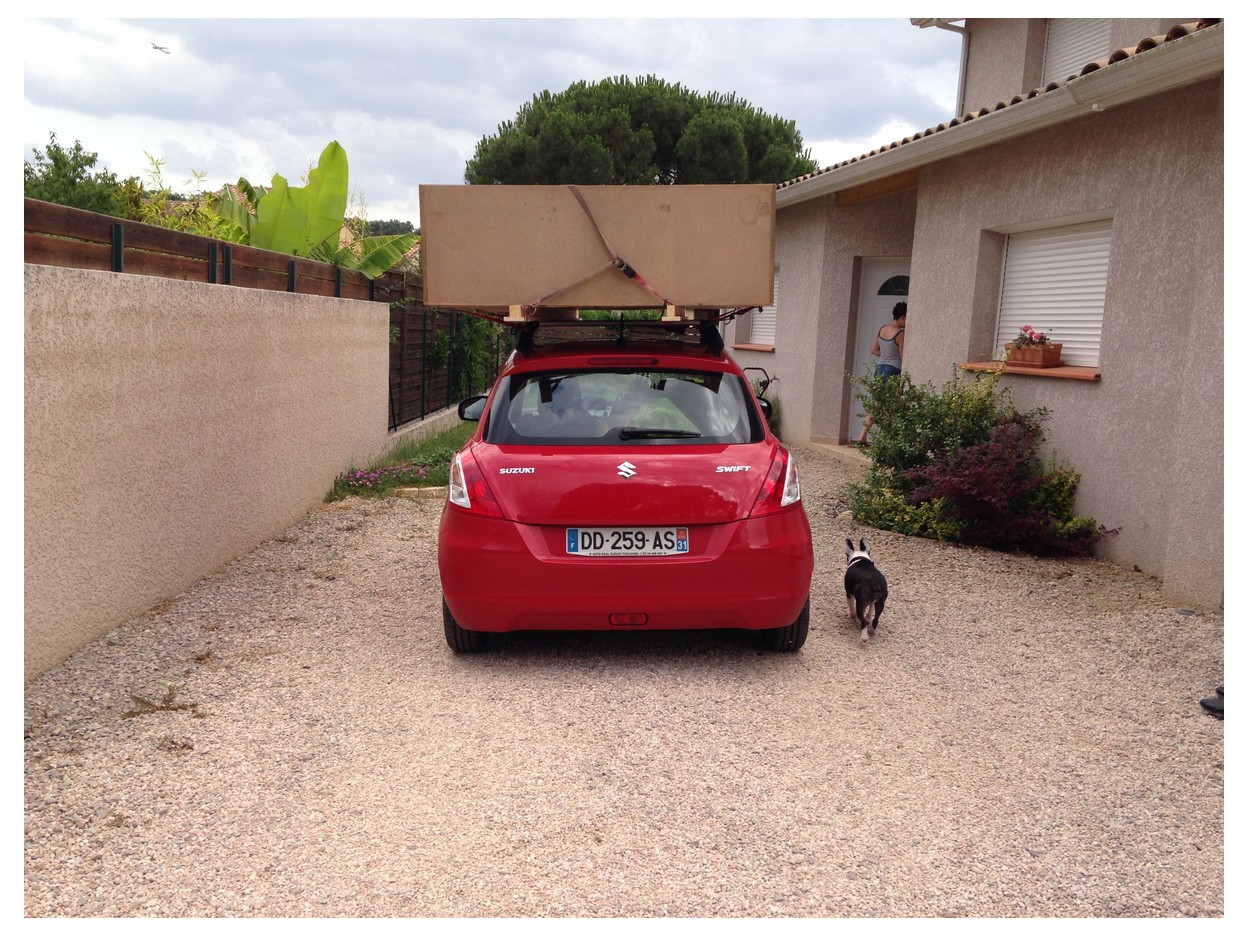
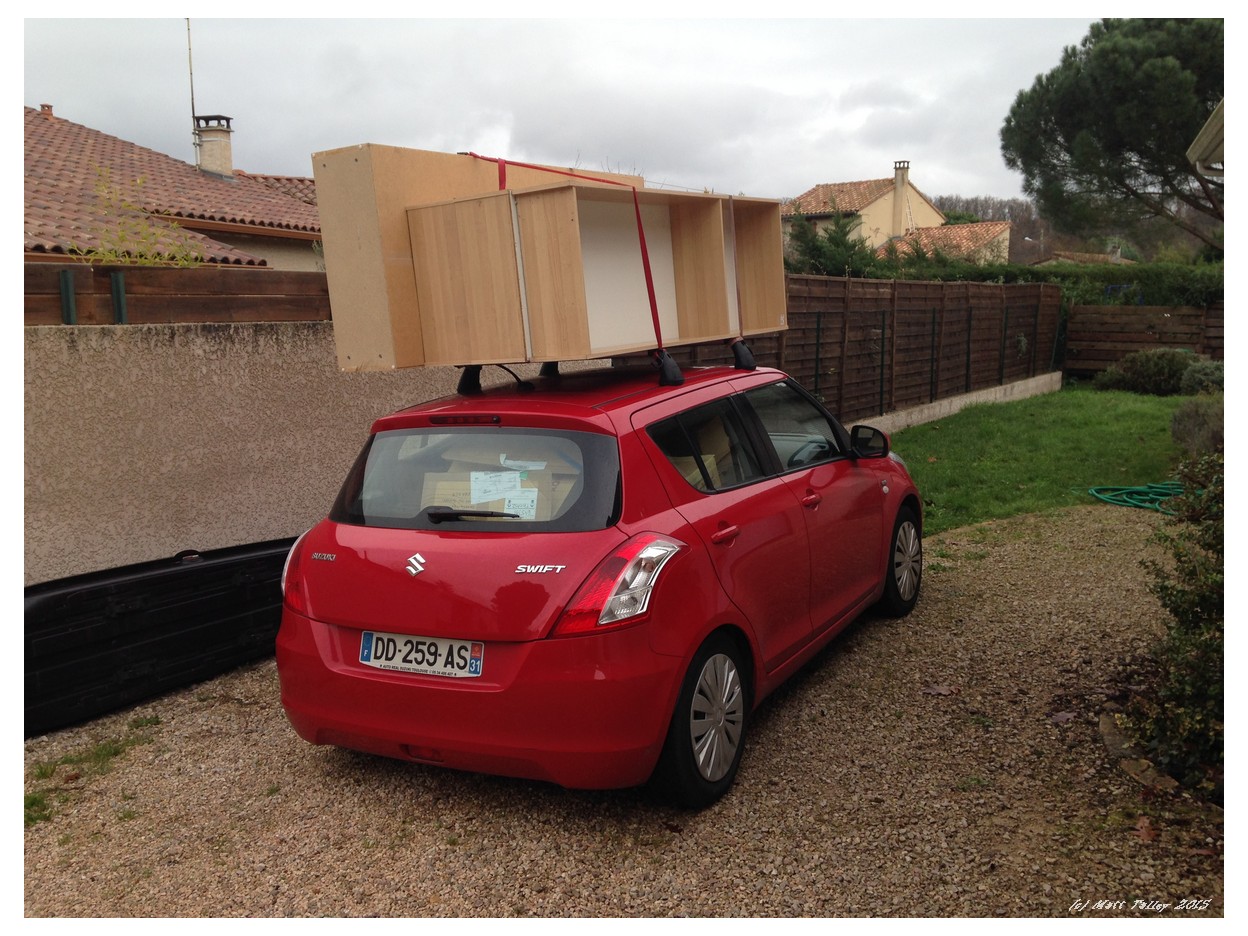
No Truck Required
When we left Seattle for Southern France, I sold my truck and it felt like I lost a hand. I toyed with the idea of bringing mine over, but it would have been impossible to park and the money that I would have had to spend for gas would have been astronomical. My very first vehicle was a truck and I have never not had a truck to drive. There have been other vehicles, but I have always had a pick-up.
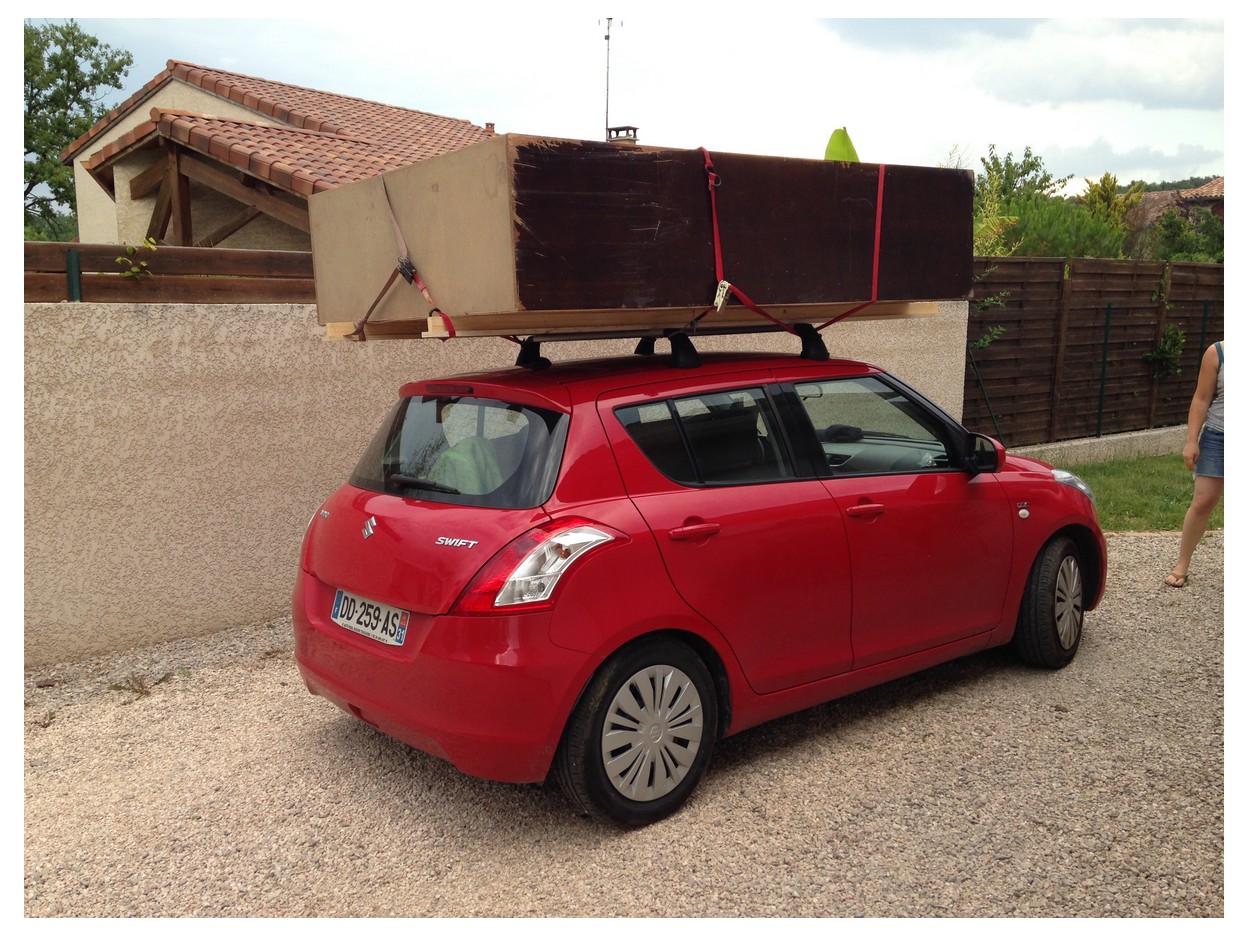
I didn’t really plan to do much heavy hauling during our time in Toulouse, so we got a 5-door diesel Suzuki Swift and I added a roof rack – just in case I needed to road trip with a bike or grab the odd 2X4 at the lumber yard… Reality is often brighter and more interesting than the initial plan. We have abused our little Suzuki. I have treated it like a farm hauler and overloaded it again and again. The rack has a 100 pound weight limit, yeah about that… In my own experience, 250 pounds has ridden just fine. I still miss my truck, but we are making due.
All the things I have hauled in or on the car that have been questionable:
400 pound wood lathe
The cut rounds from 4 trees (to date)
A 200 pound 7′ X 6′ x 2′ Wardrobe
3 large work benches
9 bookshelves
~1500 books in boxes
10+ sheets of plywood
Enough lumber to build a garden shed
2 beds
9 rolled carpets
A buffet hutch
A garden table, 2 side tables, 8 chairs, and a umbrella
250 pounds of gravel for lathe ballast
A huge antique armoire
300 pounds of wet lumber
A Canoe that was wider than the roof
5 people and all their crap


Workbench Progress
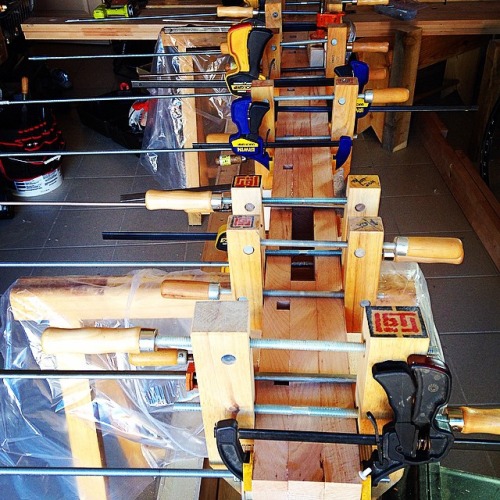
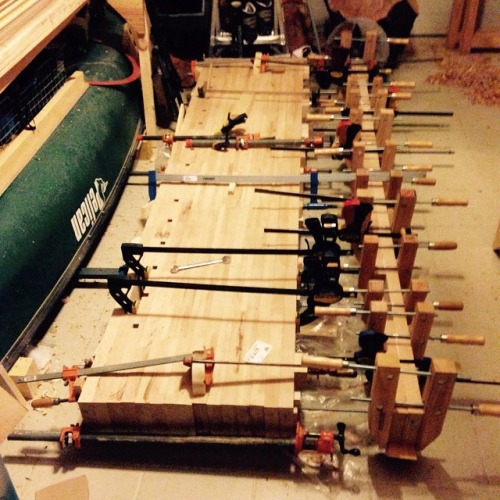
Progress on the Cornebarrieu Bench is coming along. It has been slow going – I have been swamped with work, travel, lack of allowance (I spent it on Christmas and a classic fiddle/violin…), more work, etc…
Stamps-With-Foot gave me a gift card for our local Home Center/hardware big-box as a Christmas present that took care of the price for the last section of the top. I got a lot accomplished this last two weeks:
- The final sections of the top were glued up just before New Years eve- using every single clamp I brought to France and more than a little ingenuity.
- Installed (2 hours of cutting, drilling and chiseling) a pricey German-made cast iron end vice that I got on 65% sale – was missing two small metric bolts and the wood handle.
- Made final leg cuts: the tenons that go inside the bench top.
- Put 5/16 oak dowels in to the pieces that have cracked, even a little, to make sure that the cracks do not spread.
- Gave all the base parts an 80 grit sanding.
- Really like the sawmill marks on some of the pieces. Am going to put clear poly on the base instead of milk paint to preserve the marks.
- The legs and stretchers shrunk and warped just a touch in the six months since I cut them even though I had it all clamped together. It will be fine and could have been worse.
- Made the first dry-fit of the base to the top: Everything lined up , fit perfectly, and is as square as I could ask for.
- Drilled holes for connector bolts and lag screws.
- Installed base shelf cleats
- Cut the 12 sections of 5/8″ tongue & groove pine that will be the base shelf

Before I head to the US in a couple of weeks, I hope to have installed the end-vise block, given the base a 120 grit sanding, polyurethane the base &shelf, cut the hole for the leg vise screw and the rectangle cut for the vices’ parallel guide. I also want to install the leg vise nut in a pocket behind the leg while the bench is upside down.
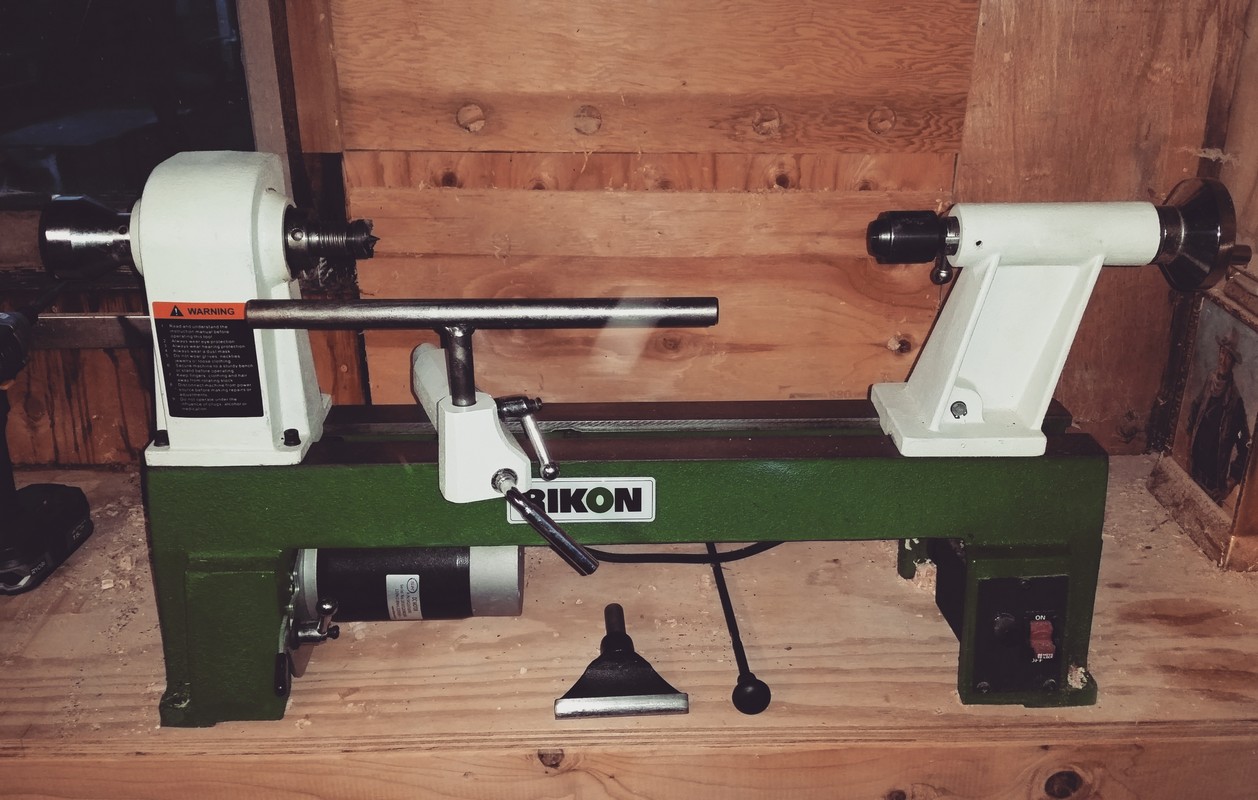
Chinese Lathe Build Update – Pimp My Lathe Edition
As mentioned in a previous post, I purchased a Chinese manufactured wood lathe shortly after moving to France. Putting it together and getting it running true was not a Herculean task, but it wasn’t a plug and play affair either. In addition to the initial setup, I have taken an hour here and there to make it bit more ridged and add some features that did not come stock, just to pimp it out a little:
- The base is now sheathed in 1/2″ plywood, glued to the wood supports and screwed into the sheet metal legs. It makes the base a LOT stiffer and clean-up is much faster.
- After 4 months of weekly run-time, I have had to replace a couple of set screws and re-tighten the short bed extension outboard of the head-stock. The clamp bolt holding the head stock shattered and caused me some grief. Chinese bolt quality sucks.
- The bottom of the base was finished with 2″ thick scraps and I added a couple hundred pounds of pavers, gravel, and crushed brick to add even more stability. It is not enough when I try to turn a 15″ hunk of cherry outboard, It still wobbles and jumps around a bit. There is just no way to make the sheet metal frame more ridged.
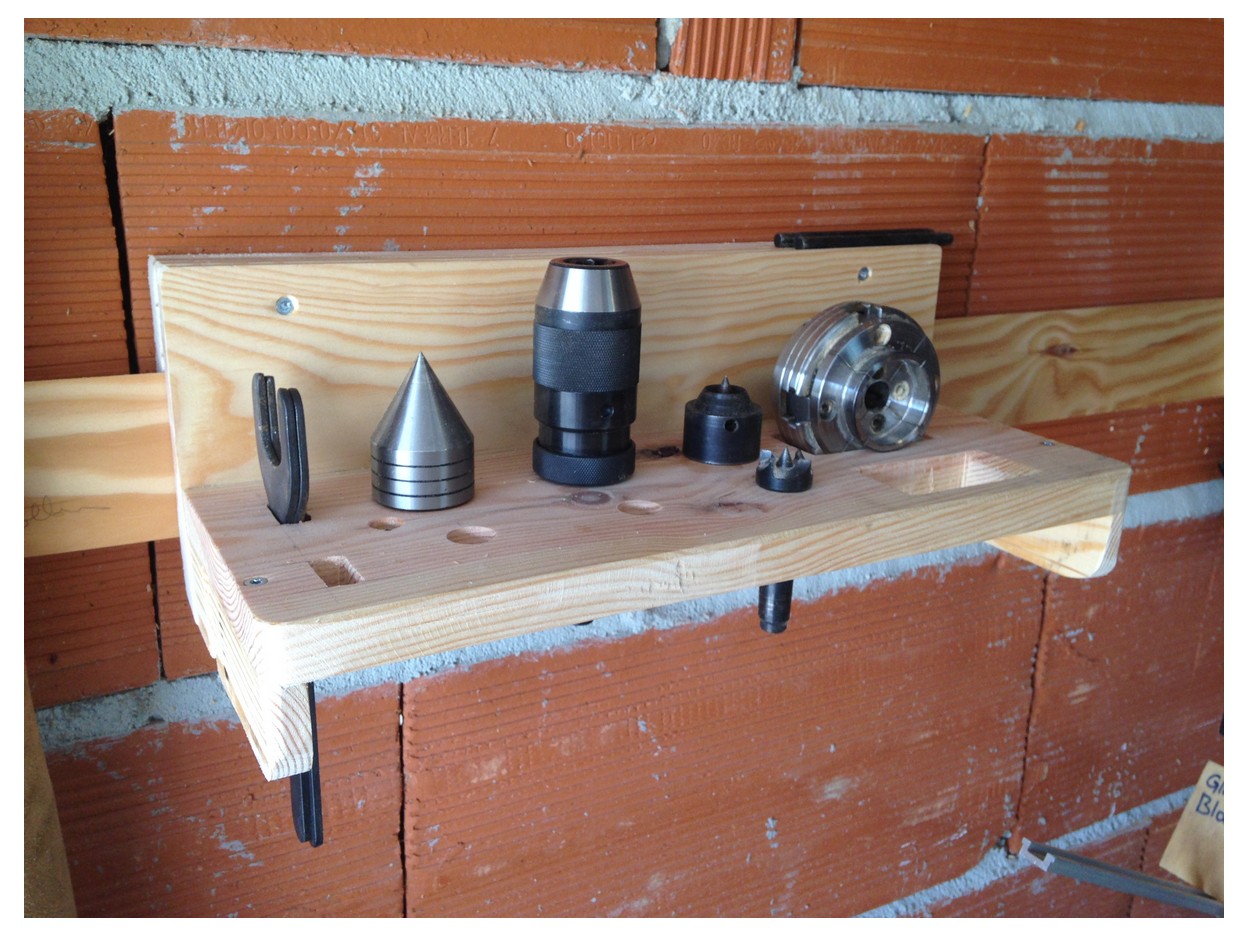
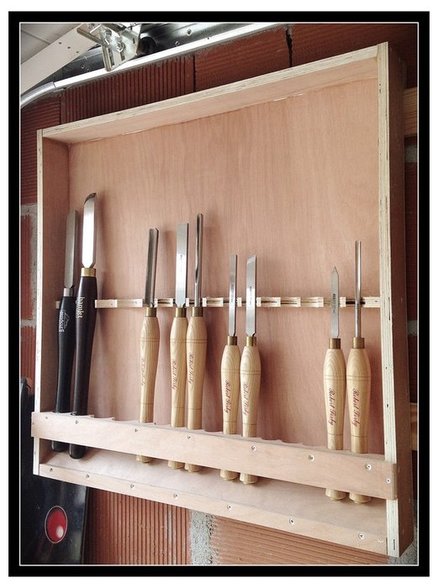
- On the French cleats above the lathe, I added a tool holder and chuck/drive center/tail center tool mount for convenience.
- I hung a long compact florescent over the work area and on the side there is an IKEA floor lamp/spot light that I can move about. Scored it used for $8.00!
- A tool grinder the I picked up for about $45 is mounted are the end of the lathe on a small table for easy mid-project tool sharpening.
- The capacity is only 12″ and that is not the magic number. 16″ – 18″ would be perfect for the bowls and bases and platters that I am doing here. If I added 2″ iron risers to the head and tail stocks, then it would give me a 16″ turning capacity (swing). I have thought long and hard about doing it, but haven’t yet as it might be a complication that is more headache than useful AND I don’t want to put anymore time or money into the thing. I just want it to work.
- I designed a steel bed extension – modeled it in 3D and everything, but I am not going to have it made… I would be trying to turn an under powered Hyundai into a V8 4X4 Toyota Truck.
- For tuning large objects with the head swiveled, I designed a sweet swing arm tool post as well. I modeled it up too, and decided not to have it built for the same reasons. I will use the tool post arm that came with the lathe with a wood post under for support when I turn bigger stuff outboard.
- This Lathe will get me by for the next couple of years and I will go over it and repair/replace any worn parts before we leave France to ensure the next owner has relatively trouble free tool, but This is my last “cheap” lathe. I am going to plop down some funds and get a Robust, Vicmarc, a huge Powermatic, Oneway, Oliver, or a Stubby – Something with power, mass, lots of heavy cast iron and reliable parts that I don’t have to screw with.

Free Wood is the Best Wood!
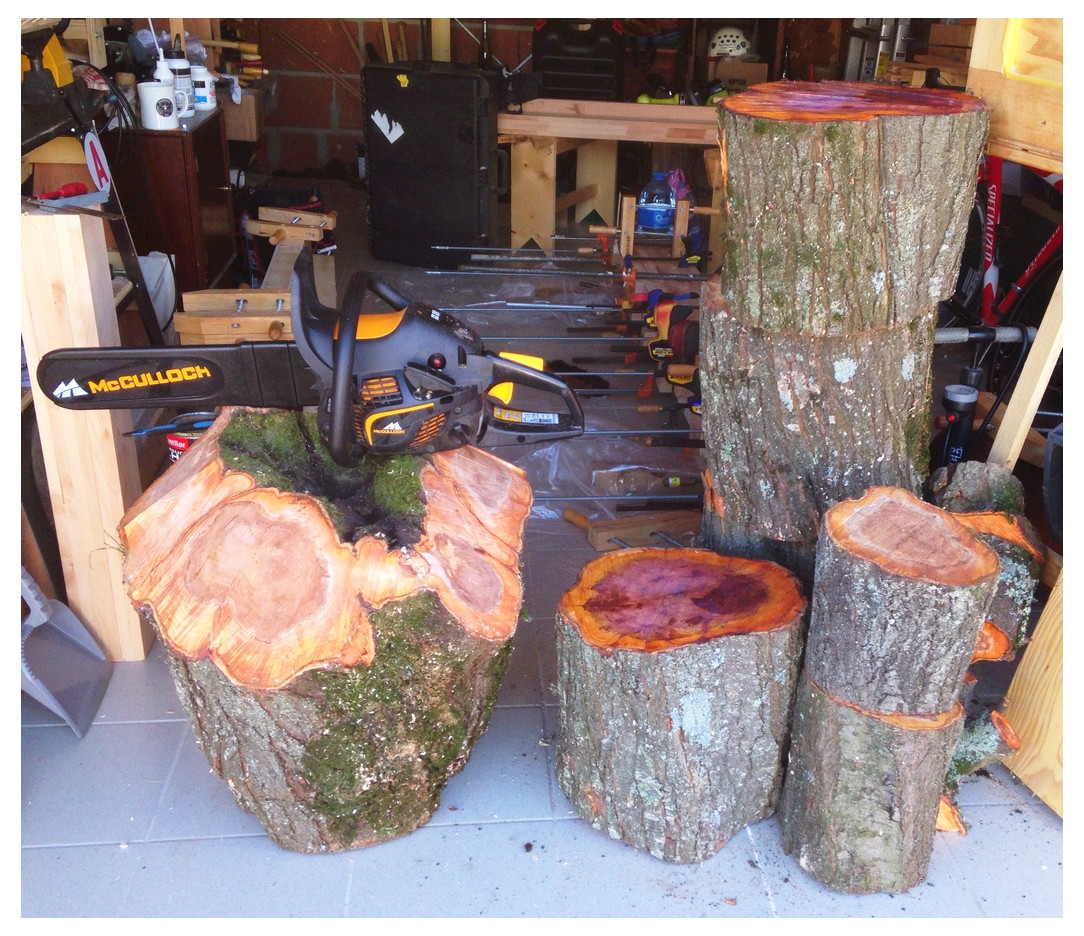
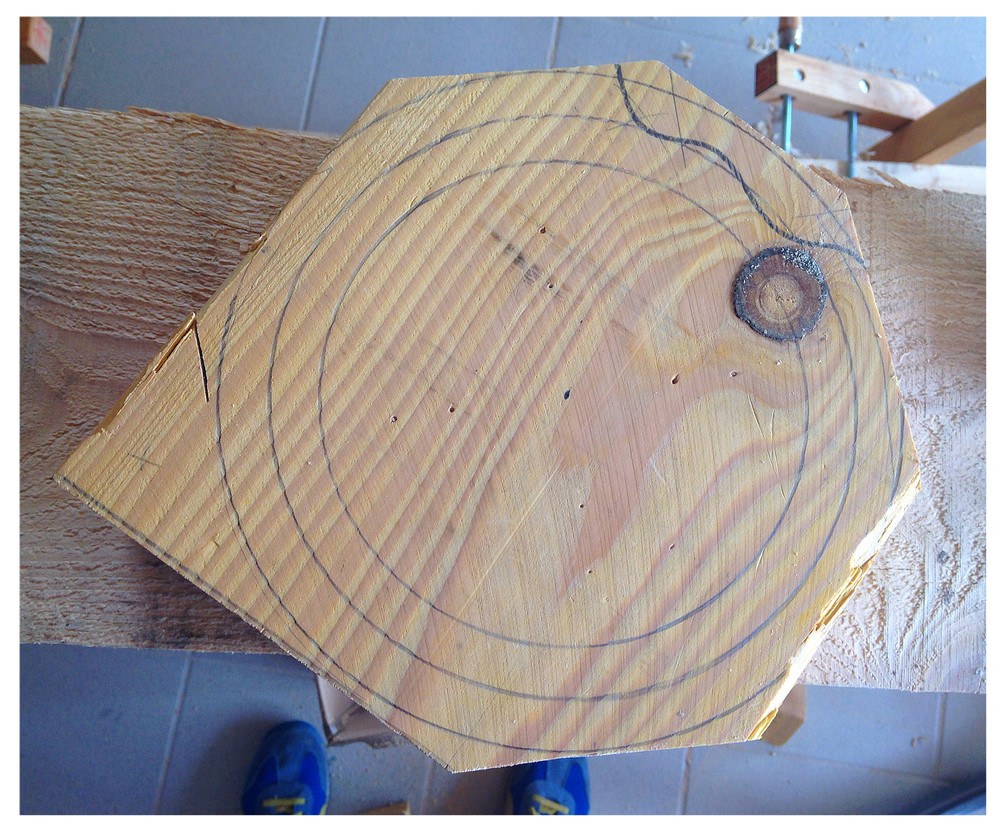
Prospects for Fall wood-turning are looking up! I am 98% done with the Chinese lathe build-up into a proper tool. I am waiting on the arrival (had to resort amazon.uk.co as there are not turning shops in a 100 mile radius?!) of two huge bowl gouges and I will be set up to make shavings all winter. I was also given a free electric oil-filled heater for the garage, which should keep things toasty! On the raw material front: I am taking an old apricot tree out of a small orchard for some friends a few villages away tomorrow (National Holiday) and I am really excited to turn some bowls and jar tops out of it. A few weeks ago, I mentioned the project to a friend of my wife’s and a couple of hours later she called and said that her husband was cutting an old ornamental cherry down and would I like the wood? Like the Pope wants Jesus, I did!! I went over with the chainsaw and helped him take it down and to cut a few larger limbs and the trunk into sections. Some of the images below are what it looked like inside the tree just after my chainsaw went through. We were stunned. Not just the center was beautiful – a fire purple, but there are bright reds and oranges in the outer wood as well. The tree had over 70 rings and grew next to a couple of big cedars so the rings are real tight and as I had to sharpen my chain twice during the cutting, the wood is VERY hard and dense.
It took two loads in the car to get it all home. I sealed the ends right away and stacked everything in the GROP near the lathe. They had cut a plum down earlier this week and I scored two 12” rounds from that as well – the ones with the flame purple center in the pictures below. I told the couple that I would make them a vessel or large bowl out of a hunk of the tree in trade for the lumber.
Fast forward to this past Saturday: I rough turned 6 bowls (one not pictured) in about 2.5 hours from the large limbs. The trunk sections will be cut into starting next weekend. I will let the small pieces dry for 4-6 months and then finish turning them. The larger bowls from the trunk will take a year to dry.
Am feeling reasonably optimistic about upcoming projects ![]()


Update 11-9-14:
Well, the apricot tree wood harvesting didn’t quite go as planned. I had chainsaw issues right away – needed to tear it down before the first cut and unclog the chain oil hole. Holy crap the wood was hard. It had 65+ growth rings that were stacked in tight. It was slow going with a couple stops to sharpen my chain. The clincher though was that there were two twisting veins of rot that went from crown to root ball with lots of bug damage spidering out from the rot as well. Dammit! There was was maybe 12” of trunk that I can spin a bowl out of. Per my agreement with the owner, I cut up the other trunk & big limb sections to a length that will fit in a fireplace and stacked it up for them. You win some you lose some. If not for this tree I wouldn’t have the amazing wood from the ornamental cherry and plum tree and maybe karma will smile on me the next time I lug my saw into a field.


Inaugural Hand Tool Tuesday Post
Being a child of the 1980’s, my early tool and joinery education from my own father was augmented by two TV craftsman – Norm and Roy. I have a foot in each of their worlds: My table saw, miter saw, and lathe get the lion’s share of work done in my shop, but I am giddy whenever I can whip out a chisel, Japanese saw, or molding plane. My lathe gets a lot of press as it is my only power tool here in France and I recently realized that I am not highlighting hand tools enough in my shop work posts. Additionally, I see a lot of very cool old tools here in France that need to be shared. I will be posting pictures, videos, details, openions, thoughts, etc… here.
For today, enjoy Roy and Norm
Disclosure Note: The choice of the Roy video was solely due to the heady mix of Jefferson and Roubo. In the future, I will include more videos of people actually using the tools 🙂
Reusing/remaking old tools
I love me some old tools. I love looking at them, touching their surfaces, using them… Most of my hand planes, some of my chisels, and all of my molding planes are older them my grandfather. I will push people down in a junk/antique shoppe to get to a wooden plane or socket chisel peeping out from behind a Paint-By-Numbers masterpiece.
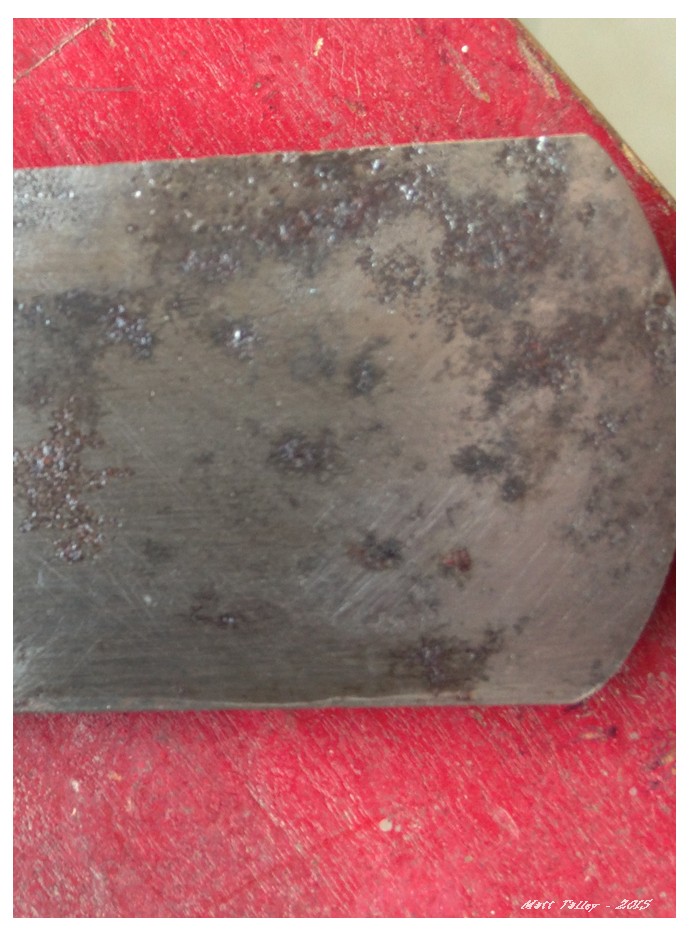
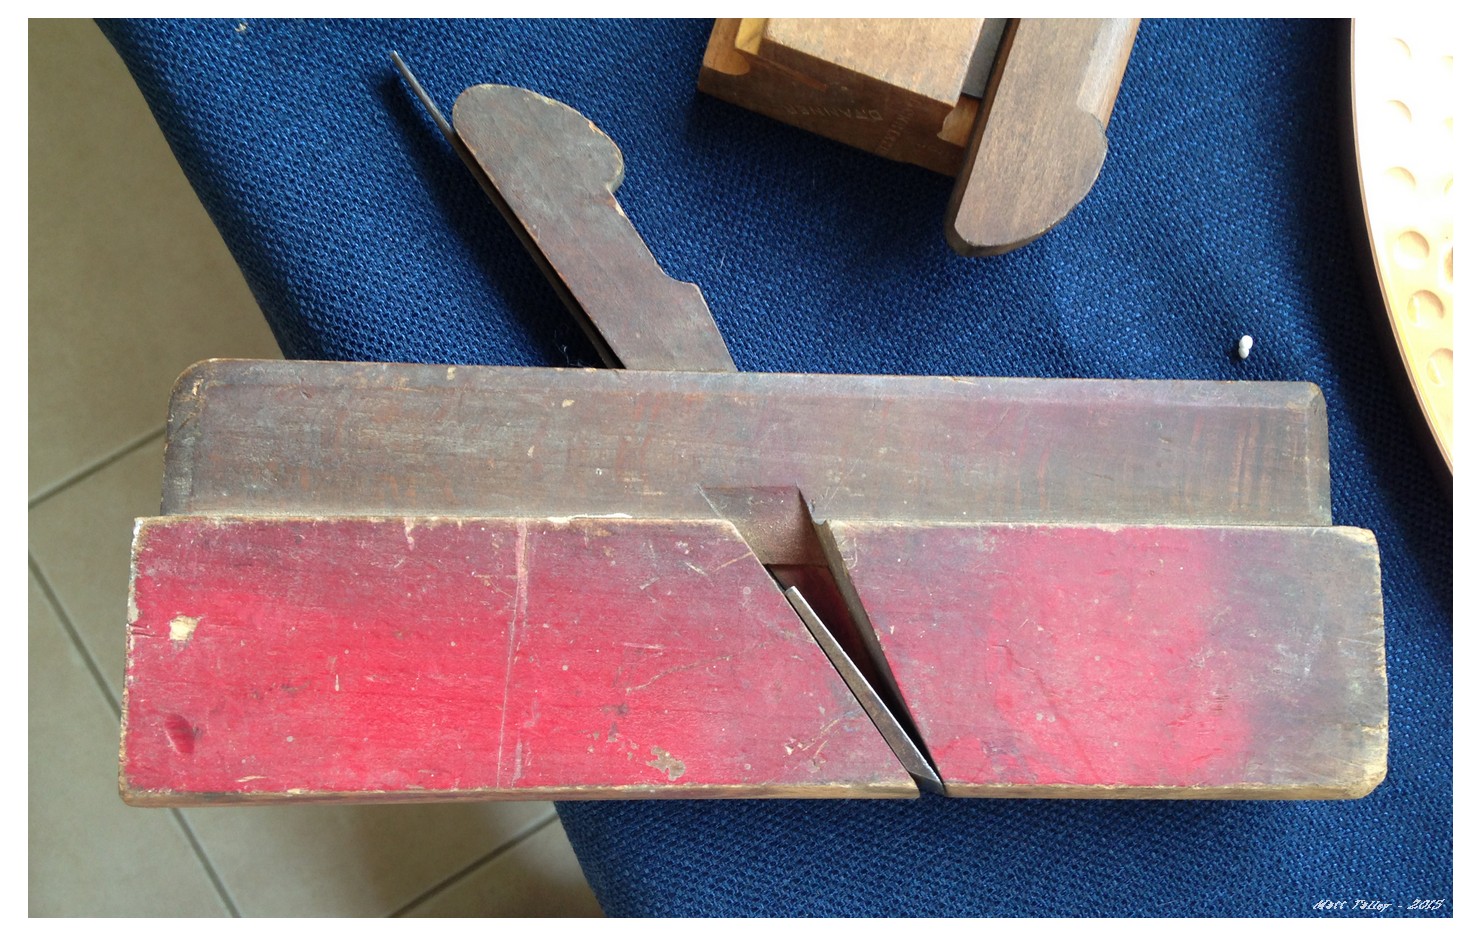
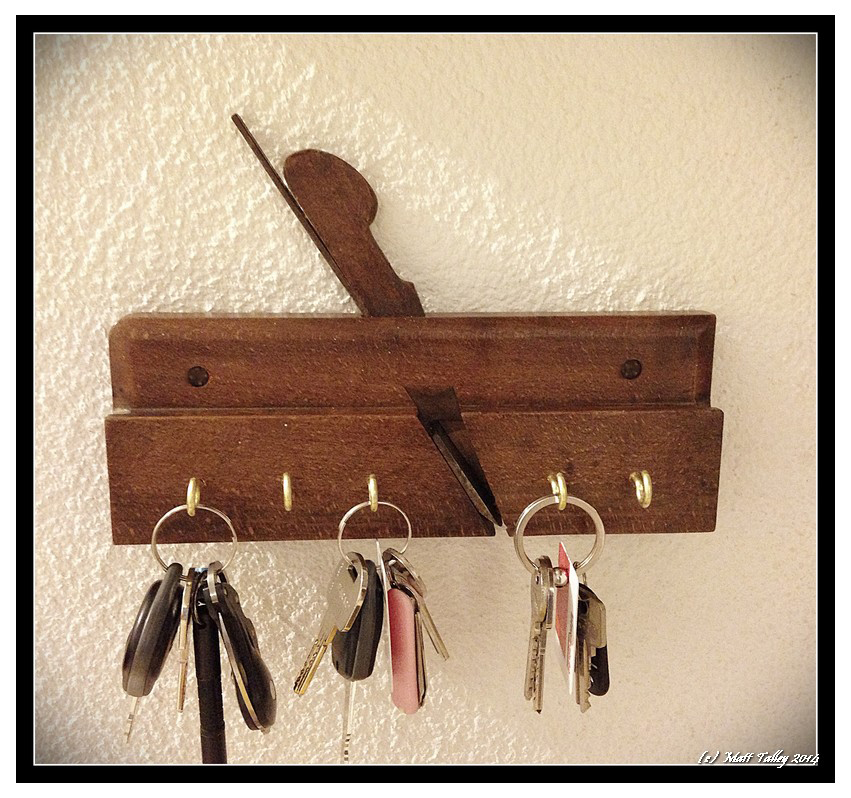
Occasionally, I find a beautiful tool that is beyond repair and cannot be brought back to life. I lament its loss. There have been a couple of pieces lately that I just couldn’t let go into the burn pile or let sit to languish as food for wood-worms. The molding plane pictured below was/is a 1860s-ish Gleave #8 round and was split and has warped at the split to the point that there was no bringing it back from the dead. So I cleaned it up, applied a little walnut oil, and added a VERY pitted iron to make a key holder for our living room. It subtly tells first-time visitors that a carpenter/Ébéniste lives here.
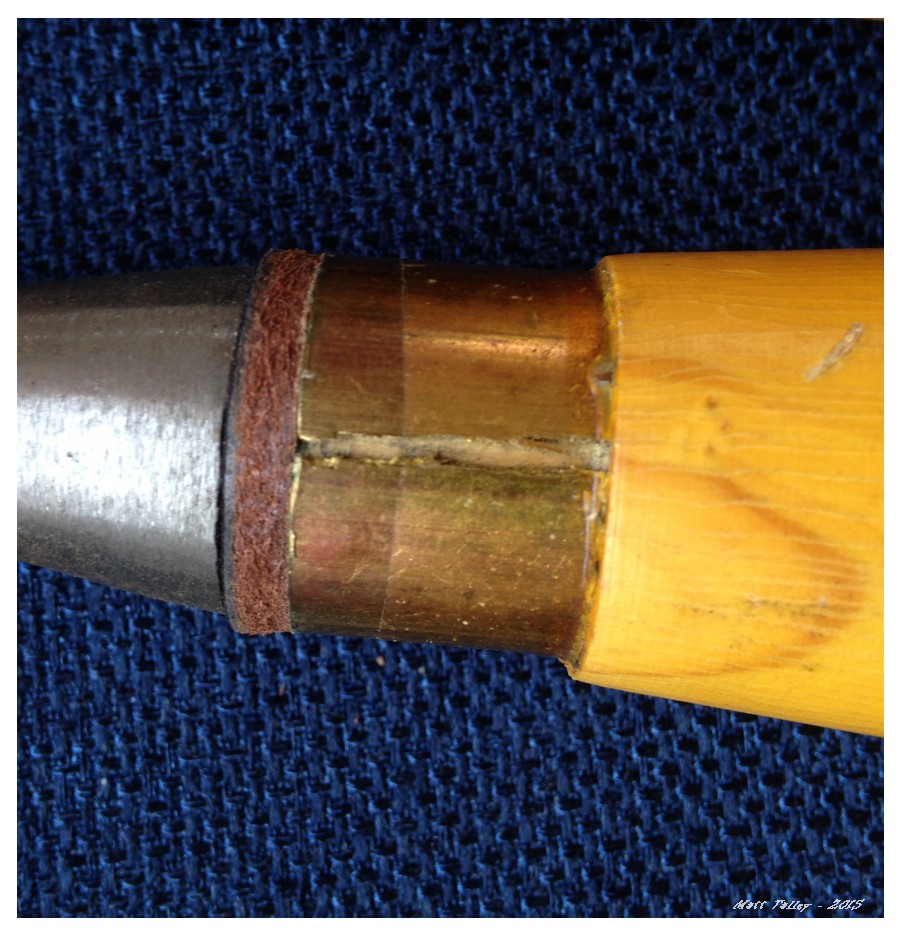
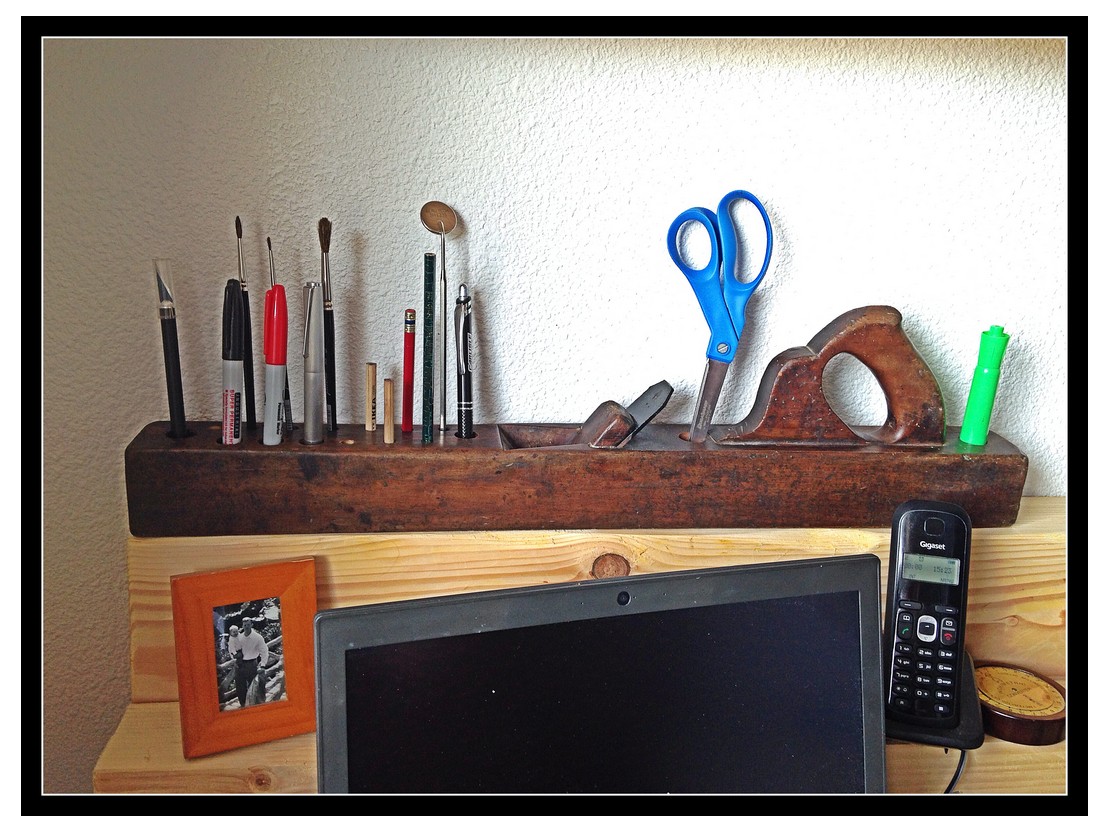
The 23″ walnut joiner plane, also below, was the property of a C. Wanger, and used just outside the village of Cornebarrieu, France. It bears the marks of his hand on the foreend and his thumb and index fingers have left deep indentions on the tote. It has been repaired a couple of times, the wedge has been cut off and worms got to it years ago. The poor thing is now held together with hope, spit, and a little epoxy. I loved the size and color, so I turned it into a desk organizer for my office.
Before you all start collecting scrap so you can roast me alive for desecrating beautiful tools, know that I rescued them from a fiery fate and have given these tools a useful and meaningful after-life.
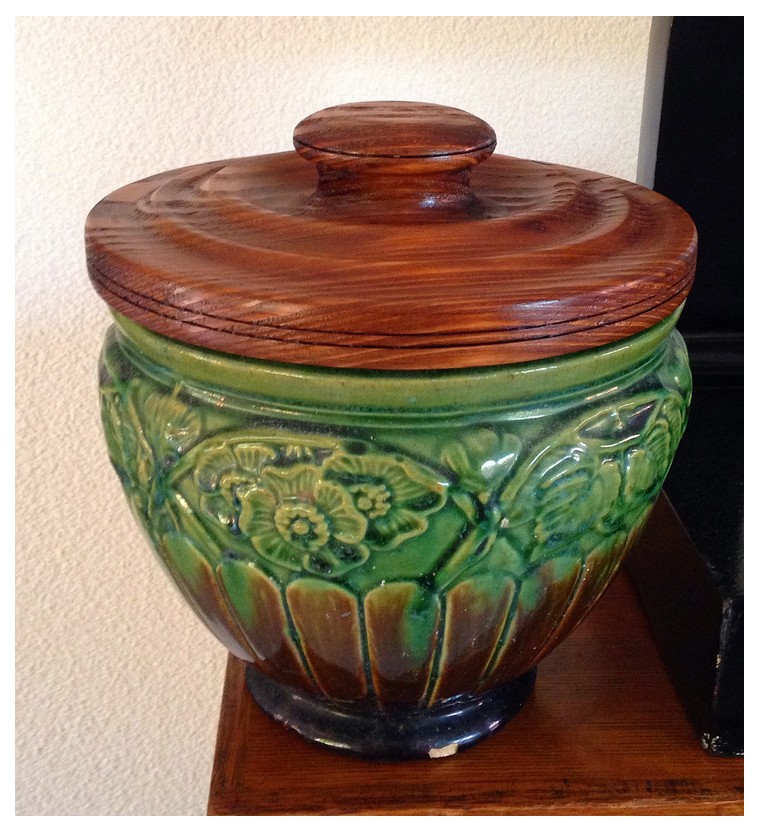
Need a trash can lid? Make it on the Lathe
We have a Art Deco flower pot in the guest bathroom that is used as a trash can. is about 9″ high and 8″ in diameter, so it doesn’t hold a lot. However, our new puppy is VERY interested in the contents of that vessel. To stem any possible and eventual messes, I took some pine scrap, chucked it up in the lathe and made a heavy wooden lid. I stained and finished to match the pot. Simple fast jobs like this make it so I can buy new tools without my sweet wife flipping out.

What I want Thursday – Birthday Addition 2014
In about 3 weeks I will celebrate the 13th anniversary of my 29th birthday and the current plan is to spend the weekend in Porto, Portugal. While there, I want cake (moist yellow cake with chocolate butter-cream frosting), snuggling, a nice glass or 6 of Port, laughter, and a few well thought out gifts. I will NOT work that day – just not going to happen – and I plan to pamper myself with a haircut and a strait-razor shave if it can be found. I might buy some new wingtips, just ’cause they make me happy. Cookies will be eaten and beef will be consumed in quantity.
Below is my birthday wish list – mostly for my wife and children, but feel free to peruse and suggest.
I already have a bunch of crap, so my first request is that you give to a worthy cause.
Heifer International: Bees, Goats, Chickens, Llama, the whole Ark… 🙂
Doctors Without Borders/MSF
Diabetes Research
If you DO want to get me a little token of your love and appreciation:
Books:
Anything from my Amazon wish list
A signed hardbound copy of Campaign Furniture
Theodore Roosevelt: a Strenous Life
I would like a signed copy of Chris Schwartz’s The Anarchist’s Tool Chest
Founding Foodies
A volume on handplanes or a tome on traditional woodworking
Twilight at Monticello
A Lost Art Press volume of The Essential Woodworker
James Krenov’s Cabinet Maker’s Notebook
Two Classic books on Shaker Furniture: here and here.
Stuff:
Don Julio Anejo Tequila
F3 Architect’s Wallet
Porsche Design TecFlex Fountain Pen (F Nib)
New bad-ass cufflinks or these or these…
A Global Chef’s knife, bread knife, and ceramic sharpener
Classic Cartoon DVDs (Bugs, Tom&Jerry, Loony Toons, Road Runner, etc…)
Stainless Omega Seamaster 007 or Planet Ocean with inscription
A fantastic sport coat
Tools:
A pair of 1/2 round molding planes
A Pair of Snipe Bill molding planes
A set of Mortise Chisels
Update:
In addition to a fine long weekend in Porto, my wife gave me a cute desert cookbook, awesome mustache cuff-links, and a watch that I have been asking for. My Father-in-law sent me the funds to buy a nice bottle of port. My Mom hooked me up with an apron for BBQing and the thoughtful gift of Heifer bees. Bottles of good wine and great beer from friends here in France and I got cards and online wishes galore. It all made me very happy. Thank you everyone very, very much!