Earlier this year, while we were finishing the attic, I took a weekend and built a cherry and ash laminated canoe paddle at the Camp Beach Center For Wooden Boats shop – as my own wood shop was in full use for the attic/storage. It was a little bit of a rush build and after paddling with it once, I decided to rebuild and reform it into a better performing paddle. This video will take you through all the steps of the initial build and the refit. The next video in in this series will show the finish steps and some on-water testing.
Tag: Tools
Fitting and refinishing a walking cane – the video
As a follow-up to the knee surgery recovery and how it is all going:
After 36 years or so, I finally fit, cut, and refinished my grandfather’s oak walking cane to my dimensions and need. I have used it every time I broke an ankle/leg or had hip/ankle/knee surgery – there have been a lot of all of those due to a misspent, but exciting, youth. It was never sized right for me though and I just made due, not wanting to cut his cane. The latest knee surgery/rebuild will require me to use a cane for an extended period of time (~4 months), so I finally decided to just get it done.
This fitting is not a shot in the dark or a “..I watched a video once…” sort of a thing. I have literally fit a 100+ canes for other people – I was a PT technician at one point during college – but for some reason never got around to taking care of my own. The fact that is was my grandfather’s makes it extra special for me.
Film Friday – BEES!!
My wife bought me a package bee hive box kit for Christmas last year, which reinforces the fact that I have a wife that is kind and considerate and pretty damn adorable.
Anywho, I thought that installing a new hive would be a terrific opportunity to document all the steps to install bees into a new hive box. I went with a nuc hive instead of packaged bees and a new queen. That is for a later video. The whole process of bringing a new hive into the apiary also allowed me to show all the steps in prepping the pre-built hive boxes/parts and I was able to build and showcase a couple of steel hive stands that I have been thinking about and designing in my head for years. I will also make a video on the design and build of the hive boxes and parts, but that will have to wait until this winter.
I love bees and I love being a beekeeper. The honey isn’t bad either…
House Painting – Attic Installment
I documented the process to paint the attic conversion that we have spent a couple of months working on. I am using a Graco airless spray rig that I bought a few years ago at a big box store. It has paid for itself MANY times over. This is part 1 of a 2 part video series. In this one, I sprayed the drywall primer and the trim paint. For paint I only use Benjamin Moore. It is my favorite to use and it wears amazing – not cheap though. Wear your mask and keep your lungs healthy!
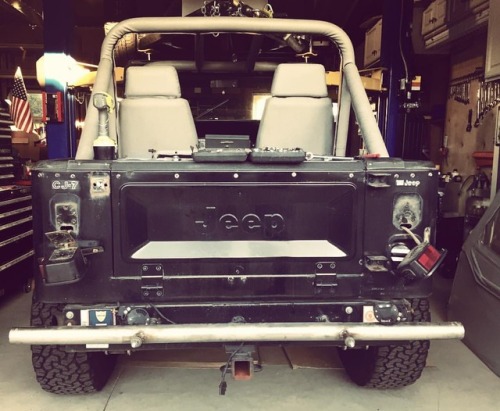
Jeep Re-Build Update Video
I got the Jeep back from paint months ago and it has been sitting on the lift in the garage – letting the paint cure as we have had work done at the house (Attic and Basement). I am not 100% happy with the paint, but that is another video. I have been collecting small cardboard boxes full of goodies since last October for the after-paint re-fit. That installation process has begun with the mounting of lights, fender flares, a new bumper, etc… I am giddy with anticipation to get it out in the Seattle summer sun.
This weekend was full. I really need to stop working on my days off.
Welding Cart experienced a failed wheel/axle combo
I said dirty words and decided to replace rather then rebuild
Also decided to upgrade – just a little.
Sourced new cart and used a 20% off Coupon
Assembled new Harbor Freight/General Tools MIG welding cart
Recorded a video of whole experiebce for YouTube channel
Wired in a couple plugs and lights in the attic.
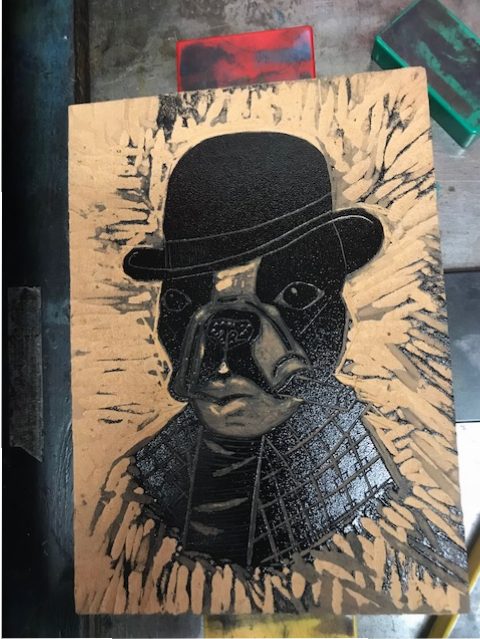
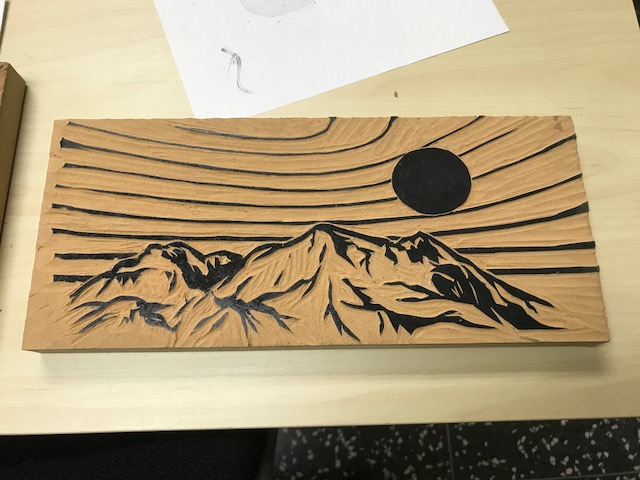
Worked on linocut of our dog Brodie and of a mountain scene print for two letterpress projects.
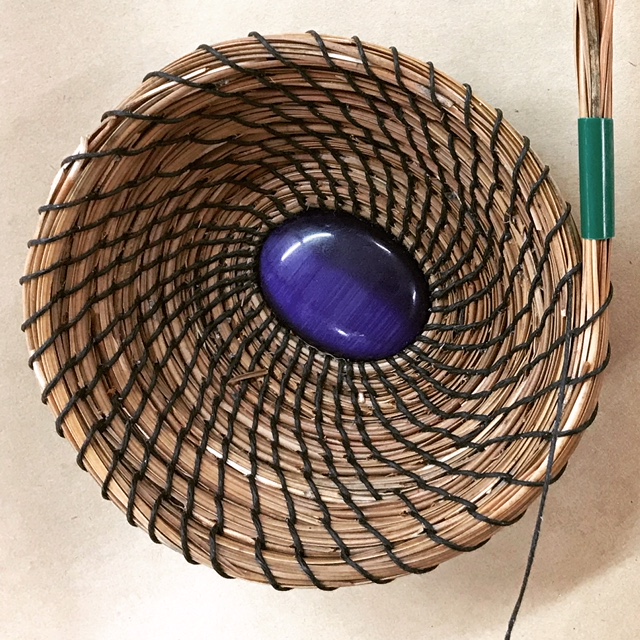
Wove a 9”+ pine needle coiled basket – because I can.
Made like 6 Instagram posts
Played Ukulele for a bit.
Recorded a couple of riffs and a drum track
Started building a podcast tool for website – slow going
Made a run to the city dump with a trailer load of building material/construction waste.
Mowed and edged yard.
Worked on the washing machine
called it names until it worked
Spent an hour looking for new Jeep parts that disappeared in the garage.
Said more dirty words – there is a theme here…
Found the parts
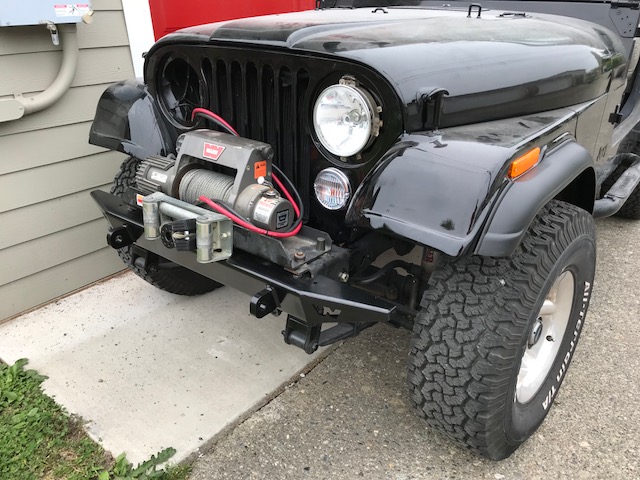
Installed front blinkers and driver’s side head light.
Completely failed at installing LED tail lights.
Threw a little fit.
Asked questions and then ranted on the Internet forums.
Packet the LEDs back up, returned them, and ordered replacements with regular bulbs.
Sat in yard and drank some Rose’
slept late (8:30) on Sunday morning
Cleaned backyard a little
Took Mom to lunch
Celebrated Mother’s Day
Took mom to nursery for flowers and yarn shop for some skeins of alpaca wool.
Installed new fender flairs on the Jeep.
Installed new Jeep bumper and re-installed winch
HUGE pain and took forever
Two band-Aids with consumed.
Wore good cloths while wrenching.
Wife caught me with grease on shorts
She made wet-cat noise and I got in trouble…
Organized and hauled out all of the recycling from house and garage.
Drank wine in the front yard.
Drank some more wine.
Binged watched season 2 of Westworld to catch up.
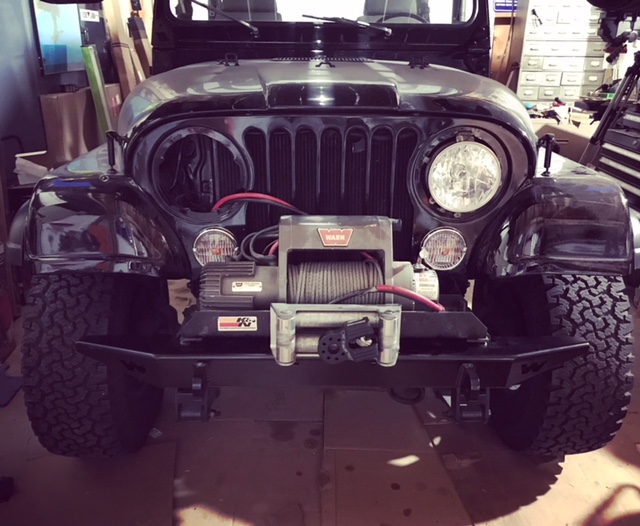
The Jeep Rebuild After Paint
As you know, I got the Jeep back from paint about a month ago and it has been sitting on the lift in the garage – letting the paint cure. I am not 100% happy with the paint… It took 4 tries for them to get the hood and fenders right and there are little spots and dings on the tailgate. There is also some mess just above the nerf bars and a run on the rear fender that makes me twitch, but they will be covered by some trim and the fender flairs, so… I included the Jeep’s homecoming in a video here, but skip to 5:09 as I spent way too much time blabbing about other non-Jeep related crap in the 1st part of the Video.
Anyway, I have been collecting small cardboard boxes full of goodies since last October for the after-paint re-fit. That installation process begins this coming weekend. I am giddy with anticipation.
The part additions and changes from Morris, Amazon, ARB, and Northridge4X4 include:
Duel Battery tray
Halogen headlight Lamp Conversion Kit (wanted LEDs, but don’t want to pay $600+ for headlight!!)
Black Rugged Ridge Fender Flare Kit
Stainless Fender Flair Hardware
Front Side Amber Marker Lights
New Wiper Blades
New thick rubber floor mats
BestTop Bikini Top (uses existing soft top channel) for the 2 months of sun in Seattle this summer
Rugged Ridge LED Tail Lights
Front Parking Lamp/Lens
Black Factor 55 FlatLink Winch Cable Shackle
Burnt Orange Jeep Fender Decals
New Frame to Cowl Weather Seal
Black Powder Coated Stainless Steel Side Mirrors
New Winch Cover
Warn Winch bumper with D-Rings
Black Vinyl Spare Tire Cover
New Aviation-Style Light Switches for front spots and reverse lights
Stainless Steel License Plate Holder (I had it powder coated black)
Second set of D-rings (Powder Coated Burnt Orange to match Jeep Logo)
Hi-Lift Jack Rebuild Kit (sandblasting and repainting origional)
Bronze Door Hinge Bushings (sourced at McMaster-Carr)
Warrior Pipe ½ doors (because I can)
ARB Recovery Tools Bag to organize my off-road gear
ARB Compact Onboard Air Compressor (Got a SMOKING Deal at the ARB booth at a recent Jeep Swap Meet!!)
Getting new bar covers made as well
Film Friday – An Update and a Little Ranting
A quick update about why I have not posted here on my blog or been on YouTube for a few weeks and how I have been spending my time: Roadtrippin’, some slight ranting, obscene gestures, naughty words, snowboarding, beer, some boats, a little 3D printing, and a sneak peak at the Jeep’s homecoming after 12 weeks in the body shop are all to follow.
Film Friday – Double Feature
I had a found (fly-away issue) DJI Phantom 3Pro sent to me as a gift by an awesome buddy – a SERIOUSLY awesome friend! I took a look and decided to rebuild the thing and see if I could get it back in the air. Here is that process:
From my second You Tube Channel – the one I use to share vacation videos and miscellaneous stuff – I present for your viewing pleasure: Snowboarding at Loveland and Winterpark in Colorado with great friends on MLK weekend 2018
As always, PLEASE hit the subscribe button if you like my content on YouTube. Thank you!
Film Friday – Oak and Maple Pizza Peel Build
My Father-in-Law, The Chatty Buddha, wanted me to make him a pizza peel and while I have built cutting boards and boat paddles, I hadn’t yet made a peel. I agreed, sourced the lumber from a local salvege store. It used to be flooring, but after some magic with the table saw, jointer, some glue, and a hand plane or three – he has a pizza peel that I gave to him for Christmas. I hope to be enjoying pizza from it for years to come.
My Own Personal Take on Hand-planes: Buying Recommendations to Use
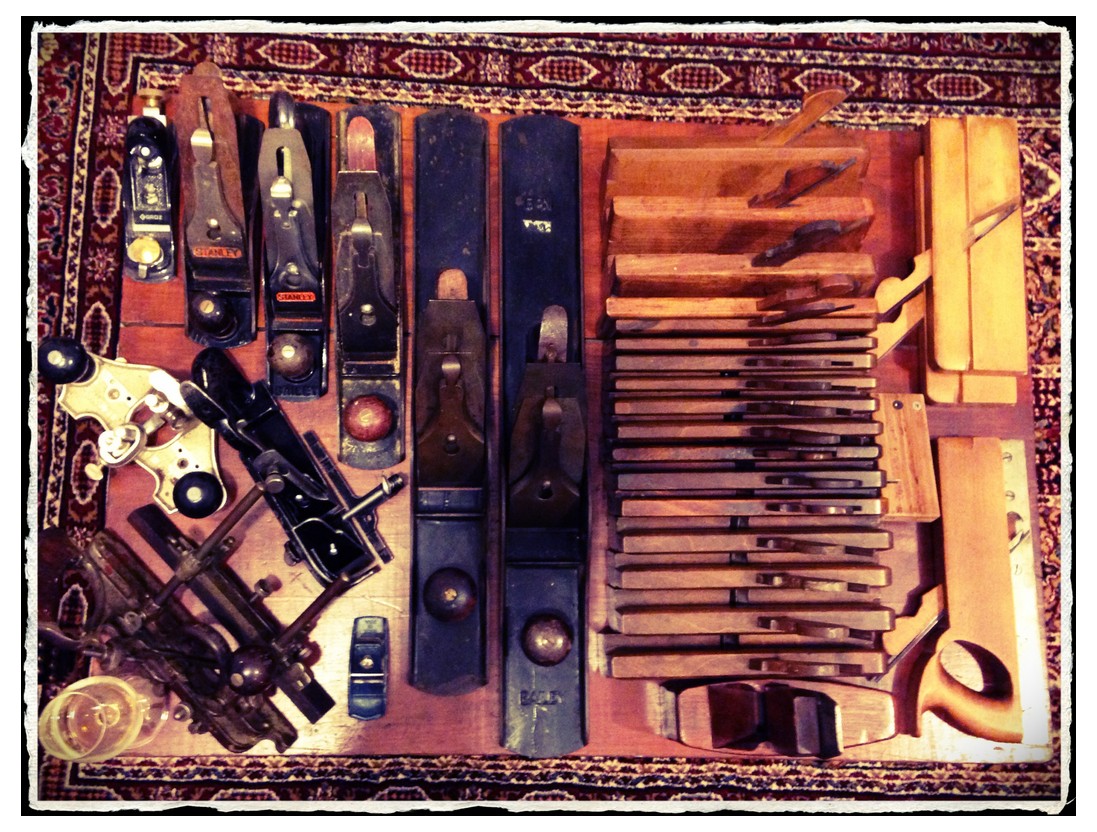
I use the bejesus out of my power tools. I LOVE my SawStop, my Bosch compound miter-saw is scary accurate, and my band-saw is magic, but there is room in my life and in my shop for lots of hand-tools. I am a child of both Norm Abram and Roy Underhill. I watched them both on PBS every Saturday after cartoons as a small child in 1981 until I was 44 or so. Their combined influence has made me value the old way of doing things without being a Luddite and I can appreciate modern cabinet shop/woodworking tools. Case in point: I have a 3HP Powermatic 3520 lathe and would not even want to think about turning a bowl or platter on a pole lathe with a forged hook knife. On the other hand, while I have not given up a single one of by 5 routers, I found years ago that it is sometimes faster to grab an old wooden molding plane from a shelf and take care of an edge detail or piece of trim. I can be done and dusted with the plane in the time it would take me to find the right bit an set up the router.
Because of my vocal love for hand planes, I get questions all the time from friends and acquaintances about what they should buy, where they should start, how to set something up, sharpening, truing a sole, etc… I thought I would take a minute to go over those things, stand on my soapbox a little, and give the world my opinions concerning hand planes.
.. Ascending my soapbox… Ahem…
- Buy a quality block and #4 smoothing plane – Lie-Nelson, Wood River, or Veritas are great options. Stay away from used hand planes or classics until you get used to how a hand plane SHOULD work. Setting up an older Stanley or Bailey plane, sharpening, replacing parts and flattening the sole will drive you insane if you don’t know exactly what you are doing and will make you want to throw the thing and swear off hand planes forever. Start with the known good and once you know how it should function, then you can pick up a used #2 bench rabbit or a #8 corrugated bottom jointer and tune them sweetly – maybe. I would go over any prospective purchase with a scornful eye and replacement the blade and/or chip breaker on an old plane is required about 50% of the time, in my experience anyway.
Here is my list of the initial planes and accessories you will want/need ( I like the low angle but to each his own):
- Stanley Low-Angle Block Plane
- Shoulder plane
- Smoother plane
- Plane chip-breaker Screwdriver I swear to God you need this, really! When you mare the screw an a $200 plane because you didn’t listen, it is your own fault for not listening.
- Sharpener: get two…
- Buy a nice set of Japanese water stones 1000 to 8000 grit. Watch the videos and keep your blades sharp.
- Also, Japanese planes, like Japanese pull saws and water stones, are FANTASTIC. They deserve their own diatribe, but for the purpose of this post I will stick to western planes with the exception of an edge-rounding plane. I use mine constantly.
Nice to have once you get serious about using hand planes:
- Jack Plane
- Jointer planeSpoke shave Get the flat first then the curved. You probably wont ever need the concave one.
- This Router plane but, if I were in the market for a new one, this Walke Moore version is the nicest I have ever seen!
- Scraper plane – get the toothed blade
- A combination plane, but be wary of used Stanley Record #45/#46s. They can be a beast to swap around and if they come with all the original parts they are spendy!
- if you are going to be doing a lot of drawers or insets, then both a Left and Right Plow Plane are really nice to have
- Wooden molding planes : See below…
Once you have been bitten by the molding plane bug, you will want to run right out and buy a 1/2 or full set. Good luck. There are not a lot of makers out there and the ones that are doing it have a long wait list and are not cheap. Some people, like myself, invest is an older set. My molding planes include a 3/4 harlequin cove and round set (mixed from various makers and time periods) that I have carefully built over the last 9-10 years. The dates for my planes run from 1956 to 1930s to 1850s/70s and I have one from the 1790s that has an uncommon roman ogee shape that I use on boxes and 6-board chest lids. This collecting takes time as there has never been a set standard for what a #8 is, for instance, so there is a lot of variance in sizes between makers. I have replaced a few irons as well.
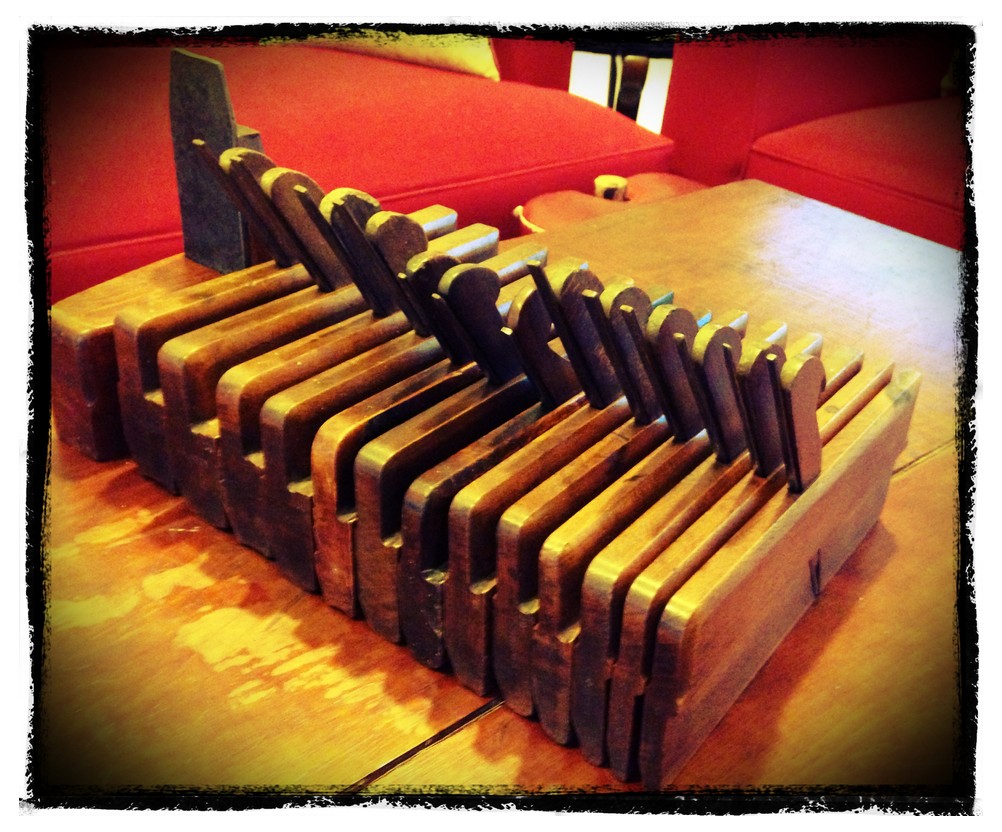


I often defer to people that are smarter than me and Matthew Bickford and Chris Schwartz recommend a set of #4 and #8 and a set of #6 and #10 hollows and rounds as an initial starter set. I would add that a 3/16 beading plane is a wonder to have as well if and when you start down this road.
To my own set, I have added some additional beading planes – up to 1/2″, tongue & groove planes for 1/4″ – 1″ stock, specialized profile molders, 1/4 rounds, scrapers, etc., but those is my own personal obsessive tendencies.
I failed miserably at finding a classic matched set of snipe-bills and half rounds (NEEDED for linen-fold panels). I have resigned myself to buy new ones from Old Street Tools, but I have to warm my wife to the idea of me spending serious cash on blocks of wood and iron that I will use 5-6 times a year. I have been working on her for 3 years and they are on my Christmas and birthday list every year. No luck yet.
Read Bickford’s Moldings in Practice (if you have bled with me or we have swapped spit, you can borrow my copy) and take a look at the video of the same name before jumping in. Molding planes can be sourced from the following, in no special order:
New planes:
- Caleb James
- Matt Bickford
- Old Street Tools
- Made in England Philly Tools
- J. Wilding Planemaker
Classic:
- Jim Bode Tools for reliable planes
- Liberty Tool has great molding and fine steel planes as well
- I have made some decent finds on Inchmartine Tool Bazaar
…and now I will dismount my soapbox…
Film Friday – Another Hammer Re-Work/Repair
I had a tired, old, home-made, second-hand chipping hammer that was broken and had been so for years. So, I MIG-welded the busted joint, ground the transition, and added a reclaimed hickory handle, which came from a hatchet rebuild shown in a previous video that I posted on YouTube. With the re-weld and addition of copper handle rivets, it should last a few decades now.
Chopping Firewood Warms You Twice
I have some on the most awesome neighbors ever. I know a lot of people say that, but I firmly believe in mine. One of my neighbors across the street took down a maple and a cedar and offered both up as fire wood for me to just HAVE! Now, two trees is a lot of wood to and split and the cedar looked nasty with lots of knots and limbs. I decided to rent a $70 hydraulic log splitter for the day and just get it done.
I showed up with a chainsaw, bar-oil, and the splitter and he had it all laid out and ready to go. He gave me pre-mixed gas for the saw and spent 9 hours helping me bust it all up – just because!! Even though we used the splitter, it was still HARD work and we lifted/rolled/moved/cut/shoved 2+cords of wet heavy wood around. It was work! I bought him lunch and a bottle of Bushmills 10yo Whiskey, but that is nowhere near enough payment for all he did!
The maple is enough to supply around a third of our wood for next winter (takes a while to season) and the cedar will make for awesome fire pit wood in the back yard and at the beach! I am on the lookout for some oak to lay up this winter and I would commit heinous acts for a load of madrona…
Film Friday – Home Garage Car Lift Details
The short film below is part on my on-going series on YouTube discussing and showing my garage/shop build process. It details my experience of having a 2-post Rotary Revolution RTP10 vehicle lift, why I went with the type/brand/style that I did, thoughts after using it for 9 months, and what I might do differently if I could go back in time.
As Always, likes are really appreciated on my YouTube Channel!
Film Friday – Blacksmithing and Forging
I am a novice smith and that is being generous. I do like to forge though and it is awesome when I get a little time to make things for myself. This short film details a couple of the different type of hold fasts (metal work and word work) that I recently made at the Pratt Center for Fine Arts forge in Seattle. If you live in Seattle, have a single maker bone in your body, and haven’t checked them out – do so immediately and sign up for a class or two.
Amazon is my friend.
Amazon makes me happy. I need a tool or a book or a part and a few clicks and 24-48 hours later I have the stuff I need. In the last month I have purchased the following and help make Jeff Bazos officially the worlds richest man:
1-3/16-Inch Combination Wrench
1/2″ drive 6 PT STD Socket 1 3/16
Book: The Orphan Master’s Son: A Novel (Pulitzer Prize for Fiction)
Valvoline SynPower Synthetic Automotive Grease – 14.1oz
Conan The Barbarian Thulsa Doom Iron/Sew On Embroidered Patch
Winter is Coming / Stark Wolf / Game of Thrones 2×3 Patch
Dropping F Bomb WW 2 Style Tactical morale 3.5 X 1.25 Hook Patch
1 $25 gift Card
Book: The Weight of Ink
Dickies Men’s Short Sleeve Shirt, Blue Chambray, Medium
Book: The Adventure of English: The Biography of a Language
DCDEAL Large Size 24 Compartments Adjustable Plastic Electronics Parts Gadgets Tool Storage Box
Biotics Research – CoQ-Zyme 30mg 60 Tabs
Book: Spoonbenders: A novel
Book: South Pole Station: A Novel
Microsoft Wireless Mobile Mouse
Pampers Swaddlers Disposable Diapers Size 2, 204 Count
Baqua Spa Metal Control (1 pt)
Crosman Squirrel Reset Target, Metal
2 of Philips 416131 Clear Appliance 15-Watt T7 Intermediate Base Light Bulb
A Court of Thorns and Roses Coloring Book
Smittybilt 2733 Tire Plug and Seal Kit
all Mighty Pacs Laundry Detergent with OXI Stain Removers and Whiteners, Free Clear, Pouch, 38 Count
Echo Dot (2nd Generation) – Black
Westmark Germany Vegetable and Salad Spinner with Pouring Spout (Red)
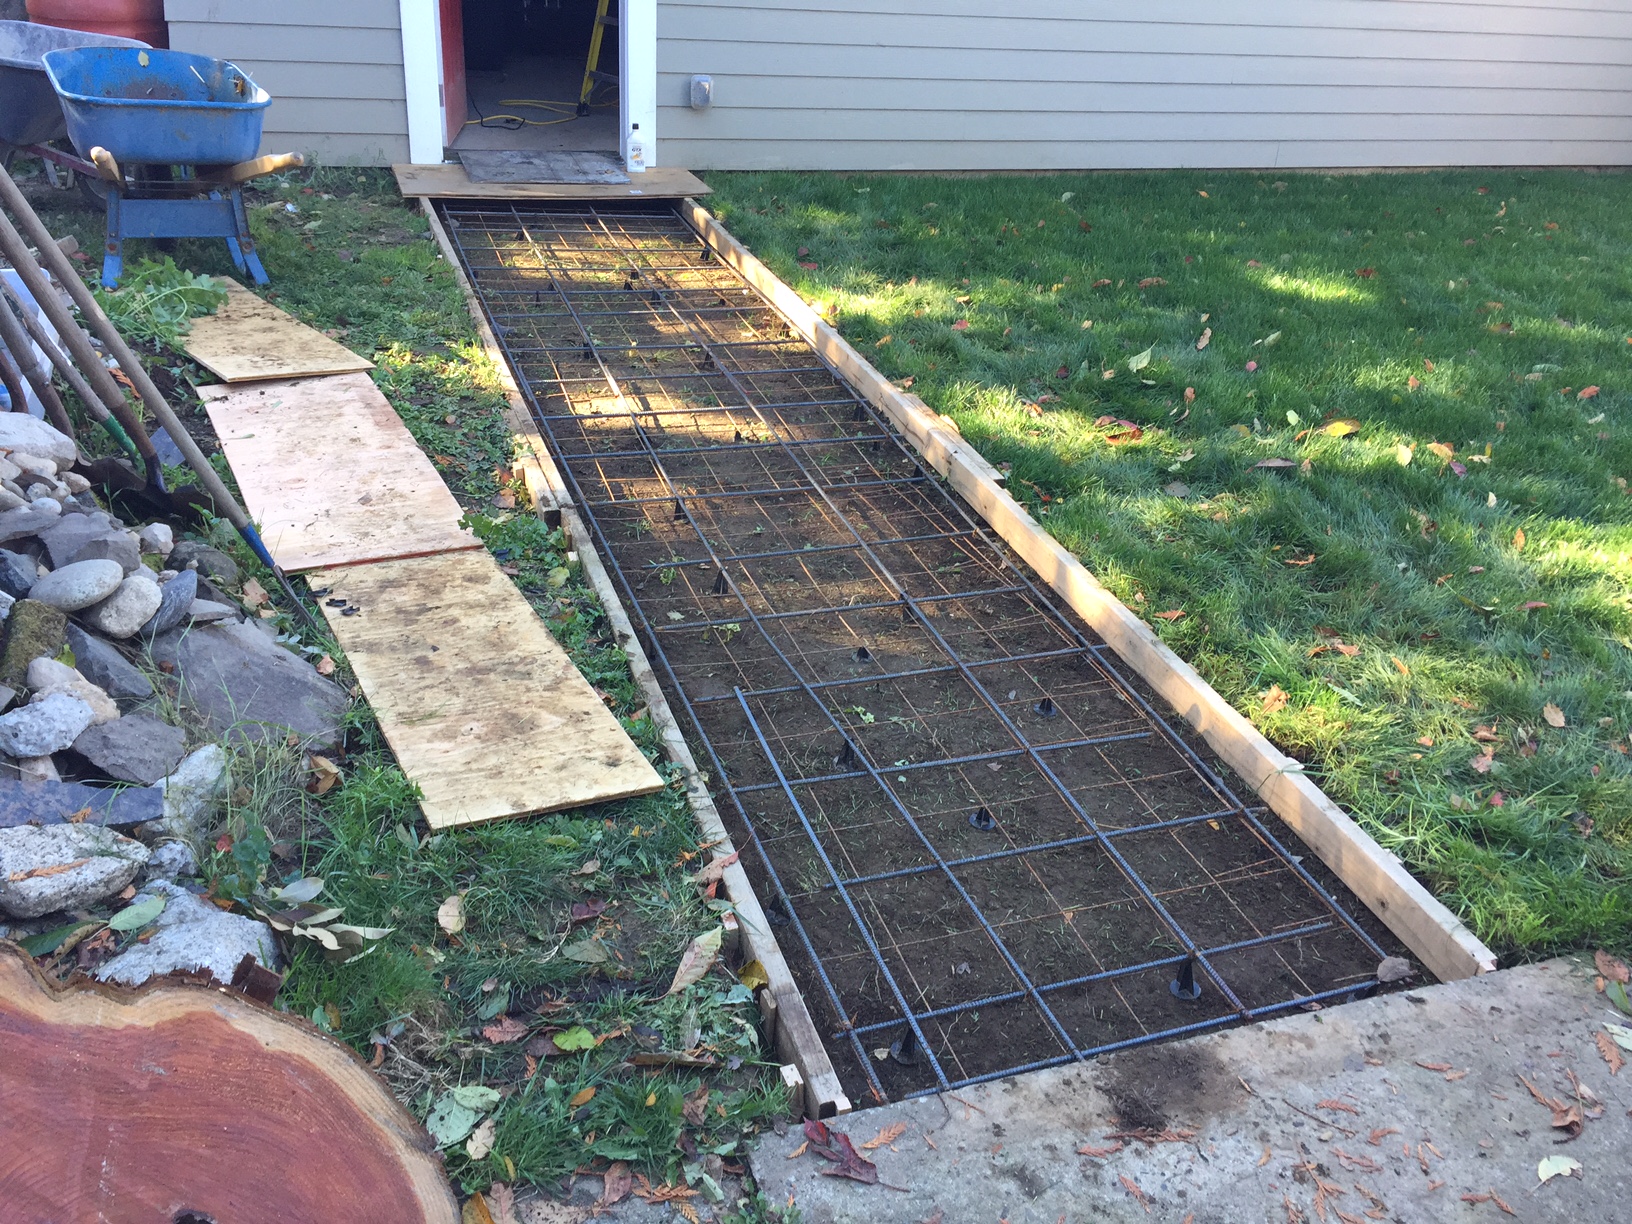
Film Friday – The Garage Sidewalk Pour
Below is a short film documenting all the steps taken in pouring a walkway between our existing patio and my garage/shop, as also discussed in less detail in a previous post. I MAY have overbuilt it… a little… maybe…
Thieving Bastards…
My neighbor, who is remodeling his just purchased home had his garage and house broken into and a bunch of tools and supplies were taken – mostly hand tools. He and his family thankfully live elsewhere right now, until construction is complete. The thieving bastards were on foot and left the larger tools and job box. There was lots of damage to the newly installed wooden doors that required hours of labor for patches and repair. It was all a huge pain in the ass for him and to add insult they came back a week later in the middle of the night with a u-haul truck to get the bigger stuff. This time they cut through the newly installed deadbolt on the garage with a sawzall, but my neighbor had already moved his tools out, so they left empty-handed.
The thieves were caught on camera both times, but who knows if the police are looking really hard at this. This super sucks for my neighbor and the neighborhood. For me, it heightened my level of worry. I already have an alarm on our house and garage, but haven’t installed the POE cameras yet. They will be going on this weekend and I am also installing an external siren capable of damaging someone the next state’s hearing. I hate that it has come to this and that we all have to be so paranoid, but I have already lost tools to a thief once and I REALLY don’t want it happening again.
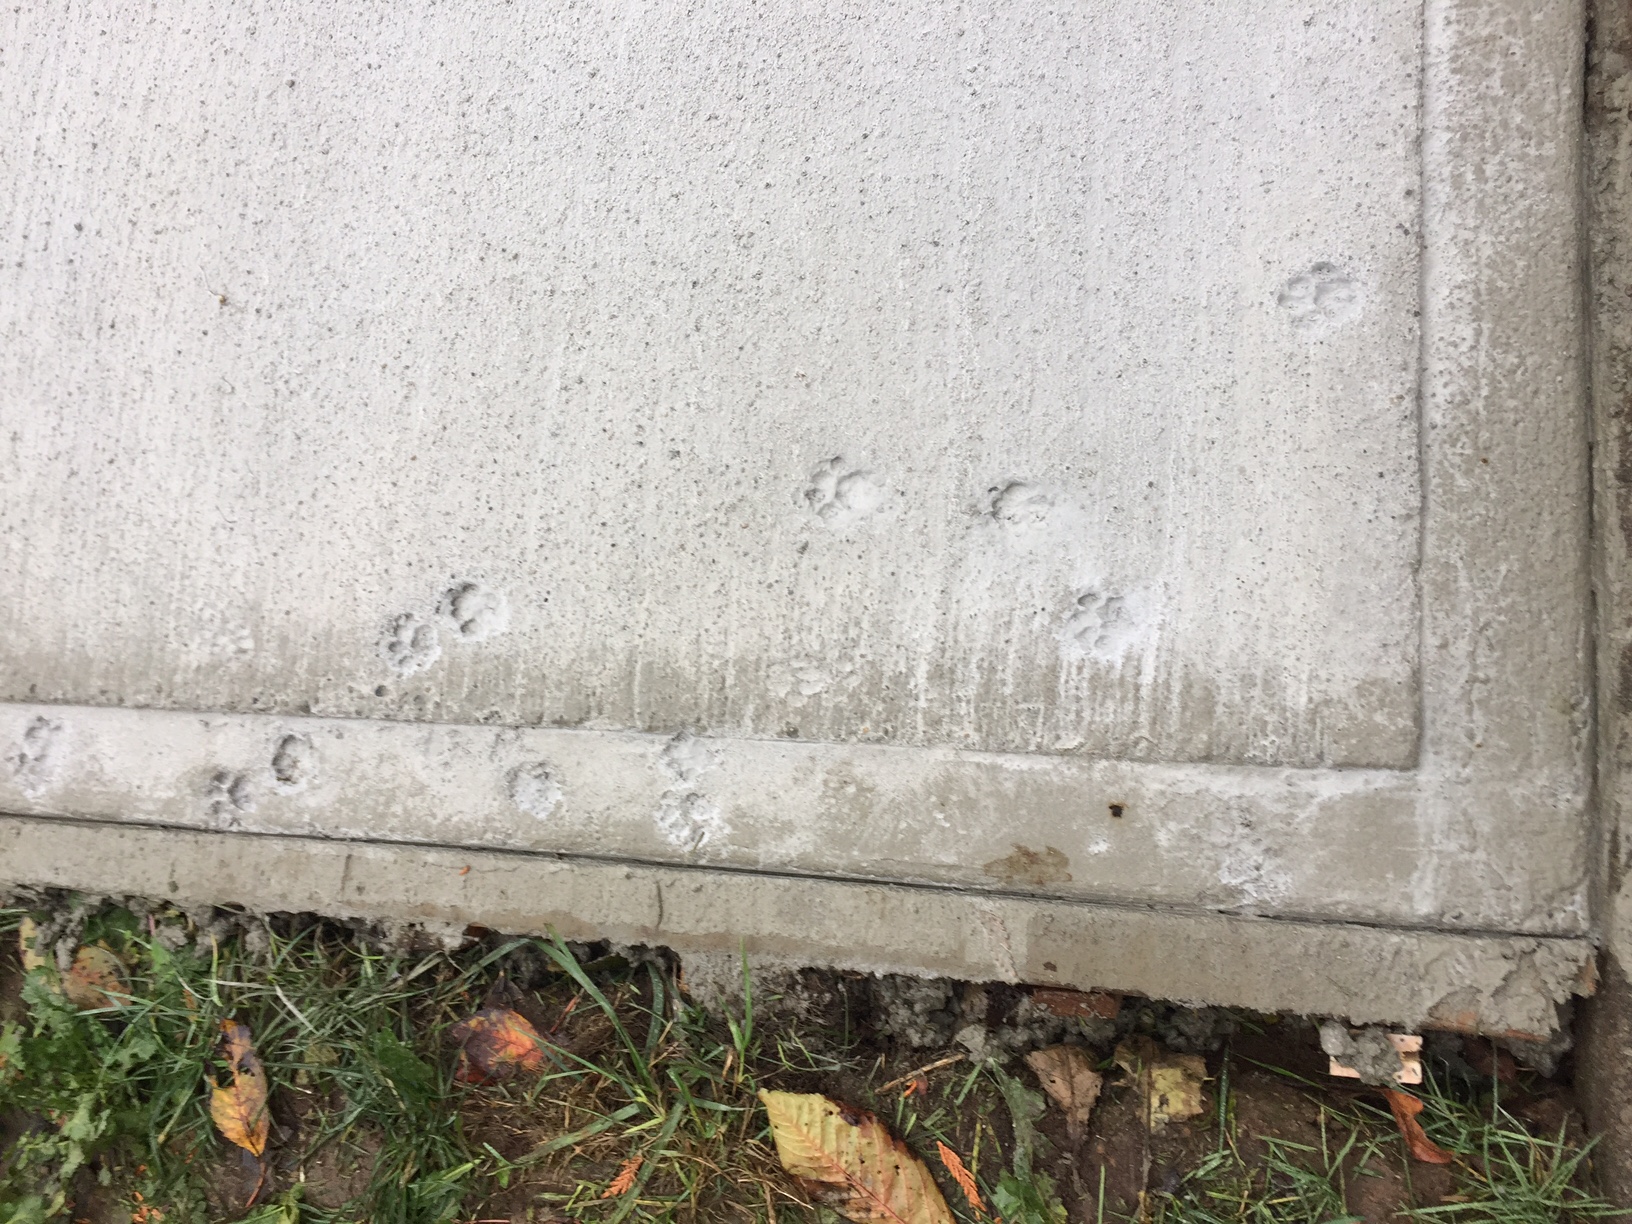
Garage sidewalk now poured with a side of cat-related drama
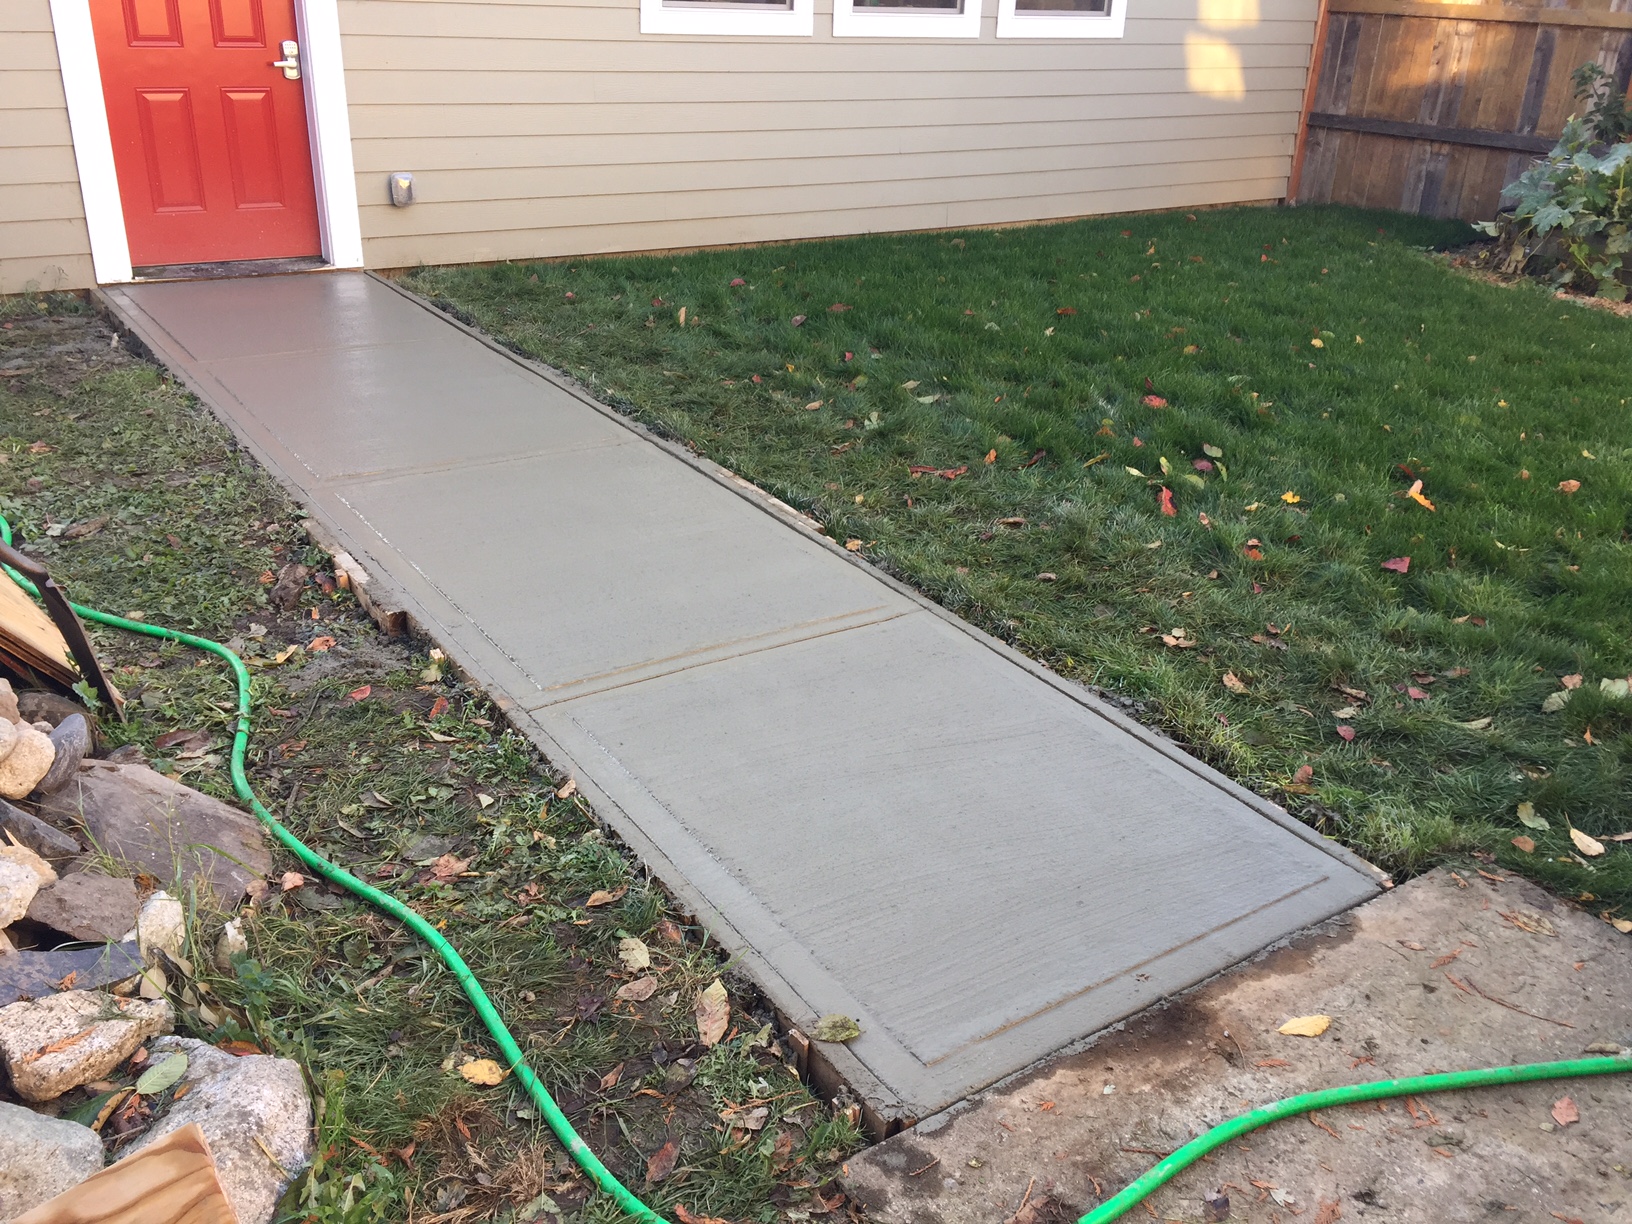
The sidewalk to the garage is finally poured – 8 weeks after I put the forms in… To recap, it is 20’X4′ and 4″ deep. I used 3500PSI with fiber added and lots of steel, because I hate cracking sidewalks. I paid a guy working on the house next door give me a hand with the wheel barrow concrete moving and to move-hold the other side of the scree board. It took two hours from the minute the truck rolled up until I was cleaning up my tools and I saved >$1500 doing it myself, even with the cost of material, delivery and a couple of new tools.
I was super happy with the results when I went inside at 5:30. When I went back out to check on it at 9:30, the cat had walked up one side all the way to the garage, walked across, and back down the other side. I now have cat prints in my “perfect” sidewalk until the end of days…
I am not anthropomorphizing, she did it as a “Fuck You bald monkey!” because I would not let her in the house. It was too dry to re-float. This morning, to add insult, the hate-cat dropped a giant turd in the middle of the thing up by the garage door. I said such dirty words! This is the last straw!
Who would like an overweight white fluffy cat that is passive aggressive and shits on the things I love? I will throw in 2 bags of food, a carrier, shot records, box of band-aids, half eaten mouse, and 3 cat-nip impregnated toys. It is an awesome deal! Won’t last! Act now before someone else snatches her up!

Film Friday – Jeep Paint Prep
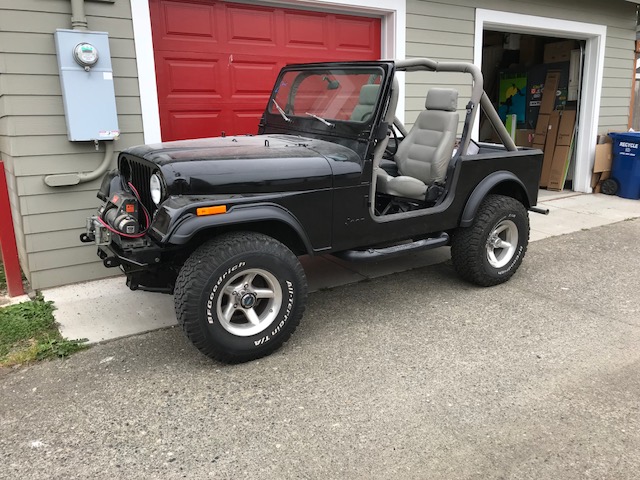
…And so begins my plan for interweb domination… This is the 1st in a series of videos detailing my Jeep re-painting project. I am doing the prep work and getting ready for my 1986 CJ-7 to go into the shop for a little cosmetic make-over. It was painted black at the factory in Toledo, has been black ever since, and will stay black until they make something darker. I also give a little bit of an update to what I have been up to of late, some projects that are in the works, and a quick pan view of part of a dirty, disorganized, and cluttered shop.

Labor Day Weekend – 2017
I was at home for Labor Day weekend this year and spend the time working on the house and yard. I dug up a cubic yard+ of dirt where the garage walkway will be and then built concrete forms, added rebar, and welded wire for a 20′ X 4′ sidewalk pour next week.


I also took a couple of hours to rebuild a 10′ section of fence on our south side. A 40′ (12.2m) tree had grown through it from the neighbor’s yard. He let me cut it down a couple of weeks ago and rebuilding the fence was required. Note: Stamps-With-Foot did not see me roped up, hanging in the harness, topping the tree, so I didn’t get in trouble for being a “stupid man” until later 🙂


Garage, lawn, and house work this weekend
Worked in the basement a bit to make Stamps-With-Foot’s sewing room/project space usable.
Made two trips to the dump.
Built screw clamp holder.
Did a little Amazon shopping for a gift and a part that I needed.
Went shooting at the range – shot like a blind squirrel.
Cleaned pistol, muttering disappointment in self whole time.
Hip super-hurt all weekend.
Went to see Atomic Blond for date night. Great movie.
Bought two bookshelf cabinets for garage at Second Use – got a super good deal (hard to do these days at Second Use)
Picked up 2 cases of oil at discount from NAPA
Put down a little 1/4 round trim in dining room.
Washed Stamps-With-Foot’s car.
Filled the washer fluid.
Worked on a couple of films.
Cleaned lighting contacts on the trailer light harness.
Took a load of recycling to the dump.
Organized shop a little and hung the two cabinets.
My shop now has all the storage I will ever need – until I fill it all up 🙂
Consumed some rosé while sitting in sunshine in back yard.
Snuggled wife and puppies.
Installed my welding cabinet and filled it with helms, jacket, gloves, sticks, and welding tools.
Made a happy face.
Did not mow lawn…
Ran two lighting circuits and one 220VAC circuit in garage.
Need to install the 4 florescent lights.
One 220VAC circuit to run and all shop wiring will be complete!
Flew drone a bit to work out new firmware update.
Took a few macro photos with camera
Spent too long on Instagram and Twitter.
Ignored the grass some more.
Changed oil in my father-in-law’s truck.
Picked-up/was given wrong oil filter!
Said dirty words…
Made it to parts store 3 minutes before they closed for new filter.
41 more oil changes and the lift pays for itself!
Car Lift and Jeep CJ-7 Saga/Search/Information
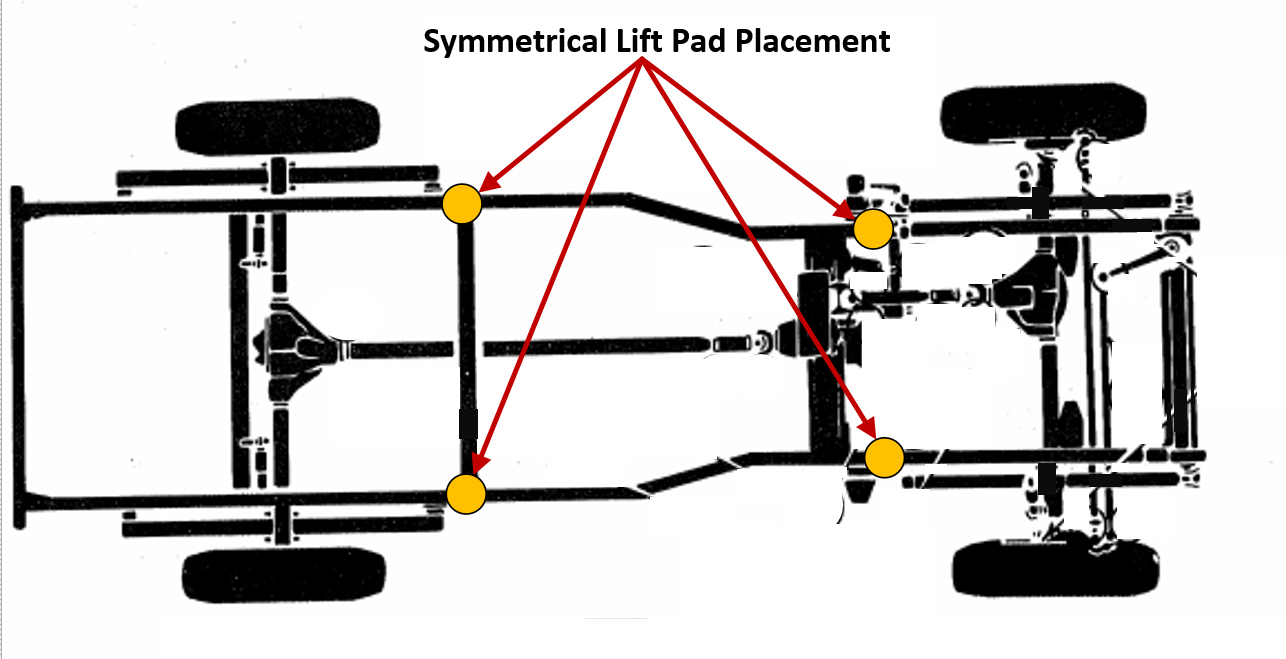
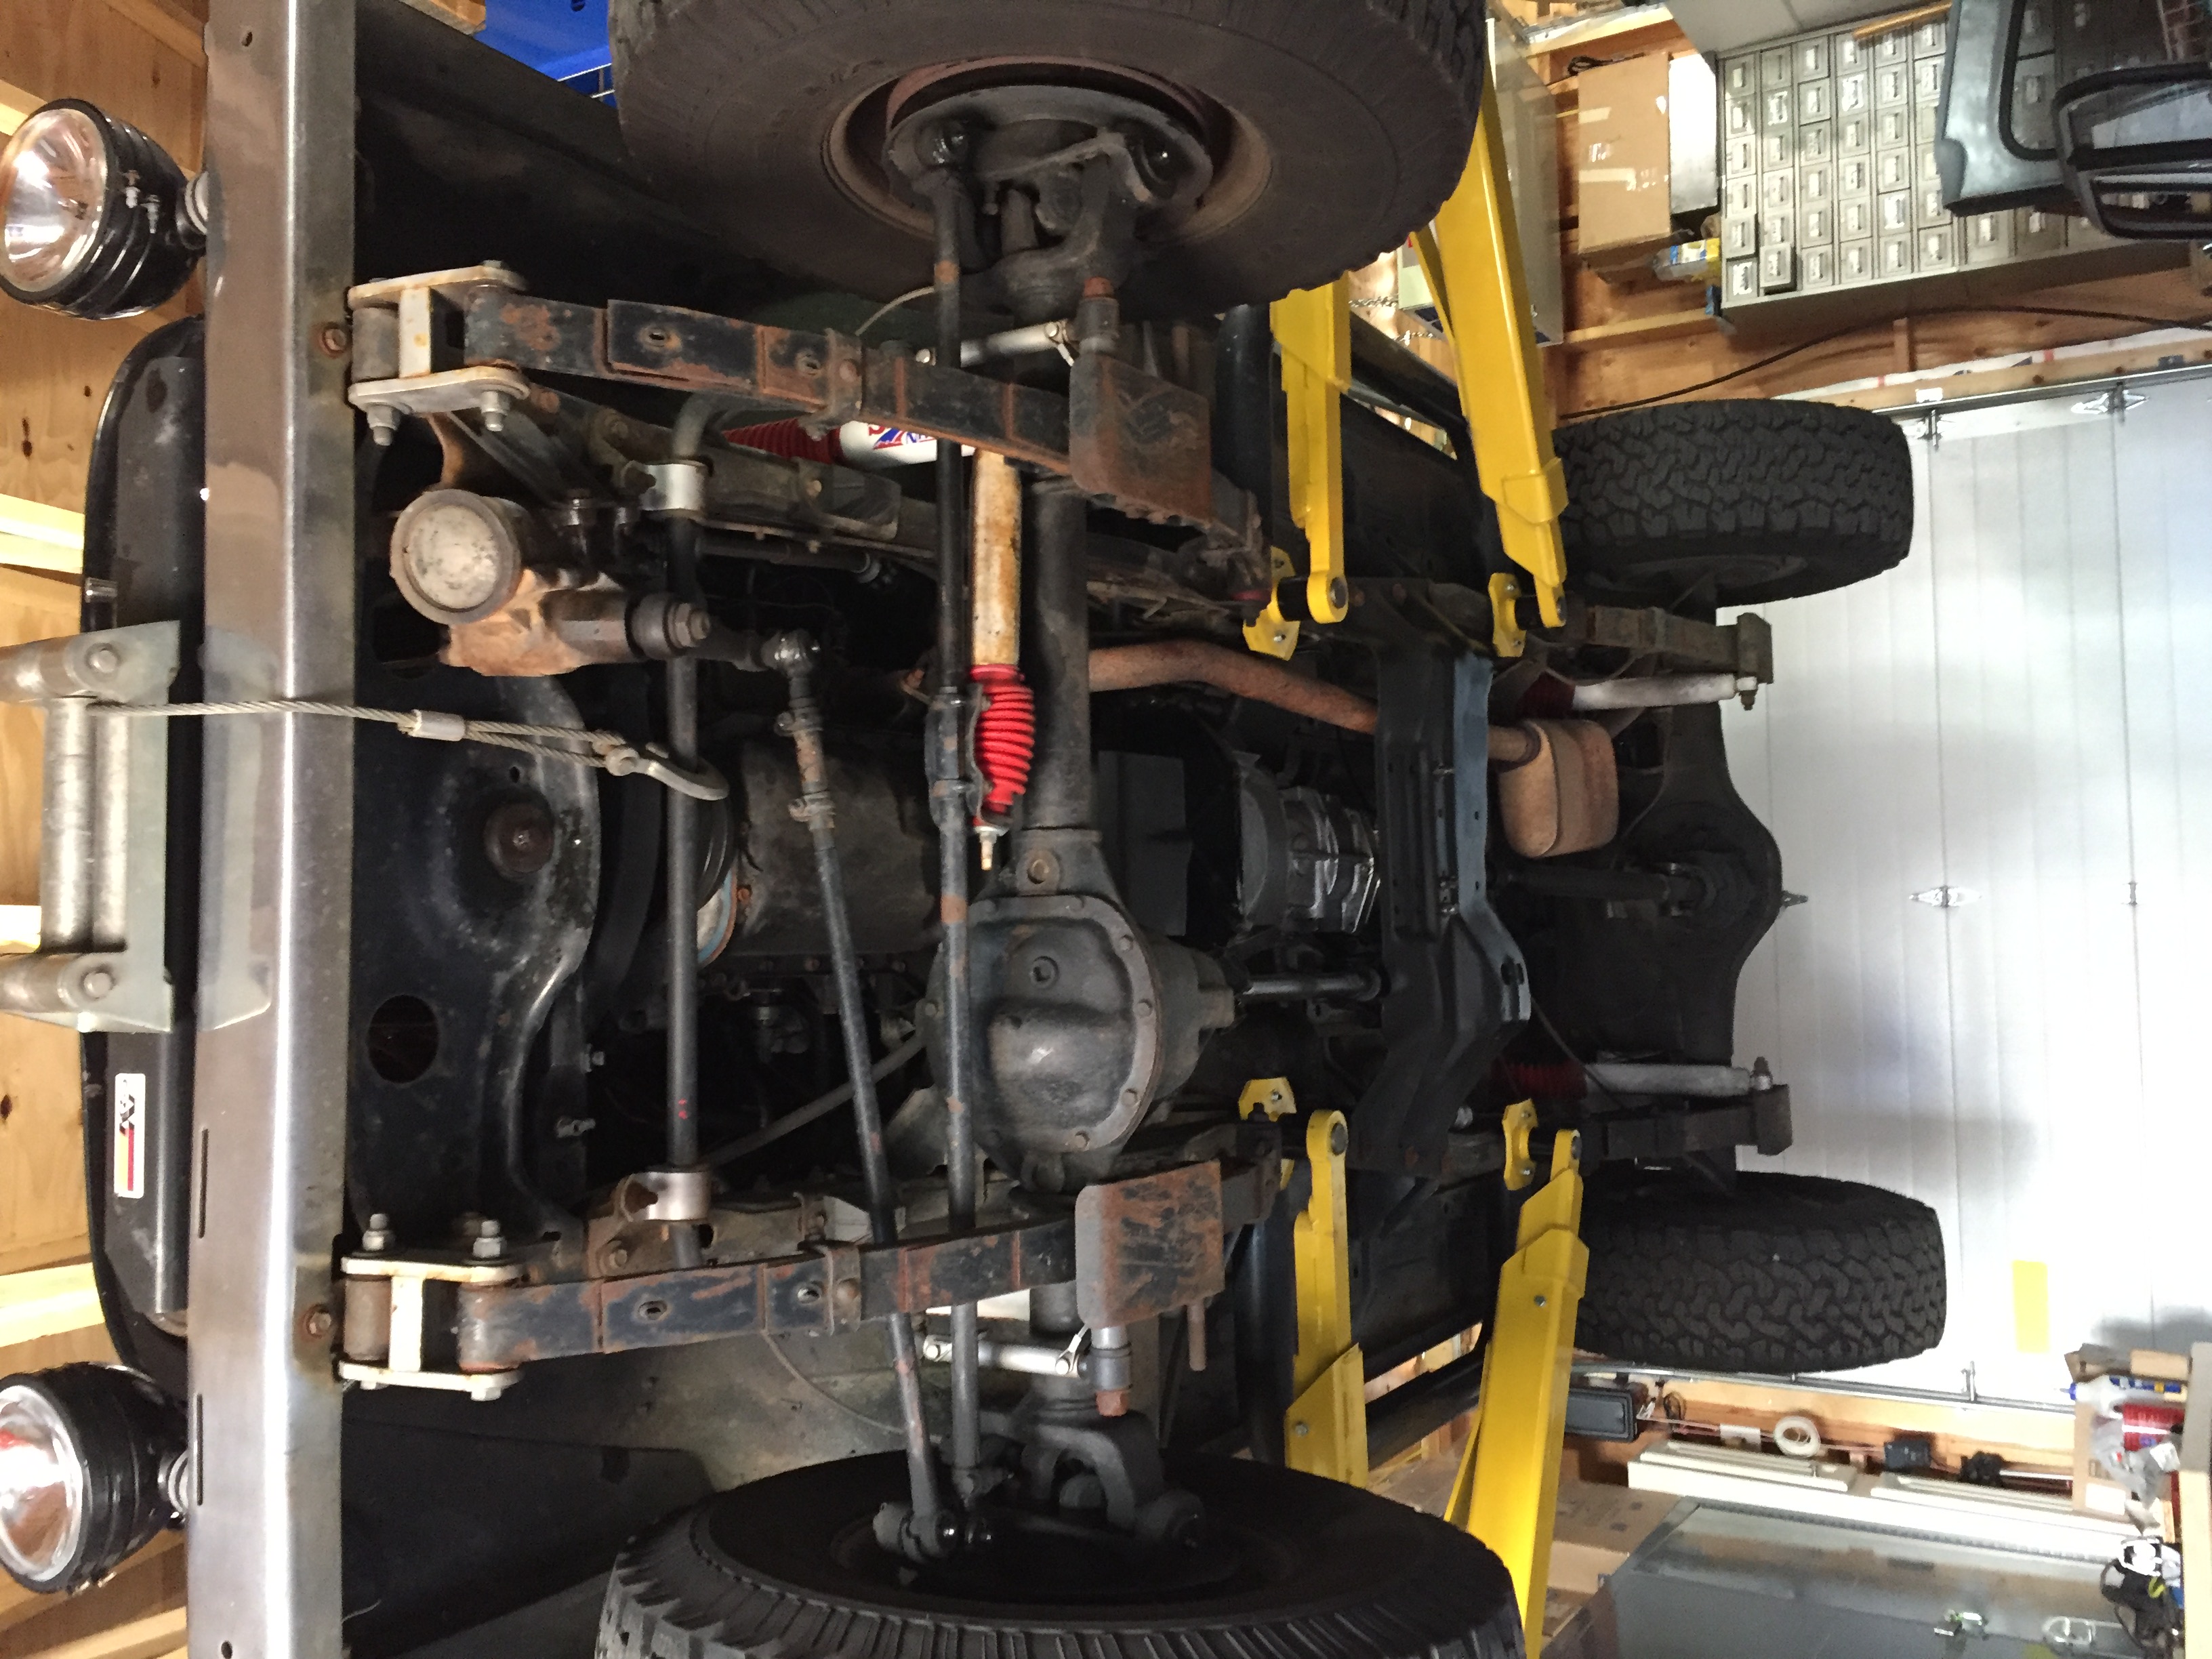
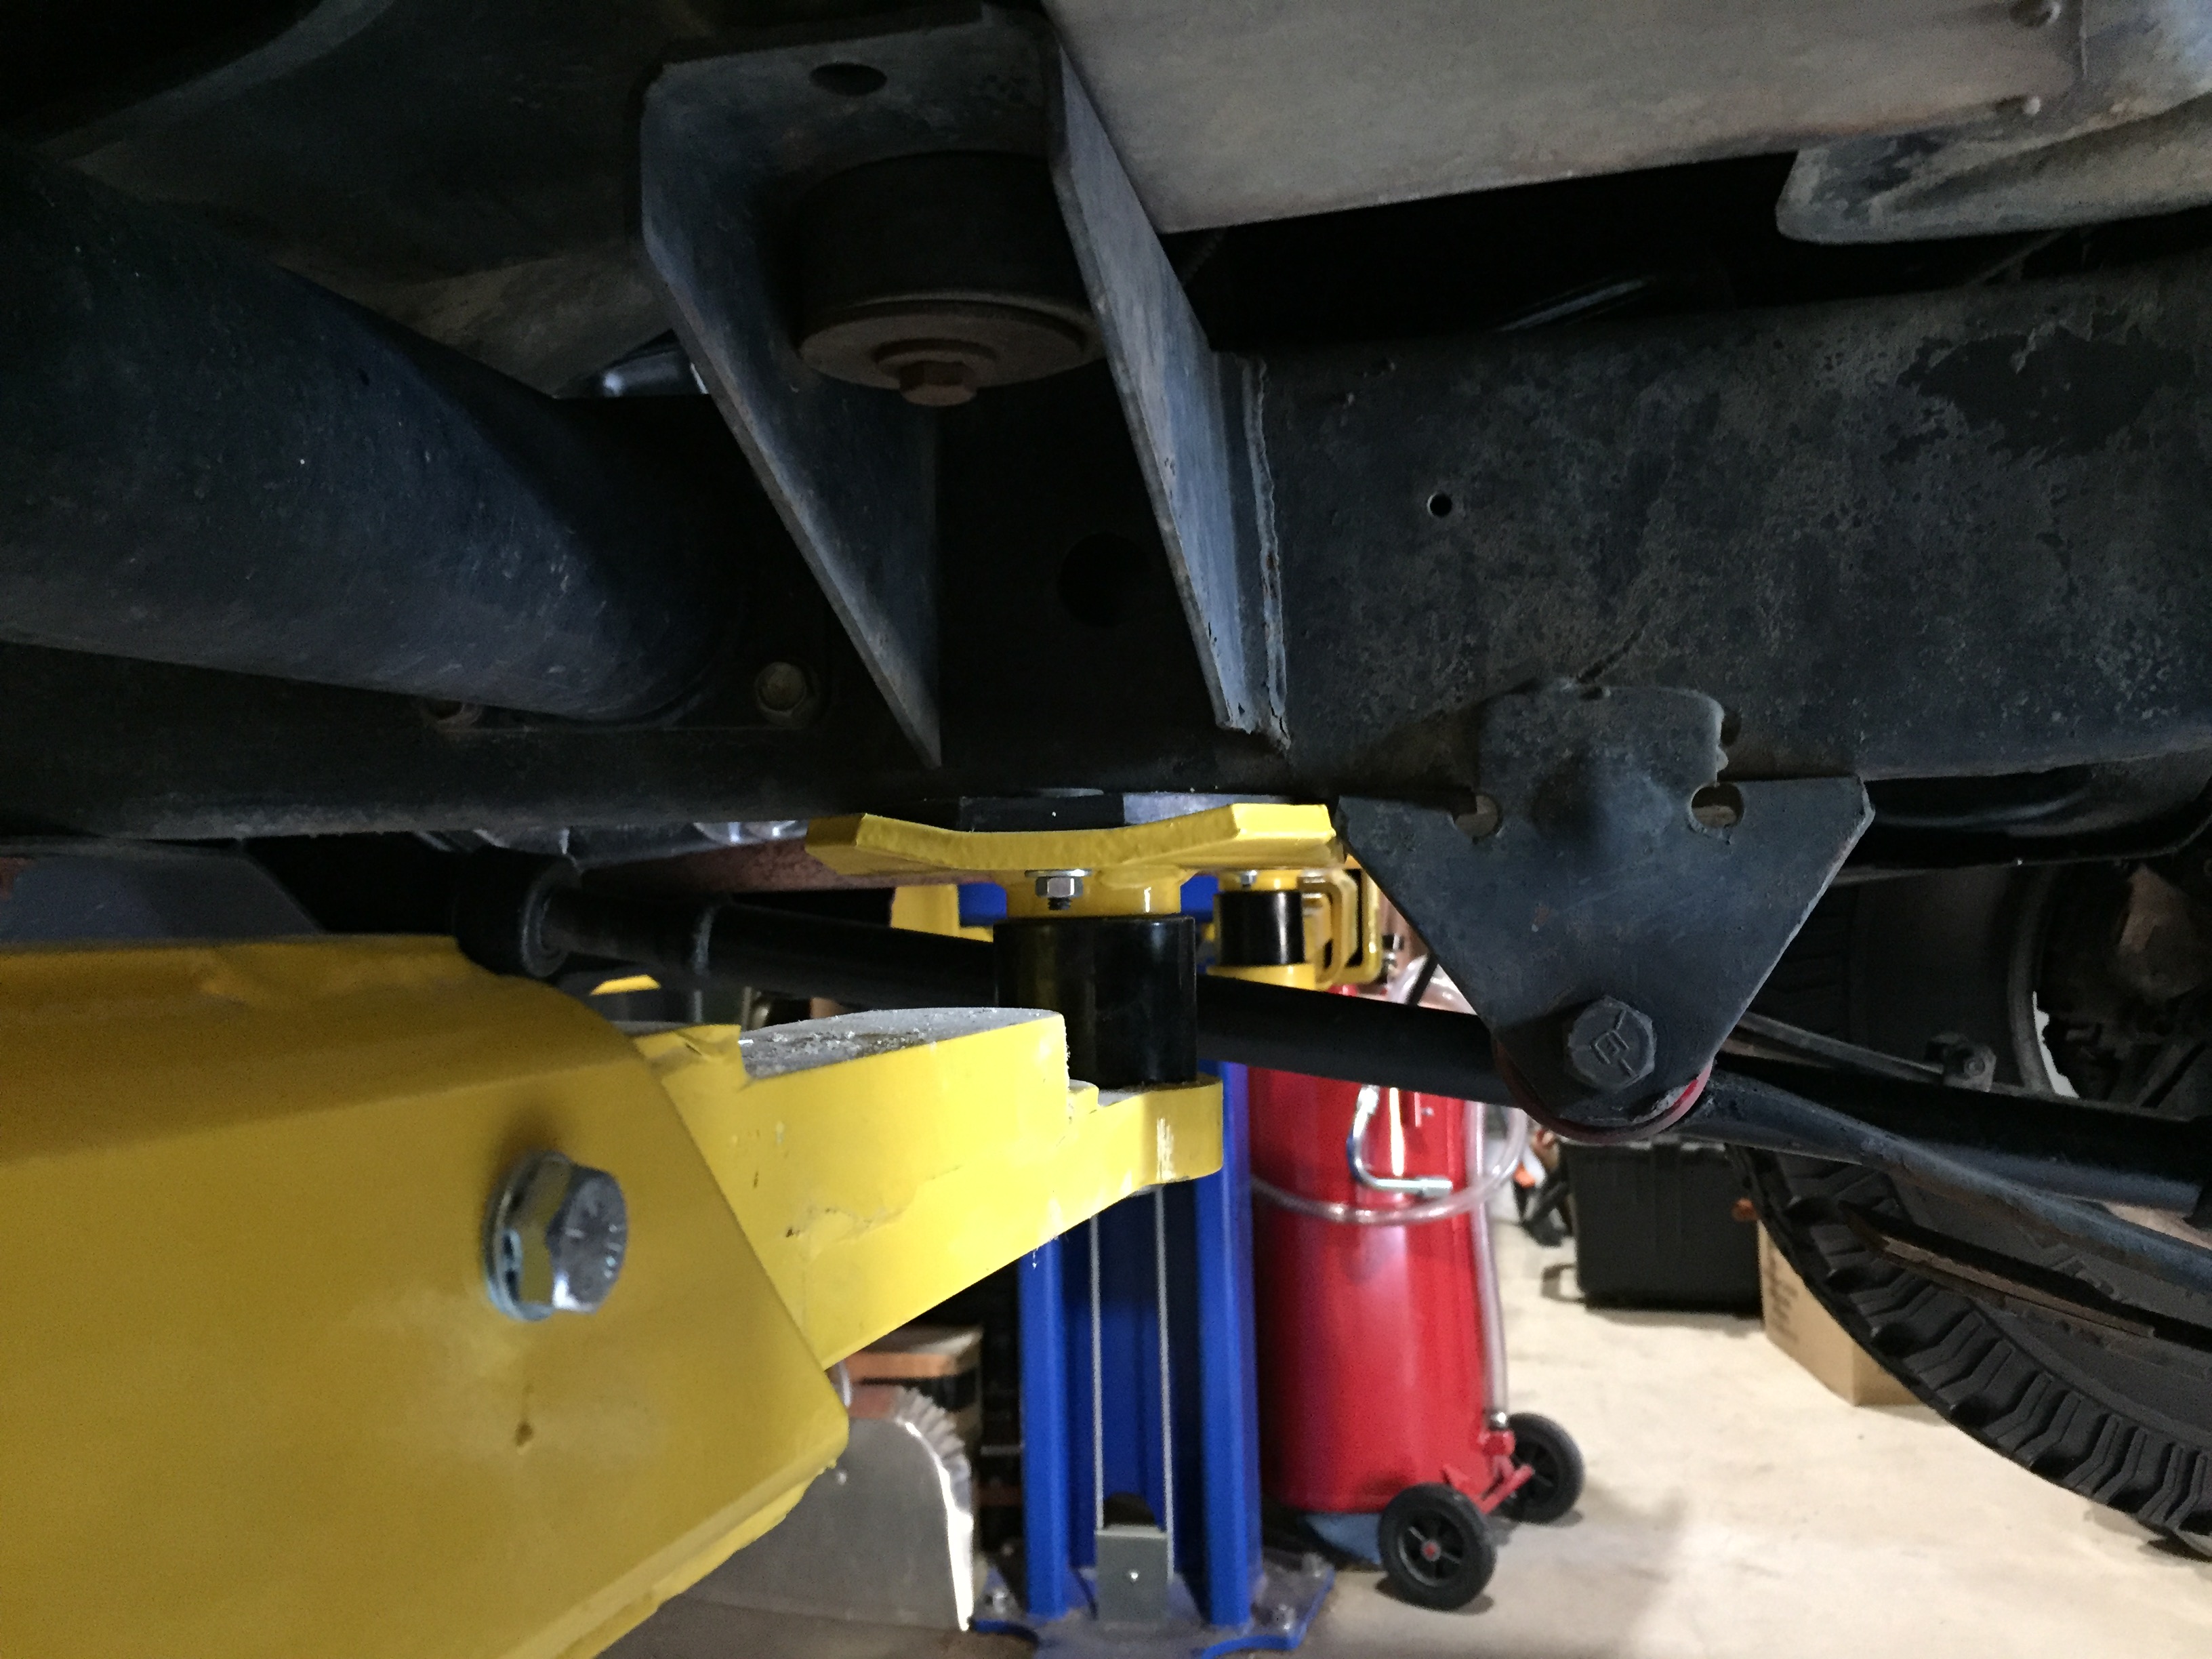
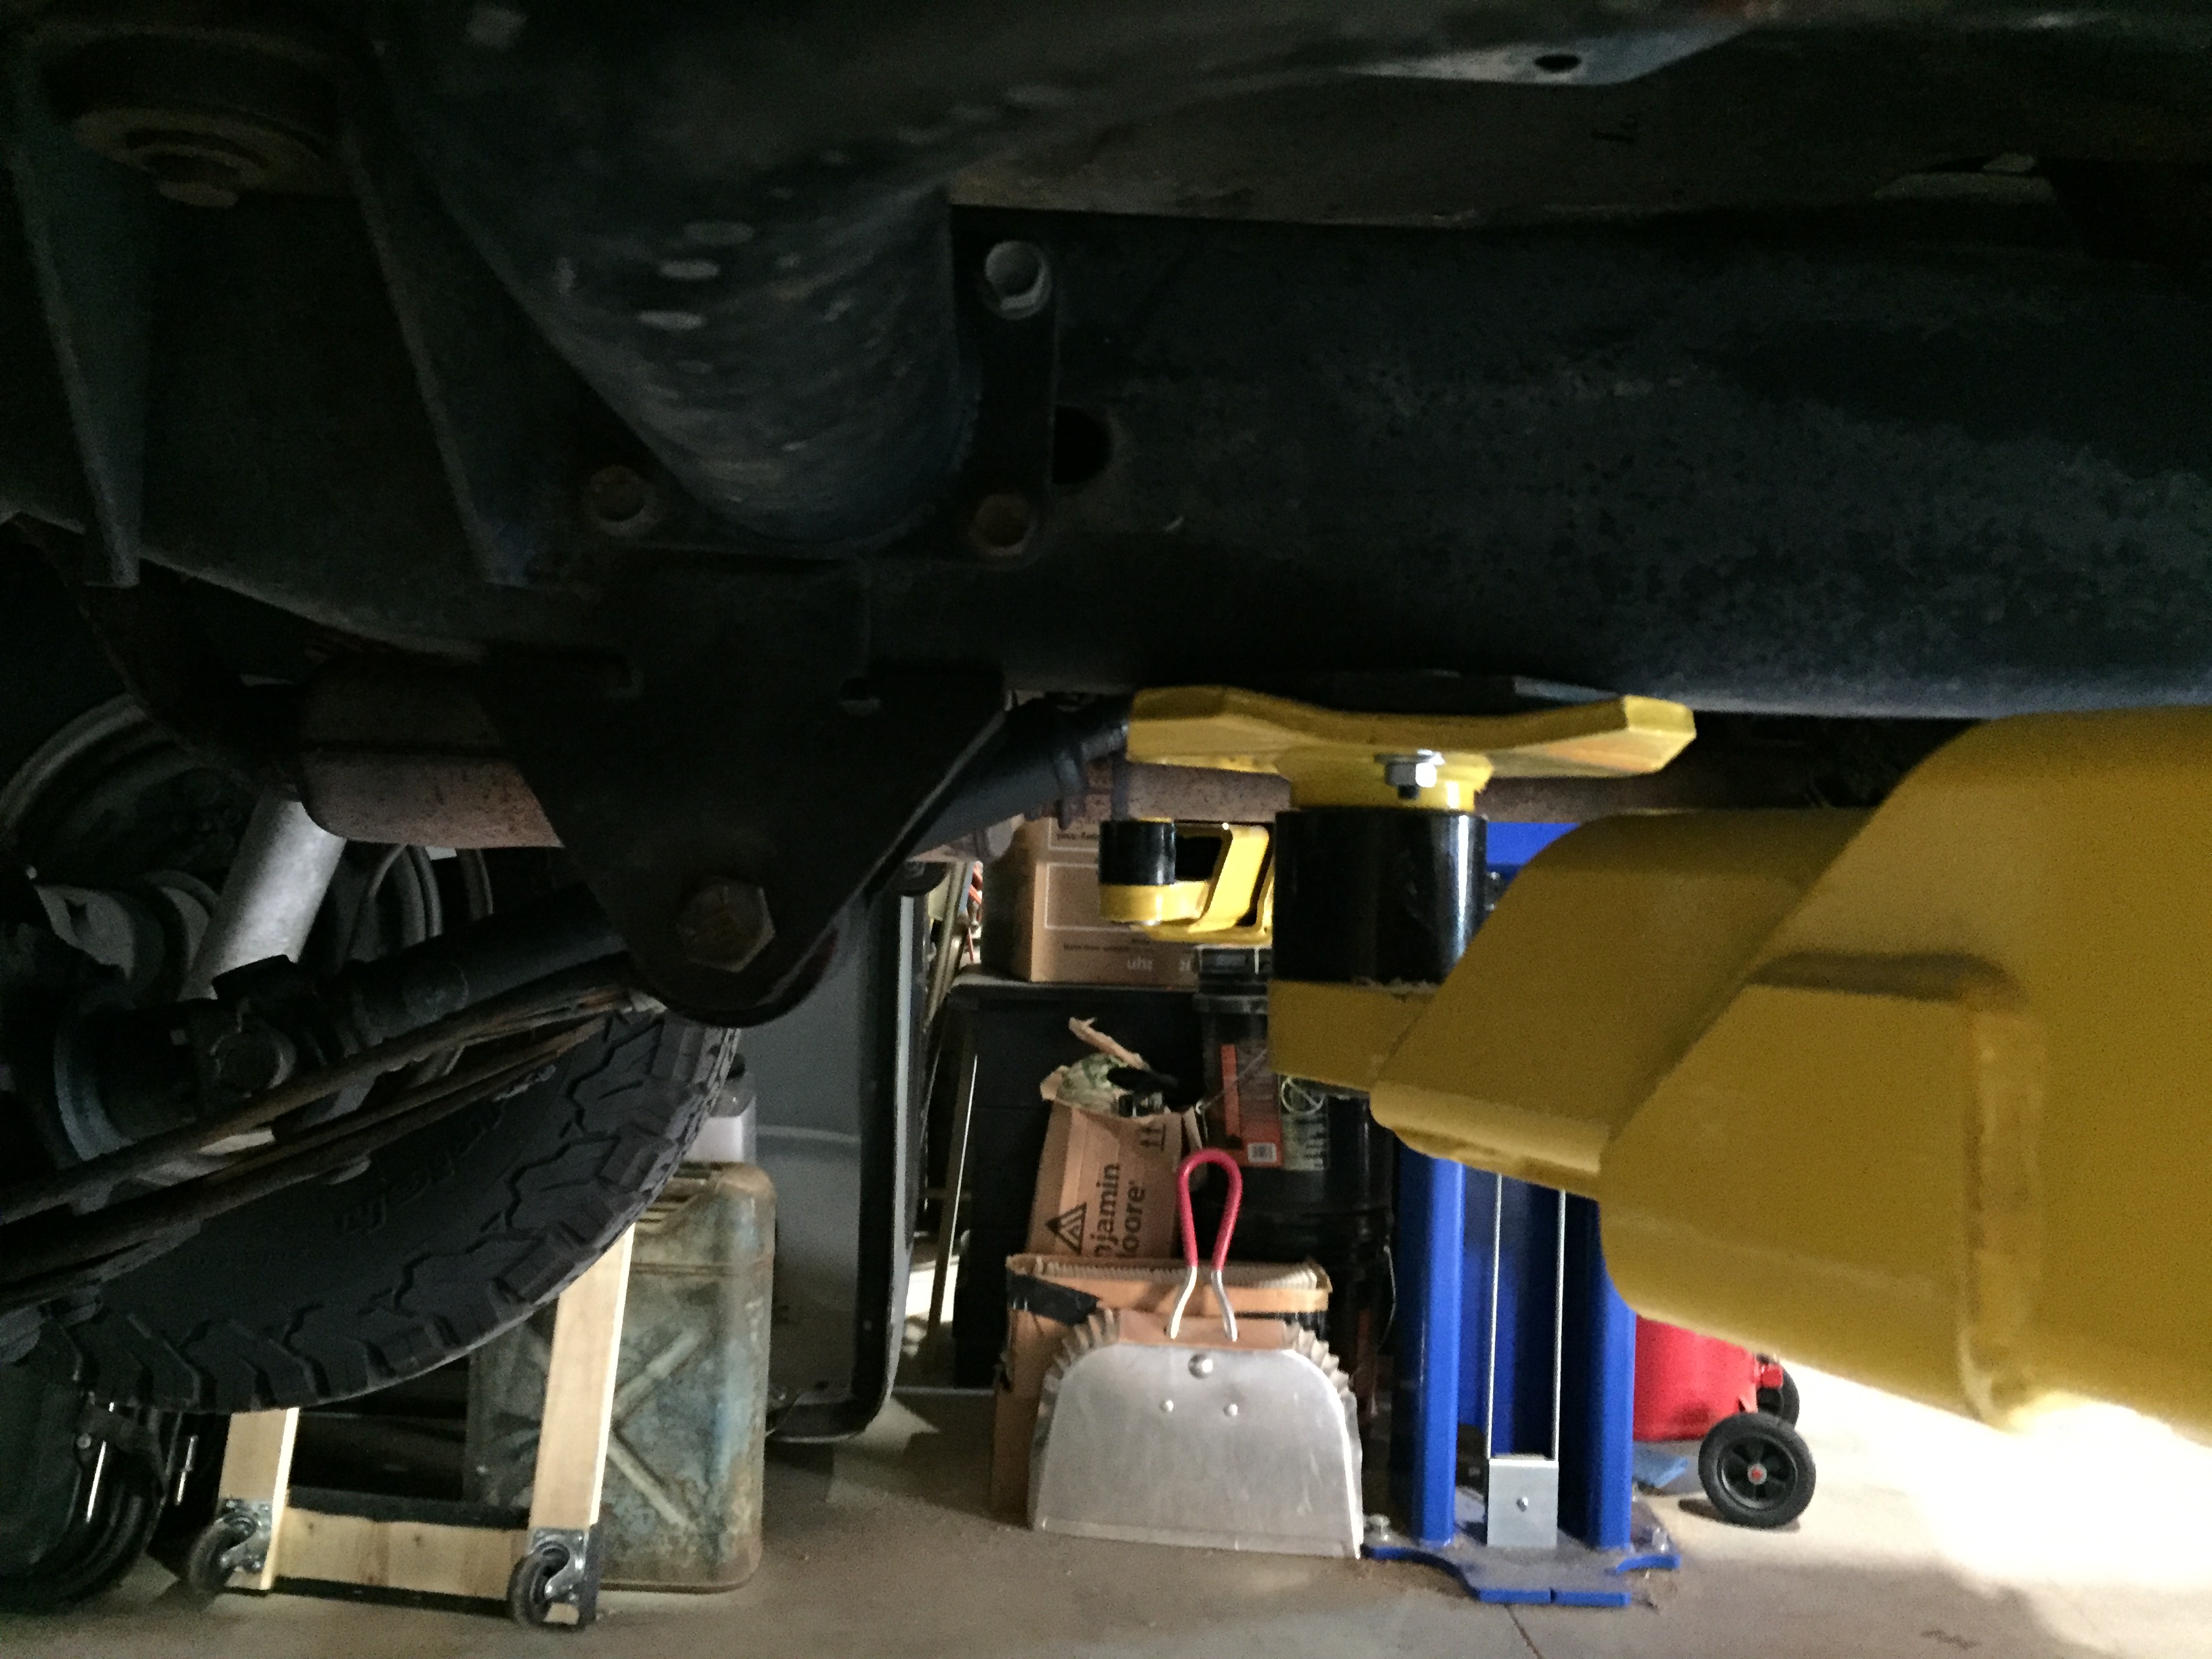
Before putting 4000 pounds of 31 year old Toledo steel above my head for the first time I really needed the correct locations for a 2-post-lift pad placement points on a CJ-7. I like who I am and I have some plans for the next 30 years or so and really didn’t not want to be that guy who squashed himself in his own garage. It happens.

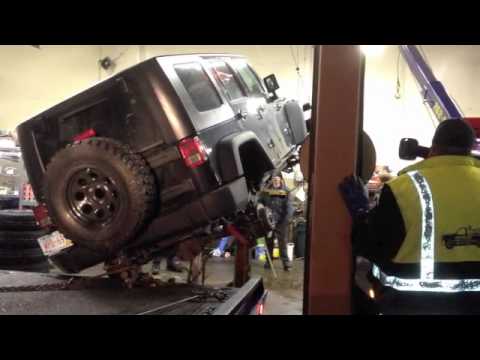
I have seen two jeeps on their sides at dealerships after falling off lifts, countless other lift fails, and have seen CJs put up in the air at least four different ways. I have had a couple of cars in the air since building the garage, referencing their owner manuals for lift placement, but not the Jeep yet. Again, I didn’t want to be the guy that drops his 4X4 pride off the lift in his own garage. I started doing a little research and asking questions.
After a fairly fruitless internet Search, I called the company that built my lift (it is a Rotary Revolution RPT10) and they referred me to The American Lift Institute (ALI) manual that came with the lift. The 2016 version of the manual only goes back to 1991 for most vehicles and when I called them, there was no answer that they could give me. They referred me to “a local Jeep dealer.”
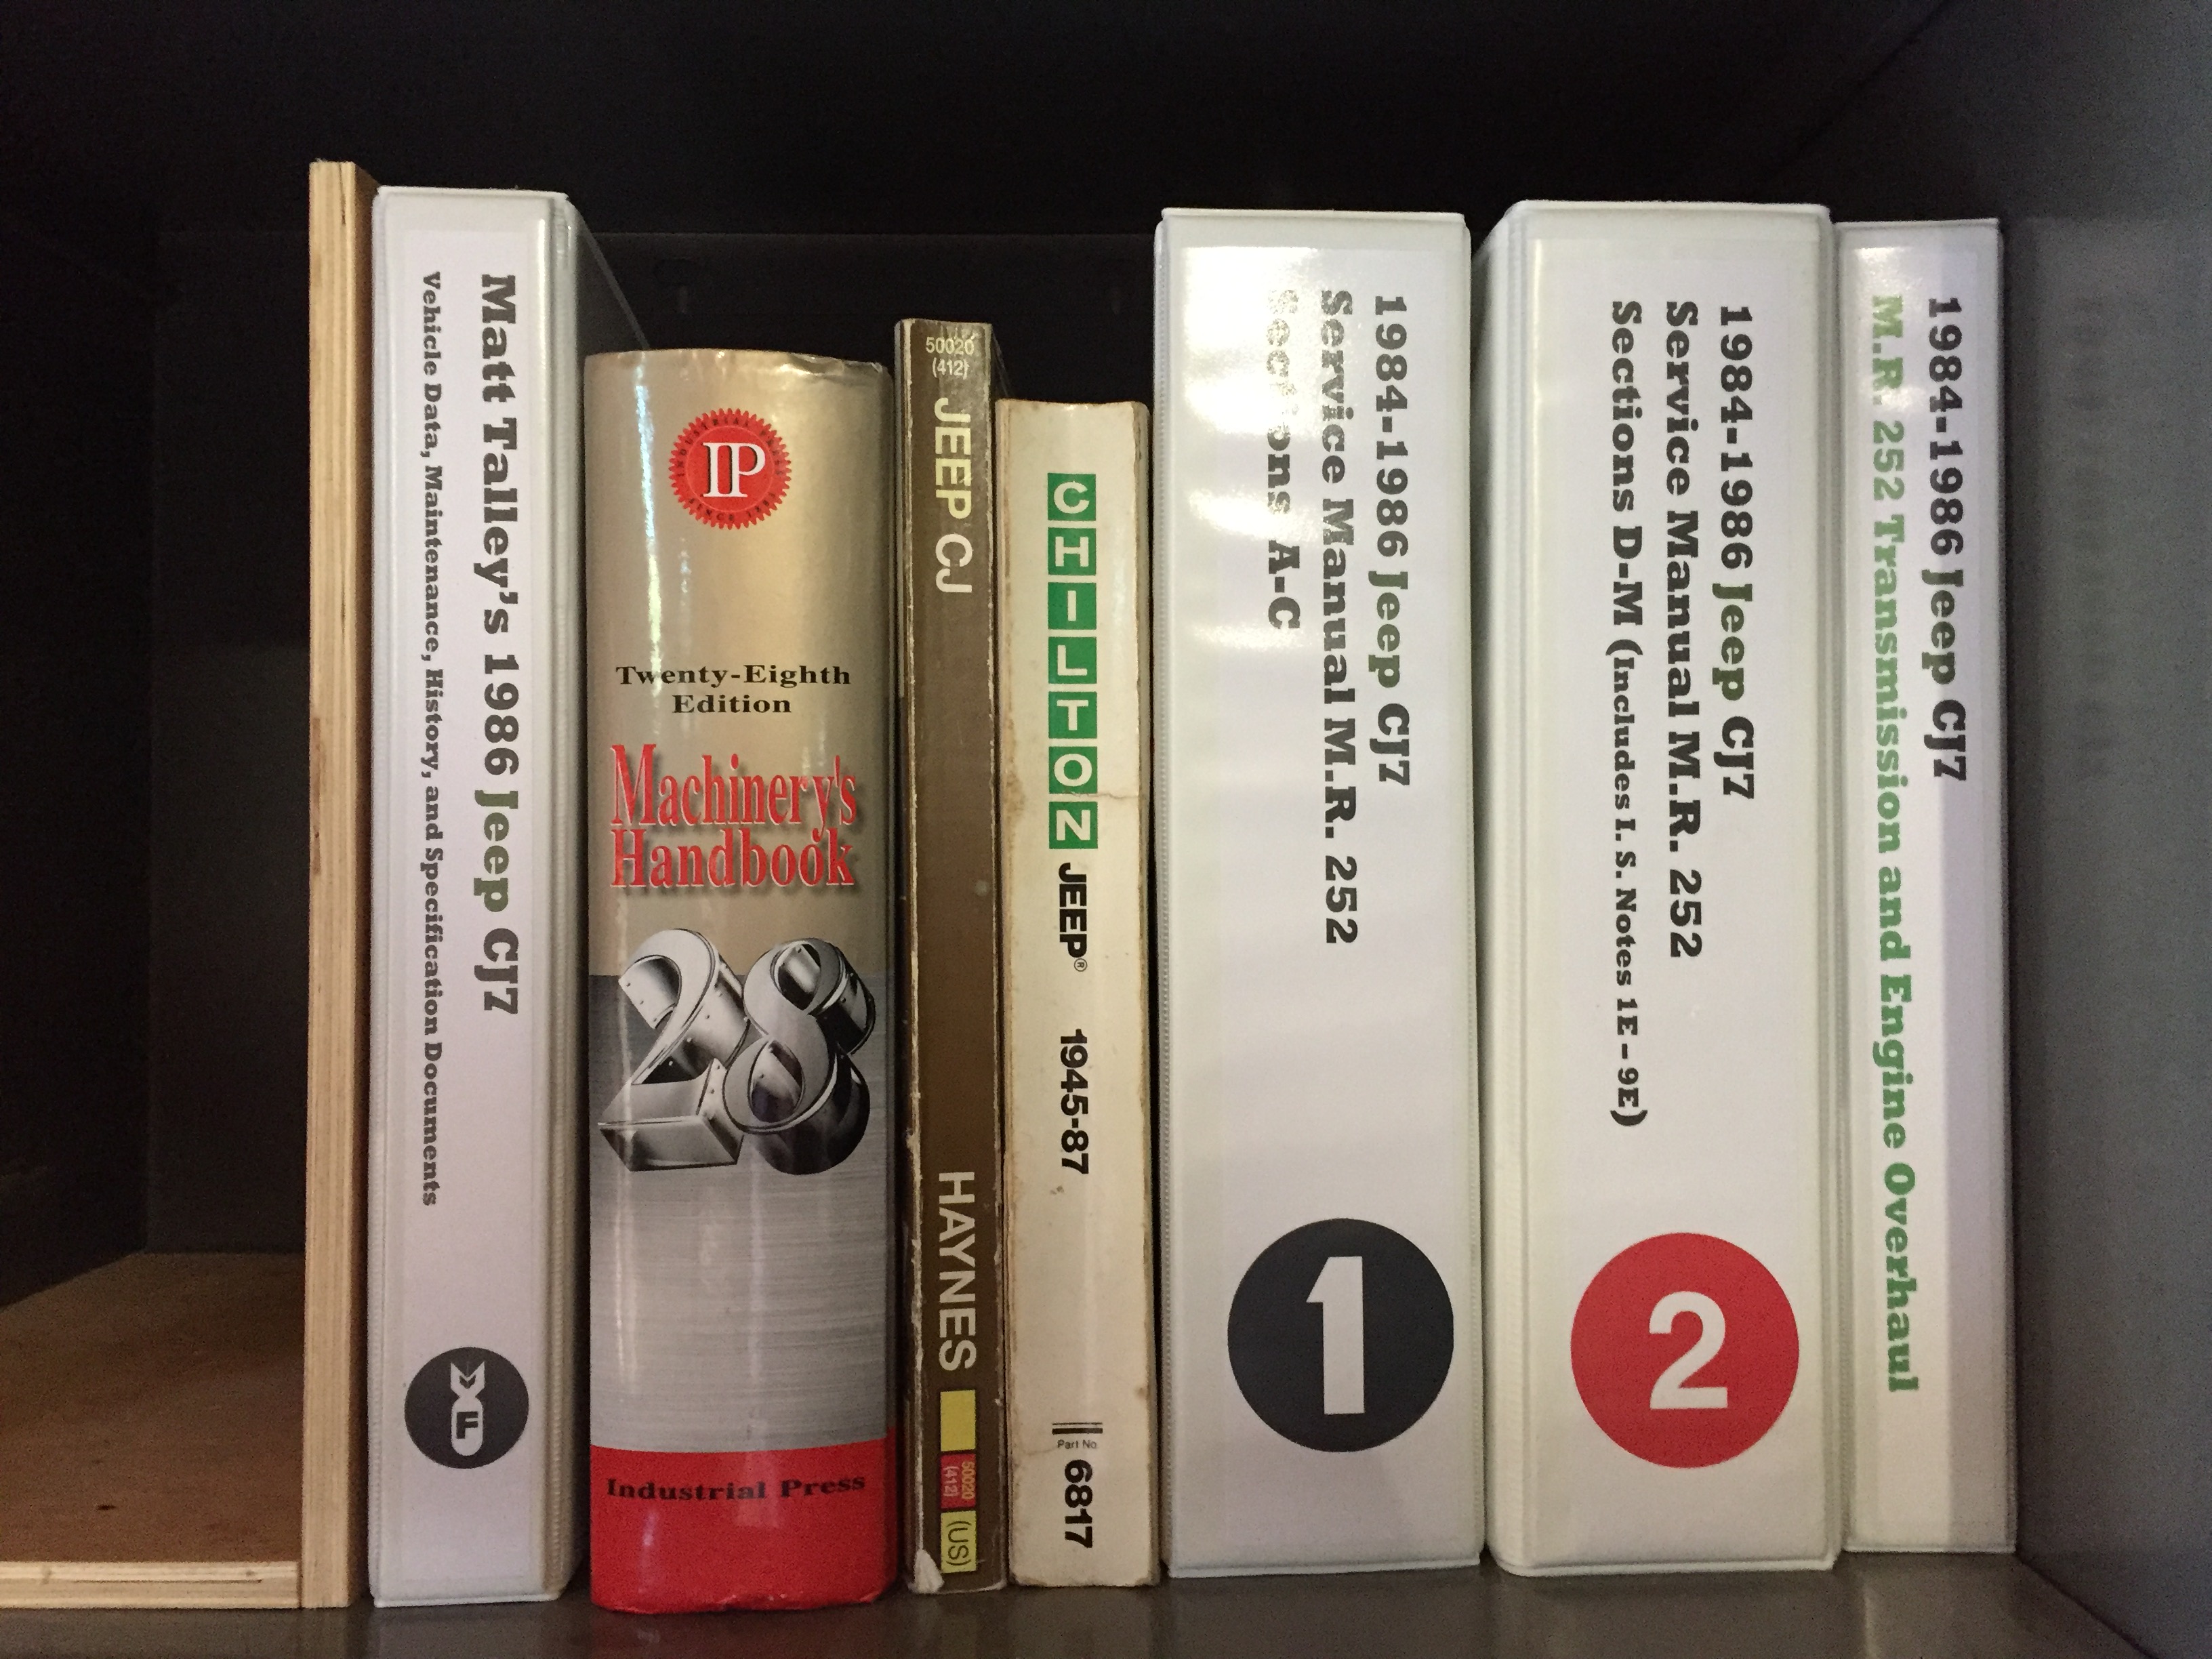
I dropped in the one nearest the house and there was not an “old-guy consensus” on how to life a CJ: on the frame behind the shackle mounts, on the shackles, on the spring plates, on the axles, etc… My Chilton and Hayes manuals have nothing and I am still trying to source a good 1986 Service Manual (can’t find anything in the downloaded ’82) and would love an original Owners manual. I went by a 4X4 shop a bit ago and the tech there said “lift it on the shackles…” and posed it as sort of a question. I walked away swiftly.
So, relying on Cunningham’s Law, I asked the internet via the JeepForum if anyone had some documentation on where to apply the lift arms/pads on a CJ-7 frame and where the balance point/center of gravity of the vehicle was to put in-line with the lift posts? I got some helpful suggestions and a couple answers that were on the edge of trolling, but the general consensus from CJ owners and mechanics on the forum was to follow the guidelines for the 1991 Jeep Wrangler and their frames, suspension, and balance points are very similar: The lift pads are placed under the frame (centered on the pads), directly adjacent to spring hangers/shackles. Sounded reasonable and plausible, so I decided to go with that. The balance point/CoG is between my dash and the bottom of the steering wheel and that point goes on center between the two posts of my symmetrical lift.
I went ahead a couple weekends ago and decided to put it up and do a little general maintenance. After everything checked out – raising the Jeep 6″ off the ground and giving it a serious shake on all 4 corners, raising it up and down a few times, I spent 30 minute for full oil and filter change. I lubed all the zert points on the drive-line and chassis while I was there. No squashing or falling Jeeps. 🙂

Film Friday – Hatchet Handle Replacement
I seem to be keeping with a theme – another Handle replacement. I promises that this is the last one for a while 🙂 My next film will be from an adventure in China or a snowboarding mishap.
This hatchet was given to me by a neighbor a little while ago. It had a hard life: the handle was chipped and split and the heel had been used for driving God only knows what and had mushroomed out a bit. Twenty minutes of my time, $12.00 in total cost, and I have a repaired tool that will outlast me. It is destined for a kindling chopper and glamping chores when my wife and I venture into the wilds “roughing it” with a camper trailer.
Film Friday – Hammer fix
We are well on our way to becoming a doomed and disposable society. Example: After trying in vain to buy a handle replacement locally for my broken framing hammer, I had to buy one online and have it shipped to Seattle from the East Coast. I didn’t need the fancy matching OEM handle. Most any would have worked with a little shaping using a rasp and file. Neither Home Depot nor Lowes sells replacement handles for hammers or hatchets anymore – just handles for garden tools. I had four people try to sell me a new hammer while searching though. Apparently, just spending $80+ is easier than fixing a tool with a replaceable part designed into it. Lazy mother f….. Son of a …
The hammer holds no special value or spot in my heart or personal history. It wasn’t smuggled into the US 300 years ago by a ancestor who built and defended his home with it… Nope, just a framing hammer that someone gave me once. It had already been used and abused for years before it fell into my hands. The point was/is the thing is mine. A tool that I use to make stuff with. A tool that is MADE to have the handle replaced and somehow there are not enough people with the skill and drive to do such a simple task to keep them stocked on the shelves of multiple large national chain building supply stores. I stand by my statement that the movie Idiocracy is a documentary filmed by time travelers.
The whole replacement cost me $12 for the handle and shipping + 20 minutes of my time. A lot better deal than $80+ for a new hammer. As an added bonus, I get to rant a little and make a slide show 🙂
Going Topless
I made a short film showing all the steps in removing the Hard Top from my 1986 CJ7 Jeep for the first time in 1.5 years. I couldn’t round up the help to pull it off, so I put on my thunking’ cap and used the lift. The garage is a MESS, but my excuse is that we are still remodeling the house and it has been a wet winter and spring so there are materials and projects in work everywhere.
Film Friday – The Garage Build Film Part 2
Below is Part 2 of a 3-Part series documenting our garage/shop build. Like Part 1, this film is made from pictures taken during the build with a voice over commentary. Part-3 will be a mix of videos, stills, and some drone shots.
There is a “hidden track” at the end…
Garage Sale Saturday
We have a LOT of crap. No, like a lot, lot. In an attempt to simplify and sort our life out, we need to purge and are using the normal options: Craigslist for some of the furniture, books to the used book shop for credit, eBay for anything with real value to nerdy-folk, Goodwill for this and that, and we are having a garage sale.
Starting a couple of weeks ago, we started the planning and logistics to be included in the yearly West Seattle Community Garage Sale. It is huge with more than 180 individual sale sites, press, an online map, etc… and increases our changes of selling more stuff due to the increased possibility of traffic.
We had a yard sale before our move to France, but this one will be larger and as we have a garage now, it will be a proper all-weather shindig. My mom and a couple of neighbors are throwing stuff in and we are selling tools, books, bikes, furniture, dishes, electronics, computer cables, sports gear, fishing gear, clothes, shoes, picture frames, puppy crates, posters, some more tools, nick-knacks, furniture, and gobs of other stuff.
Stamps-With-Foot is hoping to make $700 from the sale. I am not that optimistic, but you never know.
5/13/2017 Update:
The sale went OK, though I think that the weather conspired against us a little. We made $480 total with some Craigslist help and did get rid of a ton of crap. What didn’t go will be headed to next week. Side note: Someone puked wine on the side of my garage after a little neighborhood after party.
Flying the Drone
I have had a remote controlled camera mounted drone for about a year. I got it specifically for an airborne camera platform for taking stills and video of cool scenery and of me doing awesome stuff on my bikes, boards, boats, and jeep. The house remodel and garage build have gotten in the way of life and I haven’t filmed as much as I have wanted to. I have 7.5 total flight hours on the drone and am using it and thinking of novel ways to employ it a little more now that I am limited in my mobility with the hip rehab. I took it out last weekend, filming at the beach and this weekend, I got it in the air over my neighborhood on the first REALLY nice spring day.
I am a good little pilot and have my required FAA license, my aircraft is marked with my license number, I only fly where I am supposed to, stay under the 500’ ceiling, don’t go near airports, no flying over peoples’ homes, etc. I have had a few “concerned citizens” and tiger moms at the park get cranky about a drone over their heads, but I point to my prominently FAA license displayed on my case inner lid – printed at 300% larger than the original, cite the FAA and WA state statues calmly in an almost blasé manner without taking my eye off the drone. I have a bright yellow round “H” landing target, an airport flight-line safety-yellow parka, and a couple of small orange cones. I look legit, so I am left alone except for kids who linger hoping to see me crash it into the ground.
I plan to do a more and more filming with it this year, including a stint as the Team Zero FTG videographer for the 2017 Sea to Ski Race. I was originally going to compete in the kayak leg, but the hip said “NO!, not this year…” I also really want to get it out on a few hiking trails around Rainier, make an aerial film about West Seattle, use it to work on a mockumentary film I am piecing together about our dogs lives and how we are the ones that have been trained.
A couple of short snips of video that I have done recently:
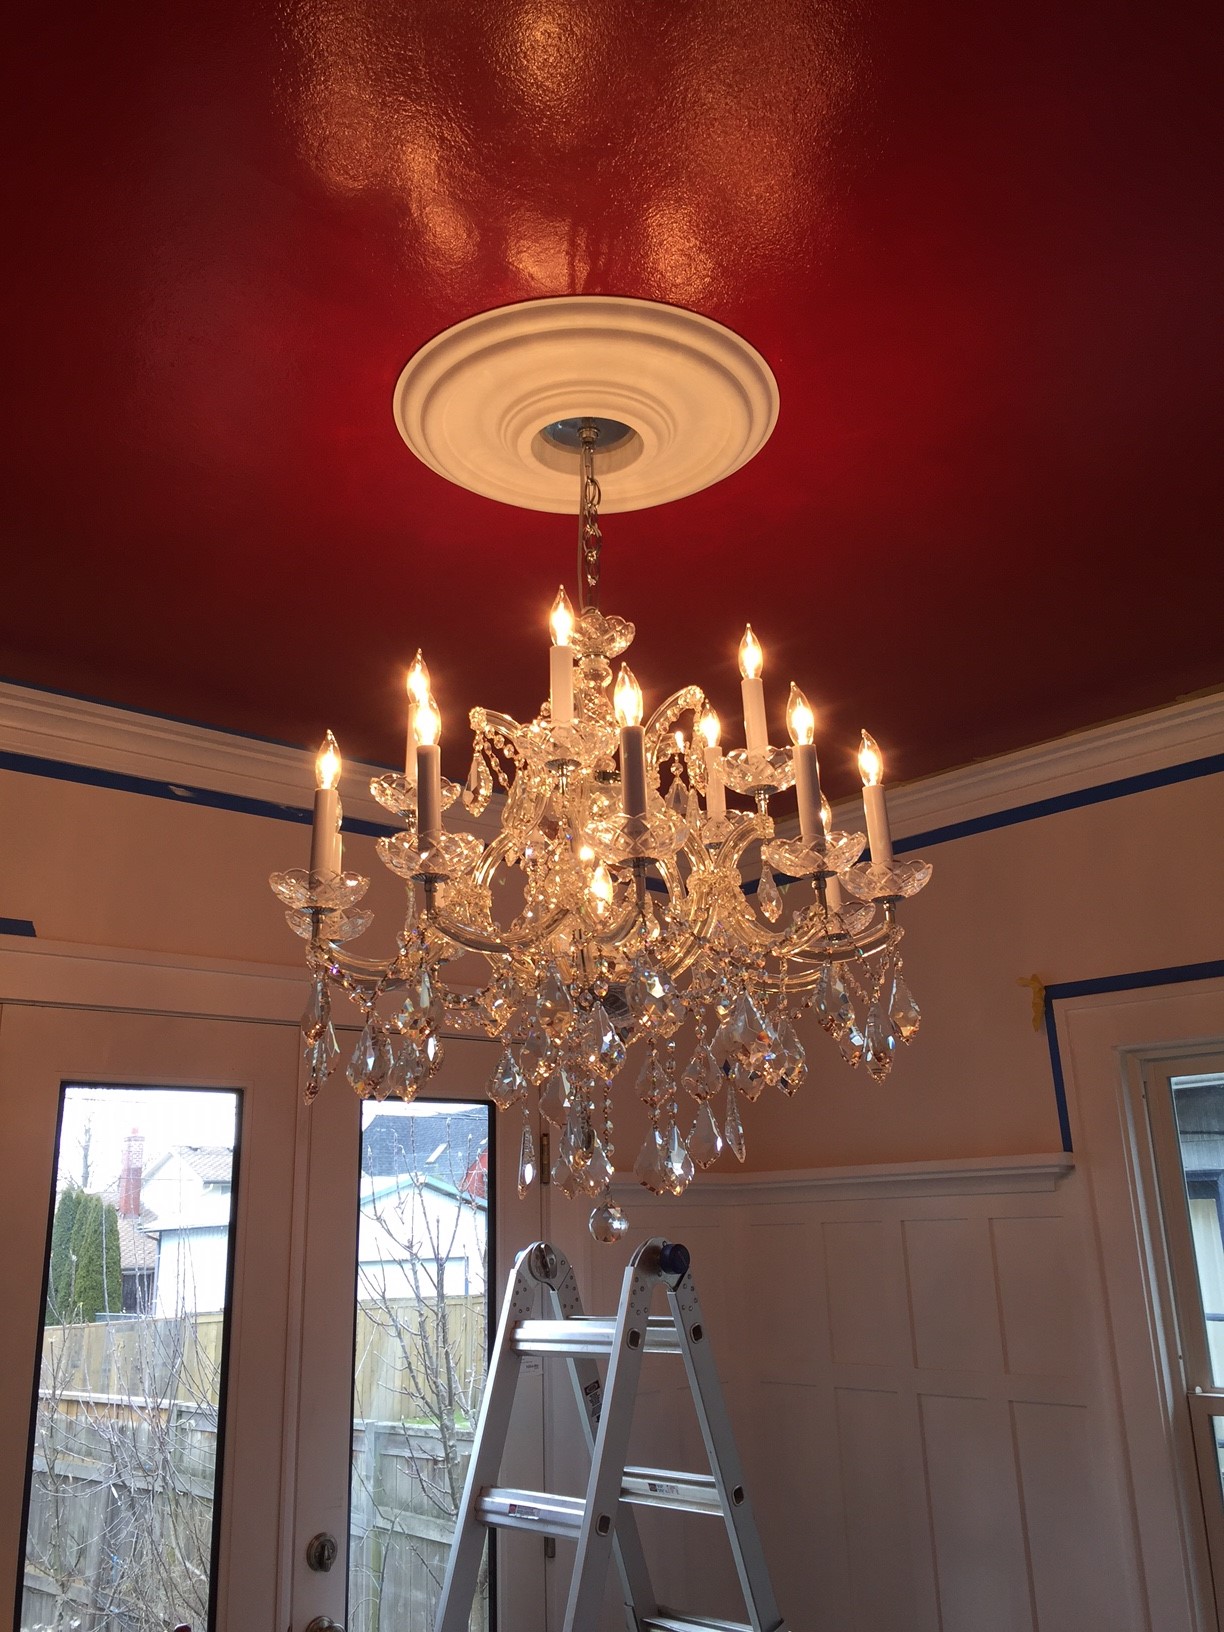
My Wife’s Prized Chandelier Almost Made Me Poop Myself
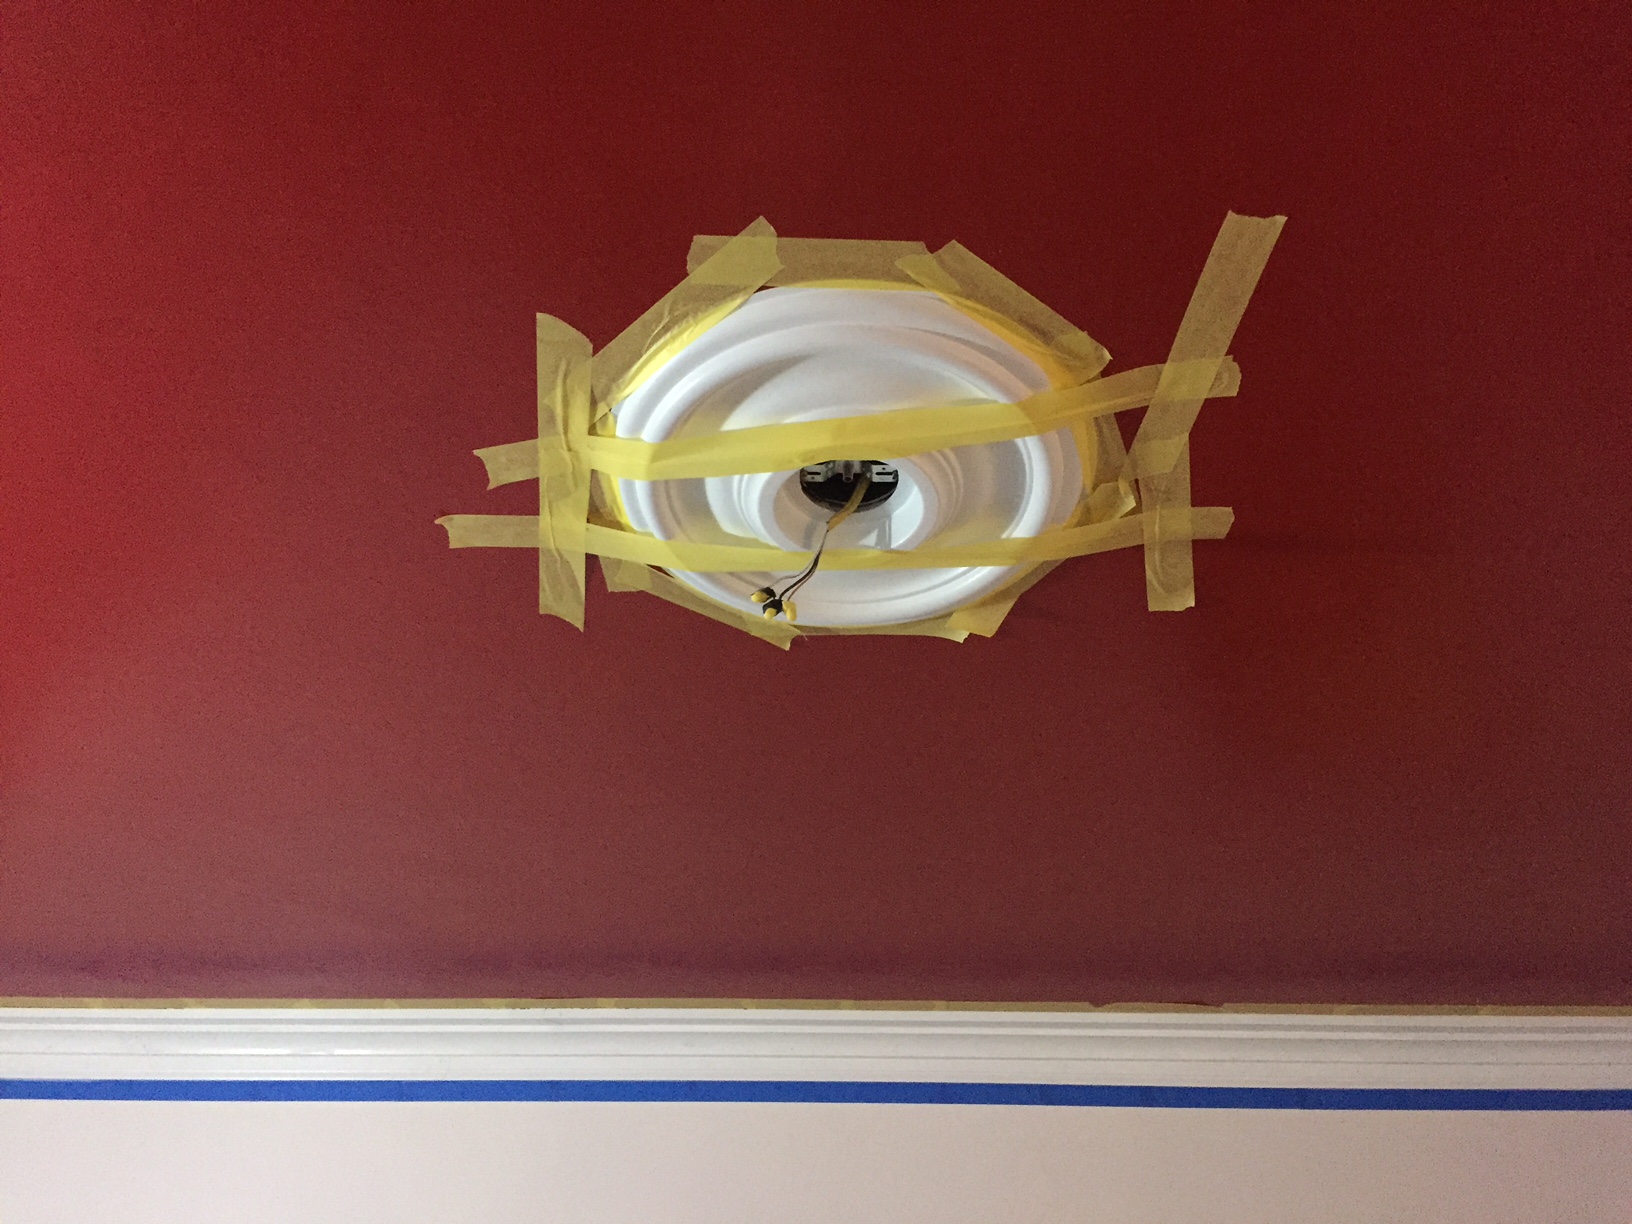
We are in the house remodel home stretch. Just small trim details left on the main floor. One of them being my wife’s chandelier installation. I had planned to install the kitchen floor this past weekend, but Stamps-With-Foot had other plans. She sat me down over coffee Saturday morning and made it clear that my plan was out and that her sparkly lamp was in. Always a fan of choosing my battles wisely – into the dining room I went.
I needed to caulk the new dining room crown molding and prep it for paint before I could install the ceiling medallion/escutcheon for the light. It took two passes and some light sanding, but all the cracks and gaps are filled and we were ready to hang the crystal and steel behemoth around 4:00pm on Saturday. I had my wife sitting in the attic holding the chandelier by its safety cable while I wired it to the ceiling junction box. Like in a really bad sit-com, there was a “ping” noise, the safety wire popped, and the stupid-expensive hunk of cut glass and metal headed to the floor. It happened like it was all in slow motion. Now this thing is not small. It is not light. It did not come with handles. From the top of a six-foot ladder, I instinctively reached way out and grabbed her prized chandelier as it fell. I teetered for a second on the top of the ladder, having flashes of crashing to earth and how many stitches I would be getting, before the ladder stopped moving and I was able to slowly walked the beast down to the floor. I did have to check my britches as it was a rough couple of seconds, anything could have happened. Thankfully, just one single tiny glass bit cracked in half from the jolt – super glue will be the answer. The ceiling medallion also popped loose and I had to pull it down, remove the adhesive and remount it, afterward clamping it to the electrical box and taping the edges to the ceiling so that the glue would set up overnight.
After getting the medallion in the air, I went to Home Depot, purchased some 1/8” stainless steel cable and with a swaging tool -everyone should have their own… 🙂 , I remade the safety cable. After waiting until the next morning, I spent an hour installing the beast. My wife danced around with giddy joy when I flipped the switch after all twenty of the 45watt bulbs were installed. Happy wife, happy life…
I will be done painting the trim this week, the blue and yellow tape will come down, and then the dining room is 100% done. On to the Kitchen.