Kitchen Cabinet Work Update

There was a flurry of activity to get our kitchen done before our move to France.  I got it 99% of the way – with serious help from Mr. Flood and my sweet wife.  It just needs a little paint on the overhead fridge pullouts, slight pull-out slide adjustment and the installation of the custom milled and matched cove molding.  That will all keep until we get back to Seattle though.  My mom will be able to cook in there just fine as-is.

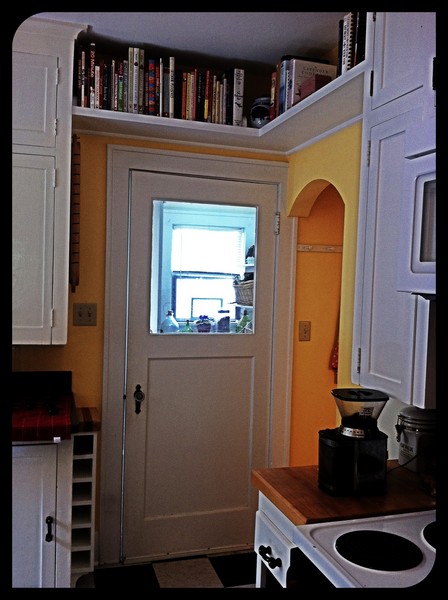
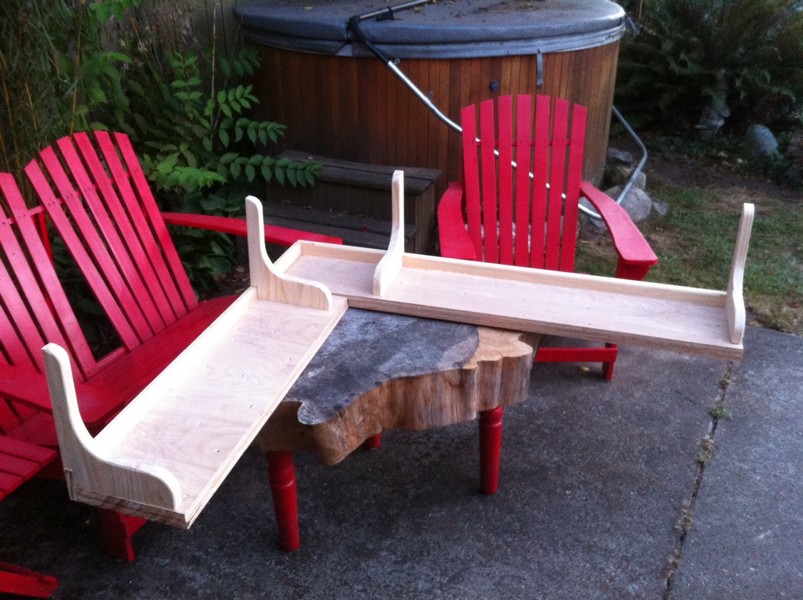
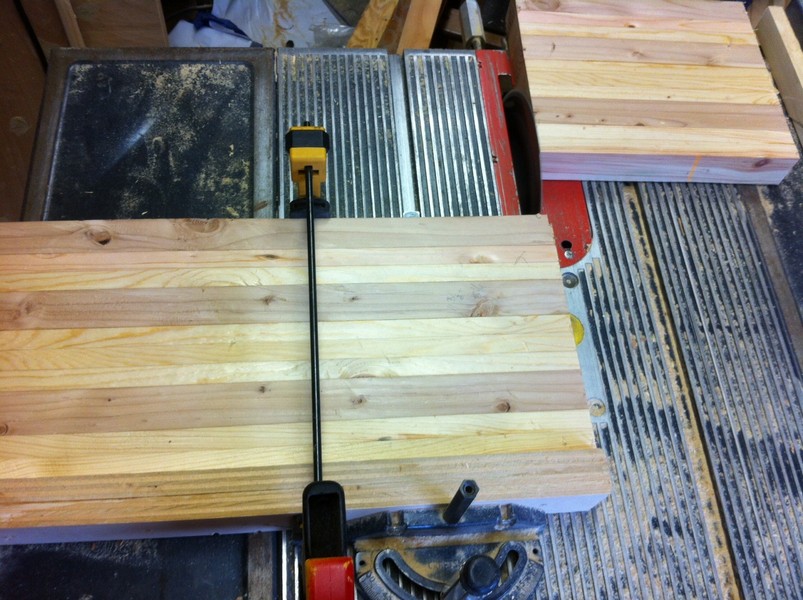
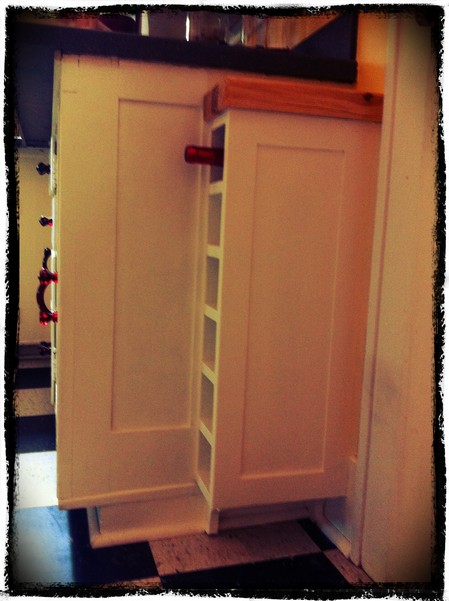
I feel that the upper cookbook shelf ties the old and new sides together and adds that part of the overall kitchen that was missing.  The shelf also seems to lighten up the space a little as well.  The wine rack was put in specifically for my wife.  It started as a discussion in the breakfast nook one mid-morning, transitioned to a napkin sketch, and four hours later, the carcass was built, bottom brackets cut, and block top was in the clamps with the glue drying.  After the paint was on and top installed, my wife swooned.  It made me smile from ear to ear!

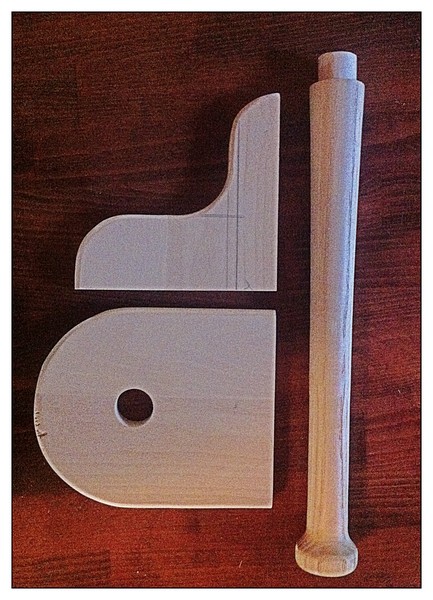
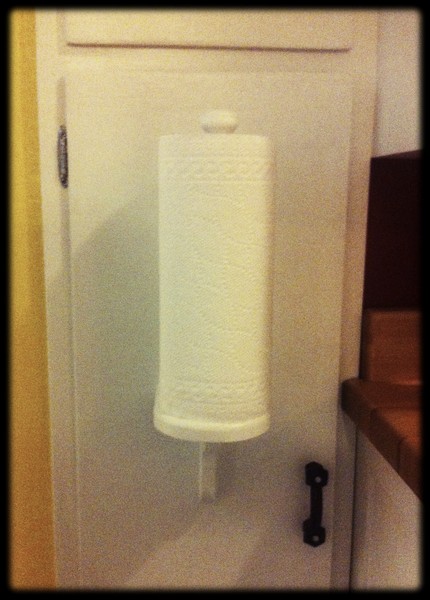
The paper towel holder was a bit of a conundrum.  With low upper cabinets, there was just no good spot either on the counter or under the cabinet.  I toyed around with a couple of ideas before I decided to mount the paper towels on the old ironing board (now spice cabinet) lower door.  I used some scrap popular and turned a section of oak down on the lathe for the rod.  It is inserted all the way through the shelf and both wedged and glued in place.  My grand kids will still be able to use that towel holder when they are my age.  yes, I over built something again…  On the brighter side, the paper town holder bracket, the small round shelf brackets, the cookbook shelf brackets, and the wine rack brackets all match, again marrying all the different kitchen elements together.

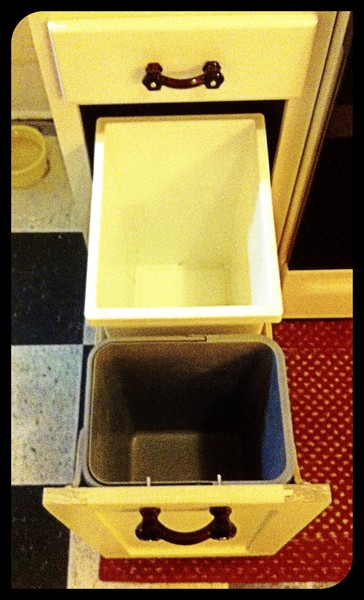
Almost as important to her as the wine rack was the trash and recycling can drawer.  After it was in and painted I caught her pulling it open and closing it over and over with a giggly smile.  The curves on the side match all the shelf brackets – I couldn’t help myself.

Kitchen Cabinet Doors

I am super trying to finish up the kitchen cabinet doors and get them painted and hung. I was putting the last coat of paint on them this weekend and the cat decided to help… I said dirty words – loudly. The cat didn’t care and looked away like I was insane for questioning her right to sit in fresh white paint. Had to let the door dry and sand cat hair off and repaint. I said more dirty words. The cat didn’t care and laid on her side in the grass, I am sure thinking: ‘Ima gonna do it again, jus ’cause. Dirty pink bald monkey…’

Fvcking cat.

Building Custom Cabinet Doors

1. Buy dimensional 3/4″ poplar boards.
2. Plane to uniform thickness.
3. Rip 2″ and 3″ strips on the table saw.
4. Two dado cuts on table saw for 1/4″X 3/8″ panel groove.
5. Run each section on router because table saw is a POS and there is depth variation in all the grooves…
6. Threaten table saw with large iron maul – mean it.
7. Grumble a little.
8. Cut door stiles (sides) to length – Measure opening for stiles, subtract 4″ for stile width and add 3/4″ for double 3/8″ panel slot.
9. Write all measurements down on a non-descript sheet of paper.
10. Put measurements somewhere safe.
11. Take a 2 week to 4 month break because life gets busy.
12. Lose paper with measurements.
13. Tear house and shop apart looking.
14. Give up and re-measure.
15. Cut rails.
16. Lay all parts out and label, check sizing, trim two pieces, and pray a little.
17. Set up horizontal drill press to drill for dowel joints.
18. Screw up at least 4 initial holes.
19. Hit head in shop at least 3 times.
20. Build sweet dowel trimming jig for table saw – let head swell a little.
21. Cut 3/8″ off each dowel (8 per door).
22. Drill 16 holes per door.
23. Sand the cut-off end of dowel.
24. Dry fit first door.
25. Success!
26. Get out every bar clamp, hand clamp, and Quick-clamp that you own and set up clamping station.
27. Find original measurements for doors in the “safe place.”
28. Say dirty words very loudly. Repeat.
29. Add glue to dowels and joints and assemble door.
30. Apply judicious blows from wooden mallet to seat parts.
31. Get glue on hands and in hair.
32. Clamp up.
33. Wipe extra glue on door off with wet rag.
34. Repeat last 6 steps 8 more times.
35. Scrape clue, plane joints, and sand doors with 3 different paper grits.
36. Check and adjust door fit to openings and prime after more planning.
37. Re-prime and paint with two coats of white cabinet paint.
38. Mark, mortise, and install hinges on door.
39. Install red glass pulls.
40. Mark and mortise hinge/door onto cabinet.
41. Check fit and adjust 2 to 9 times.
42. Repeat steps 28 thru 41 eight more times
43. Drink three beers and swear to never build your own kitchen cabinets from scratch ever again!

Kitchen Cabinet Build and Remodel

When looking at the house that we now live in the one room that had us on the fence was the kitchen.  it had original cabinets, but it was dark, dated, there were no outlets, and one wall was just a hodge-podge of appliances.  I have spent the better part of my very limited free time trying to fix those issues.  I have added a dishwasher, a knife rack, lots of paint, cranberry glass handles/pulls, outlets, pullouts, switches, a microwave, under cabinet lighting, build drawer organizers and am in the process of finishing hand made, period and house perfect cabinets for what was the ugly wall.  It has been a very long and laborious process.  I would never be this detailed in a house I was building for someone else – I would lose money.

Below is a gallery of the progress up until this point:

Left Out in the Rain

Stamps-With-Foot and I worked furiously in the warm sunshine on Sunday in our yard and on the final bits of the kitchen cabinets that needed to be done. Our last tasks for the day were building cabinet drawers and priming the two base cabinets. I had my ubiquitous notebook out, to the side of where we were working, checking off tasks and referring to measurements & notes as we went. We cleaned up the tools and paint around 6:30, changed, had dinner at a local Thai place and ventured out to our new Trader Joe’s for a little grocery shopping.

I was getting ready this morning for a trip to Boeing and started looking for my notebook because I needed a phone number in it. It then hit me like a baseball bat… My notebook… got left outside… overnight!… in the Rain!! FVCK!!!! I popped out the back door like my butt was on fire, my bathrobe flapping and losing a flip-flop in the dash. Damn… It was sitting on the side of the wheel barrow and had swollen to an inch thick. I walked back to the house, with my head hung down and blotted off what water I could and checked the pages – a light of hope. I use a waterproof, indelible ink in my fountain pens, so there was only a little loss of information or smeared blotches (in spots where I used a cheap pen) where detailed notes and drawings used to be. I could have been SO MUCH worse.

While most folks would have to live with a swollen book, most folks don’t have an awesome steel and iron 1920’s book press sitting in their home office… I blotted the pages again as best I could, separated the wettest ones with wax paper sheets, and put it in the press with cardboard and a towel plotter to get out as much water as possible. I left it there for 8 hours or so and removed it before the pages started to stick together. I then carefully opened every page, sat it on its end with the covers far apart, pages fanned open, on the kitchen tile floor in front of the heater vent. Everything should be just fine… I say that with hope in my heart and my fingers crossed.

I will let it dry for a day or two and then press it again for another 24 hours or so. I might take the opportunity to press a design or my name into the cover – I update when it come out of the press.

UPDATE 4-22-12: Took the notebook out of the press and it is nice and flat. While waiting for it finish pressing I made an embossing stamp out of a scrap piece of popular. My carving chisels were taken in a recent theft, so I used a dremel tool with the diamond carver bit to scratch a simple test piece. It is a stylized version of the Arabic word IQRA. I have more or less adopted it as my own hallmark and use it to stamp my furniture, cabinets, it is on my stationary, and I have a smaller version that I use as a wax seal here and there. I decided it was fine time to mark my notebooks as well.

Spring Cleaning and Garden Prep -2012

The sun is out and it looks like spring has finally come to Seattle. I had a full weekend off and was in the country for a change, so it was time to get busy waking the garden and yard up, prepping for planting, take care of some spring cleaning and enjoy a sunny warm day outside. Below is how this past Sunday went for me:

Up and out of the shower by 10:00am
Wife made yummy breakfast with Trader Joe’s Croissants
Coffee made me human
Put on my overalls
Removed extension cords that powered Christmas lights
Started taking down Christmas lights – 2.5 months late
Realized when on top of ladder that I needed long reach tool I made last year
Spent 30 minutes searching…
Remembered that I turned old tool into something else
Muttered dirty words
Spent 10 minutes making new long reach Christmas light removal tool
While on top of ladder, cleaned gutters – 5th time in 12 months…. Stupid Pine tree
Turned compost
Cleaned and swept shop a little
Took apart one of our winter hot houses.
Planted forgotten bag of tulip/Camila bulbs found in hot house
Shook head and hoped that they will come up
Mulched roses
Feed roses some of the pink Miracle Grow good stuff
Treated roses for Black Spot as preventative measure
Killed some evil dandelions
Laughed manically while committing the deed
Reconnected the garden irrigation system
Wife brought me coffee and a kiss
Mulched the apple and cherry trees
Ran out of mulch
Started to Home Depot and somehow drove past and all the way to Second Use
Found $220+ of oak flooring for $25
Bought oak flooring…
Picked up more mulch at Home Depot and replacement drill for one that was stolen
Unloaded truck
Wife didn’t raise eyebrow at truck full of wood
Got away with unplanned purchase this time…
Trimmed dead shoots from lavender
Mulched around all the lavender
Sweet wife made me lunch
Moved new cabinet from shop into basement
Started to move charcoal grill
Found football sized mass of blue and black mold inside grill
How in the hell does that happen??!?!?!
Gagged more than a little
Muttered more dirty words
Cleaned out mold, scrubbed every surface with bleach solution and wire brush
There were some additional words spoken that start with F
Made HUGE hot fire with oak shop scrap to kill EVERYTHING in grill
Grill now ready for spring
Laid out spot on outside garage wall for new garden tool shed.
Cut stakes for raspberries
Dark outside so went into basement
Sanded kitchen cabinet shelves that are under construction
Put a coat of primer on them
Installed in some drawer slides in what will be new 15″ cabinets beside the stove
Fv#%ing drill battery ran out of juice
My lovely bride made a yummy dinner
Can’t find new charger for new drill
Wrapped last of wife’s birthday gifts
Put finishing coat of clear-coat on Persian table base that I have been redoing
Somehow got finish in my mouth
Spat and tried repeatedly to scrap the turpentine taste off my tongue
Failed
Gave up
Went to bed
Opened book
Not a single word read before I passed completely out.

MIA – last seen with paint on new pants and sawdust in eye

I realized yesterday that haven’t posted anything for almost a month: no astute observations, not one pointed remark, no weird OCD-driven lists, no pictures of adventures at home and afield…. Nothing. Hmmmm.  I have just been REALLY busy!! It started with painting the living room, the kitched paint was next, we expanded into wiring a hot tub, I decided to finish up a furniture project, the breakfast table “needed” to be cut down, fancied up, and refinished.  I am heavy into finishing my incredibly overbuilt and way too complicated kitchen cabinets, Halloween came, there was Thanksgiving prep, I had to put the garden to sleep for the winter, blow all the water out of the yard irrigation system, clean the gutters (4th time this year – grumble, grumble… hate neighbor’s tree… grumble, grumble…). On top of it all, my J-O-B was INSANE: lots of late nights, weekends, travel, OT, pressure, stress, etc…

There is some proof of all the work that we have been doing – I have semi-updated the pictures on my project page, but remember that most were shot with an iPhone in crap conditions.  None of this pics are going to get me into National Geographic!

It hasn’t been all work though:  I have been able to go to the range with my cuddly .45s and punch holes in some zombies a good bit – fine, fine stress relief.  I mentioned Halloween – Stamps-With-Foot and I outdid ourselves again this year at our local Halloween party. We went as Wednesday and Pugsly Adams – a big hit at the festivities.   I went as a pimp to work – think Will Ferrel in The Other Guys movie: grill, blond ‘fro, leopard coat/fedora, purple faux croc high-heeled side-zippered boots, a pimp cane, crunk cup, loads of bling, coke nails – I had it down. A my fellow engi-nerds let me down though… Not one other costume in my group – not even a funny t-shirt!!  Sales had some good ones this year, HR was all in, the fiber optics group brought game, but Engineering sucked it! How is it all those people with big brains, imagination, and vast amounts of reasoning ability could not come up with something?! There are WOW players, Trekkies, SGA initiates, one D&D uber-geek, and every single one of them (including the female members of our team) have slave-girl Leia dreams…. They let me down, but I soldiered on and even gave a new-hire tour and orientation in my pimp-o-rific attire. I will not forget or forgive their breach of the nerd code! Philistines.

Speaking of my J-O-B, the long hours, travel, all the late meals out, and my general lack of physical motivation has gifted me with 20 extra pounds of fat compared to this time last year.  In essence, it is my own fault – my bikes are all sitting there waiting on me to love them, I have a sweet pair of new running kicks, A gym membership that we pay for every month, and a dusty yoga mat.  I HAVE to dig deep, put away work and get my butt moving or I will be the size of Jabba the Hutt in no time and the Wife is not into Slave Girl Leia…

I think that brings it all up to date for the most part. I will try to be more diligent about keeping up when life starts swirling around me.

Thursday again

Spend an hour a day writing: I HAVE to finish my book on life in Germany. I have sat on it for WAY too long. I have set the office up so that I have a proper work space, free of distractions. I need to get up, have coffee, a bite to eat, and spend an hour typing. This means I will have to go to bed ~10:00 though…
For my dress shirts to be tailored: if I buy dress shirts off the rack I get 16/32 . Unless it is a new “slim fit” it fits fine across my back, shoulders, arms and neck, but around the waist I have a couple feet of material to crease, tuck, re-tuck, and hide. It looks sloppy if I take my suit jacket off. I would really like them taken in and button holes added to all so I can wear cufflinks. I know, petty uptown problems…
Get rid of some crap: I am on a binge to get rid of some of the crap we have accumulated in the last year. Do I really need a 4X8′ drafting table in the basement? How many backpacks does it take to be excessive? Do I need to keep all those fvcking back issues of Monocle and Outside?
Red tomatoes: Last year my tomato harvest sucked. I had 5 red tomatoes, 4 of them split on the vine, and all the rest remained green. I will not be having that shit this year! I planted early, have been lovingly tending to them all summer and if the warm weather is over, then I am putting a hoop-house over the beds until each and every one turns scarlet red.
Lumber: I could do with 50′ or so of 8″ wide popular planks. The final push on the kitchen will require some pull-outs installed and extra shelving put into existing cabinets.
Get off my ass: I have been traveling so much, missing runs and workouts in the gym, eating out, and scarfing down cookies like a junkie who has found a heroin tree. I have to get up, push away from my desk, and run/bike/lift/hike/climb and shed my cookie-handles.

Spring projects start and an ultimatum of sorts.

It seems that La Maison du Talley is in constant project mode.  There are two furniture refinishing projects happening in the unfinished side of our basement, there is an inch of sawdust on my shop floor, the front and back yards are still in various stages of completion, and my project idea/sketch book is quickly filling with new stuff.

I have finished a good number of things on my plate and have vowed to finish everything currently under construction or re-construction before beginning anything new.  I decided that as winter closes and spring dawns to take advantage of the better weather and rising temperatures (better for painting and finishing) and get some stuff knocked off.  In that vein, I had a very productive weekend:

I built and installed an irrigation system for the backyard made with ¾ PVC.  There are drip hose attachment points, ball valves, and splitters for ancillary hose attachments.  I built it so that I can later install a timer for watering the fruit trees and veggies when we are out of town and a coupler to flush the pipes with compressed air before the first freeze every year.  The total cost was less than a $100, I spent maybe 8 hours of labor from concept design to finish, and the shear convenience of it will pay off in spades in the years to come.

Last spring I acquired the top half of a built-in dish cabinet/hutch that had been ripped/sawed out of a 1920’s house.  It was missing one side, had no back, covered a thick coat of unknown layers of paint, and scrapes and gouges all over it.  I looked past its current state and saw some potential for some period appropriate and beautiful basement storage, so I picked it up for a steal and brought it home.  It languished there in the basement, covered with plastic and accumulating junk on top through my shoulder recovery, the excitement of the summer, and during our fall of rest and relaxation.

I got serious about it a couple of weeks ago and after, squaring the cabinet with joined pipe clamps, I installed a beadboard back – real beadboard and not the plywood facsimile.  I had Stamp-With-Foot help glue and drive a few nails so she would get an appreciation of the scope of the rebuild.  I also took her with me to the millwork store and she picked out some decorative edge molding that I incorporated into a built up crown detail.  I really appreciated her input as it made the project seem more like ours than just mine.  After re-gluing and adding screws to all the joints, I installed a new side piece and 3” structural beams for mounting it to the wall – it will be holding a good bit of weight and I wanted the load evenly distributed on the whole piece.

My little wife helped me man-handle it into place and attach it to the walls.  I spent an evening last week gluing up a custom top with clear grained popular and pine – it will have additional recessed storage in the top.   While milling the edges on the top edge, I realized that I had used my father’s tools to do almost the entire job.  I made me both smile and a little sad.  My father helped give me the skill to build cabinets and furniture; he taught me that doing something right and making it beautiful were one and the same.  I am using his tools because they became mine when he passed away and it made me wish that he were still here to see my adult ability to build and create, to help teach my son (his namesake) the same lessons I learned, and to just sit quietly and listen to him talk about his day and experience his warm smile.

I spent Saturday night and Sunday evening installing the new top and bits of trim.  I built all the pieces perfectly square and there was a hiccup during installation as the walls of our 1928 house and the actual dimensions of our “new” 1920 cabinet are anything but…  I called the wife down, she gave me her opinion (better than my own in this case) and I spent some quality time with a razor-sharp draw knife, a svelte jack plane, and creatively used a couple of long shims to make it all both work and look good.  All the trim is now installed and the whole thing turned out really nice. We will do a little more scraping before priming the bare wood and paint it all with a gloss white trim paint.  I will ost about it again when the finished cabinet is ready for unveiling.

Note: Stamps-With –Foot has now informed me that this is the last project that I will do in the house until I install a dishwasher and build the additional cabinets in the kitchen.  I will NOT complete the 1942 Philco Radio refinish, nope to reseeding the grass, the nook table remake will wait, no new fruit tree planting, the crown and headboard in our bedroom has been pushed and gym entertainment/storage cabinet is nixed until the Kitchen is done…