Port Townsend Wooden Boat Festival – 2019

Another fine year for the Port Townsend Wooden Boat Festival.  It is one of the weekends that I look forward to all summer.  My plan was to go early this year, like leaving the house at 6:00 AM and fueling up on coffee and energy bars for the 2+ hour trip from Seattle early.  The best laid plans of mice and men…

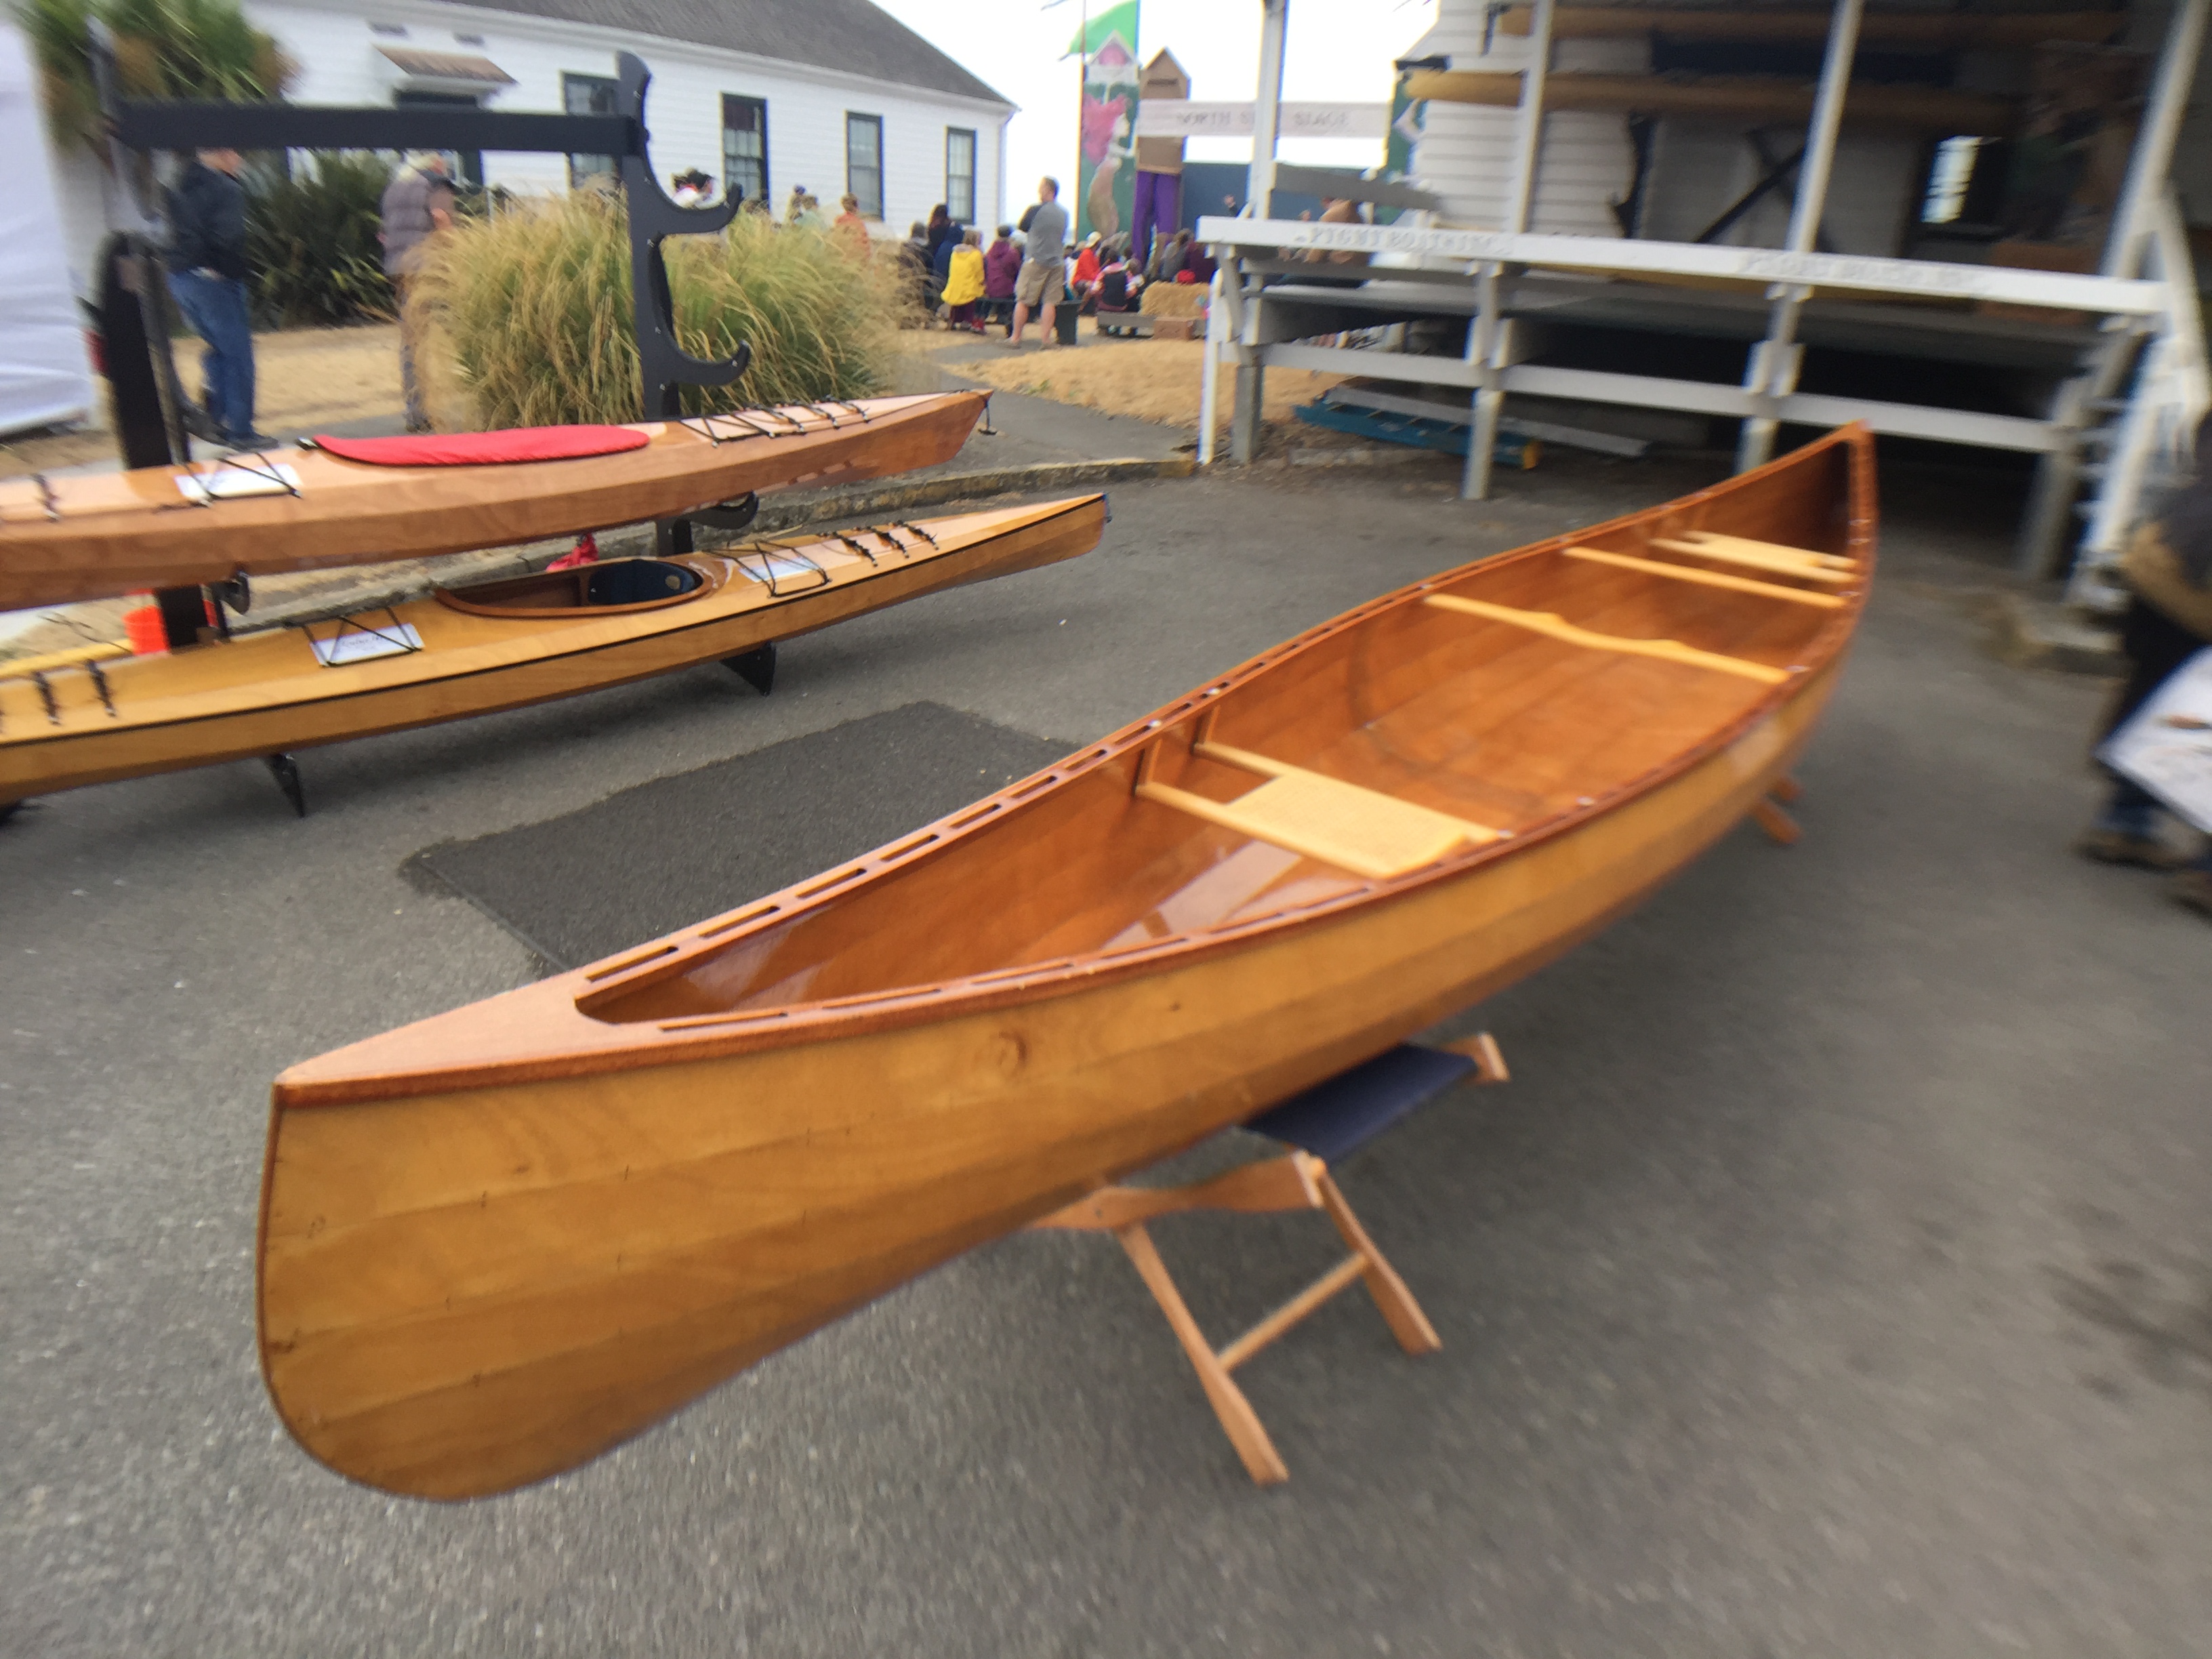
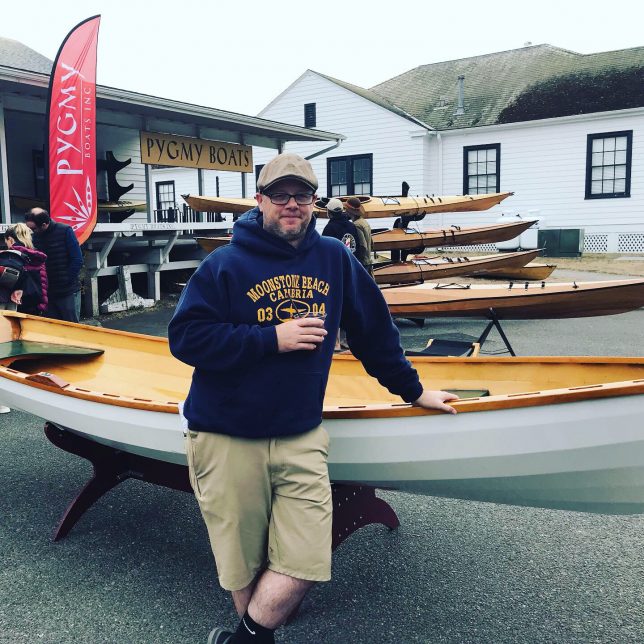
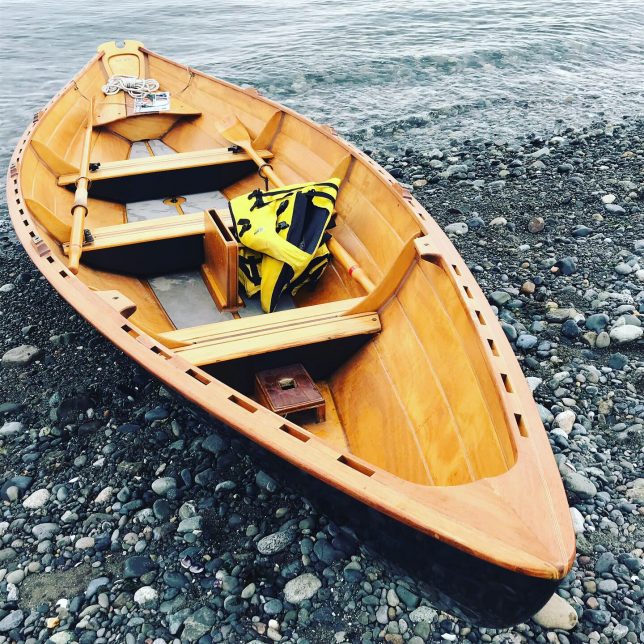
After a REALLY late start and failing to meet up with a boat builder friend at the show, my wife and I still managed to have a great day at the Festival. I think she went with me to keep me from buying a boat that “ Just needs just a little bit of work…”  Unbeknownst to her, I went to but a boat that needed a LOT of work: I am building a boat this year and had 90% decided on the Pygmy Wineglass Wherry.  I showed up planning to row the boat to make that number 100% and on taking one of their stitch&glue kits home with me.  It was ON! 

The Pygmy shop was really short staffed that afternoon and the person I spoke with initially didn’t really have the answers to show pricing, additional fiberglass, material for a sculling notch, etc…  I was told to speak with someone else, but they were not available.  Fine.  I wondered down to the water for a test row and the boat was booked out with folks in line for hours. Ok.  I am patient, I can wait.

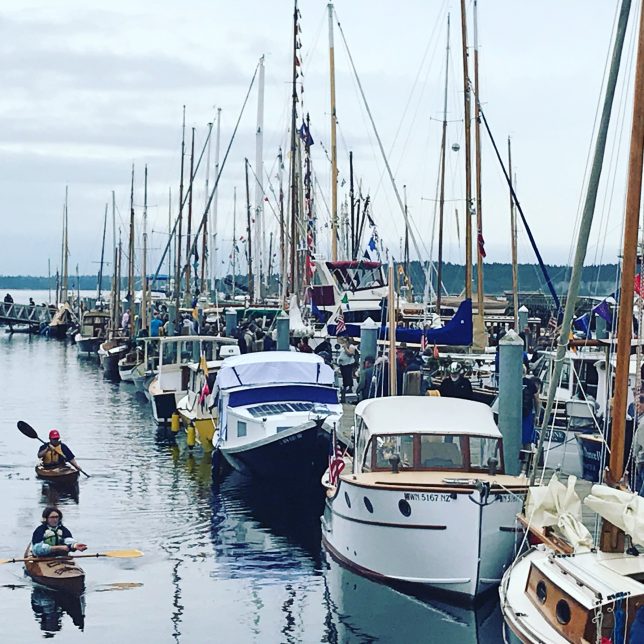
I toured a few boats on the water and there was some stunners!  Conspicuously absent though, was my favorite Puget Sound pocket-yacht, OPUS, an Ian Oughtred Wee Seal II design.  I hope to see her later this month at the Lake Union Wooden Boat Fest.

After touring a few boats, we walked down to the Connecticut Light Craft booth and I happened into Jon Harris, the owner/designer for CLC.  Even while tearing down the mast and sails for a customer to row a boat (talked to the guy later and he bought a kit) Mr. Harris took his time to discuss his design and answer my questions.  His Northeaster Dory is everything I want the Wineglass Wherry to have after modifications (dagger board, sails, and notch) but is a little longer and is more money.  After rowing it and watching how fast the sail and mast came down, I started looking hard at the Northeaster.  My wife likes the Dory more, as does the boat builder friend we failed to meet up with earlier in the day, but I am not 100% sold (it is the additional cash and the kit delivery fee in all honesty), so I bought the Dory scale model and will build and paint if this winter to help me decide.  In the end, I did buy a boat, just a 1/8” wooden scale model.

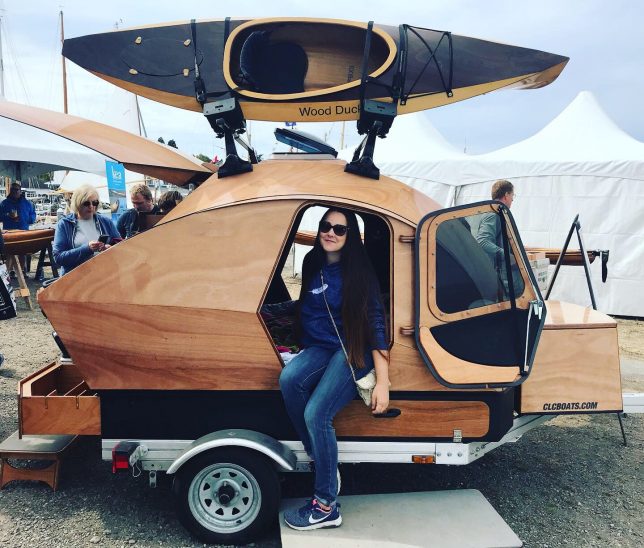
This year was Laurel’s first time seeing the CLC teardrop camper.  She was all giddy and crawled around the thing like it was a big fluffy warm dag: all smiles.  She has a new plan: She wants to split the cost of a kit and help me build it this spring. Really, she said those words.  She is super into it! I guess we are now building a camper, but she stopped short of buying the kit right there.  It was touch and go and I could see her Alaska Miles Credit Card vibrating in her pocket.  The plan it to wait and save the cash up and build this spring for summer adventures.

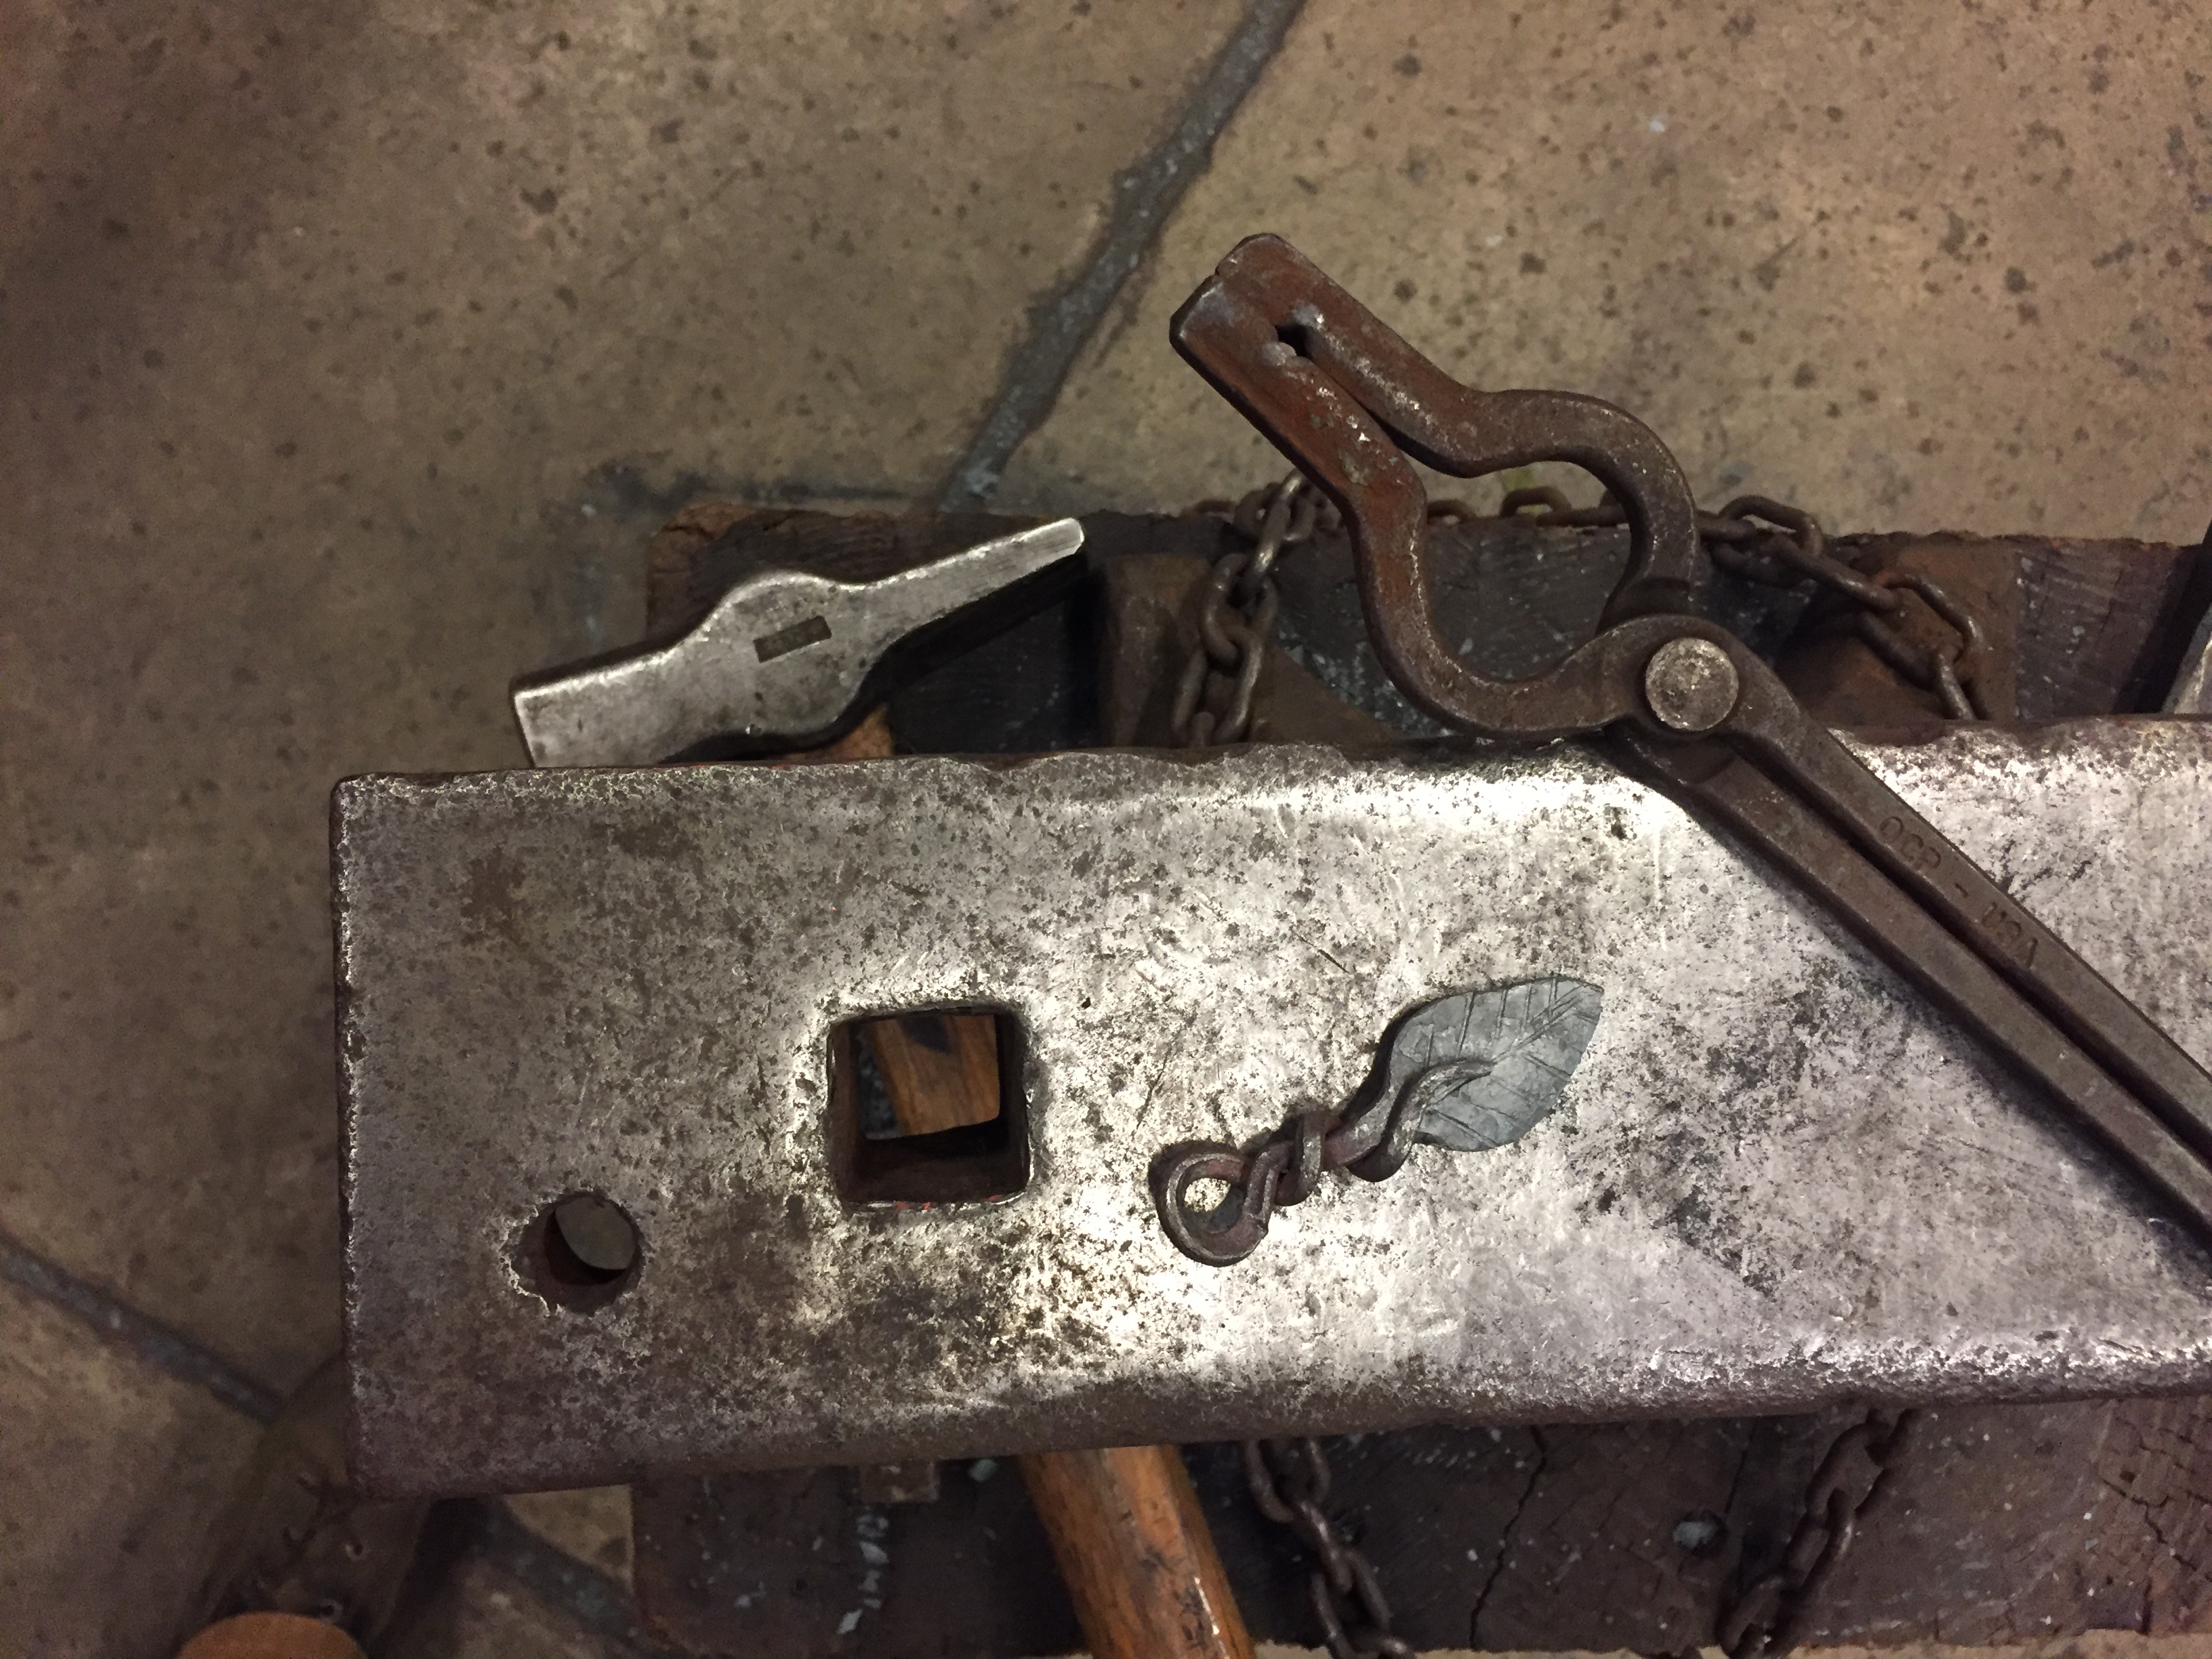
In addition to buying a boat, my other hope/plan was to pick up another Clamptite from AKcooltools.  They did not have a booth there last year, but I saw them on the vendor list this year.  I looked for them some, but figured they hadn’t made it.  My wife noticed their booth in a back corner, hidden away and asked me, “That booth says clamps, it is strange that we haven’t been there today.”  (YOU CAN’T OWN TOO MANY CLAMPS!)  Well, we/I ran right over, plopped my money down and now have a new stainless Clamptite to replace the one I dropped into Lake Union.

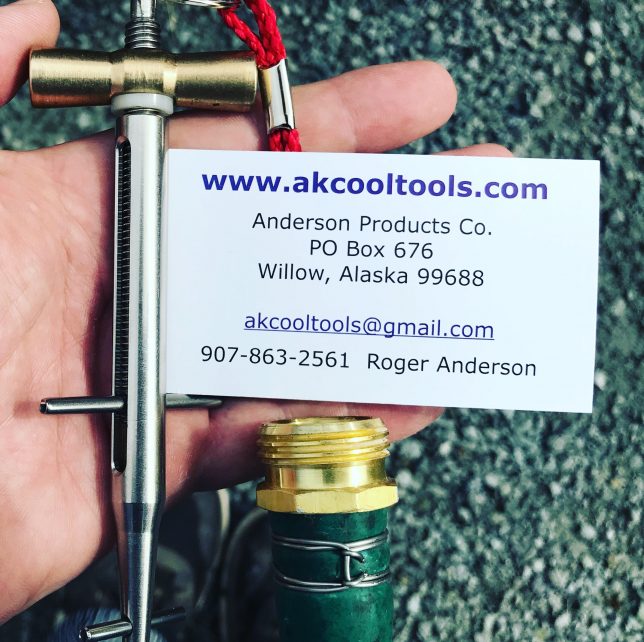
Like I said, These folks didn’t have a great vendor spot and I don’t think it was a great show for them, which isn’t really fair in relation to their level of customer cervicce, general attitude, and awesome products.  Look them up, see if it is something you can’t live without. I am not affiliated in any way with the sellers, festival, tool, etc. and get nothing from this. I just really like what they are doing and don’t think they were getting the foot traffic they deserve.  I made a YouTube video on using the tools as well.

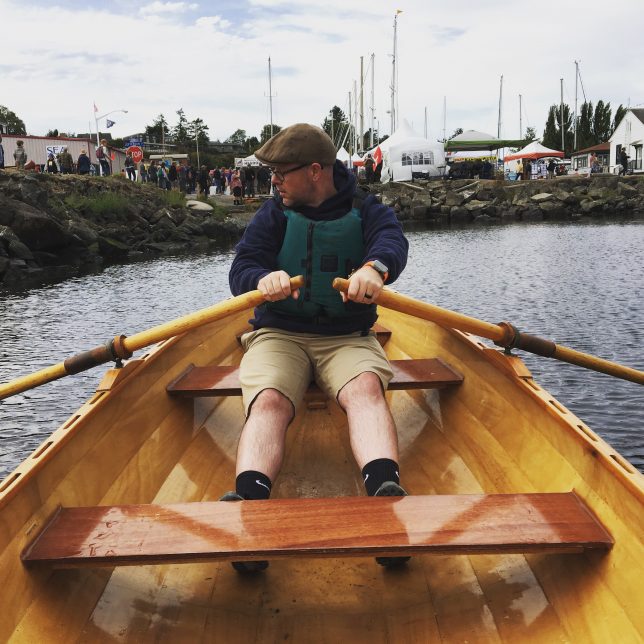
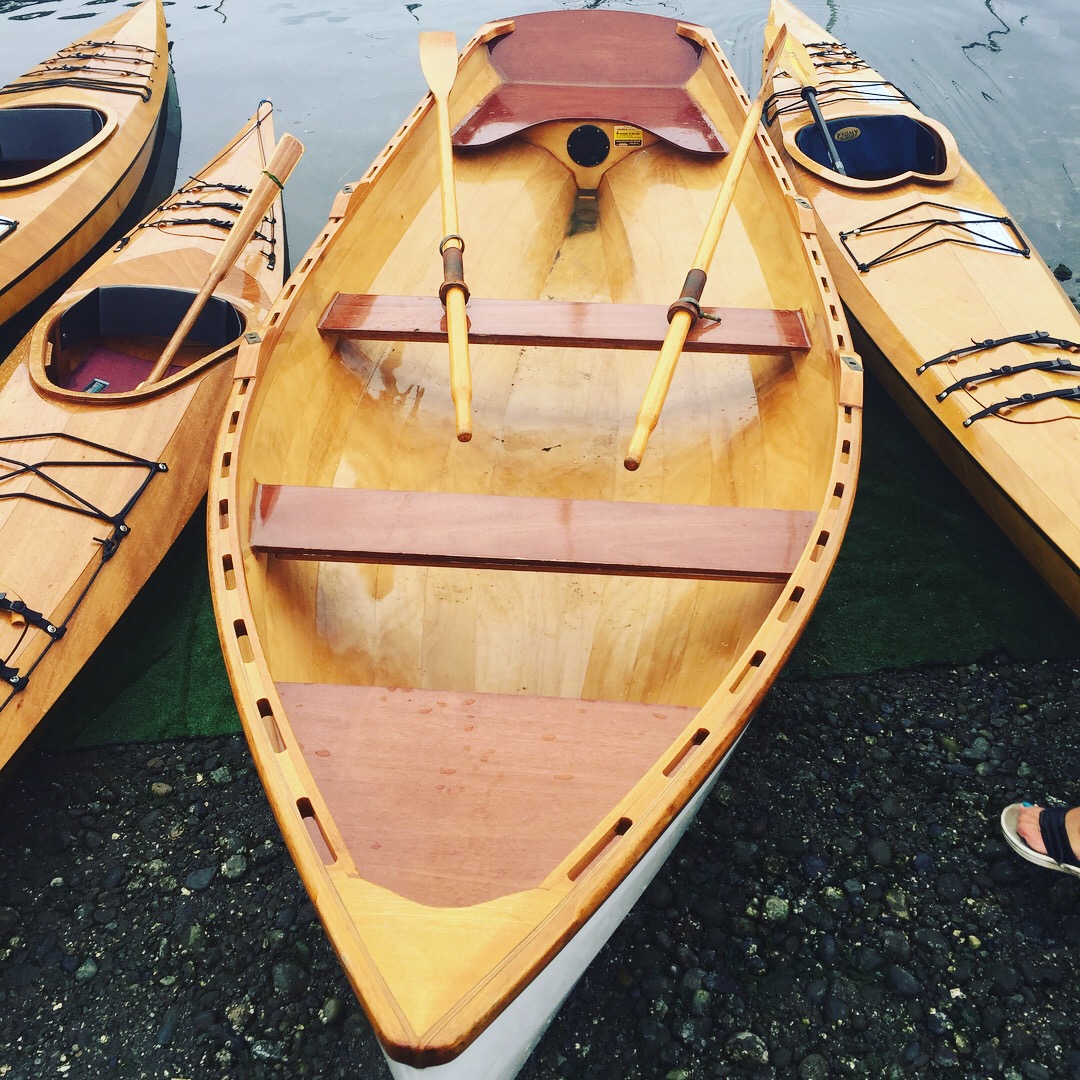
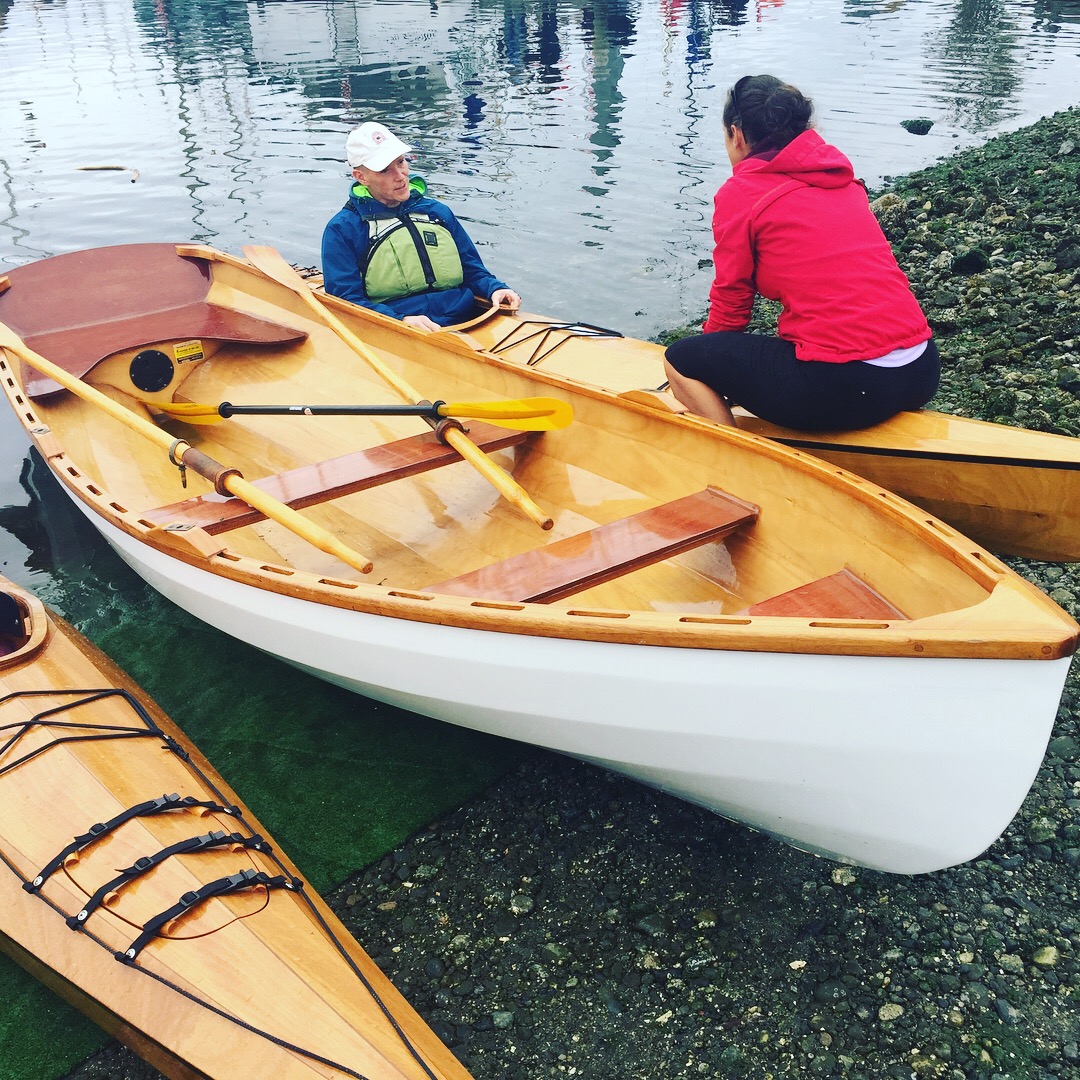
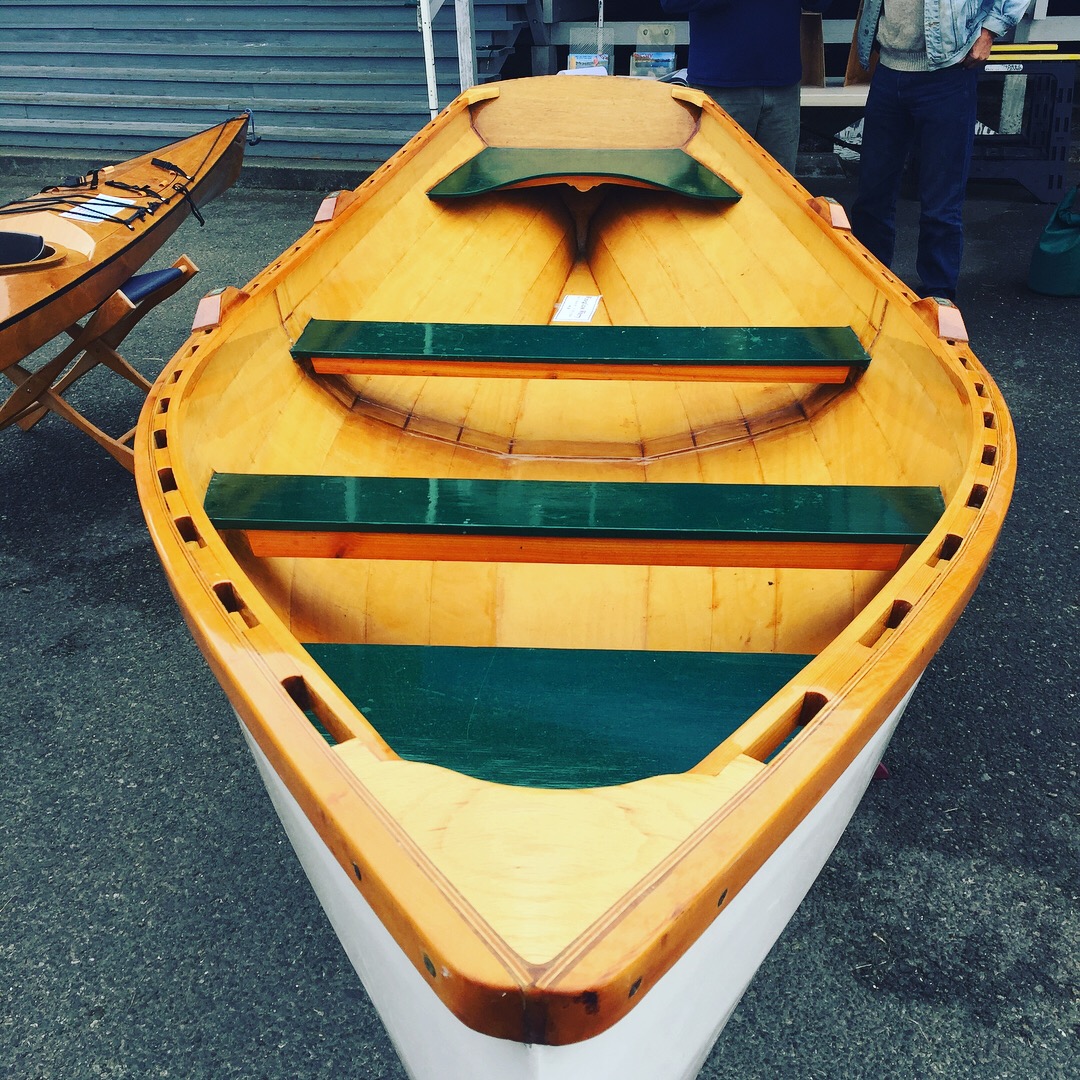
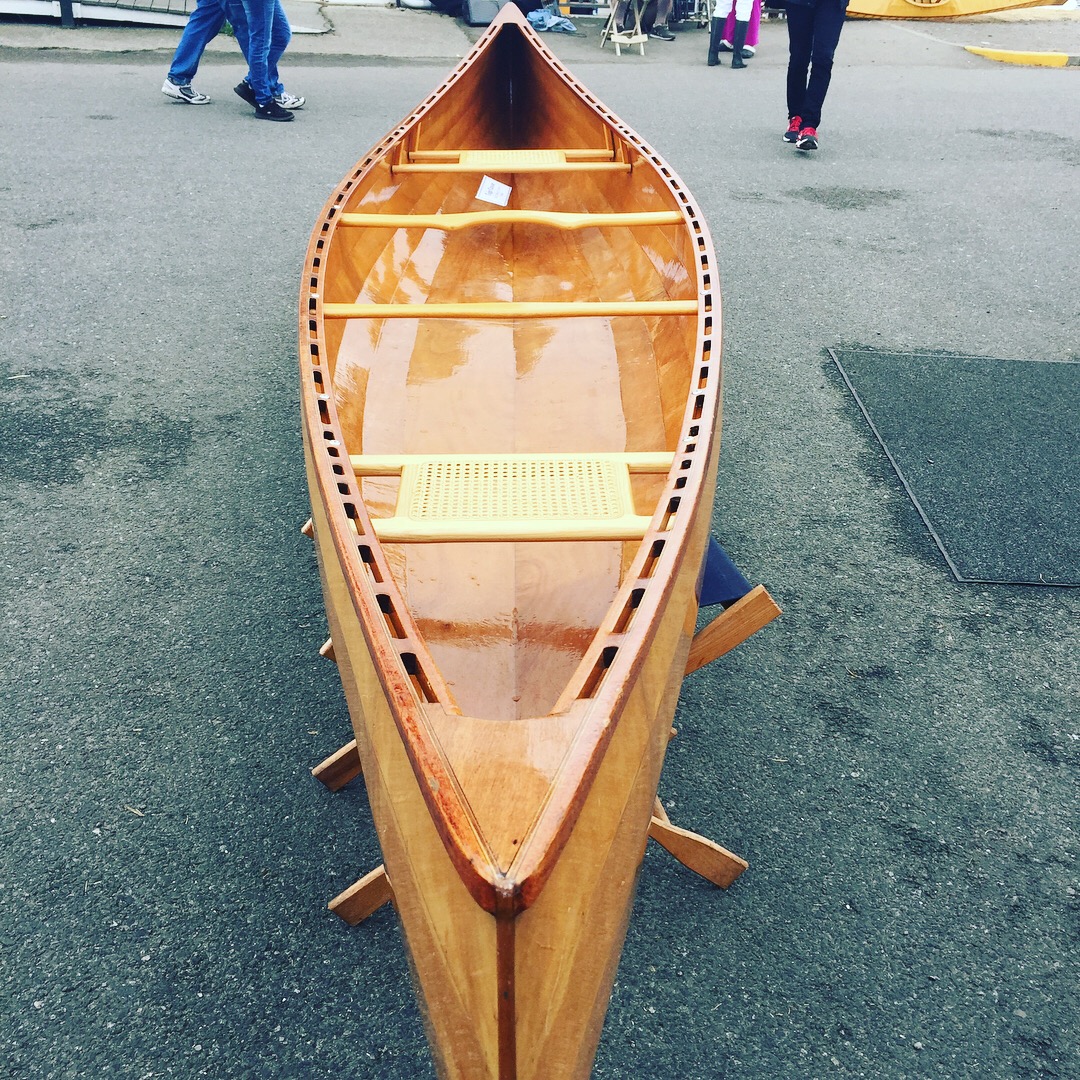
At the VERY end of the day Saturday, I caught the two ladies manning the Pygmy test paddle area just before they put the boats up for the night and they were awesome about letting me take the Wineglass Wherry and my sweet wife out for a spin. The boat was really stable and tracked well. The wind pushed her a bit when not rowing, but that is to be expected from a 90 pound rowboat. I still really like this boat I love the lines and the transom.  Like I said above, was almost sure I was going to build one with an added sculling notch, but I really want a daggerboard and a small sail. Both it and the dory are great boats. I have a decision to make…

Film Friday – Canoe Paddle Build Part I

Earlier this year, while we were finishing the attic, I took a weekend and built a cherry and ash laminated canoe paddle at the Camp Beach Center For Wooden Boats shop – as my own wood shop was in full use for the attic/storage. It was a little bit of a rush build and after paddling with it once, I decided to rebuild and reform it into a better performing paddle. This video will take you through all the steps of the initial build and the refit. The next video in in this series will show the finish steps and some on-water testing.

Birthday List – 2018

My birthday is almost here. The big 45.  If I am super lucky and healthy, this is the MAXIMUM point in life that I can be before I am Middle Aged.  Seriously, if I live to be 90, I am just a few days from being 1/2 way there.

Like most years, I will be taking the day off from work, the next day as well and enjoying doing stuff that makes me happy! A haircut, brunch, an afternoon movie, steak dinner with my wife, cookies, etc… Below is a short birthday wish list in no specific order.

The #1 want for my 45th year on this green and blue rock: For the Adults in the room to take the reins of the American Political System

Things that would also be nice:
Heifer International: Bees (I really like to give the gift of bees) Goats, Chickens, Llama, or the whole Ark…
A little cash to Doctors Without Borders/MSF
Go give blood and send me a post card
Filson Overalls
A bottle of good American Whiskey
An Amazon Gift Card
Book: Campaign Furniture by Chris Schwartz
New Propane Forge
Rounding hammer
1000 followers on YouTube
A gift card to Hardwick’s Hardware in Seattle
Genetic genealogy testing from 23&Me
Starbucks Gift Card
A card from each of my kids
New brown DocMartin Wingtipe – UK 8.5:  these or these or these
The 1-day or 2-day Rally School Course at Dirt Fish
Mavic 2 Zoom Drone
Amber 2ga. Plugs (bonus points if they have insect inclusions!!)
Jack Daniel’s Tennessee Honey
A nice bottle of Porto

Film Friday – BEES!!

My wife bought me a package bee hive box kit for Christmas last year, which reinforces the fact that I have a wife that is kind and considerate and pretty damn adorable.

Anywho, I thought that installing a new hive would be a terrific opportunity to document all the steps to install bees into a new hive box.  I went with a nuc hive instead of packaged bees and a new queen. That is for a later video. The whole process of bringing a new hive into the apiary also allowed me to show all the steps in prepping the pre-built hive boxes/parts and I was able to build and showcase a couple of steel hive stands that I have been thinking about and designing in my head for years.  I will also make a video on the design and build of the hive boxes and parts, but that will have to wait until this winter.

I love bees and I love being a beekeeper. The honey isn’t bad either…

House Painting – Attic Installment

I documented the process to paint the attic conversion that we have spent a couple of months working on. I am using a Graco airless spray rig that I bought a few years ago at a big box store. It has paid for itself MANY times over. This is part 1 of a 2 part video series. In this one, I sprayed the drywall primer and the trim paint. For paint I only use Benjamin Moore. It is my favorite to use and it wears amazing – not cheap though. Wear your mask and keep your lungs healthy!

Film Friday – Double Feature: Attic and Bath Remodel Status

I spent two FULL days, with a little help from my wife, instaling the baseboard, door, skylight, stair, and window trim in the new attic space. This video includes a few tips and tricks along the way. As this will be my wife’s studio space, she put in some sweat equity filling nail holes, doing a little sanding, and she chose the paint scheme. I will be painting next and will document that whole process as well.

This is Part 1 of our basement bathroom build/finish. We decided to add a basement bathroom when we replumbed the house a couple of years ago. 6 months of chaos insued and we took a two year break before diving back into the bathroom build. This time has been SO much better. We went with white subway tile for the walls, black and while hex tiles for the floor, and charcoal grout. The next step is trim, paint and fixture install.

Film Friday – Attic Remodel: Week 7

This is the last of the weekly updates for the Attic Remodel Project. The heavy work and drywall is complete and I will start trimming and painting the space this week (nights and weekends as I have a real J-O-B) so that my wife will have a studio that is full of light and opportunity. The next and final installment of the attic build will show all the paint and trim steps, some tips & tricks, and will be a few weeks away.

Hiring a contractor the right way

I have remodeled 3 homes while living in them and am the son, grandson, brother-in-law, and step-son of contractors.  I once had my own general carpentry company and served as a subcontractor for a few small to medium sized home-builders.  I have had some great experiences working both professionally and personally with contractors and subs and I have had & seen all the possible home renovation horrors.  The advice written below comes from the experience noted above.

Once you have decided on the work to be done and your ability to pay for said work, get written itemized estimates from several firms. Don’t automatically choose the lowest bidder or throw out the highest.  Carefully consider how and why they are the lowest or highest bidders.  Does the lowest have lower overhead cost or are they missing something important to the job?  Does the high bidder know something that the others don’t or does he have a bright shiny new truck to pay for?  Never, never, EVER do business with friends, family, or neighbors.  Seriously.  The “deal” you are getting WILL NOT be worth the hard feelings at the end.  Ignore at you own peril….

Some Questions to ask while you are gathering bids:

  • How many projects like mine have you completed in the last year?
    1. Ask for a list so you can see how familiar the contractor is with your type of project.
  • Will my project require a permit?
    1. If so, will you be taking care of the Permitting process?
    2. If no, why not?
  • Does the contractor have any BBB, State Licensing Board, or labor relations board findings?
    • Call and check.
    • Use the online tools and forums. Even if there is only one negative review. Read it.
  • Will you be arranging both permits and inspections?
    • A good contractor will get all the necessary permits before starting work on your project.
    • Ask for copies of the permits and keep them handy/post on the job site.
  • May I have a list of references?
    • Any contractor should be able to give you names, addresses, and phone numbers of at least three clients with projects like yours.
    • CALL THEM ALL!
    • Ask each reference:
      • How long ago the project was and whether it was completed on time?
      • Were there any unexpected costs?
      • Did workers show up on time and clean up after finishing the job?
      • Is there anything that you would do different?
    • Tell the contractor that you will be visiting the job-site, and will that be an issue?
      • The answer should be: “No, you are welcome any time.”
    • What types of insurance does the contractor carry?
      • Answers should be:
        • Personal liability
        • Worker’s compensation
        • Property damage coverage
      • Ask for copies of insurance certificates, and make sure they’re current, or you could be held liable for any injuries and damages that occur during the project.
        • Make sure there is an indemnity clause in your contract to relieves you of any liability in the case of injury or damage cause by or to a contractor’s employee or sub-contractor.
      • Will you be using subcontractors on this project?
        • If so, make sure to state in the contract that the subcontractors have to have current insurance coverage and licenses, if required.
        • Will you be paying the subcontractor directly or will they be billing separately?
        • Is there a fee added for their service fee by the contractor?

Payment Terms:

  1. Don’t pay cash, don’t pay cash… If a contractor will give you a “better deal” for paying cash, then walk away and go with another contractor.
  2. If they are willing to not declare income on their taxes, then they are willing to take other shortcuts on your job.
  3. Limit your down payment to 10-20% of the job cost. Some contractors will want the cost of materials and the 1st week’s labor upfront and that is fine as well.
  4. Make payments during the project contingent upon completion of defined amounts of work and not on calendar days.
  5. Example: ½ of project due when roof doors, windows installed and inspection passed. Final Payment due 7 days after final inspection pass and “punch list” items agreed to.
  6. This way, if the work isn’t going according to schedule, the payments to your contractor also are delayed.

Get a Written Contract:

It should be clear and concise and include the who, what, where, when, and cost of your project with very limited legal language flourish. Before you sign a contract, make sure it includes:

  • The contractor’s business name, given address, phone, and state license number
  • The payment schedule for the contractor, subcontractors, and suppliers
  • The contractor’s obligation to get all necessary permits
  • An estimated start and completion date
    • Possible monetary penalty for (none weather related) missed dates: $50 off the total amount owed for missed milestone date due to say inspection failure and $50 for each day until Passed Inspection
  • The payment schedule for the contractor, subcontractors, and suppliers
  • A fully defined Scope of Work (SOW), which detail all work to be performed at a Time & Material rate or as a total bid cost.
    • If work to be performed is on a Time & Material basis, then a weekly summation of all costs (labor, material, permits, etc.) and debits (payments or credits) shall be provided to the customer.
  • A “Not to Exceed” amount or percentage for the job, say 5-10% of total unless due to noted and signed change orders previously outlining the expense.
  • How change orders are handled.
    • A change order is a written authorization to the contractor to make a change or an addition to the work described in the original contract. It could affect the project’s cost and schedule and that needs to be outlined in the written change order.
  • A detailed list of all materials including each product’s color, model, size, and brand. If some materials will be chosen later, the contract should say who’s responsible for choosing each item and how much money is budgeted for it (this is also known as the “allowance”).
  • Information about warranties covering materials and workmanship, with names and addresses of who is honoring them — the contractor, distributor, or manufacturer. The length of the warranty period and any limitations also should be spelled out.
  • The inclusion of a lien release or lien waiver. See below.
  • Notification time if Sewer, Water, Gas, Electrical services will be interrupted, normally 24 hours, and how long they will be off.
  • Damage to Property: Negligent damage to property by contractor or subcontractors
    • “Shall be repaired to previous condition at contractor’s expense.”
  • What the contractor will and won’t do. For example, is site clean-up and trash hauling included in the price? Ask for a “broom clause” that makes the contractor responsible for all clean-up work, including spills and stains.
    • You will want a broom clause.  Trust me.
  • Do not sign an Arbitration clause. This is for the sole benefit of limiting the contractor’s cost if things go wrong and if you report the contractor to a state labor board or a BBB in your state, this can be seen as a violation of this clause and the contract as a whole.
  • Make sure there is a General Survival Clause:
    • In the event any clause or provision of this contract shall be held to be invalid, then the remaining clauses and provisions shall never the less be and remain in full force and effect.
  • A written statement of your right to cancel the contract within three business days if you signed it in your home or at a location other than the Contractor’s permanent place of business.

After You Hire a Contractor:

Keep Records!

Keep all paperwork related to your project in one place. If it didn’t happen on paper, then it didn’t happen.  This includes:

  • Speak directly to your contractor or your assign representative. Not the plumber, framer, or roofer.
  • Copies of the signed contract
  • Change orders
  • Copies of all permits
  • Follow up any in person conversations or phone calls with an e-mail detailing any agreed to points.
  • Any correspondence with your contractor.
    • Print out and keep e-mails for ready reference
  • Keep all receipts of any material that you have purchased
    • A record of all your purchases may be need receipts for tax purposes.
  • Keep a log or journal of all phone calls, conversations, and activities. You also might want to take photographs as the job progresses. These records are especially important if you have problems with your project — during or after construction. And serves as a record for future construction or remodeling.

Once the job is “Done”:

Don’t make the final payment or sign an affidavit of final release until you’re satisfied

Besides being satisfied with the work, you also need to know that subcontractors and suppliers have been paid. Laws in your state might allow them to file a mechanic’s lien against your home to satisfy their unpaid bills to the contractor that used them on your job.  Protect yourself by asking the contractor to secure a lien release or lien waiver from every subcontractor and supplier before final payment is made.

Know when you can withhold payment

If you have a problem with merchandise or services charged to a credit card, and you’ve made a good faith effort to work out the problem with the seller, you have the right to contact your credit card company and withhold payment from the card issuer for the merchandise or services. You can withhold payment up to the amount of credit outstanding for the purchase, plus any finance or related charges.

Before you sign off and make the final payment, check that:

  • All work meets the standards spelled out in the contract
  • You have written warranties for materials and workmanship
  • You have proof that all subcontractors and suppliers have been paid
  • The job site has been cleaned up and cleared of excess materials, tools, and equipment
  • You have inspected and approved the completed work
    • Use a Sign-Off Checklist/”Punch List”

Film Friday – Week 2 of the Attic Rebuild

I know… I have been posting a bunch of videos lately and not a lot of travel, Jeep, Puppy, garden, music, building, or other normal posts.  That will change with the coming of Spring and the completion of our attic remodel/rebuild.  In that vain, below is the short video documenting week 2 of the process.  It looks like it will be a 5-part series.

Mid-week Update

So, this week has been crazy at work and at home. On the home-front, there were birthdays, shopping, it is Income Tax time, we have 3-4 guys showing up every morning at 7:00 with tools in hand to work in and on the attic.

My shop is full.  I can’t even get to my table saw and my bench is stacked 5′ high with insulation.   I need a little shop time to keep me sane or at least saner…  So, I took a little me time and signed up for some classes for spring and early summer where I will get use other folks shops and build/make stuff:

  1. Canoe Paddle Making
  2. Claw and Ball Foot Carving
  3. A 10-Week Letter Press Workshop
  4. Woodcarving Figures
  5. Spoon Carving
  6. Block Printing
  7. Industrial Sewing: canvas and leather

The Jeep Rebuild After Paint

As you know, I got the Jeep back from paint about a month ago and it has been sitting on the lift in the garage – letting the paint cure. I am not 100% happy with the paint… It took 4 tries for them to get the hood and fenders right and there are little spots and dings on the tailgate. There is also some mess just above the nerf bars and a run on the rear fender that makes me twitch, but they will be covered by some trim and the fender flairs, so… I included the Jeep’s homecoming in a video here, but skip to 5:09 as I spent way too much time blabbing about other non-Jeep related crap in the 1st part of the Video.

Anyway, I have been collecting small cardboard boxes full of goodies since last October for the after-paint re-fit. That installation process begins this coming weekend. I am giddy with anticipation.

The part additions and changes from Morris, Amazon, ARB, and Northridge4X4 include:

Duel Battery tray
Halogen headlight Lamp Conversion Kit (wanted LEDs, but don’t want to pay $600+ for headlight!!)
Black Rugged Ridge Fender Flare Kit
Stainless Fender Flair Hardware
Front Side Amber Marker Lights
New Wiper Blades
New thick rubber floor mats
BestTop Bikini Top (uses existing soft top channel) for the 2 months of sun in Seattle this summer
Rugged Ridge LED Tail Lights
Front Parking Lamp/Lens
Black Factor 55 FlatLink Winch Cable Shackle
Burnt Orange Jeep Fender Decals
New Frame to Cowl Weather Seal
Black Powder Coated Stainless Steel Side Mirrors
New Winch Cover
Warn Winch bumper with D-Rings
Black Vinyl Spare Tire Cover
New Aviation-Style Light Switches for front spots and reverse lights
Stainless Steel License Plate Holder (I had it powder coated black)
Second set of D-rings (Powder Coated Burnt Orange to match Jeep Logo)
Hi-Lift Jack Rebuild Kit (sandblasting and repainting origional)
Bronze Door Hinge Bushings (sourced at McMaster-Carr)
Warrior Pipe ½ doors (because I can)
ARB Recovery Tools Bag to organize my off-road gear
ARB Compact Onboard Air Compressor (Got a SMOKING Deal at the ARB booth at a recent Jeep Swap Meet!!)

Getting new bar covers made as well

Film Friday – Framing Double Feature

We are remodeling and rebuilding a 90+ year old attic into a master bedroom. This required completely rewiring to electrical in the attic, moving/fixing plumbing, building a complete floating floor, adding roof supports, etc… Below is thew documentation of the 1st week of the build.

Part I of a 2 part video on the replacement of a falling down 90+ year old shack of a carriage shed with a modern 24X24 garage. This was not a flat mono-slab, green field build. Lots of digging was required and a rebar-filled retaining wall and slab had to be poured in the middle of winter before the first wall could go up.

Film Friday – 3D Printing Projects

I have been doing some medium-serious designing, borrowing, appropriating, and just plain stealing some 3D designs and printing useful stuff this winter in between shop time, my J-O-B, building projects, and remodel projects. The video below details the printing and use of a couple of safety razor cases, SD card holders, and GoPro Session4 case.

President’s Day 2018

President’s Day is here and it is time to prune the fruit trees, roses, and lavender. Or at least that was my plan for yesterday. Instead, I spent WAY TOO MUCH time on Twitter – ranting about sensible gun laws and the current US administration. I also spent a couple of hours cleaning the house, washing dishes, working on 2 videos, walking the puppies, and working in the shop. So the entire day was not wasted on-line.

In the shop, I am building a Screen Printers Workbench for a local artist, Amy M. Douglas. She does some pretty amazing prints and oil/acrylic work. We are trading my time for art, so it is a win/win for both of us. Below are a couple of shots taken during the build and I will have a whole YouTube video about the build in a week or so.


I will spend an afternoon this coming weekend pruning, re-stacking firewood, and cleaning the yard – I see a dump run in my future.

3/4/2018 Update:

The bench is done and delivered.

YouTube Partnership Program Rule Change Rant

So, I am going to rant for just a bit, bear with me…

-Mounts Soapbox –

“Ahem… I set a goal to be a better filmmaker, content provider, and maker five months ago.  Part of that goal was to reach the 10,000 view threshold to monetize my YouTube account.  I did not plan to quit my J-O-B, or be internet famous, I just wanted to use it as a milestone for progress toward the goal and I nailed it on January 4th!  10,000 views!!  I was so stoked that I woke my wife up way too late one night to tell her.  My account was under review for 2 weeks and I was finally officially monetized for two days – two WHOLE days – before BAM!!  I was demonetized with a huge group of small and smaller content providers.  Son of a…

While this was a while in coming, it looks like the process/decision was sped up when a guy with 15+ million subscribers named Logan Paul posted a video of a suicide victim. 1st, what a fucking privileged asshat.  WTF is wrong with people?!  He should be forever ashamed, and spend a great deal of his YouTube revenue on suicide prevention and advocacy.  What should’ve happened following the public and advertiser outrage was YouTube suspending or deleting his channel, but that dude generates SERIOUS ad revenue, so… What happened instead was that YouTube took him off the top-tier ad group and YouTube punished the SHIT out of the small folks by demonetizing channels with less than 4000 hours of watch-time AND less than1000 subscribers to ‘protect their core values’? Makes zero sense and this guy will continue to post and earn $$$ even at the lower tier.

OK, fine, fuck’em.  I was not doing this for some mythical pot of gold.  This setback is just going to make me dig deeper.  I am 10% to the new threshold and I will keep slogging on. Keep making and doing. Post better and better content.  This will make me leaner, stronger, bigger, better, more… A better speaker, better filmmaker, I will get lighting and sound for my videos dialed, have awesome content, and be a better person from it all. Success doesn’t teach half as much as adversity.

To all effected by the YouTube demonetization BS: Don’t quit! Keep slogging on. Keep making and doing. You too will be all the better for it. Send me your channel and I will follow you and help with the watch hour threshold. As I said, I had just hit the monetization before all of this and we will get there again.  It will take some hard work but, we can all help each other out.”

– Dismount Soapbox –


2018 News Year’s Resolutions:

A year ago, to the day, I said that I would do a bunch of stuff in 2017.  I did OK, but not great. I could blame it on my old man hip, the surgery, or the recovery time, but mostly not getting stuff on the list done was all me. All my own laziness, stuborness, or my A+ skill level of procrastination. These are the promises I made to myself that I kept:

Take a pottery class
Take a Blacksmithing class at the Pratt
Read 1 book every 2 weeks – minimum
Play my uke, banjo, and guitar with others
Give lots of $$ to Heifer and MFS
Make movies and post: Adventure, craftsmanship, and family.
Make Stuff!!
Ride my skateboard because I am not too old or too fat
Road trip in WA more
Take my wife on vacation
Plant a spring garden
Fix up the front and back yards

The following is what I am committing myself to do in 2018:

  1. Organize my chaos in the shop and basement.
  2. Sell, donate, recycle, or throw away shit that I do not use.
  3. Use my planner and notebooks as tools not as something that I “have” to use.
  4. Eat my veggies.  Seriously.  Salads in my future.
  5. Take my desk at home back and make it a conducive writing space.
  6. Cut WAY back on sugar and carb intake!
  7. Lose weight – back to 175! and put on 5-7lbs of muscle
  8. Go to the gym 3-4 time a week – minimum.
  9. Box more at the gym and at home
  10. Write more: Blog posts, REAL letters, Thank you notes, fiction, and non-fiction
  11. Take more great pictures
  12. Fly my drones more
  13. Take at least a 45 minute lunch at least 4 days a week at work
  14. Show up to yoga at least once a week
  15. Take another pottery class
  16. Finish my CJ-7 Jeep restoration
  17. Look into getting back into the judo dojo
  18. Sign up and compete in the Gambler 500 car race
  19. Sign up for a letterpress class at SVC Downtown
  20. Take another blacksmithing class at The Pratt
  21. Read 1 book every 2 weeks!
  22. Learn how to play the mandolin and banjo better!
  23. Play my uke, banjo, and guitar with others
  24. Build a skin-on-frame canoe for two
  25. Road and mountain bike
  26. Take the puppies to Lincoln Park for a walk at least once a week
  27. Ride the living shit out of my Single -Speed
  28. Bike to work at least 5 times this year (12 miles each way)
  29. Volunteer more at the Center for Wooden Boats
  30. Pay off all credit cards
  31. Go sailing in Puget Sound
  32. Turn some amazing and useful stuff on my lathe
  33. Give lots of $$ to Heifer and MFS
  34. Make at least 1 movie a week for YouTube and post: Adventure and craftsmanship
  35. Monetize my YouTube account and increase my presence and standing in that community
  36. Lessen my Twitter and social media activity…
  37. See my kids and grandchildren more
  38. Be involved in politics more: financally and with a time commitment
  39. Work on my Genealogy database and organize all my info.
  40. Finish the house remodel –  even if I have to pay a contractor to do it (…shudder…)
  41. Finish the garage/shop/GROP build
  42. Make.More.Stuff!!
  43. Ride my snowboard and skateboard because I am not too old or too fat
  44. Road trip in WA and on West Coast more
  45. Have two hives of healthy, happy bees
  46. Kayak lots!
  47. See my friends more
  48. Take my wife on vacation
  49. Plant a spring garden and have a really bountiful fall harvest
  50. Have an awesome Griswald-like Christmas light display!

I am printing this list out and pasting copies in my notebook, work planner, in the shop, at my desk at work, on the fridge, and in the basement above my warranty voiding workbench.

Film Friday – Oak and Maple Pizza Peel Build

My Father-in-Law, The Chatty Buddha,  wanted me to make him a pizza peel and while I have built cutting boards and boat paddles, I hadn’t yet made a peel. I agreed, sourced the lumber from a local salvege store. It used to be flooring, but after some magic with the table saw, jointer, some glue, and a hand plane or three – he has a pizza peel that I gave to him for Christmas.  I hope to be enjoying pizza from it for years to come.

Film Friday – Offering Candle Stand Build

As the weather has cooled down, there are some welding and fabrication projects that I need/want to take care of during the short, cold, dark days of winter. This short video details the fabrication of a steel votive candle or offering candle stand that I am built for my wife/our house. It is made to fit on top of the Prie-dieu that we brought back from France. The stand is made from 1/8″ steel channel and plate, though looking back at the video the plate might have been more like 5/16″ ish…

My Own Personal Take on Hand-planes: Buying Recommendations to Use

I use the bejesus out of my power tools.  I LOVE my SawStop, my Bosch compound miter-saw is scary accurate, and my band-saw is magic, but there is room in my life and in my shop for lots of hand-tools.  I am a child of both Norm Abram and Roy Underhill.  I watched them both on PBS every Saturday after cartoons as a small child in 1981 until I was 44 or so.  Their combined influence has made me value the old way of doing things without being a Luddite and I can appreciate modern cabinet shop/woodworking tools.  Case in point: I have a 3HP Powermatic 3520 lathe and would not even want to think about turning a bowl or platter on a pole lathe with a forged hook knife. On the other hand, while I have not given up a single one of by 5 routers, I found years ago that it is sometimes faster to grab an old wooden molding plane from a shelf and take care of an edge detail or piece of trim.  I can be done and dusted with the plane in the time it would take me to find the right bit an set up the router.

Because of my vocal love for hand planes, I get questions all the time from friends and acquaintances about what they should buy, where they should start, how to set something up, sharpening, truing a sole, etc…  I thought I would take a minute to go over those things, stand on my soapbox a little, and give the world my opinions concerning hand planes.

.. Ascending my soapbox…  Ahem…

  1. Buy a quality block and #4 smoothing plane – Lie-Nelson, Wood River,  or Veritas are great options.  Stay away from used hand planes or classics until you get used to how a hand plane SHOULD work.  Setting up an older Stanley or Bailey plane, sharpening, replacing parts and flattening the sole will drive you insane if you don’t know exactly what you are doing and will make you want to throw the thing and swear off hand planes forever.  Start with the known good and once you know how it should function, then you can pick up a  used #2 bench rabbit or a #8 corrugated bottom jointer and tune them sweetly – maybe.  I would go over any prospective purchase with a scornful eye and replacement the blade and/or chip breaker on an old plane is required about 50% of the time, in my experience anyway.  

Here is my list of the initial planes and accessories you will want/need ( I like the low angle but to each his own):

  1. Stanley Low-Angle Block Plane
  2. Shoulder plane
  3. Smoother plane 
  4. Plane chip-breaker Screwdriver  I swear to God you need this, really!  When you mare the screw an a $200 plane because you didn’t listen, it is your own fault for not listening.
  5. Sharpener: get two…
  6. Buy a nice set of Japanese water stones 1000 to 8000 grit.  Watch the videos and keep your blades sharp.
  7. Also, Japanese planes, like Japanese pull saws and water stones, are FANTASTIC.  They deserve their own diatribe, but for the purpose of this post I will stick to western planes with the exception of an edge-rounding plane.  I use mine constantly.

Nice to have once you get serious about using hand planes:

  1. Jack Plane
  2. Jointer planeSpoke shave  Get the flat first then the curved.  You probably wont ever need the concave one.
  3. This Router plane  but, if I were in the market for a new one, this Walke Moore version is the nicest I have ever seen!
  4. Scraper plane –  get the toothed blade
  5. A combination plane, but be wary of used Stanley Record #45/#46s.  They can be a beast to swap around and if they come with all the original parts they are spendy!
  6. if you are going to be doing a lot of drawers or insets, then both a Left and Right Plow Plane are really nice to have
  7. Wooden molding planes : See below…

Once you have been bitten by the molding plane bug, you will want to run right out and buy a 1/2 or full set.  Good luck.  There are not a lot of makers out there and the ones that are doing it have a long wait list and are not cheap.  Some people, like myself, invest is an older set.  My molding planes include a 3/4 harlequin cove and round set (mixed from various makers and time periods) that I have carefully built over the last 9-10 years.  The dates for my planes run from 1956 to 1930s to 1850s/70s and I have one from the 1790s that has an uncommon roman ogee shape that I use on boxes and 6-board chest lids. This collecting takes time as there has never been a set standard for what a #8 is, for instance, so there is a lot of variance in sizes between makers.  I have replaced a few irons as well.


I often defer to people that are smarter than me and Matthew Bickford and Chris Schwartz recommend a set of #4 and #8 and a set of #6 and #10 hollows and rounds as an initial starter set.  I would add that a 3/16 beading plane is a wonder to have as well if and when you start down this road.

To my own set, I have added some additional beading planes – up to 1/2″, tongue & groove planes for 1/4″ – 1″ stock, specialized profile molders, 1/4 rounds, scrapers, etc., but those is my own personal obsessive tendencies.

I failed miserably at finding a classic matched set of snipe-bills and half rounds (NEEDED for linen-fold panels).  I have resigned myself to buy new ones from Old Street Tools, but I have to warm my wife to the idea of me spending serious cash on blocks of wood and iron that I will use 5-6 times a year.  I have been working on her for 3 years and they are on my Christmas and birthday list every year.  No luck yet.

Read Bickford’s Moldings in Practice (if you have bled with me or we have swapped spit, you can borrow my copy) and take a look at the video of the same name before jumping in.  Molding planes can be sourced from the following, in no special order:

New  planes:

Classic:

…and now I will dismount my soapbox…


Film Friday – Another Hammer Re-Work/Repair

I had a tired, old, home-made, second-hand chipping hammer that was broken and had been so for years.  So, I MIG-welded the busted joint, ground the transition, and added a reclaimed hickory handle, which came from a hatchet rebuild shown in a previous video that I posted on YouTube. With the re-weld and addition of copper handle rivets, it should last a few decades now.

Film Friday – Home Garage Car Lift Details

The short film below is part on my on-going series on YouTube discussing and showing my garage/shop build process. It details my experience of having a 2-post Rotary Revolution RTP10 vehicle lift, why I went with the type/brand/style that I did, thoughts after using it for 9 months, and what I might do differently if I could go back in time.

As Always, likes are really appreciated on my YouTube Channel!

Weekend in the shop

I got some serious crap done in the garage and at home this weekend:

Cleaned, swept, and put away tools for over an hour Saturday morning
Added wheels to my screw-clamp stand
Built a hammer stand – I have a lot of hammers
Organized 4 drawers on my tool cabinet
Organized a drawer for just camera mounts and cables
Hung 22 small blue U-Line organization bins
Cleaned off table saw
Installed new table saw blade
Re-tensioned bandsaw
Cleaned off bench for 1st time in MONTHS!
Put all the miscellaneous screws, bolts, and hardware in the proper organization bin
Sanded the carcass for a bathroom cabinet installation
Moved some angle-iron into the metal storage rack
Carried 2 of the 3 cabinet sections in the house
Cranked on the lathe to reduce the diameter of a dowel
Blew 30 amp breaker
Said the f-word at least 3 times
Took a look and original electrician did not fully terminate one of the “hot” wire legs, which led to the failure.
Said dirty words
Drove to Home Depot and back for breaker
Swapped out a blown breaker
Ran 75 linier feet of 12-2 Romex wiring
Installed 12 electrical boxes
Only dropped 1 on my head/face
Installed a couple of runs of CAT-6 ethernet cable for the PoE camera system
Jesus, CAT-6 is expensive!!
Moved some firewood into the house
Built and installed butcher paper roll noteboard on a cabinet front
Re-set wall clock
Worked on chipping hammer re-build
Shot a couple of videos
Sanded a couple spots on the jeep under windshield
Wished I had a bathroom in the garage at 3 different points during the weekend
Started on pizza peel build for Father-in-law

Film Friday – Blacksmithing and Forging

I am a novice smith and that is being generous. I do like to forge though and it is awesome when I get a little time to make things for myself. This short film details a couple of the different type of hold fasts (metal work and word work) that I recently made at the Pratt Center for Fine Arts forge in Seattle. If you live in Seattle, have a single maker bone in your body, and haven’t checked them out – do so immediately and sign up for a class or two.

Garage sidewalk now poured with a side of cat-related drama

The sidewalk to the garage is finally poured – 8 weeks after I put the forms in…   To recap, it is 20’X4′ and 4″ deep.  I used 3500PSI with fiber added and lots of steel, because I hate cracking sidewalks. I paid a guy working on the house next door give me a hand with the wheel barrow concrete moving and to move-hold the other side of the scree board.  It took two hours from the minute the truck rolled up until I was cleaning up my tools and I saved >$1500 doing it myself, even with the cost of material, delivery and a couple of new tools.

I was super happy with the results when I went inside at 5:30. When I went back out to check on it at 9:30, the cat had walked up one side all the way to the garage, walked across, and back down the other side. I now have cat prints in my “perfect” sidewalk until the end of days…

I am not anthropomorphizing, she did it as a “Fuck You bald monkey!” because I would not let her in the house. It was too dry to re-float. This morning, to add insult, the hate-cat dropped a giant turd in the middle of the thing up by the garage door.  I said such dirty words!  This is the last straw!

Who would like an overweight white fluffy cat that is passive aggressive and shits on the things I love? I will throw in 2 bags of food, a carrier, shot records, box of band-aids, half eaten mouse, and 3 cat-nip impregnated toys. It is an awesome deal! Won’t last! Act now before someone else snatches her up!

Film Friday – Jeep Paint Prep

…And so begins my plan for interweb domination… This is the 1st in a series of videos detailing my Jeep re-painting project. I am doing the prep work and getting ready for my 1986 CJ-7 to go into the shop for a little cosmetic make-over. It was painted black at the factory in Toledo, has been black ever since, and will stay black until they make something darker. I also give a little bit of an update to what I have been up to of late, some projects that are in the works, and a quick pan view of part of a dirty, disorganized, and cluttered shop.

Forging and Fabricating

I can do and make bunches of stuff: Everything from joinery to electronics, from wood turning to machining, from bookbinding to electrical, from carving to heavy machine operation, but there are certain things that I have never really been able to do in the world of hand-craft, mostly due to lack of exposure or instruction. Chiefly among these things are/were forging/blacksmithing and metal shaping. The latter composed of shaping and bending sheet metal into forms and objects.

I decided this year to work on those deficits and have been taking some forging and fabrication classes at The Pratt Fine Arts Center in Seattle. A couple nights a week, I leave work and hammer, shape, weld, grind, and make stuff out of steel. I have been at it for 5 weeks and am really please with both The Pratt and all that I am learning. I have also learned that while I have dipped my toe in these waters, that there is a ocean of knowledge out there. I do not have any want to be a full-time blacksmith or fabricator, but I want to keep learning, so I can add some of the techniques and pieces to stuff that I already build and add to my repertoire of ability and understanding. Below are some of the pieces that I have made, tools I am using, and some stuff that I am working on. I am putting together a little video as well.

A Weekend On and Around Puget Sound

I spent this past weekend ignoring my grass, projects in the house, and garage organization/completion and took to the road.

Saturday afternoon found me at the Port Townsend Wooden Boat Festival.  There were no puppies allowed at the show, so Stamps-With-Foot stayed at home for a grueling round of puppy sitting/reading in the sunshine duty.  Despite a serious and prolonged case of Wooden Boat Lust, I succeeded in not buying a wooden sailboat at the show.   It was the ONE thing that my wife made me promise before leaving the house, which means that since I was able to fight off the boat-buying minor demon on my shoulder, am staying married.

While packing/planning the night before going to the festival, I decided it was a fine venue to work on a short YouTube film ( which will be uploaded by Friday), so I took a couple of GoPros, camera mounts, my drone, four extra SD cards, and a bunch of batteries.  The weather kind of sucked, but between pockets of rain/mist I shot the whole festival and some of the boats out on the water from the sky as well as the dock-side happenings.

There were so many cool boats and interesting folks in for the weekend!  My favorite trailer-sailor, OPUS, was there and the museum boat PIRATE from the Seattle CWB made it.   I really enjoyed talking to Tim Lemon, the owner of a Devlin Sloop named MR. MALLARD. His sculling prowess on a sailboat is impressive.  Designer and builder Graham Byrnes, of the cat ketch CARLITA was probably my favorite builder that I talked to.  I would definitely buy a boat from him if not for the above mentioned promise to my wife…  Pygmy Boats has a stitch&glue wineglass wherry rowboat that I would love to spend part of the winter building and I MAY be putting some funds back to do just that.  Howard Rice and his Scamp SOUTHERN CROSS had a fantastic story story to tell about adventures in Terra del Fuego.  Really enjoyed the Festival and love Port Townsend!  Stamps-With-Foot is definitely coming next year.


Side note:  If Lee Bjorklund & Larry Goerss ever decide to sell OPUS, my wife has given me permission to buy her.  She is the only wooden sailboat that I am “allowed” to purchase.  Just saying is case Lee and Larry and hankering to move on…

Sunday afternoon was spent on Vashion Island and both my bride and the furry monsters puppies came with.  We really like the island and the coffee produced by Vashion Island Roasters.  After a short ferry ride, we went over, drove a round a little, took in the sites, had lunch near the marina, and bought 10lbs of Guatemalan medium-roast coffee.  We sampled the goods while there, played a little chess, and split a cinnamon roll before heading back to the ferry and back home for dinner.


One year plan…

So, I have a One Year Plan to make my site and web content better and at the very least self-supporting.  I have had this site for 16 years and it is not free.  I would like for it to at least generate enough income to pay for the software updates, registration fees, equipment, and hosting costs.  A Great Leap Forward without the Maoist philosophy, mass-starvation, mass-migration, and such. It is multi-pronged and here it is:

Shop:

  • Stop eschewing progress for perfection.
  • Get it set and start working and building and doing!
  • Finish current Jeep projects

Website:

  • More regular updates
  • Split my personal BLOG/website and my “commercial” one
  • More video content for this site and commercial site (trying REALLY hard to buy Matt of Many Trades from its current owner – see blurb below)
  • Use as a funnel to increase my YouTube traffic

YouTube:

  • Monetize Account
  • Branding
    • Change the page name
  • Focus on specific content – craft and making stuff
  • Split art, travel, family, cycling and kayaking videos onto second YouTube channel
  • Become a better filmmaker
  • Spend time in front of the camera
  • Use better tools
    • Lenses
    • Lighting!
    • Microphones
    • Drones/software
    • Camera Mounts
  • Make better videos
  • Make some of my own music for videos

To kick this off right and so to as not to make plans without follow through, I have now re-branded my YouTube Channel from “matt talley” to “Matt of Many Trades”  to match my Instagram User Name.  I have used the name for about 25 years and even considered it for a company name (I was building decks, doing some trim carpentry, concrete forming, wiring HVAC systems, residential electrical, welding on red steel, and doing some light remodeling) while in college to pay tuition/groceries/rent.  I even have an OLD shirt I had silk screened with a hammer and cutting torch crossed with the name in an arch above.  It is about accurate branding and I do/make/build/fix/break a bunch of random crap 🙂 and it is time to embrace accurate branding.