Earlier this year, while we were finishing the attic, I took a weekend and built a cherry and ash laminated canoe paddle at the Camp Beach Center For Wooden Boats shop – as my own wood shop was in full use for the attic/storage. It was a little bit of a rush build and after paddling with it once, I decided to rebuild and reform it into a better performing paddle. This video will take you through all the steps of the initial build and the refit. The next video in in this series will show the finish steps and some on-water testing.
Tag: Wood
Fitting and refinishing a walking cane – the video
As a follow-up to the knee surgery recovery and how it is all going:
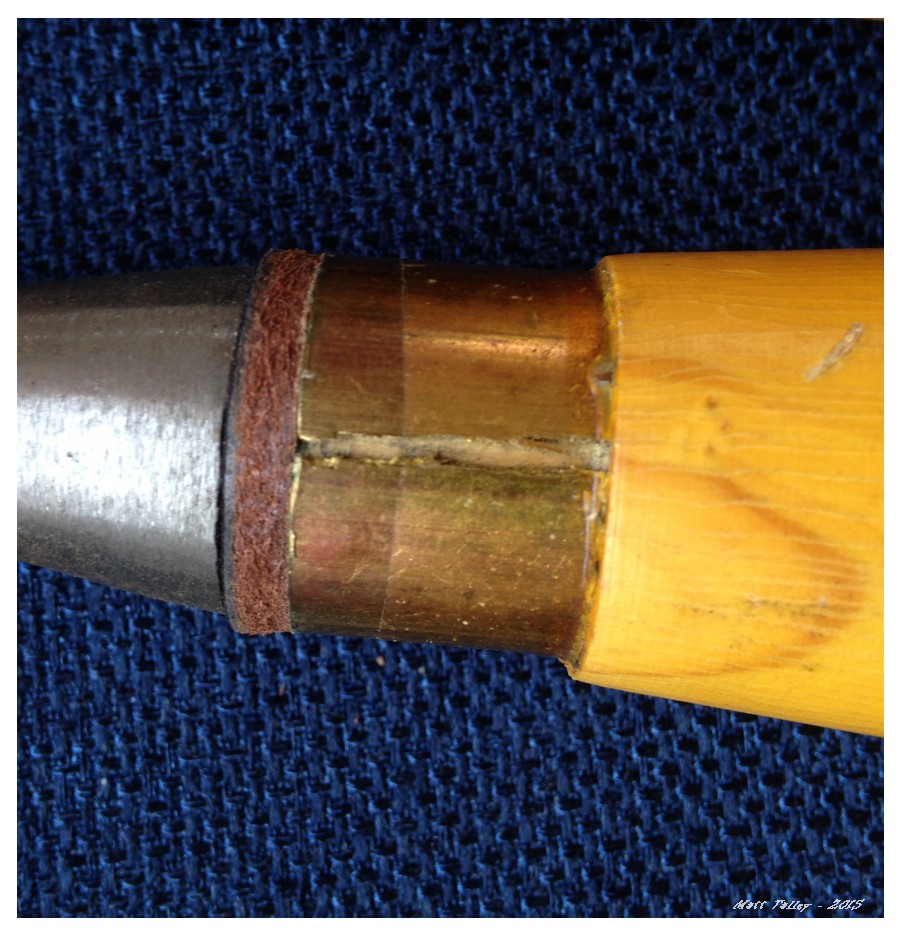
After 36 years or so, I finally fit, cut, and refinished my grandfather’s oak walking cane to my dimensions and need. I have used it every time I broke an ankle/leg or had hip/ankle/knee surgery – there have been a lot of all of those due to a misspent, but exciting, youth. It was never sized right for me though and I just made due, not wanting to cut his cane. The latest knee surgery/rebuild will require me to use a cane for an extended period of time (~4 months), so I finally decided to just get it done.
This fitting is not a shot in the dark or a “..I watched a video once…” sort of a thing. I have literally fit a 100+ canes for other people – I was a PT technician at one point during college – but for some reason never got around to taking care of my own. The fact that is was my grandfather’s makes it extra special for me.
Mid-week Update
So, this week has been crazy at work and at home. On the home-front, there were birthdays, shopping, it is Income Tax time, we have 3-4 guys showing up every morning at 7:00 with tools in hand to work in and on the attic.
My shop is full. I can’t even get to my table saw and my bench is stacked 5′ high with insulation. I need a little shop time to keep me sane or at least saner… So, I took a little me time and signed up for some classes for spring and early summer where I will get use other folks shops and build/make stuff:
- Canoe Paddle Making
- Claw and Ball Foot Carving
- A 10-Week Letter Press Workshop
- Woodcarving Figures
- Spoon Carving
- Block Printing
- Industrial Sewing: canvas and leather
Film Friday – Framing Double Feature
We are remodeling and rebuilding a 90+ year old attic into a master bedroom. This required completely rewiring to electrical in the attic, moving/fixing plumbing, building a complete floating floor, adding roof supports, etc… Below is thew documentation of the 1st week of the build.
Part I of a 2 part video on the replacement of a falling down 90+ year old shack of a carriage shed with a modern 24X24 garage. This was not a flat mono-slab, green field build. Lots of digging was required and a rebar-filled retaining wall and slab had to be poured in the middle of winter before the first wall could go up.
President’s Day 2018
President’s Day is here and it is time to prune the fruit trees, roses, and lavender. Or at least that was my plan for yesterday. Instead, I spent WAY TOO MUCH time on Twitter – ranting about sensible gun laws and the current US administration. I also spent a couple of hours cleaning the house, washing dishes, working on 2 videos, walking the puppies, and working in the shop. So the entire day was not wasted on-line.
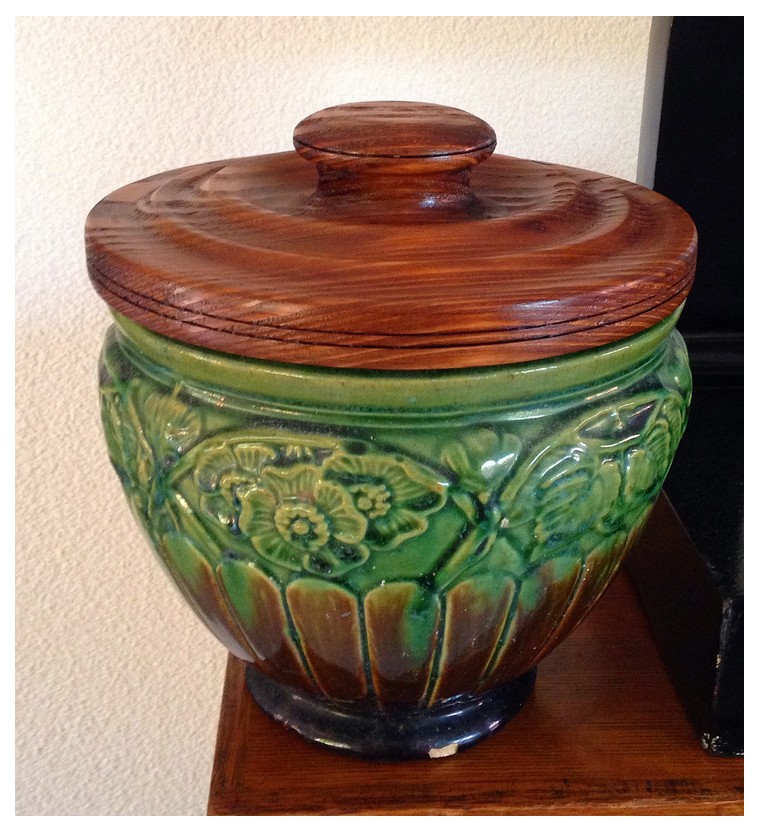
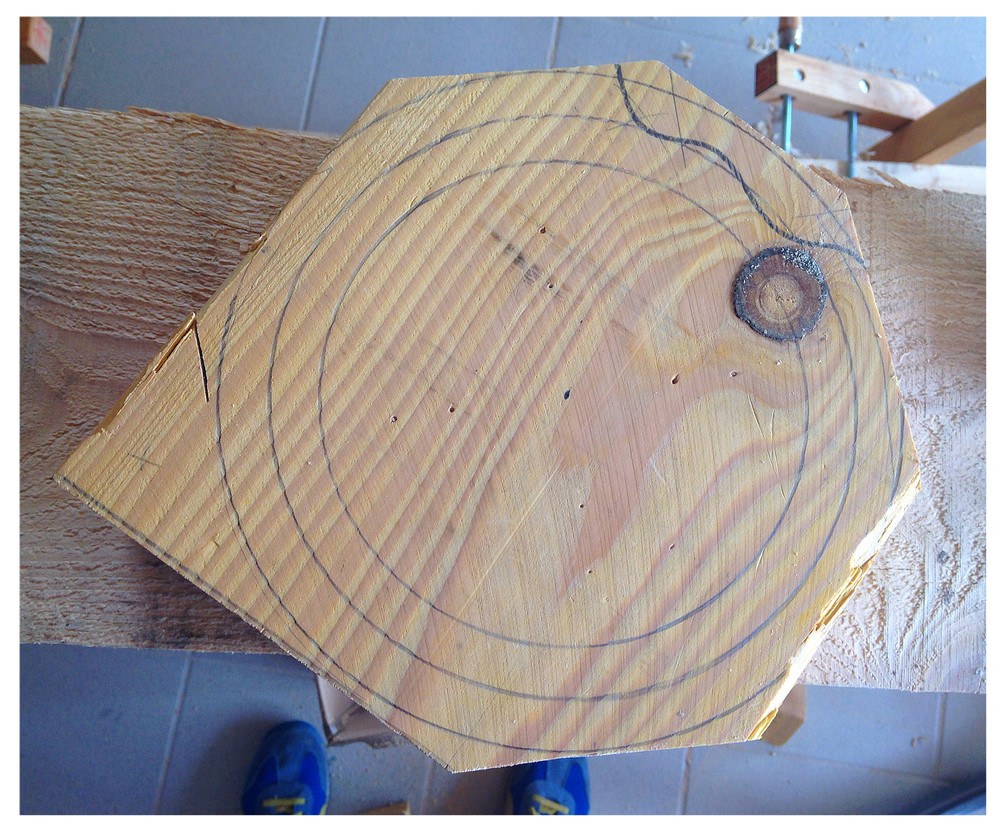
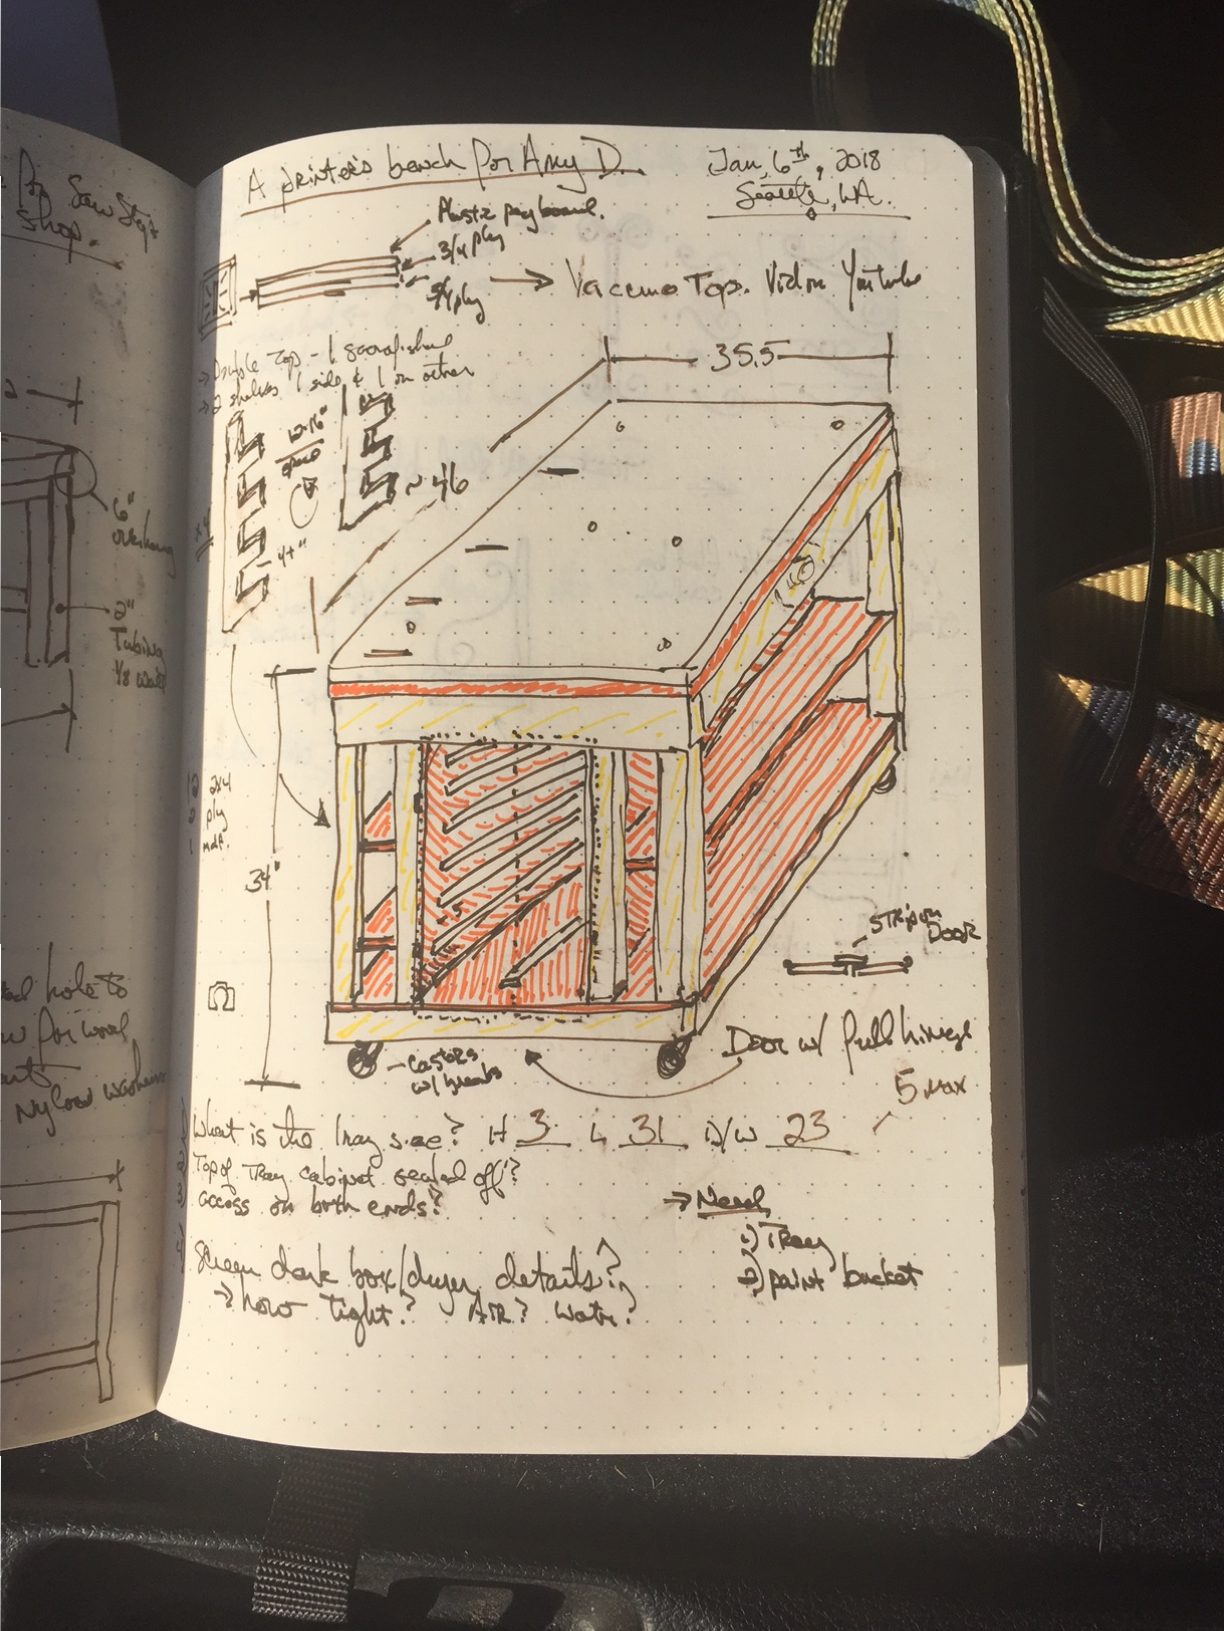
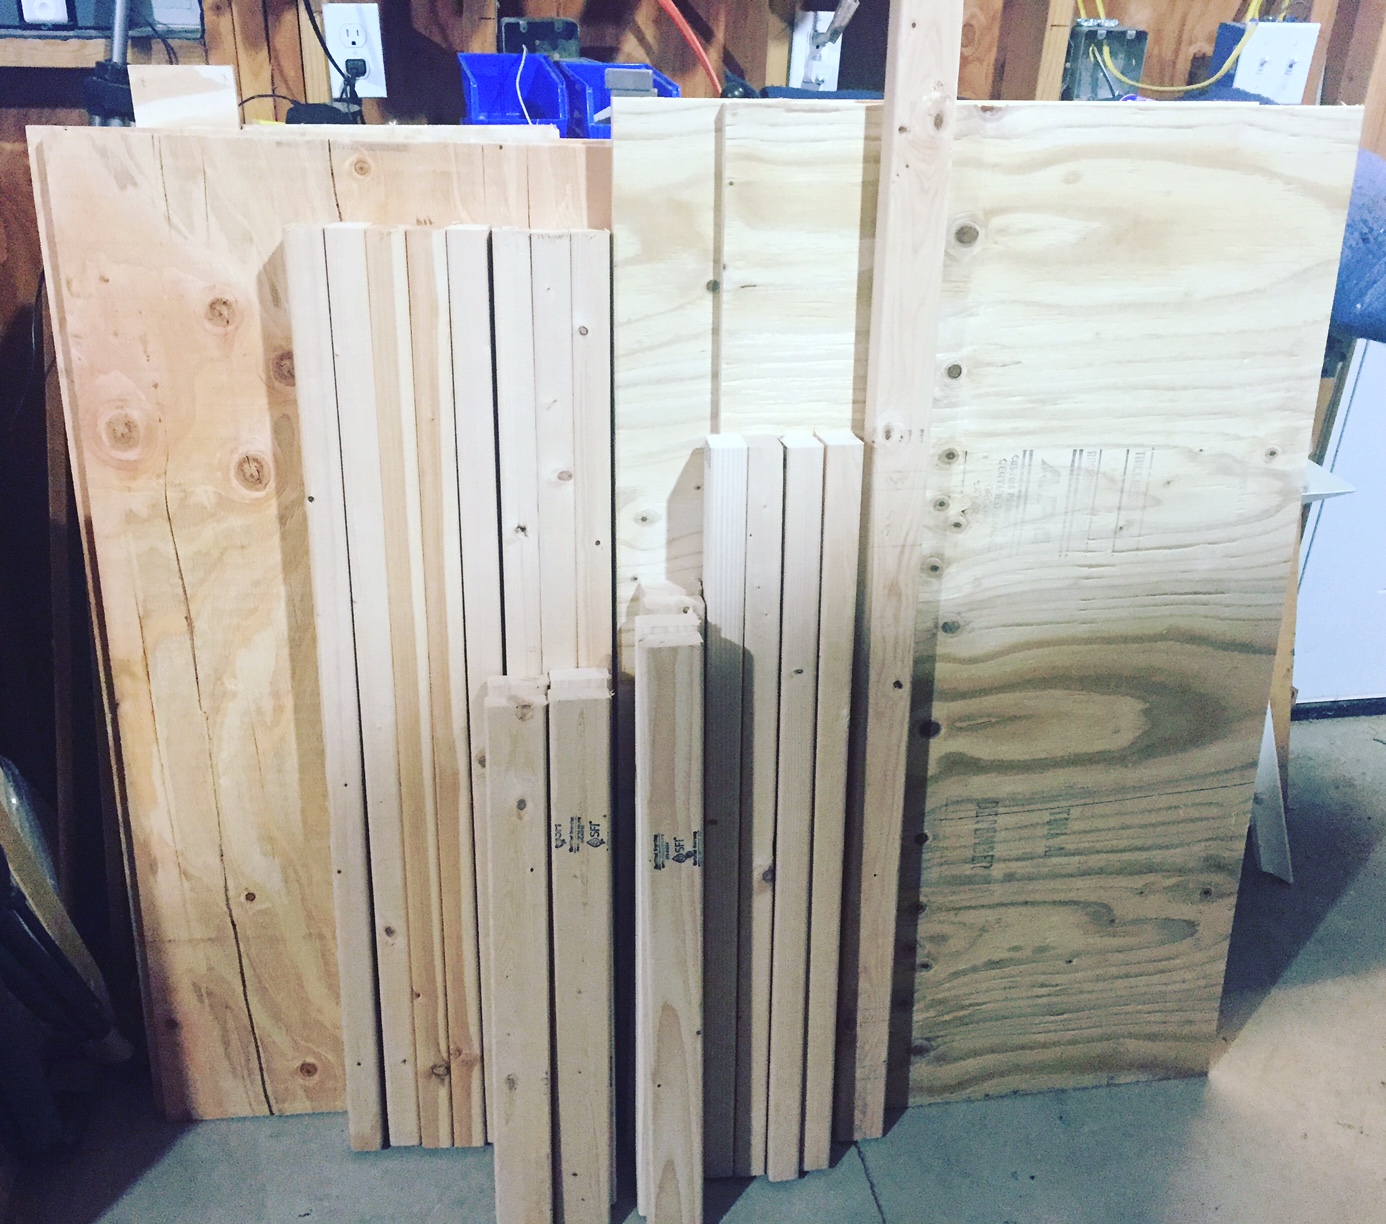
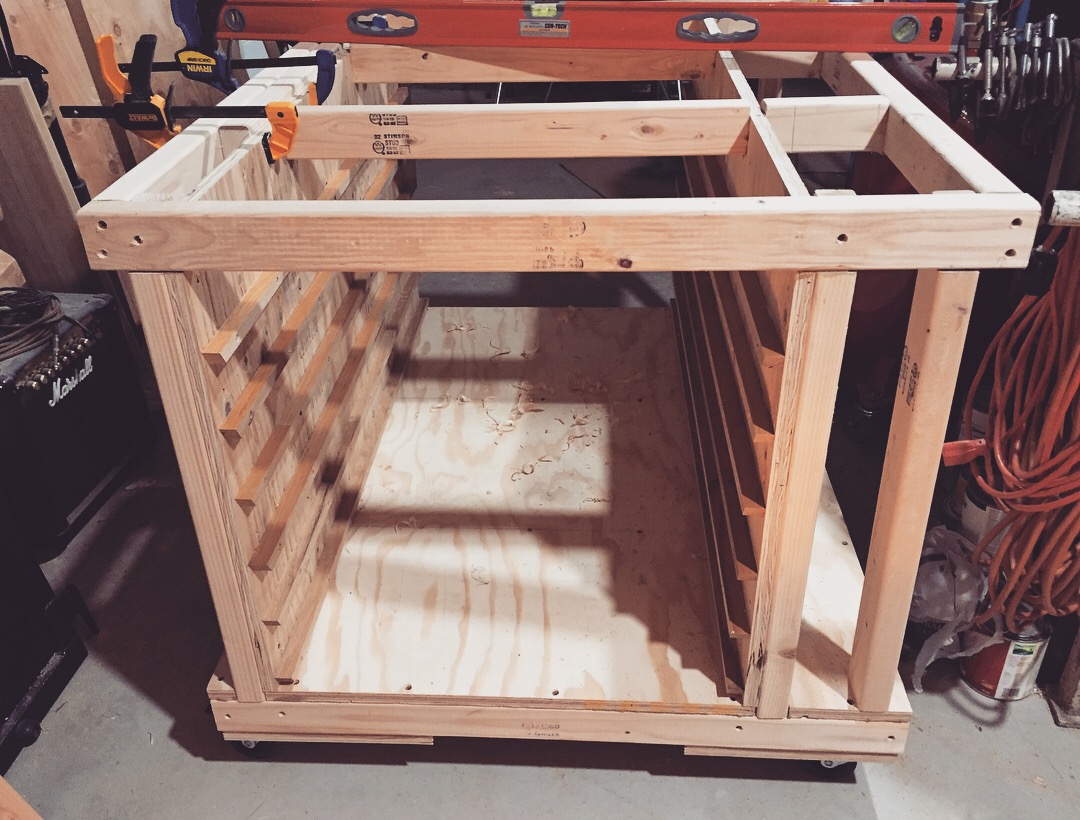
In the shop, I am building a Screen Printers Workbench for a local artist, Amy M. Douglas. She does some pretty amazing prints and oil/acrylic work. We are trading my time for art, so it is a win/win for both of us. Below are a couple of shots taken during the build and I will have a whole YouTube video about the build in a week or so.


I will spend an afternoon this coming weekend pruning, re-stacking firewood, and cleaning the yard – I see a dump run in my future.
3/4/2018 Update:
The bench is done and delivered.
Film Friday – Oak and Maple Pizza Peel Build
My Father-in-Law, The Chatty Buddha, wanted me to make him a pizza peel and while I have built cutting boards and boat paddles, I hadn’t yet made a peel. I agreed, sourced the lumber from a local salvege store. It used to be flooring, but after some magic with the table saw, jointer, some glue, and a hand plane or three – he has a pizza peel that I gave to him for Christmas. I hope to be enjoying pizza from it for years to come.
Chopping Firewood Warms You Twice
I have some on the most awesome neighbors ever. I know a lot of people say that, but I firmly believe in mine. One of my neighbors across the street took down a maple and a cedar and offered both up as fire wood for me to just HAVE! Now, two trees is a lot of wood to and split and the cedar looked nasty with lots of knots and limbs. I decided to rent a $70 hydraulic log splitter for the day and just get it done.
I showed up with a chainsaw, bar-oil, and the splitter and he had it all laid out and ready to go. He gave me pre-mixed gas for the saw and spent 9 hours helping me bust it all up – just because!! Even though we used the splitter, it was still HARD work and we lifted/rolled/moved/cut/shoved 2+cords of wet heavy wood around. It was work! I bought him lunch and a bottle of Bushmills 10yo Whiskey, but that is nowhere near enough payment for all he did!
The maple is enough to supply around a third of our wood for next winter (takes a while to season) and the cedar will make for awesome fire pit wood in the back yard and at the beach! I am on the lookout for some oak to lay up this winter and I would commit heinous acts for a load of madrona…
Labor Day Weekend – 2017
I was at home for Labor Day weekend this year and spend the time working on the house and yard. I dug up a cubic yard+ of dirt where the garage walkway will be and then built concrete forms, added rebar, and welded wire for a 20′ X 4′ sidewalk pour next week.


I also took a couple of hours to rebuild a 10′ section of fence on our south side. A 40′ (12.2m) tree had grown through it from the neighbor’s yard. He let me cut it down a couple of weeks ago and rebuilding the fence was required. Note: Stamps-With-Foot did not see me roped up, hanging in the harness, topping the tree, so I didn’t get in trouble for being a “stupid man” until later 🙂


Grilling Cedar Plank Salmon
The very first meal that my father-in-law ever made for me was a semi-traditional cedar plank salmon. It was delectable and I have asked him for the magic recipe a few times since, but it was only this weekend that he had the time & opportunity to go through it all from start to finish. I, of course, documented the whole thing with my iPhone (GoPro battery was dead). As a note, he is a professional chef and on this visit hooked us up with a version of his recipe/process made for and on our tiny 10-year-old, much loved and used Weber grill. The meal was AMAZING! Here is the whole process:
Film Friday – Recycling Sawdust and Wood Chips
I spent last weekend in Portland, Oregon and happened by a custom furniture shop downtown called The Joinery. The workmanship of their wares was terrific and the sales staff was really accommodating. They knew I wasn’t going to buy any of their very nice pieces and yet still explained their ethos and process, details of the builds, and even let me wonder around taking a couple of pictures. If Mid-Century to Japanese Fusion to 21st Century Modern is your thing and you are as allergic to IKEA pressed wood crap furniture as I am, them look them up and see if they have a piece of furniture that you have to have to fill that void in your living-room/soul.
Aside from their furniture, they had a display of pressed hardwood sawdust pucks – making furniture produces some waste and normally this sawdust goes to landfills or in my case, used for mulch and compost roughage. Their display piqued my interest and I started asking questions. The Joinery and like establishments produce exponentially more sawdust than my little shop does, so their way of dealing with it is that they have invested in a sawdust briquette press that makes these hardwood hockey-puck-ish sized briquettes that are burned in pellet stoves, regular wood stoves, or fireplace inserts to provide heat. There is no glue or bonding agent used, just pressure from a hydraulic ram-press keeps the pucks together. The shop goes a little beyond expectation though and GIVES THEM AWAY FOR FREE to the public at their other sales location and workshop (48th and Woodstock in Portland). I can’t even tell you how happy it makes me to see a company do this. The shear fact that this is part of their business model makes me want to buy a small occasional table or some such item just to support what they are doing.
I am so turned on by this that I am looking into a small briquette press for my shop. The ROI time for the model that meets the size/cost requiremnet for me (a UK made press, a couple of Chinese machines, and one Canadian model) would be like 2 years for my limited use, but it would be worth it to me as there is only so much mulch that I and my neighbors can use. I would like to use the briquettes for some house heat and to heat the shop and green house in the winter, giving away what I didn’t use. Stay tuned for updates in my hunt and go by The Joinery’s website of shop and support them if you can.
Film Friday – The Garage Build Film Part 2
Below is Part 2 of a 3-Part series documenting our garage/shop build. Like Part 1, this film is made from pictures taken during the build with a voice over commentary. Part-3 will be a mix of videos, stills, and some drone shots.
There is a “hidden track” at the end…
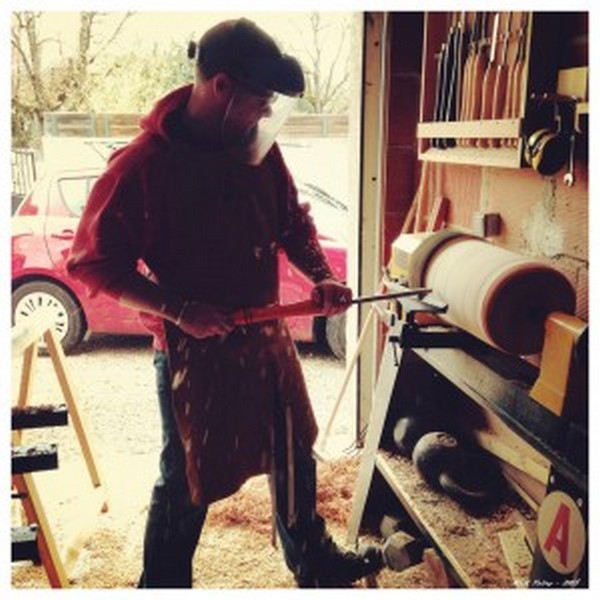
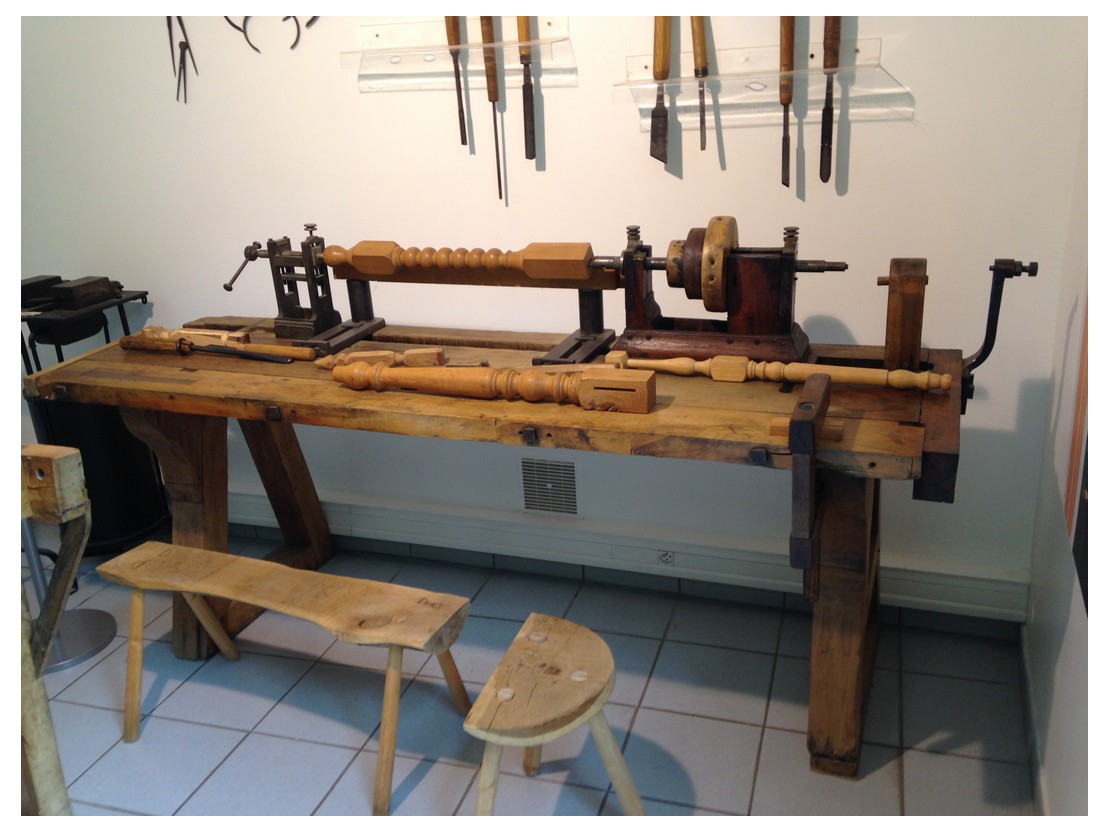
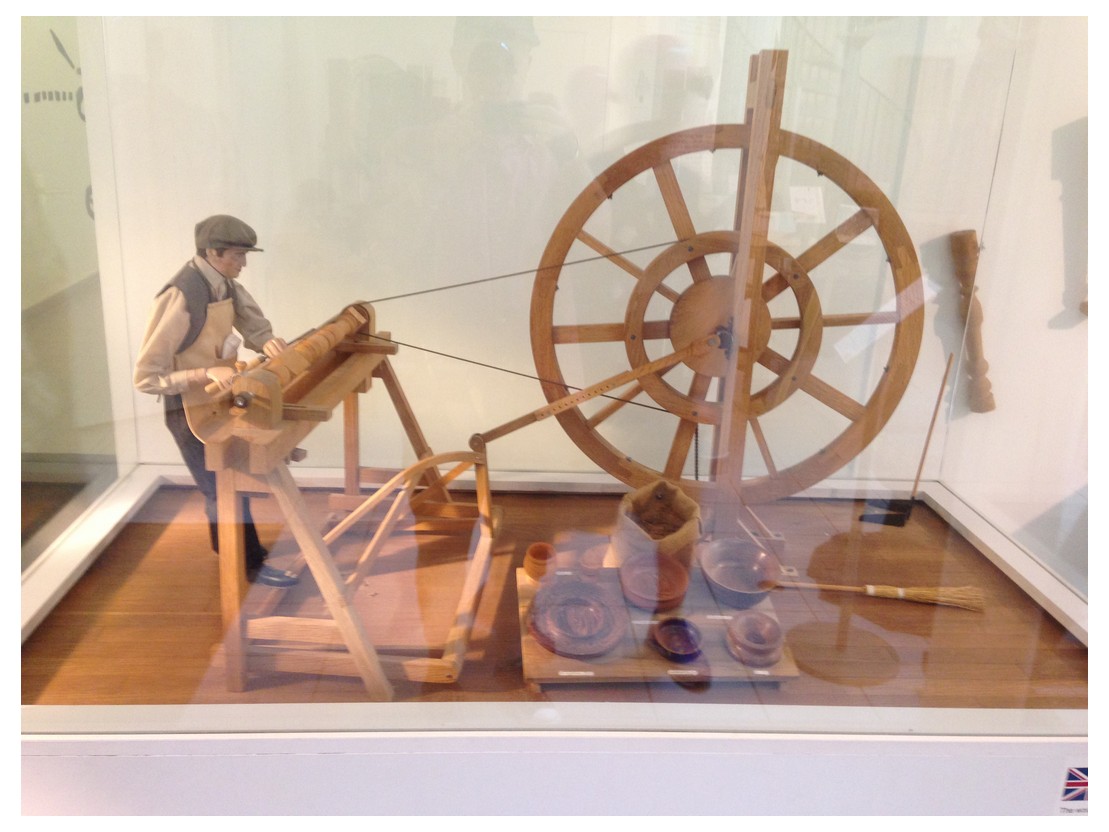
Film Friday – Foot Powered Lathe Double Feature
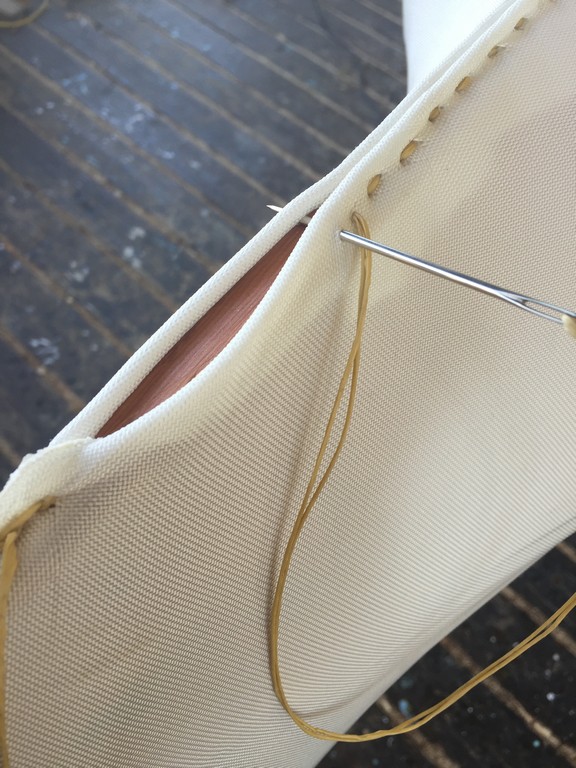
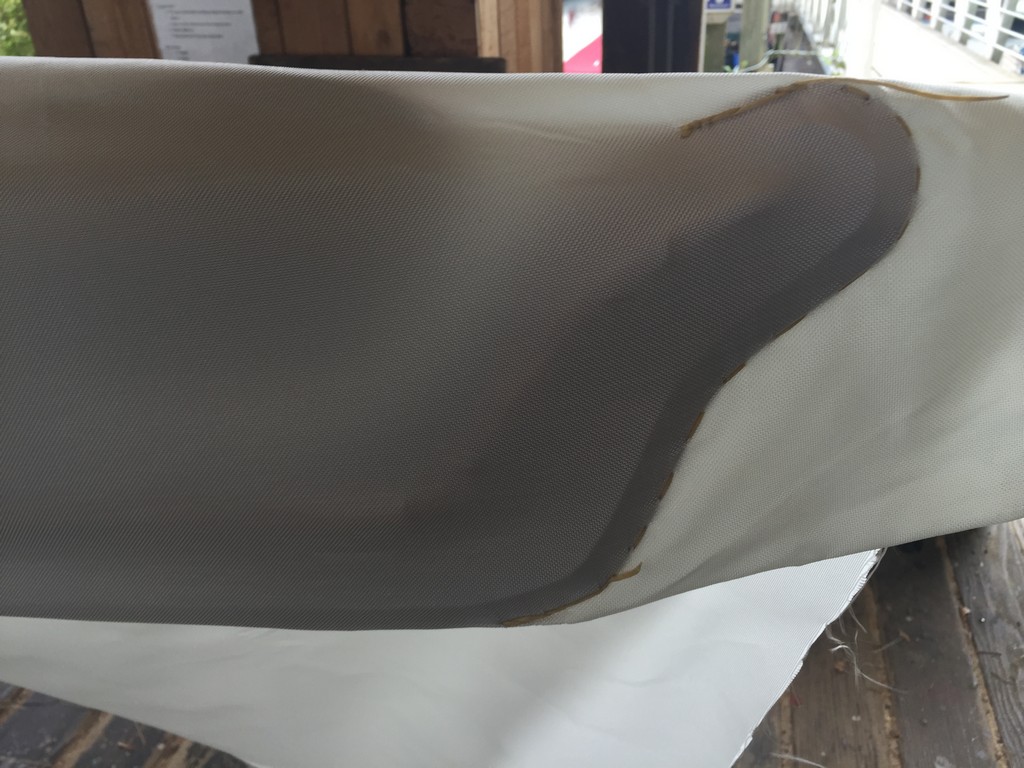
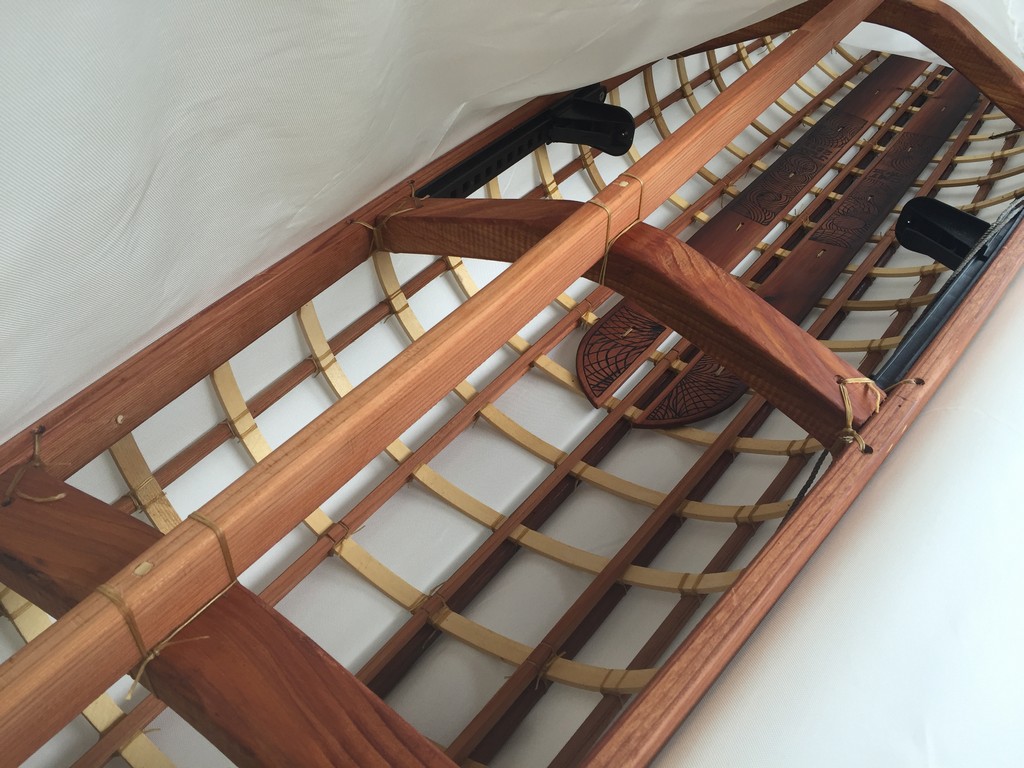
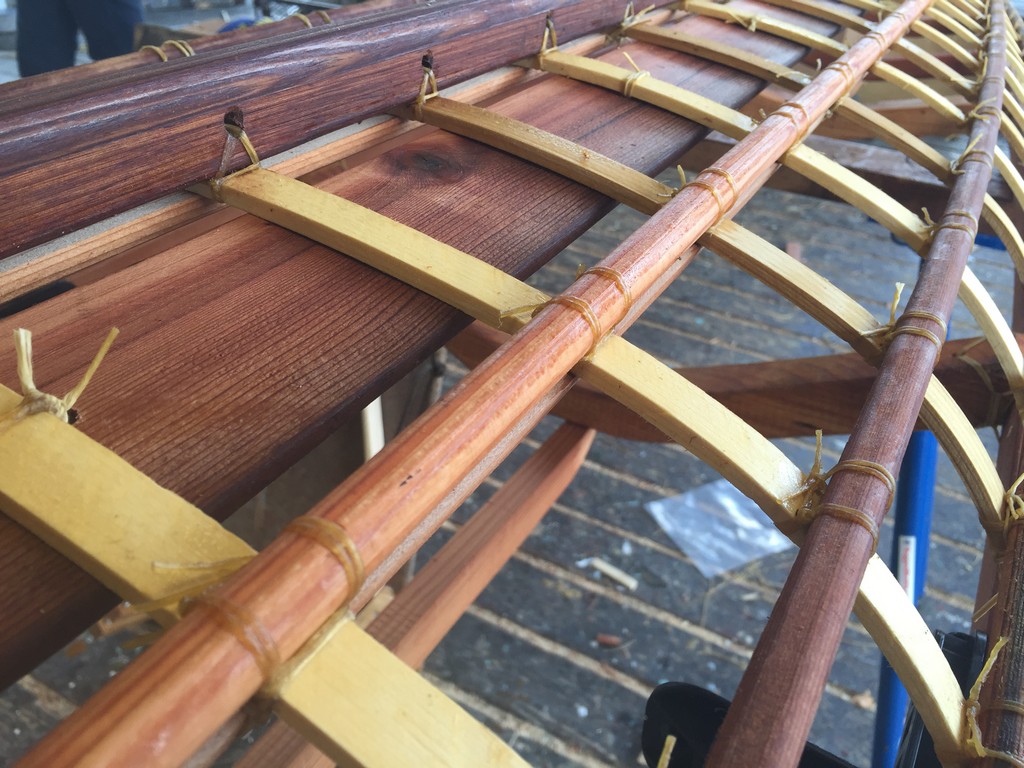
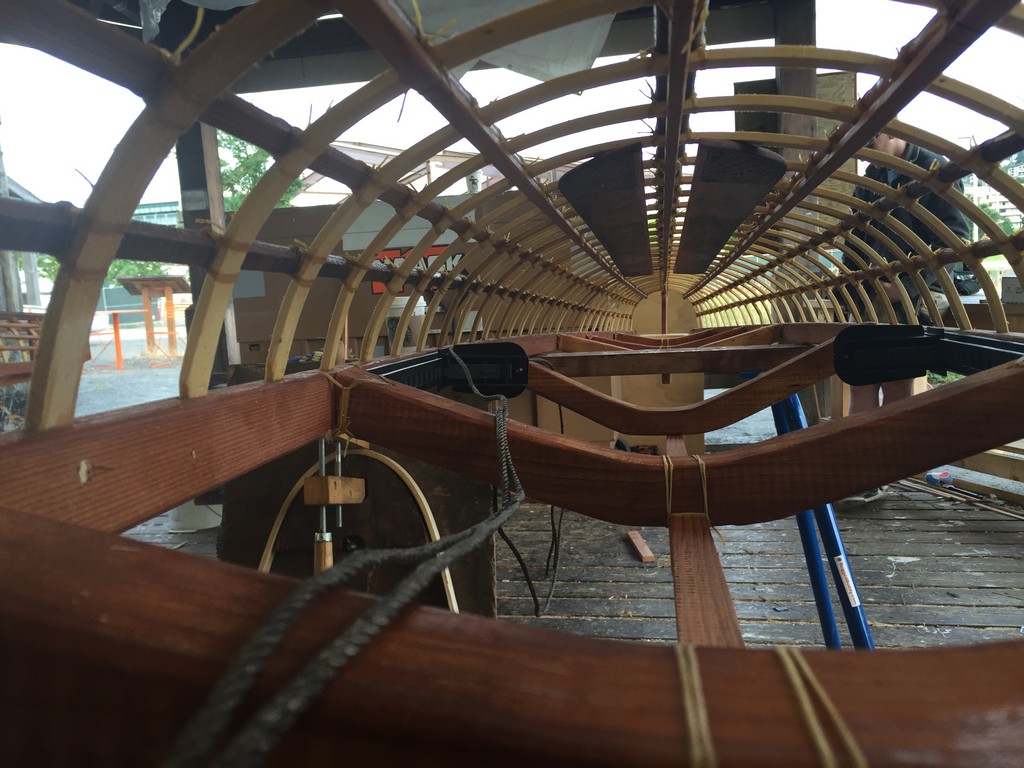
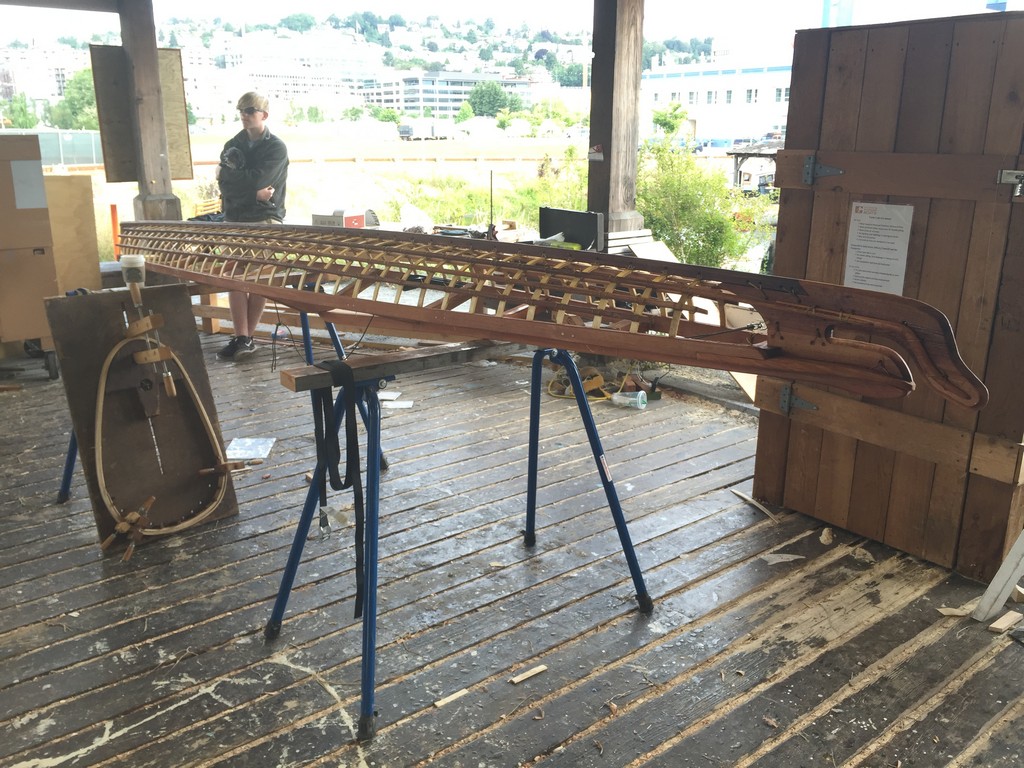
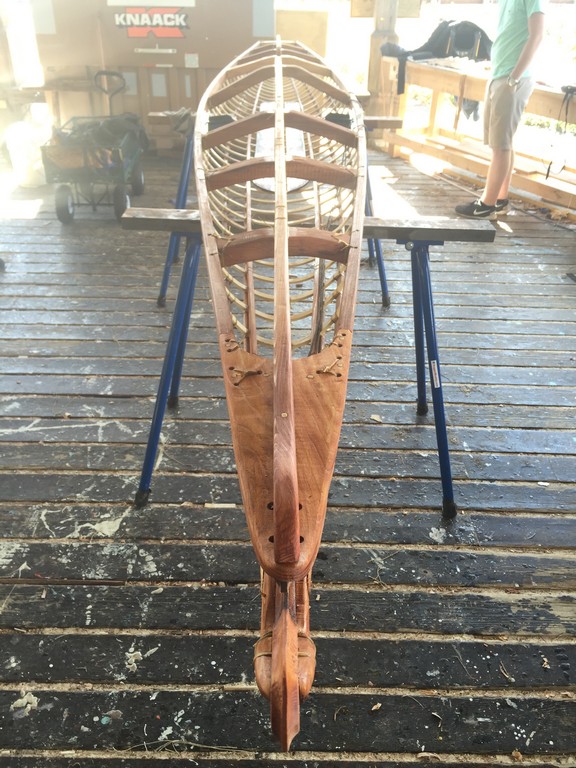
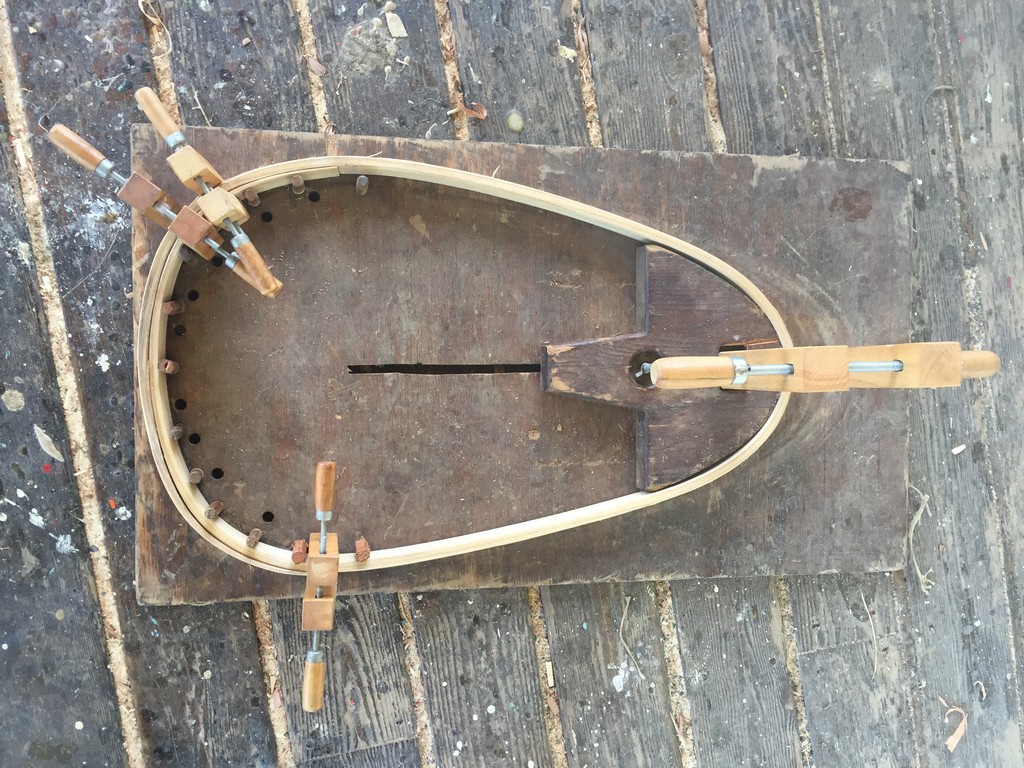
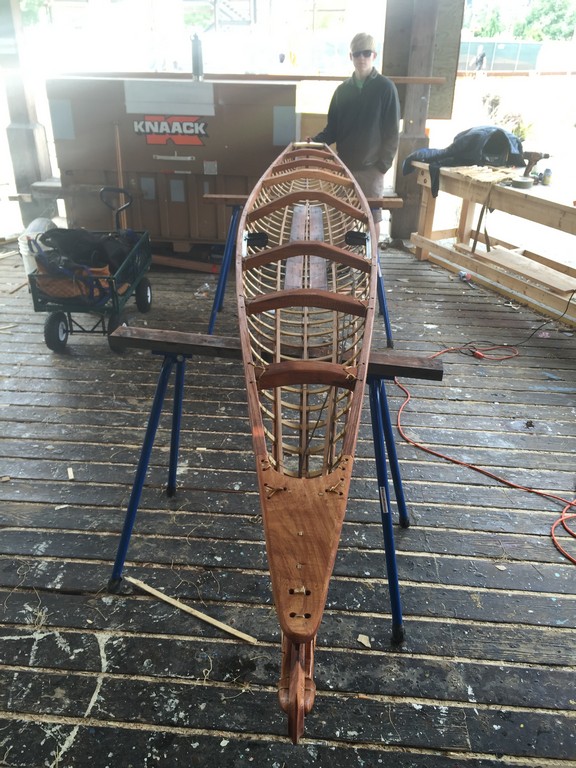
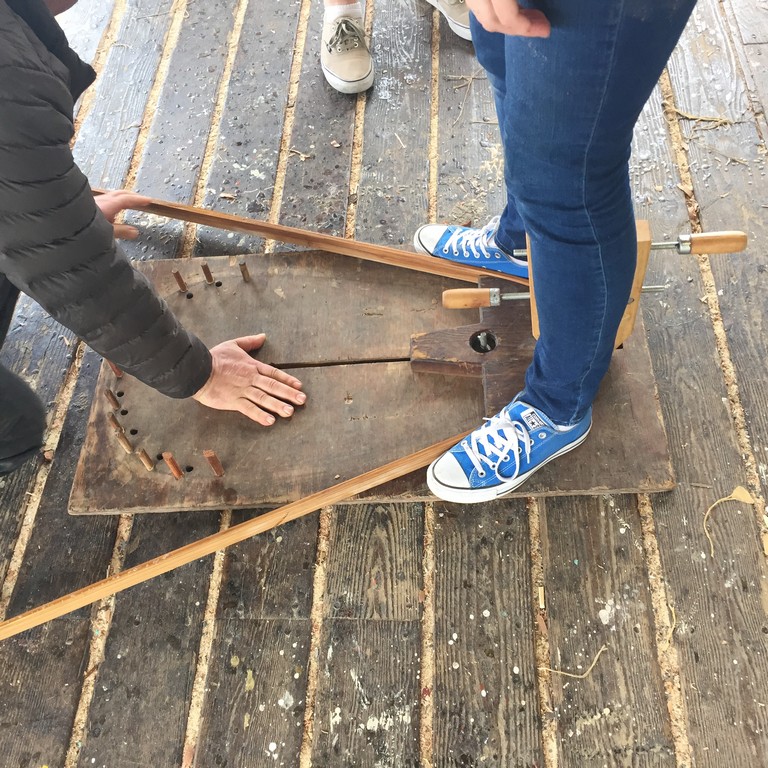
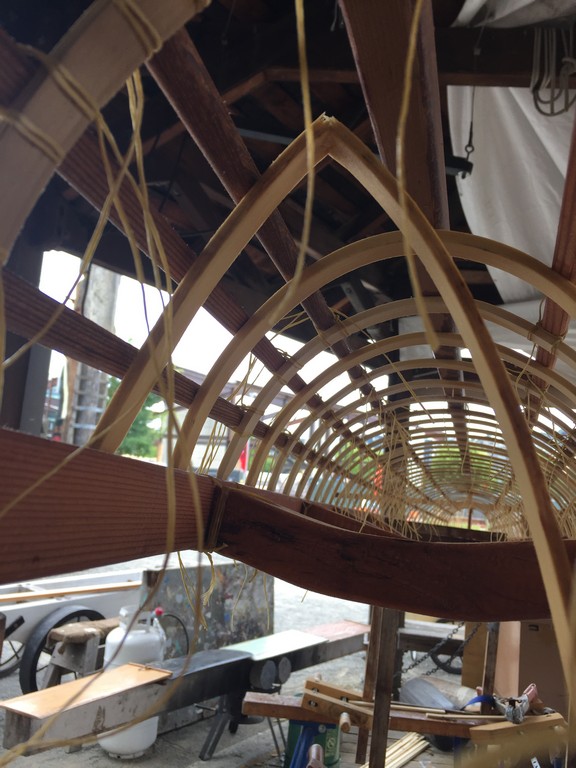
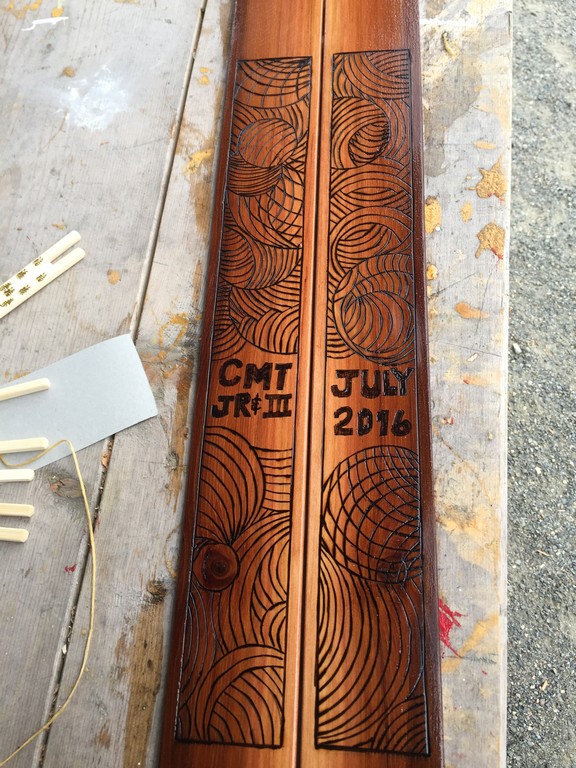
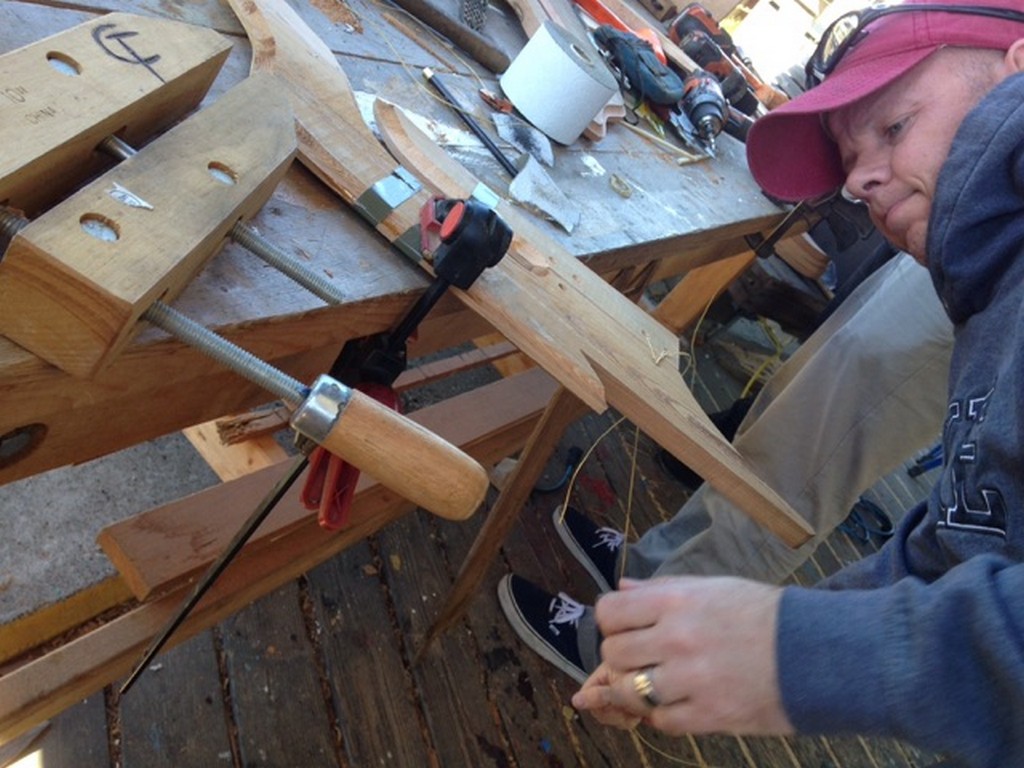
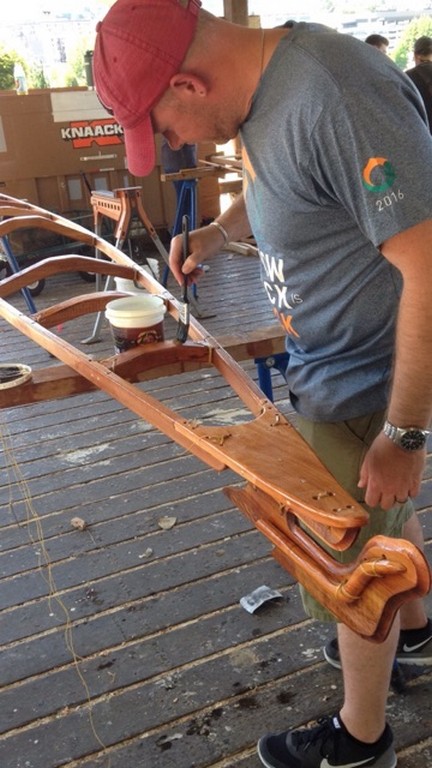
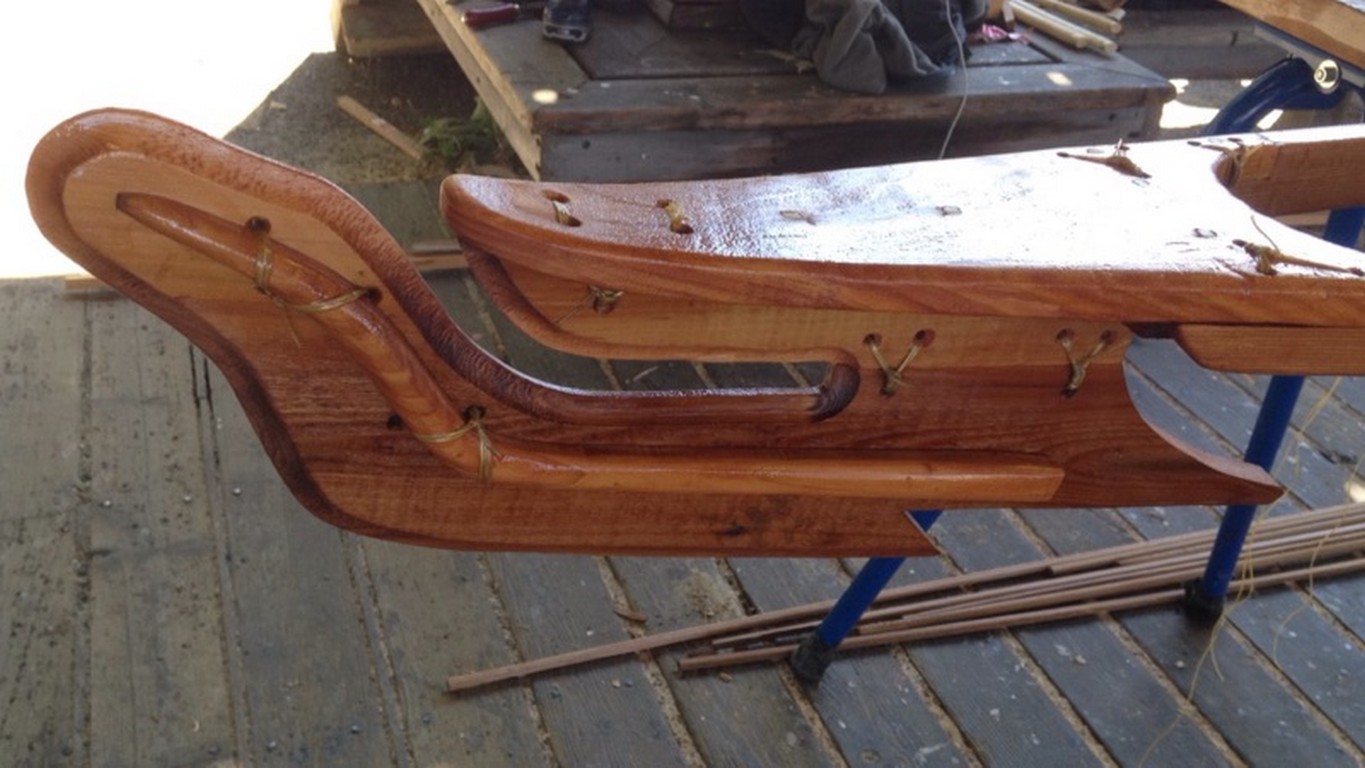
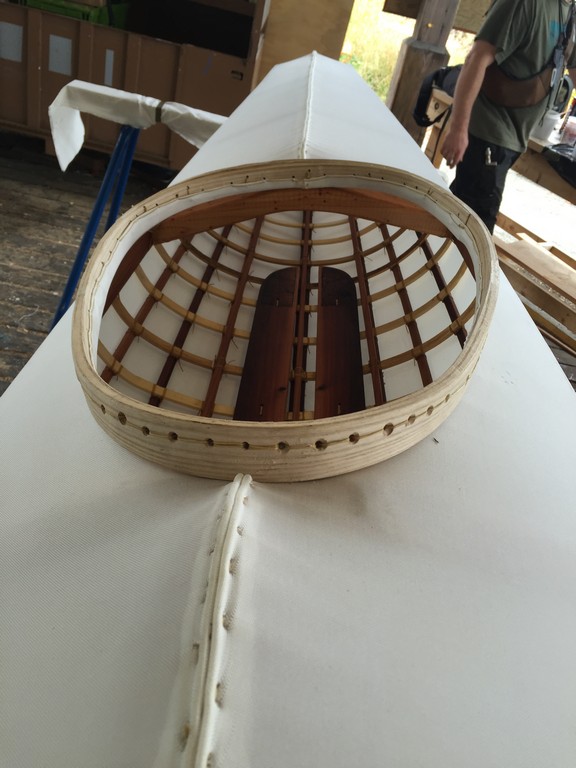
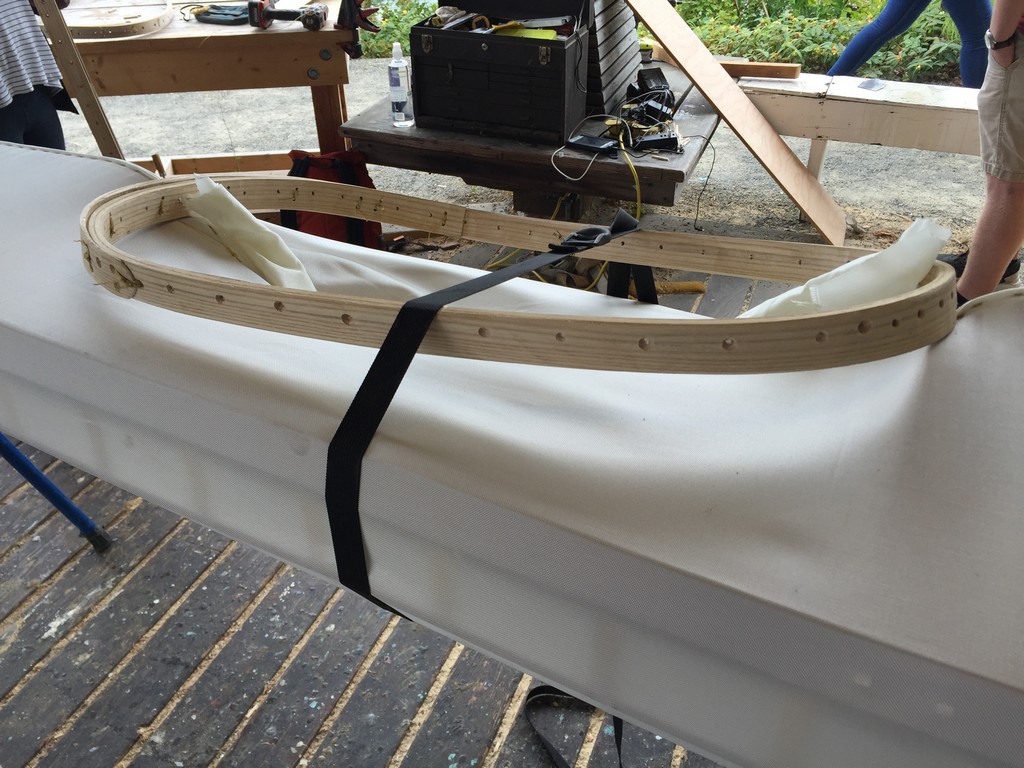
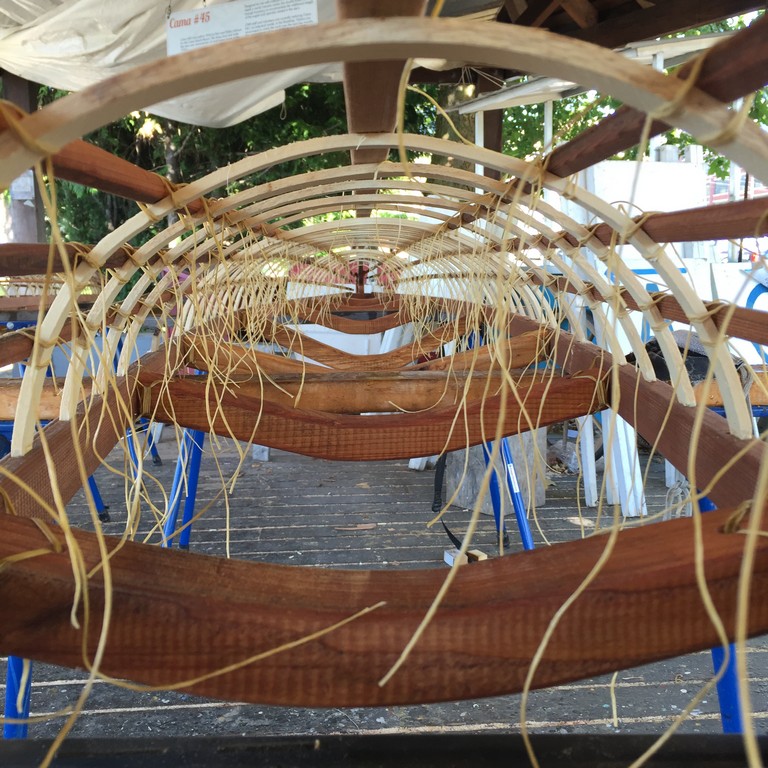
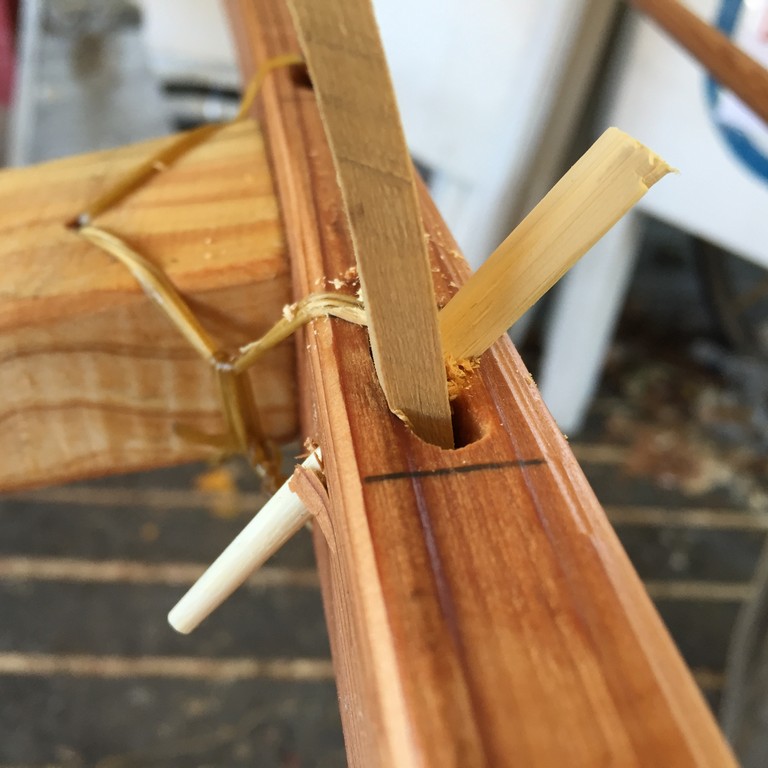
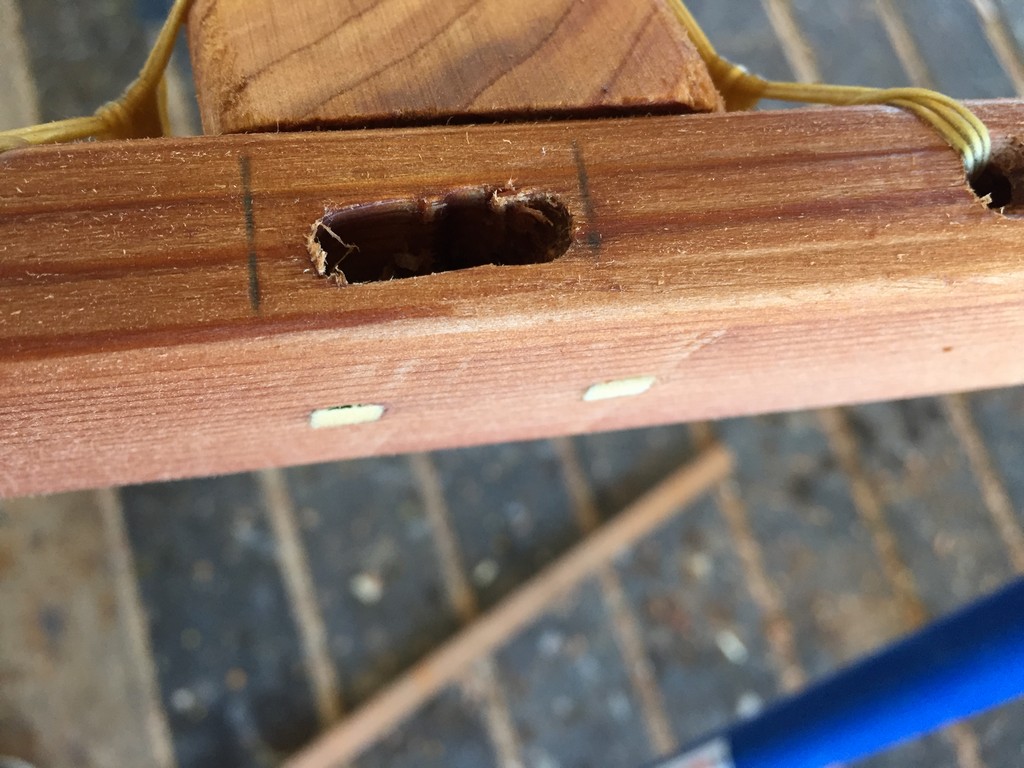
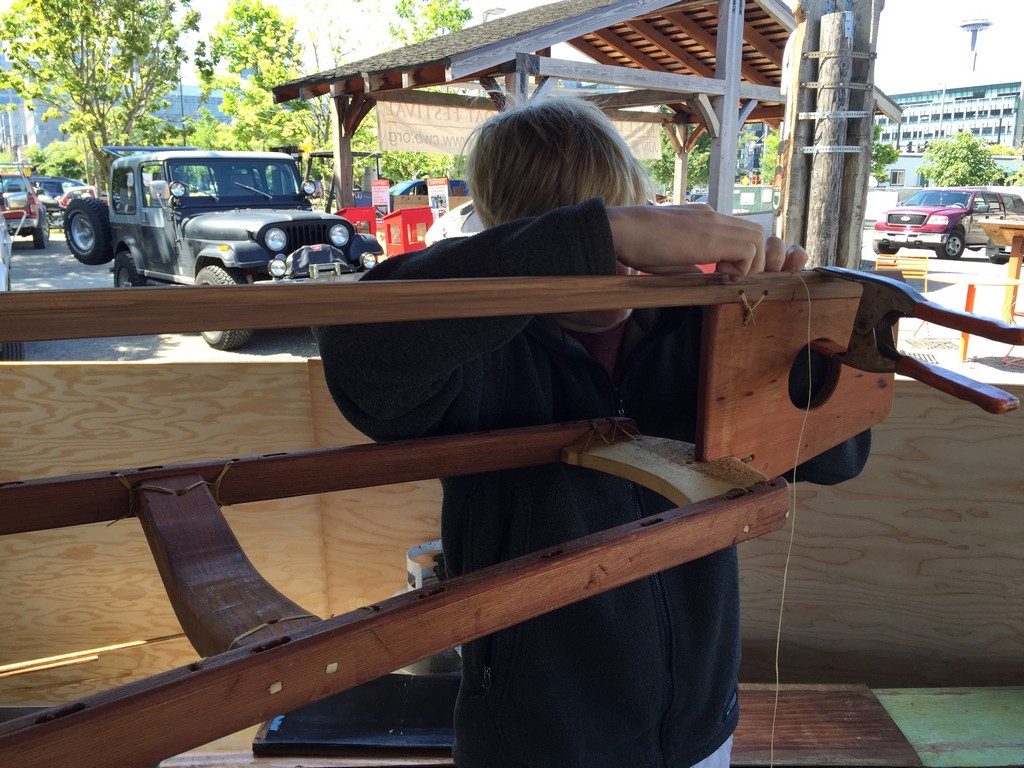
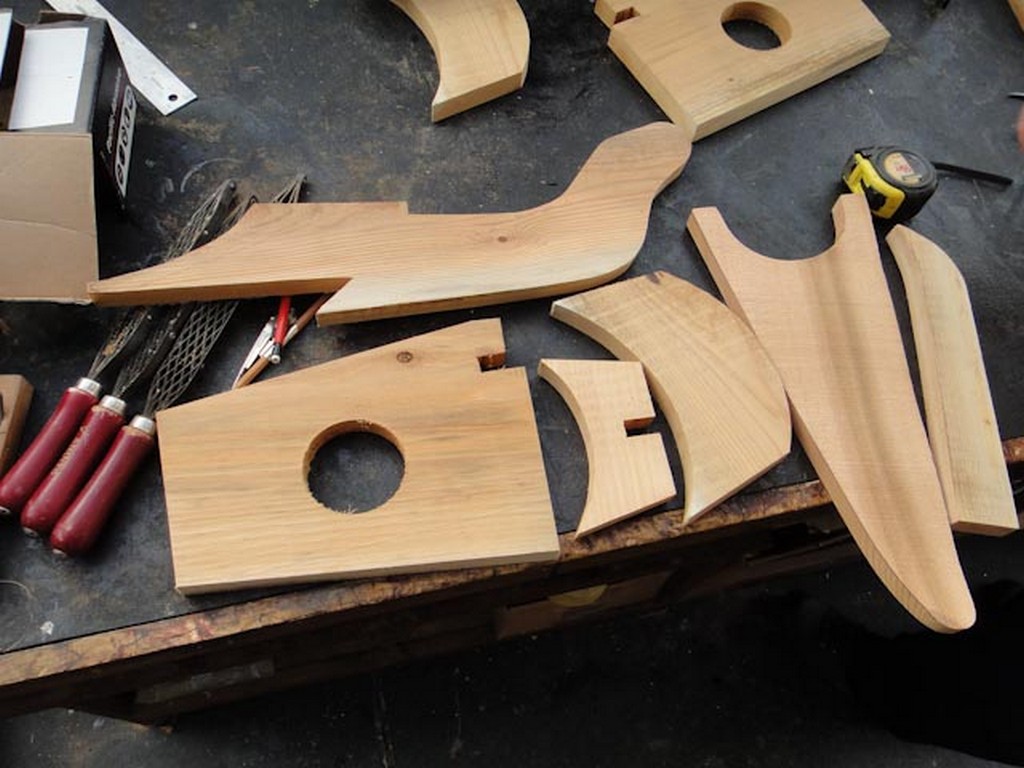
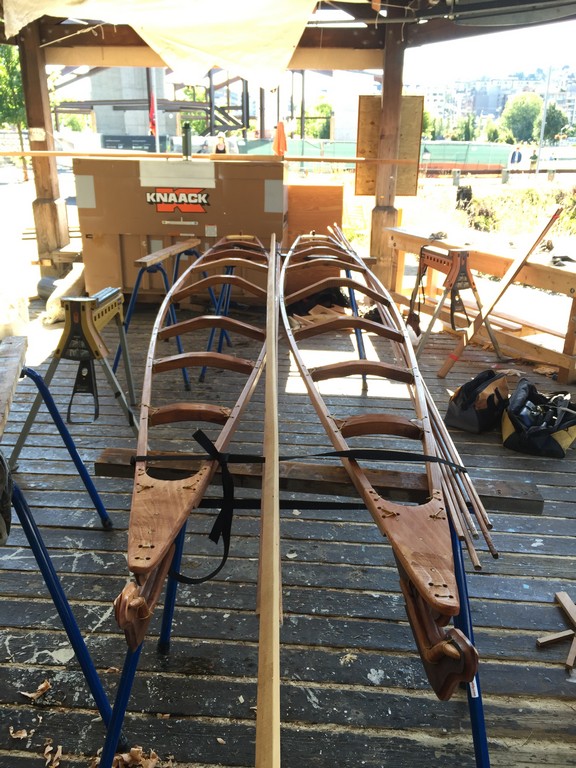
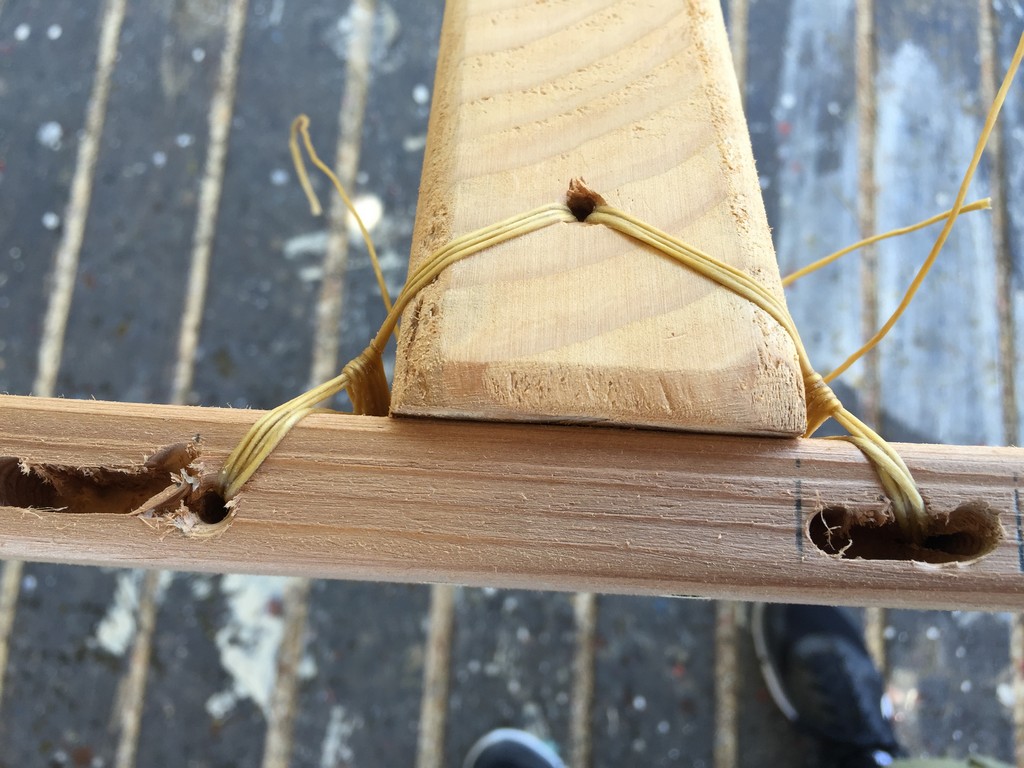
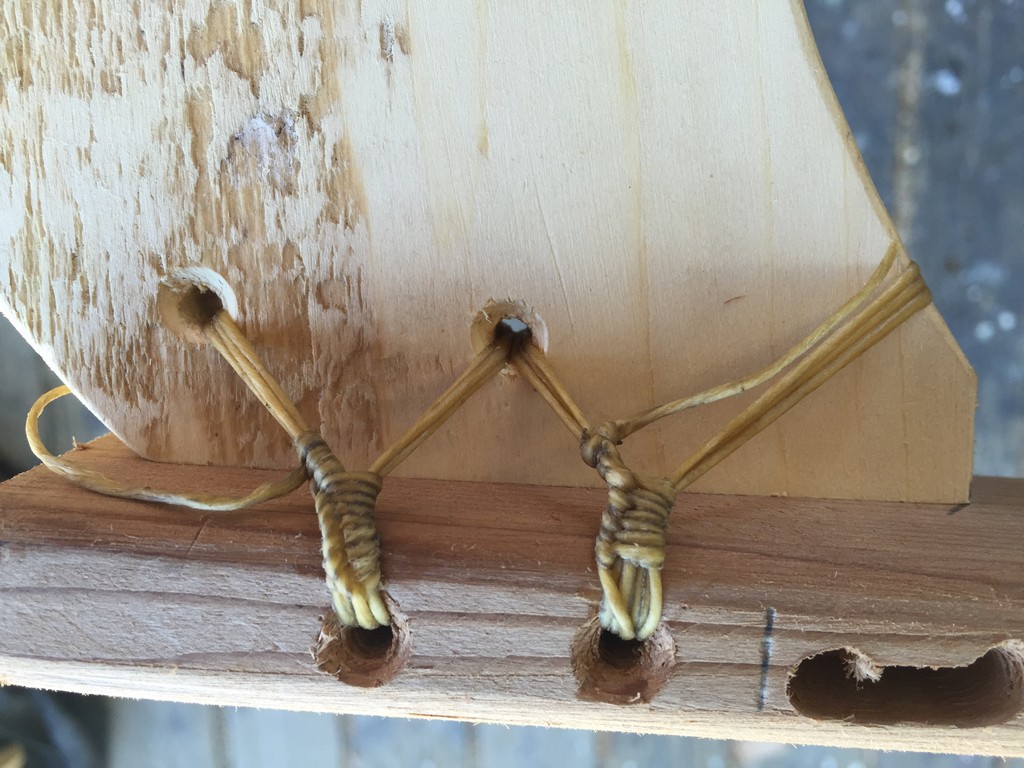
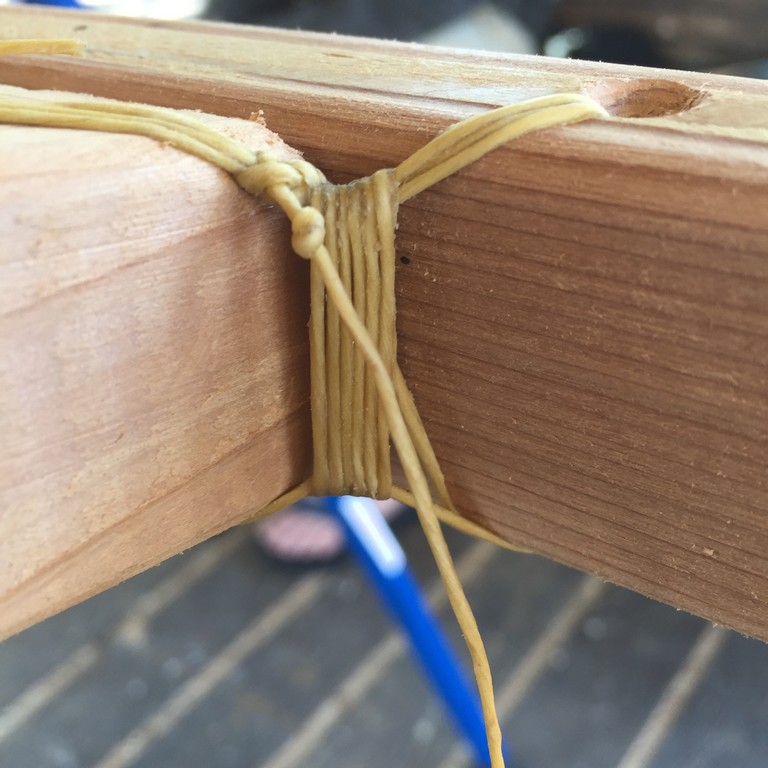
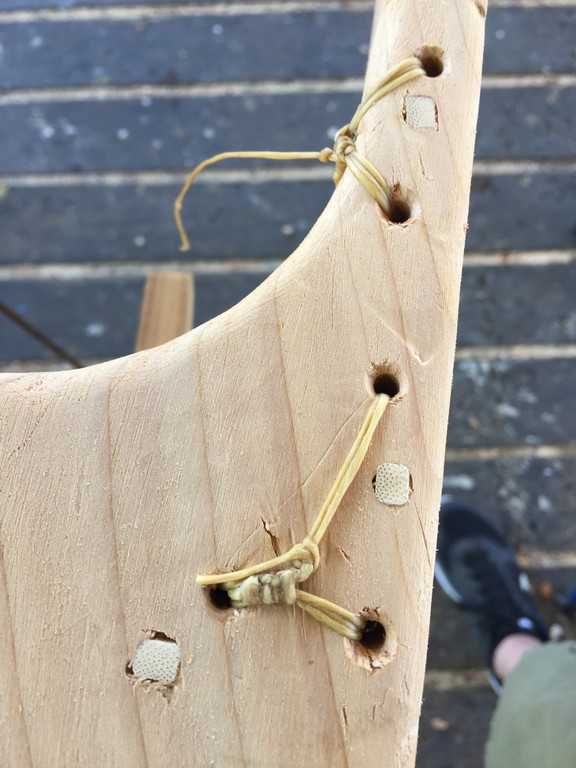
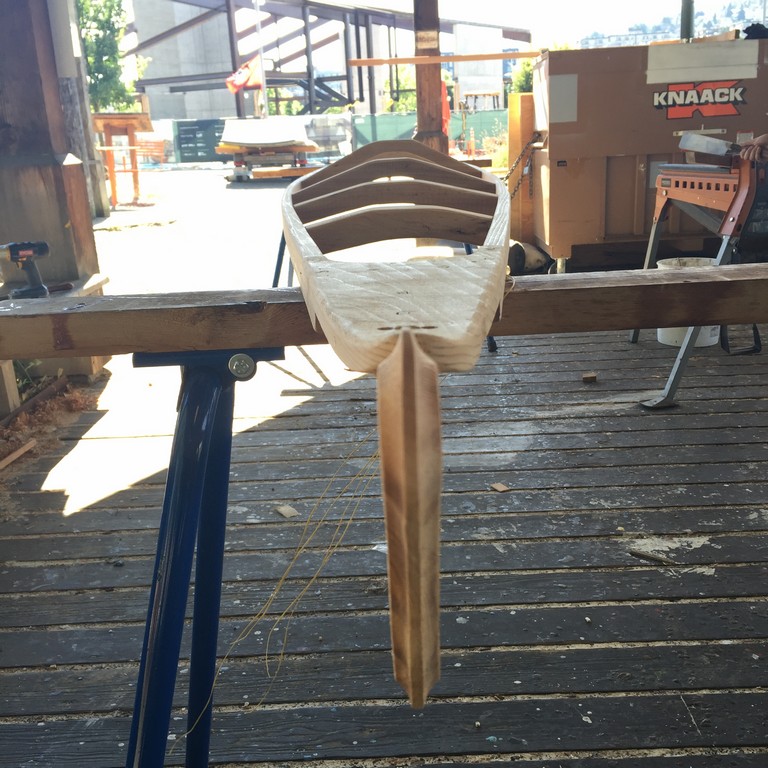
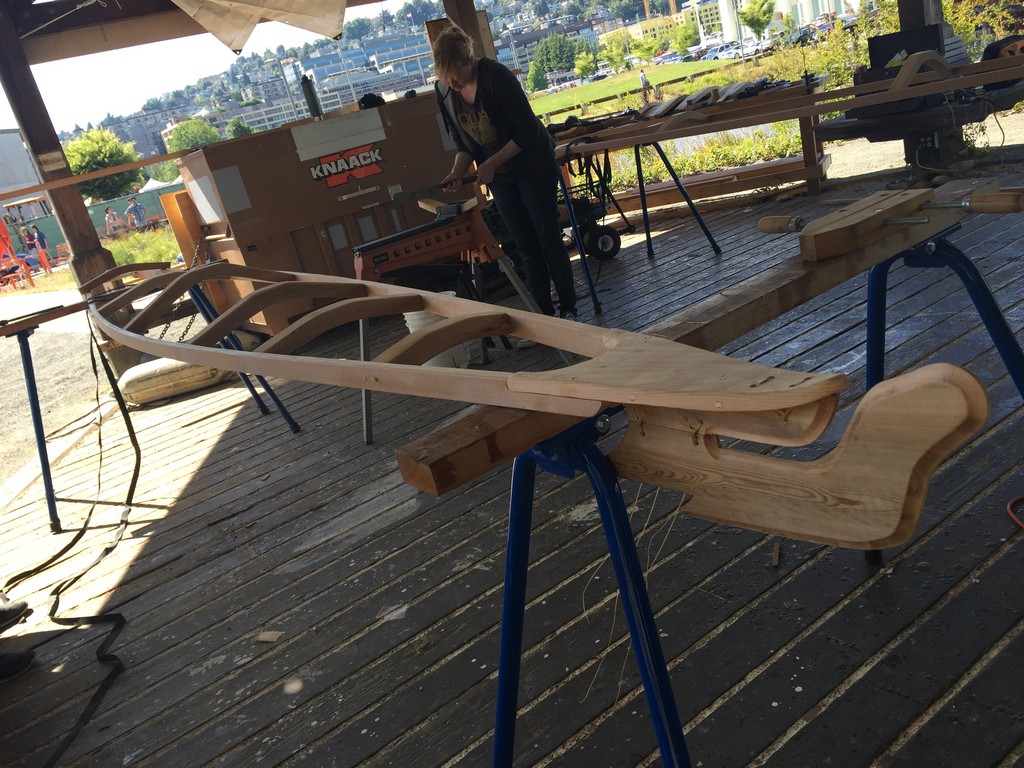
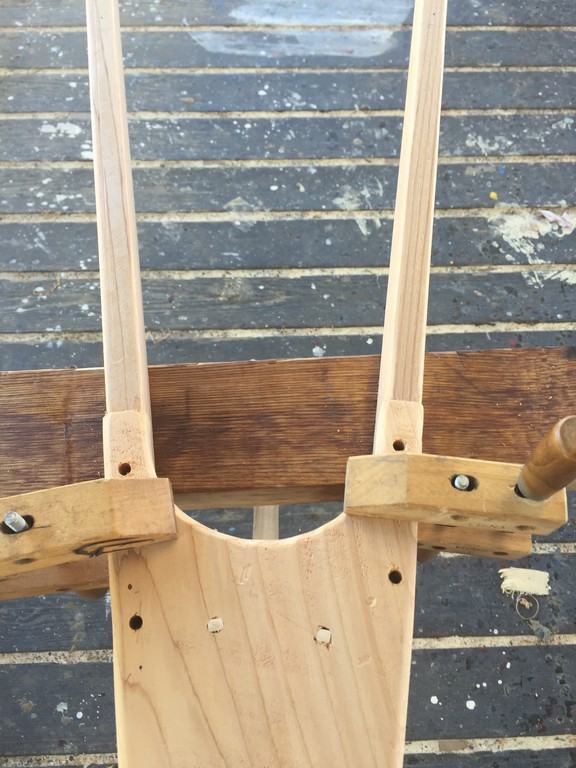
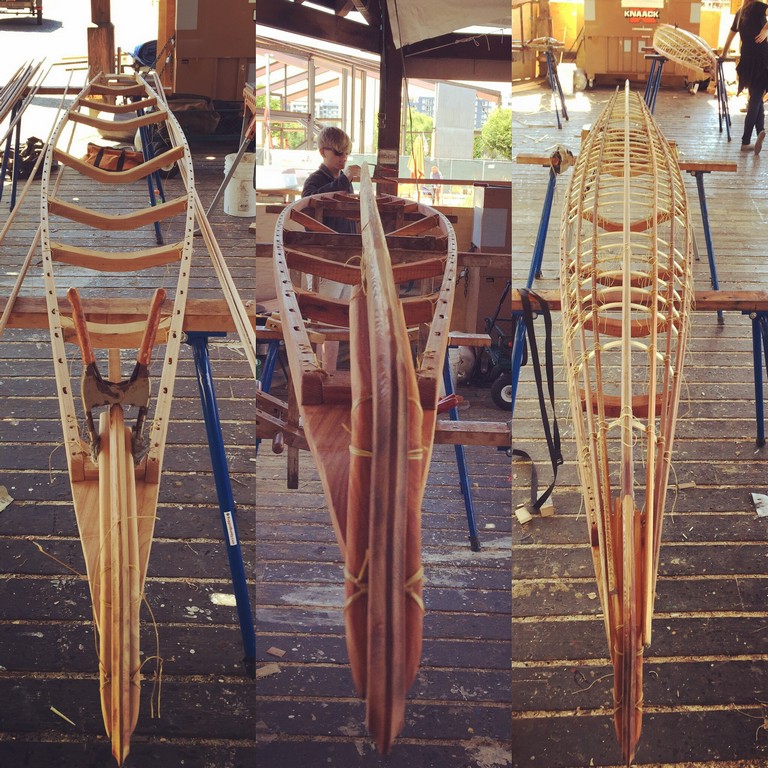
Building a Skin-On-Frame Kayak
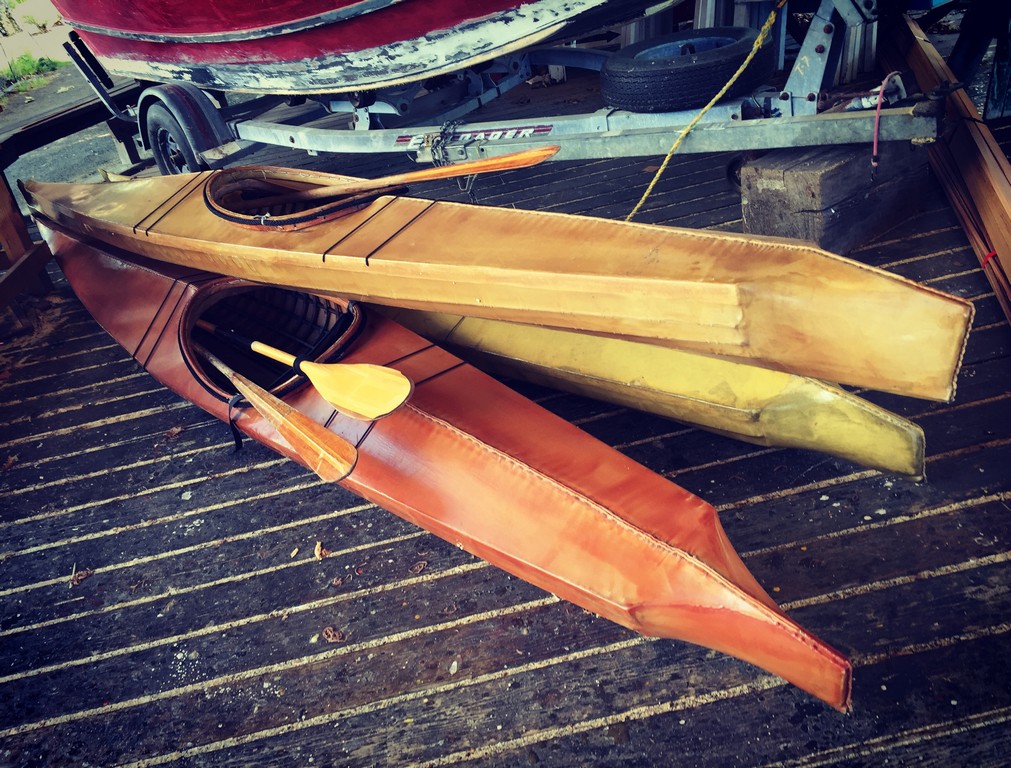
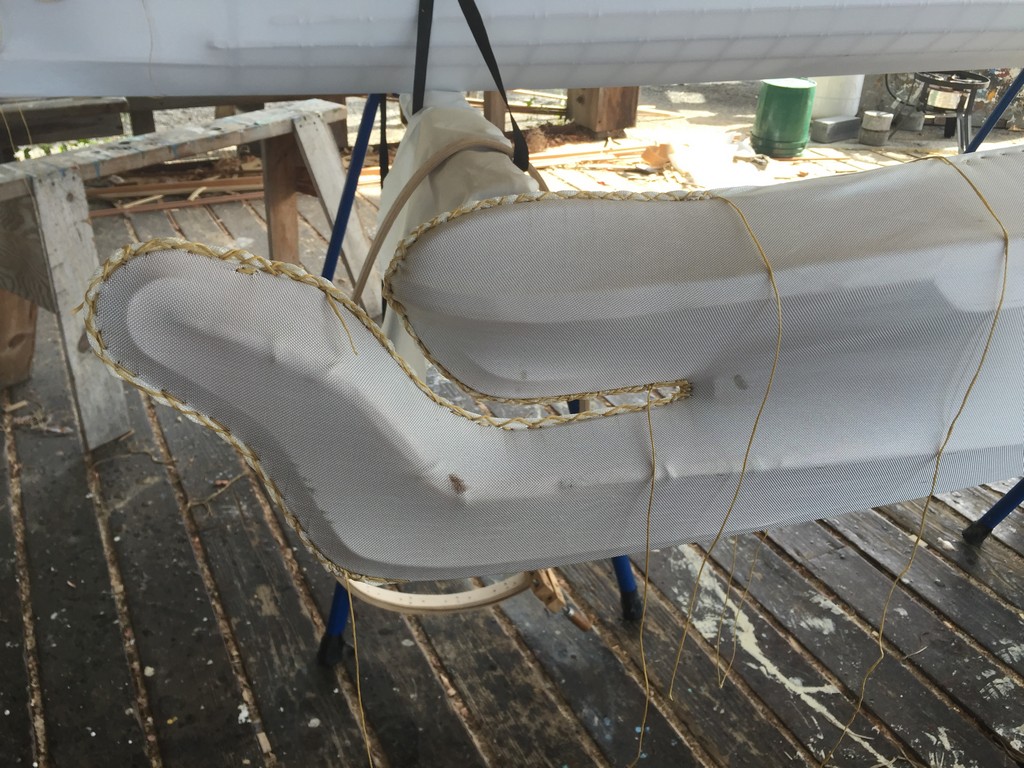
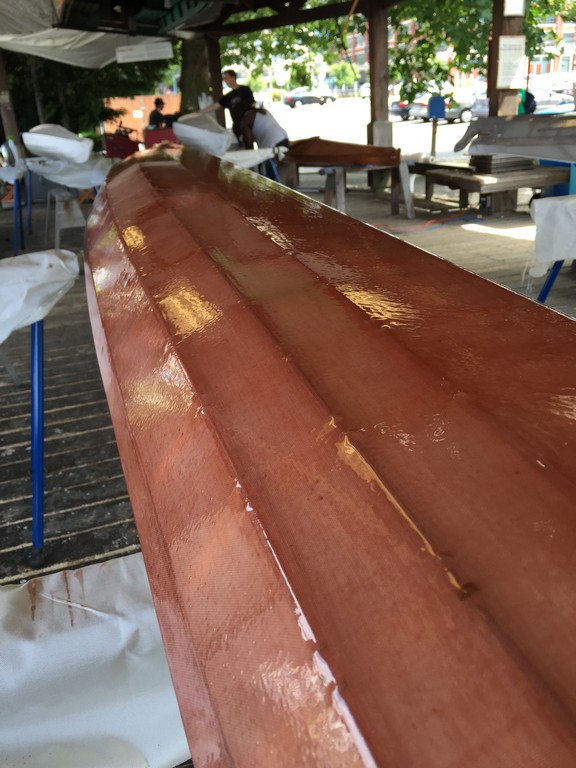
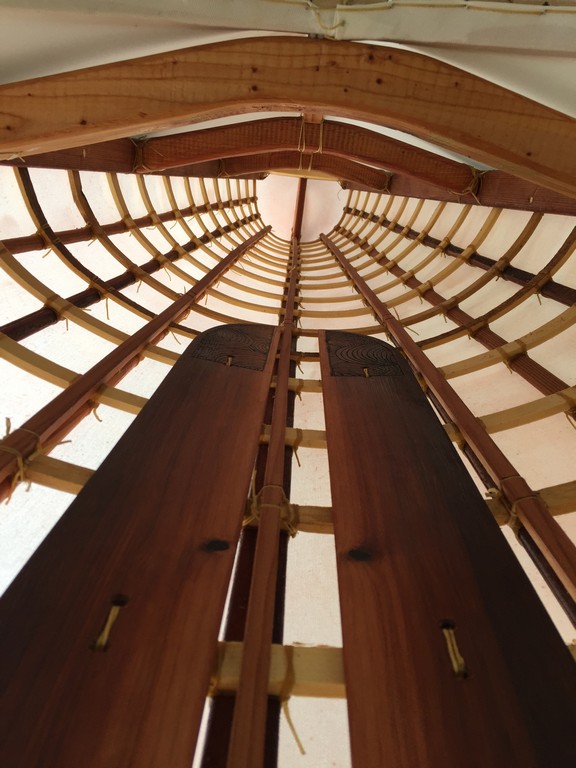
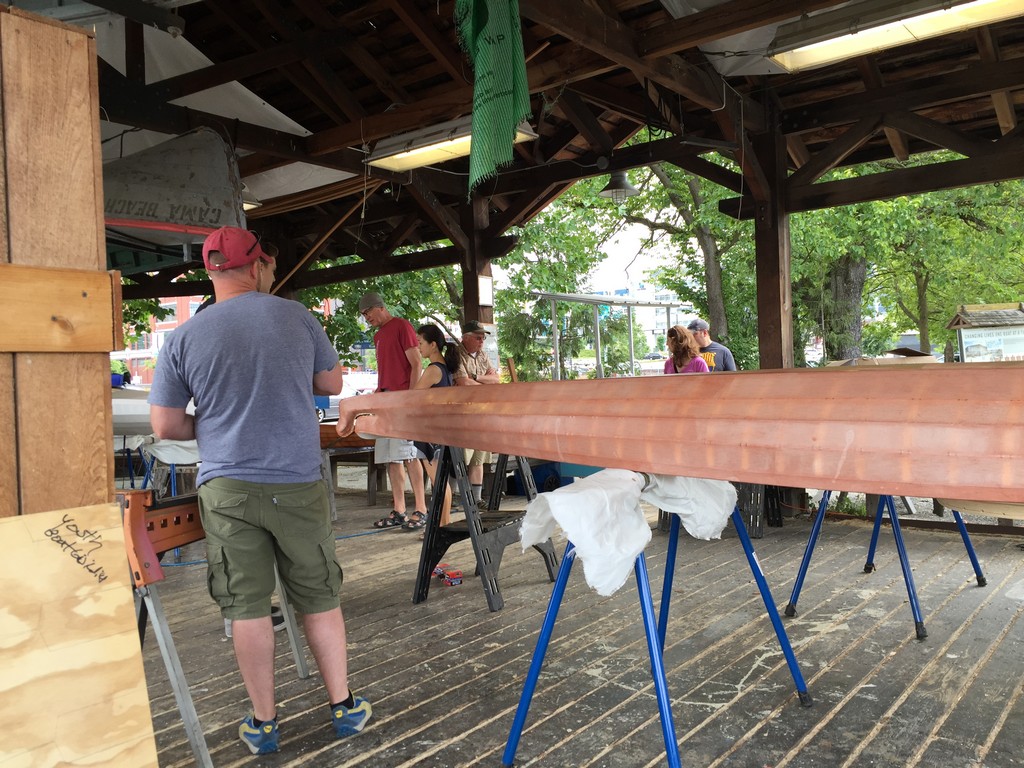
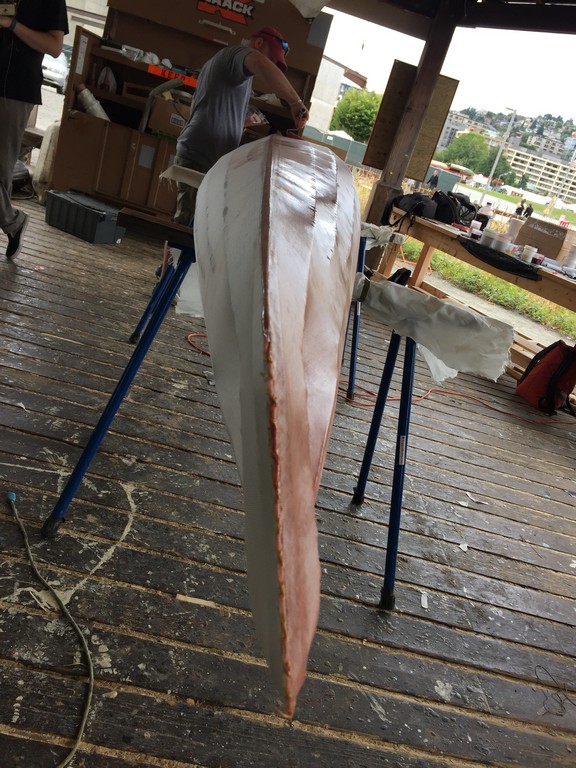
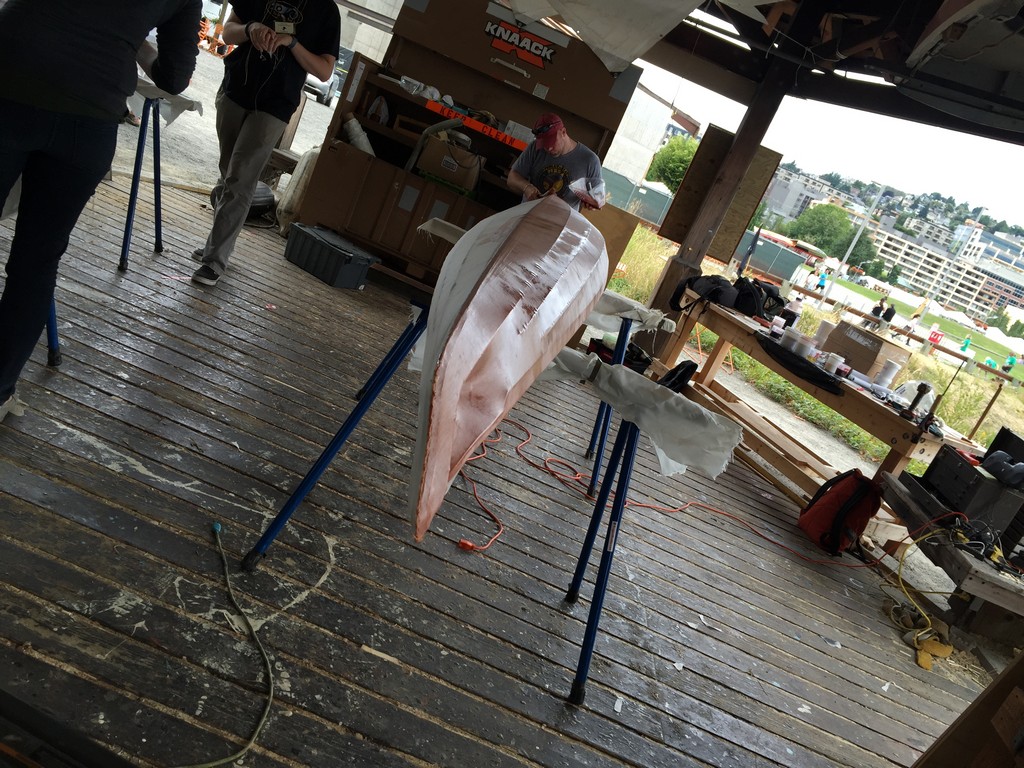
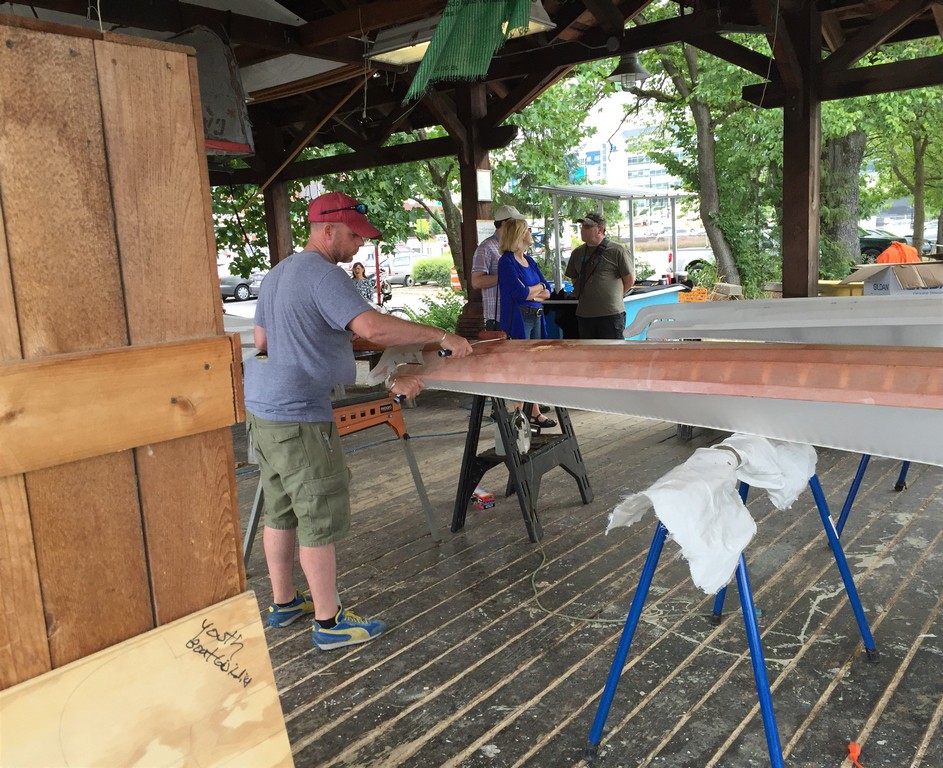
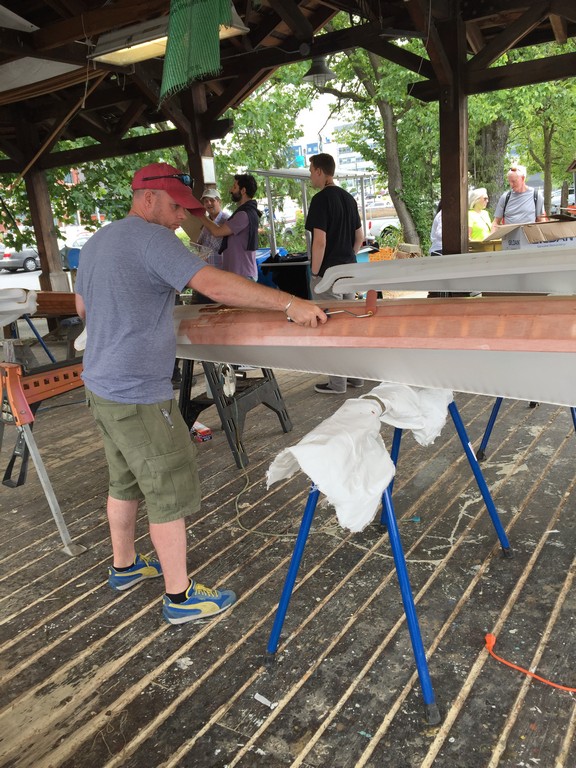
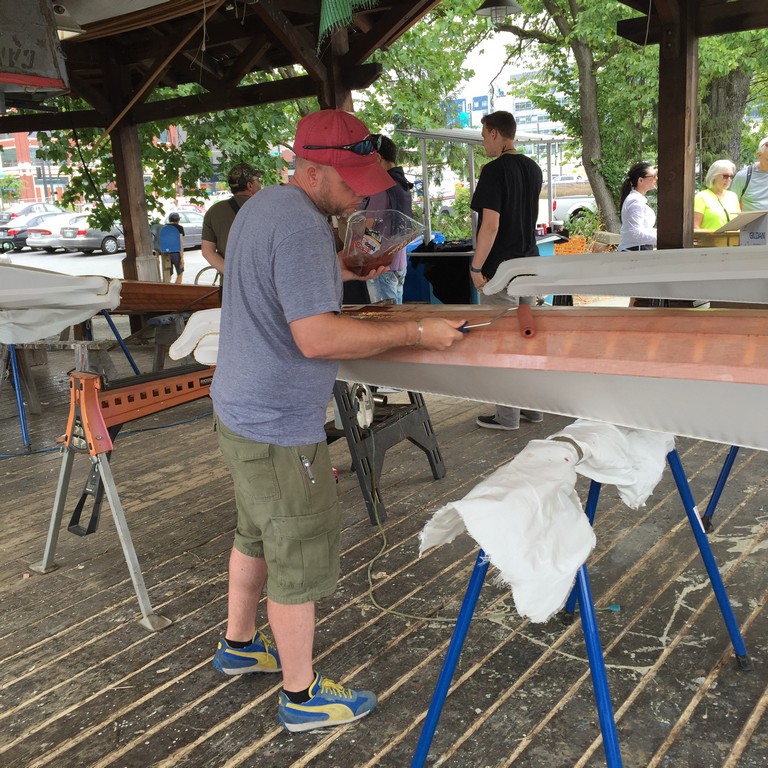
On my very first trip to Seattle in 2003, I had a day off from work and happened to wonder into The Center for Wooden Boats in the South Lake Union area of the city. I loved it immediately and lingered around the boats and workshop for hours with a smile and a happy heart. At some point, a volunteer let me take out a kayak and paddle the lake. It was not like the plastic and fiberglass beasts that I had paddled or owned previously. It was light and flexible in the right spots, sleek, and fast. It was a skin-on-frame boat, called a Baidarka, that was based on a 4,000+ year old Aleut design. No nails, no glue, no screws. Just wood, nylon (modern replacement for walrus or seal skin…), and LOTS of knots.
I was smitten and just as happenstance, there was a baidarka building class going on that was finishing up under a pavilion on site. I talked to the instructor, Corey Friedman, asking all sorts of questions, until I think he wanted to drown me. Six years later as we were planning our move to the Emerald City, I vowed to take the kayak building class. Finances, life, and vacation available conspired against me until this year, thirteen years after seeing them for the first time (though I did read the Dyson book in college), the stars aligned and I was able to sign up for the class and take the time off. It also happened to coincide with my son’s summer visit, so I got to build an item on my bucket list AND spend serious quality time with my son.
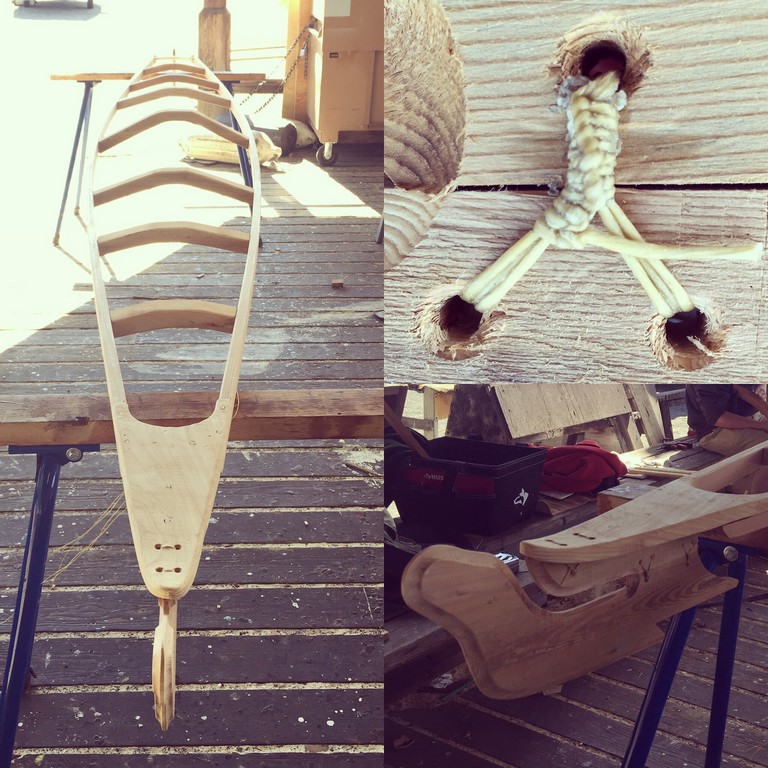

We started on a cold Saturday morning with three ladies also building boats and 8.5 days later, I brought my hand built and custom sized boat home. The interim was spend learning a GREAT deal, tying 2000+ knots, bending frame ribs, listening to way too much zydeco music (instructor’s favorite), sewing, saying dirty words, removing stitches, resewing, loving the time spent with The Ruminator, and enjoying the ambiance of the Center for Wooden boats.
I have included a full photo documentation of my build as a pictures on my notes. I figure that the more people who document the process, the better chance this boat has of living on for future generations. Here is an additional documentation from another former student that was better at it than me.


Film Friday – The Man Who Planted Trees
“A Society grows great when old men plant trees whose shade they know they shall never sit in.”
I am not sure where or when I first saw this film, but it impacted me hugely. It is the story of a simple shepherd and the small thing that he did every day that had profound consequences. A beautiful film.
The Man Who Planted Trees from Max Urai on Vimeo.
If you want to hear God laugh, tell him what your plans are…
As mentioned a few weeks ago, we hit a snag on the garage build. Super frustrating. There is some stuff in the house that takes precident – they just have to happen and happen right now. Thankfully, we are in a place to take care of it, but my dream shop has been pushed a couple of months. That hasn’t stopped me from getting everything prepped though. I have completely cleared out my current GROP and moved all the innards into storage for the duration of our build/re-build. A few things like ladders and yard tools are left, but after giving away an entire trailer load of scrap lumber and plywood it is all open space. It hurts a little that the cleanest my garage shop has ever been is right before I tear it down to built a new one…
The other day, I had to do a little fiberglass repair on the Jeep top and swap out my floor-mounted headlight dimmer switch. Not super a fun/sexy mod, but taking the door off made it easy – ish. I will not be bright-lighting folks for my entire commute anymore. It was nice to have a dry spot to work during a Seattle winter. Also, this was the only time in 6+ years that a vehicle had been in it.


We had to start the house remodel before the garage and start in the rear bedroom (NW corner of the house). The interior walls had to come out to repair an issue(s). After we take care of the repairs, a new arch will lead into the kitchen, there will be a 4′ French door with a 12″ balcony looking out into the back yard, and we will have wainscoting up to 68″ and a coffered ceiling in what was the back bedroom and what will be the new dining room. Here are some shots before the full wall removal, some replacement studs and new headers.
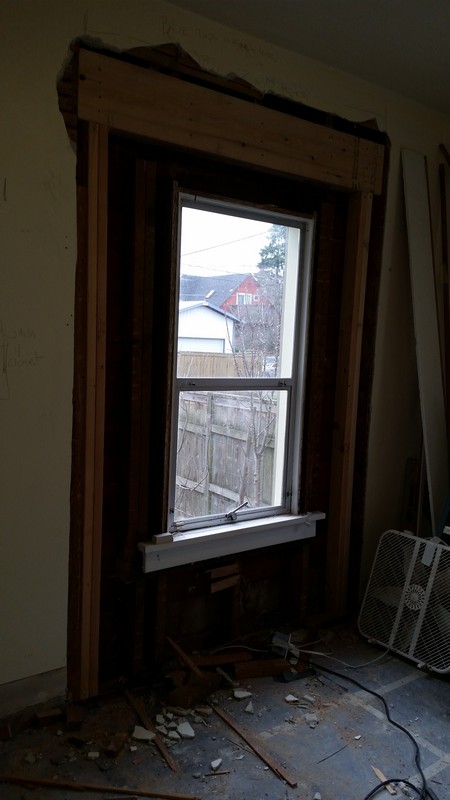
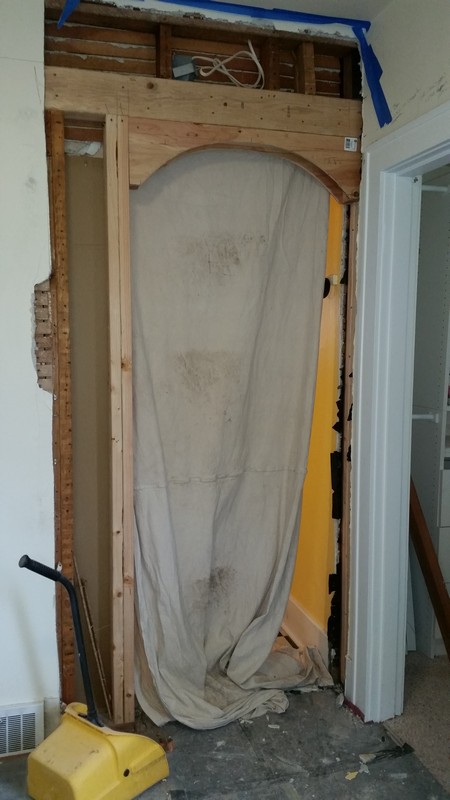
The basement stairs are also in need of replacement and will be taken out and rebuilt next week. The new HVAC will go in the week after. It has been and will continue to be a test of our resolve and patience.
Wood Lathe for sale in Cornebarrieu – SOLD
The move is ON! we have two weeks until the packers and movers get here and Stamps-With-Foot and I spent the morning and part of the afternoon going through stuff and listing stuff for sale the largest of which is my lathe. It hurts me a little to see it go, but I know that a huge old gap-bed lathe waits patiently for me in Seattle.
Below is the add that my wife is posting on the local English-speaking forums here in the Toulouse area:
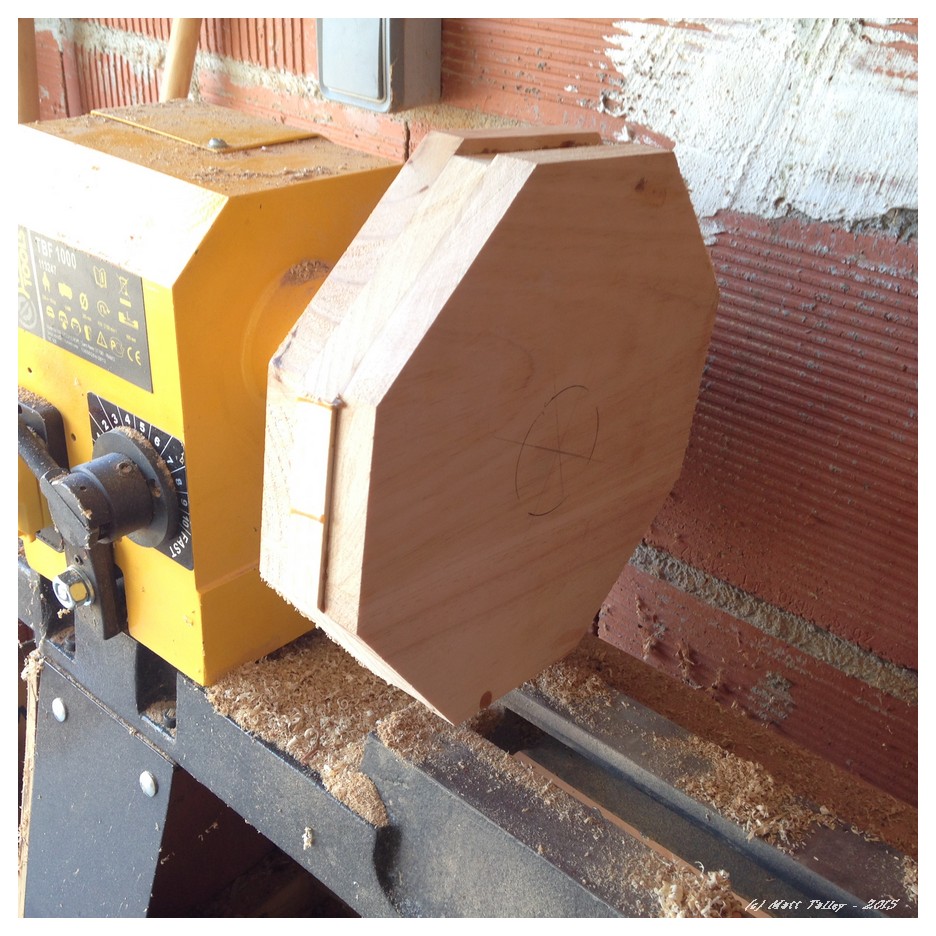
FAR TOOL TBF 1000 Wood Lathe for sale in Cornebarrieu:
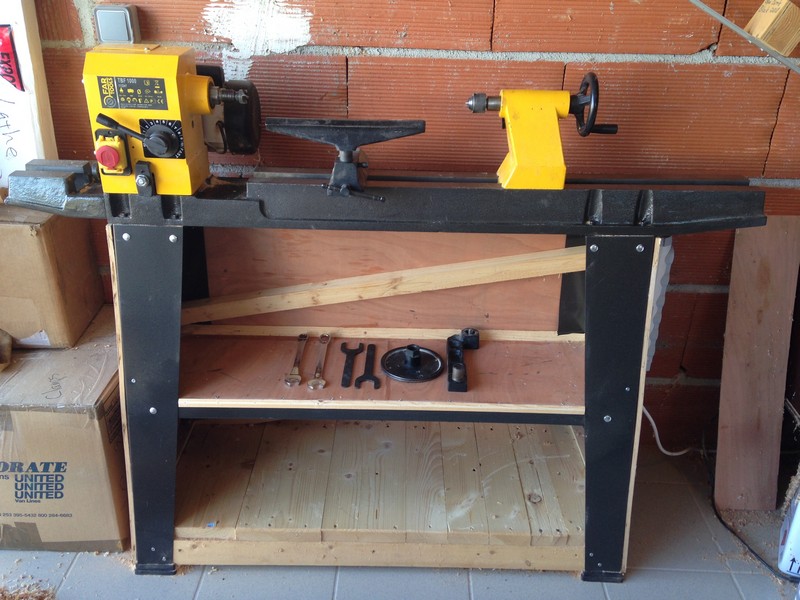
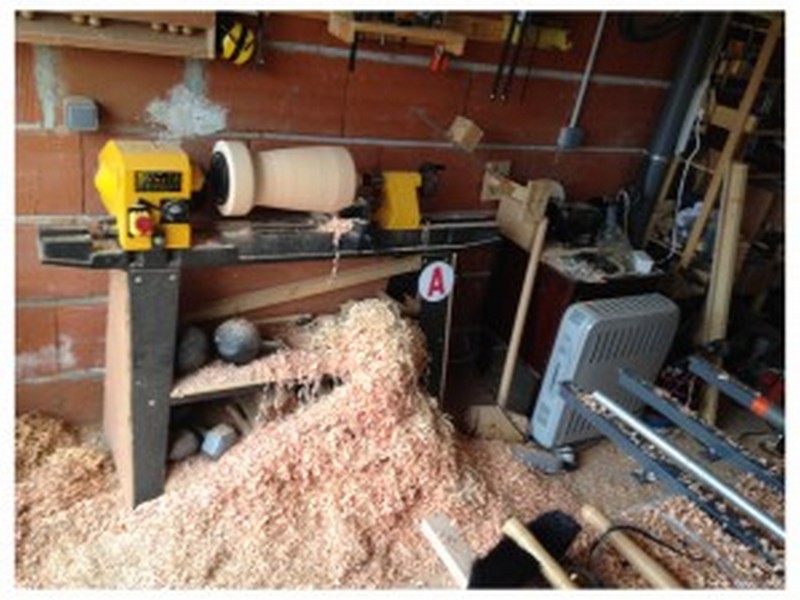
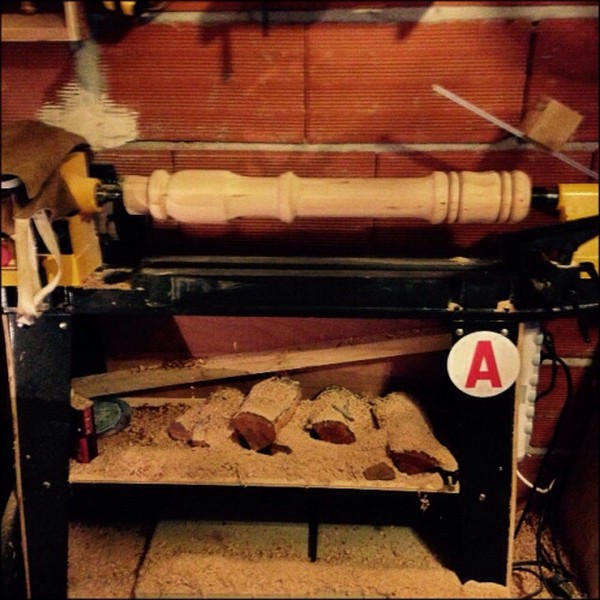
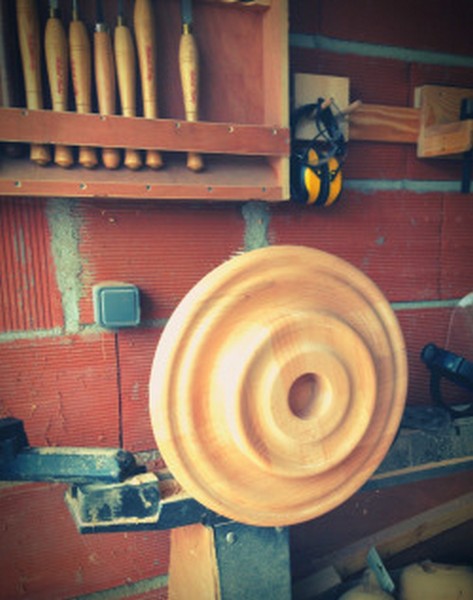
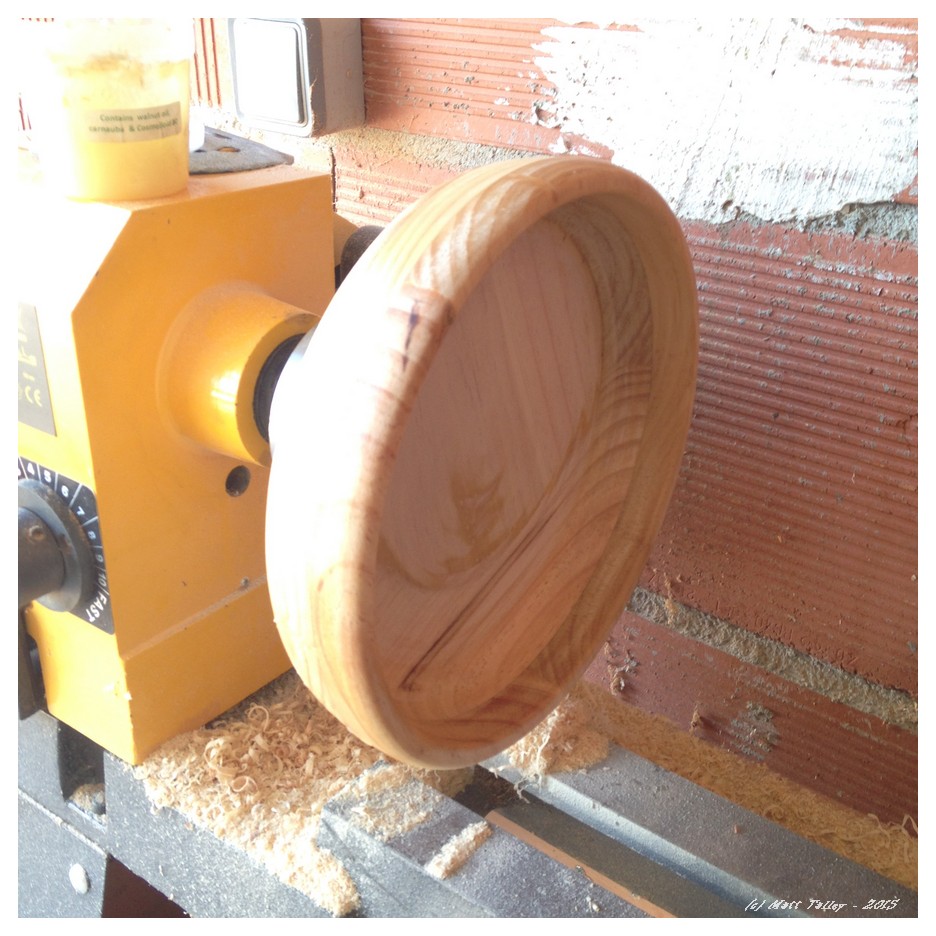
I bought this lathe brand new from a local shop 18 months ago. Since it came unassembled, I reinforced the standard steel base with additional shelving, cross-braces to remove any possible flex. I then sheathed three sides for extra rigidity and added a strong bottom platform for ballast. I have turned everything from honey dippers, to bowls (large, small, & huge), stools from tree trunks, stair balusters, platters, furniture feet, tiny wooden and acrylic ornaments, lids, etc. It has been a great lathe and has NO PROBLEMS or “small issues.” The bearing are true and tight and there is ZERO rust on the ways/bed. This lathe is in perfect shape and the only reason I am parting with it is because we are moving back to the US and the power there will not work with the lathe’s 240/50Hz motor.
Here are the details and specs as well as a couple of links to shops that sell it:
- Cast iron variable speed lathe features a 360 degree swivel headstock.
- Solid cast iron headstock and lathe bed construction.
- Extra bed extension for outboard turning.
- Speed is fully variable between 450 – 2100 rpm.
- Weighs ~120 kilos
- 300mm width capacity over bed and 900mm between centers.
- Have turned 600mm platters with headstock swiveled 90 degrees
- 550W enclosed fan-cooled motor
- hollow self-ejecting tailstock with #2MT
- Cast iron offset tool rest and extension arm
- Head Stock has MT2 Taper and 25.4mm (1:8TPI threading – industry standard for lathes this size – easy to find chucks and accessories
- Includes reinforced/enclosed steel base, added powerstrip for lights and hand sanders, a 4-prong drive centre, bowl/platter faceplate, live tail center, 4 wrenches, knockout-bar, shop-made stead rest.
It will be perfect for your garage or shop or for your partner’s Christmas present since it is ready to work and you just have to plug it is. I paid 520 Euros for this lathe 18 months ago and it currently lists for 550 – 745 Euro depending on the shop. I am asking 375 Euro. Please give me a call if you have any questions and the lathe is available for demo if you would like.


UPDATE:
I sold the lathe to a nice English gent, who got a smoking deal. I helped him take it all apart and put it in his car. The rear springs were seriously loaded, but he looked happy as he pulled out of our drive.
Film Friday – Hand-Crafted Shoe-Trees
Hand crafted shoe tree from JOHN Popick on Vimeo.
Puttering around in the shop
I had a super shitty trip home from Morocco and was stressed out & pissed off when I got up Saturday morning.
First Coffee.
I then decided that and working on some current projects, a couple of little things on the lathe, and making lots of sawdust and wood shavings would make it all better.
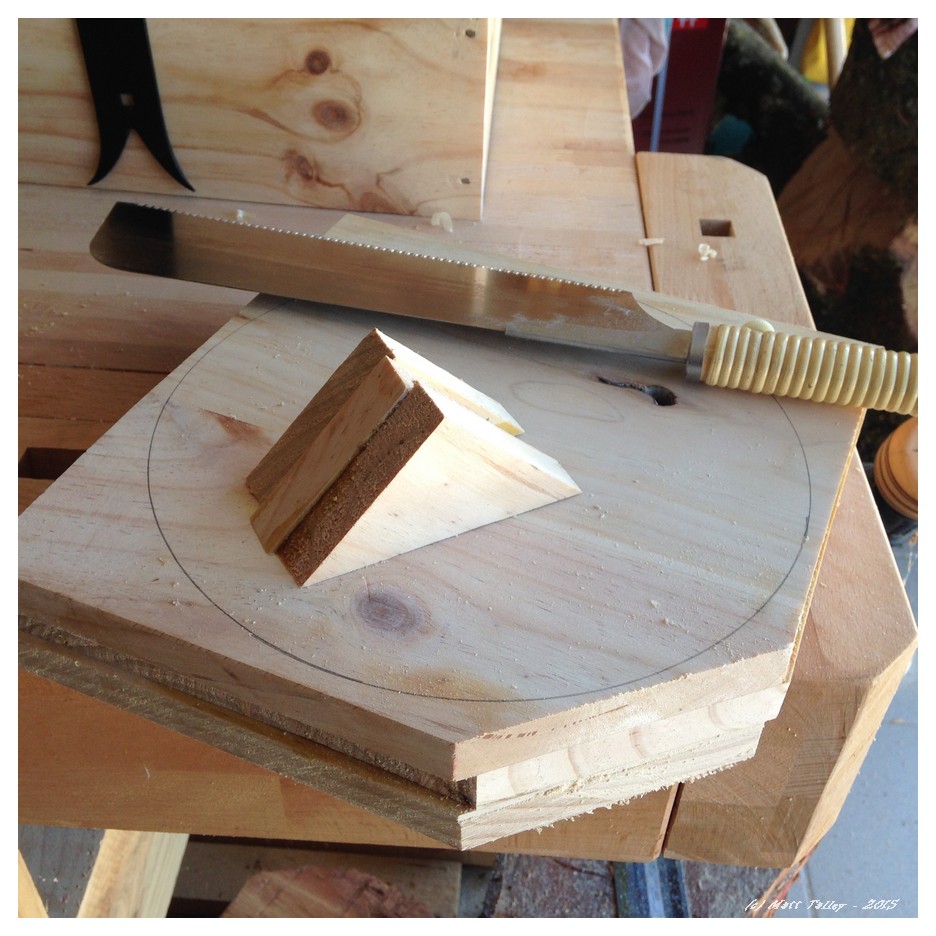
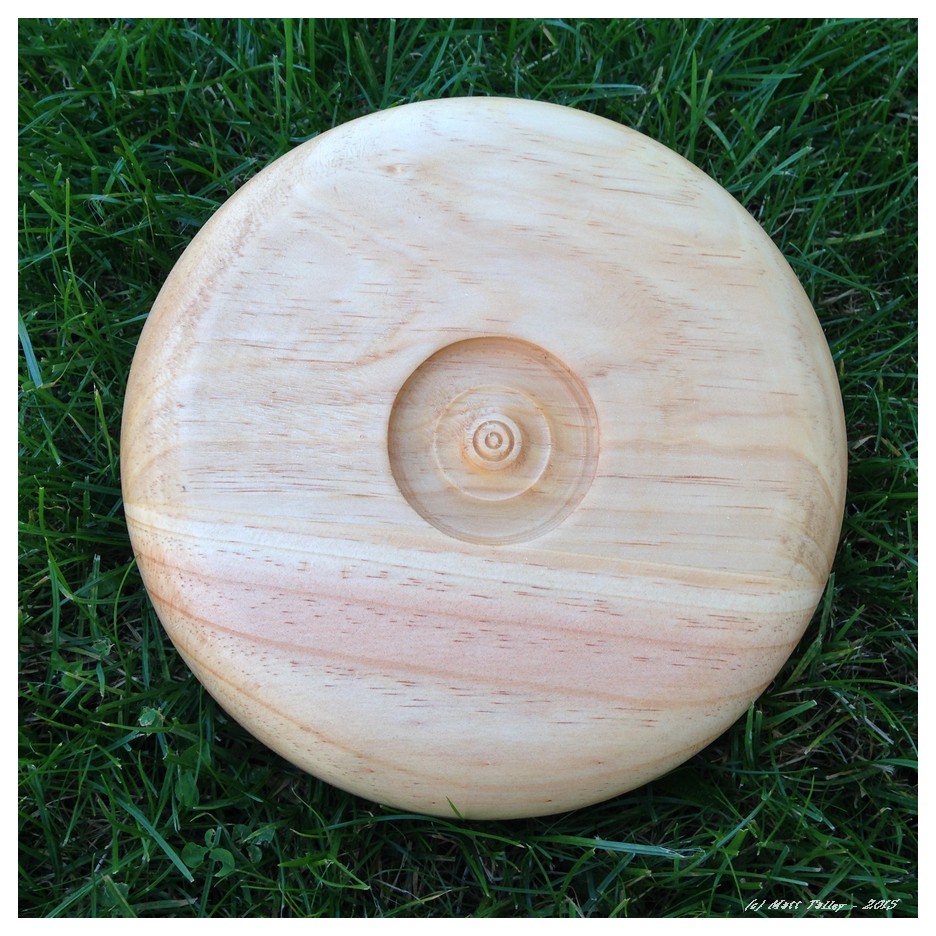
I am in the process of building an old-school 6-board chest (now 8-board as I added a skirt to front and rear…) and had some white pine scrap sections left from the two sides and the bottom. I glued them up before I left for Casablanca and when I got home I decided to turn a quick fruit dish for the kitchen/my wife. It took all of about 20 minutes and is 10.5″ in diameter and 2″ tall. I am pretty happy with the results.

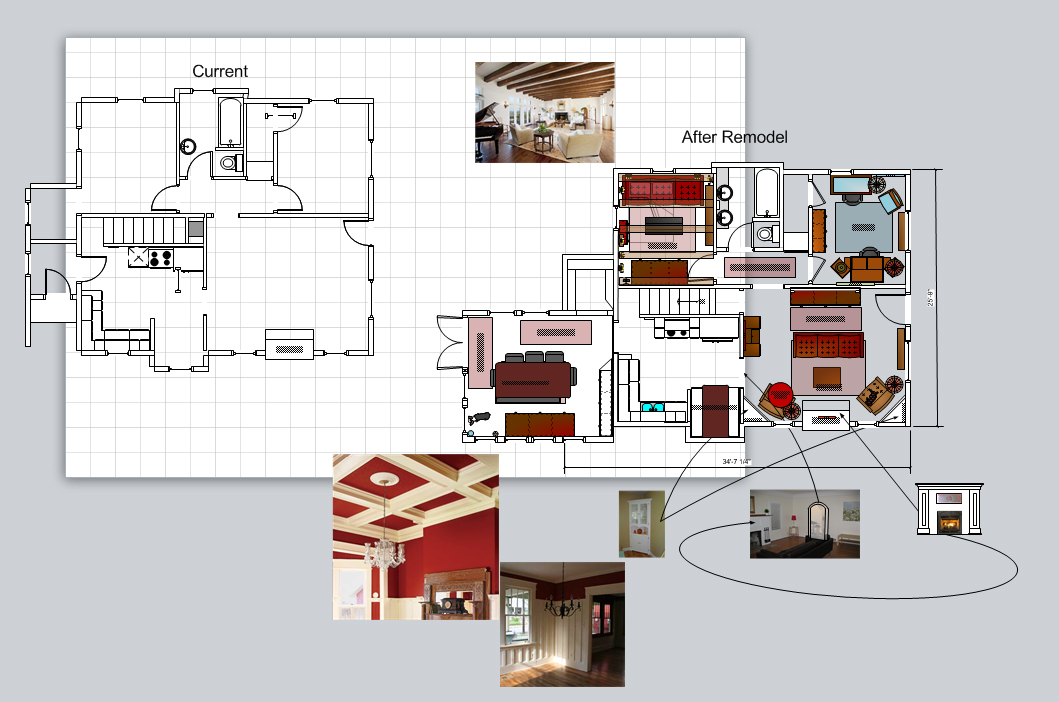
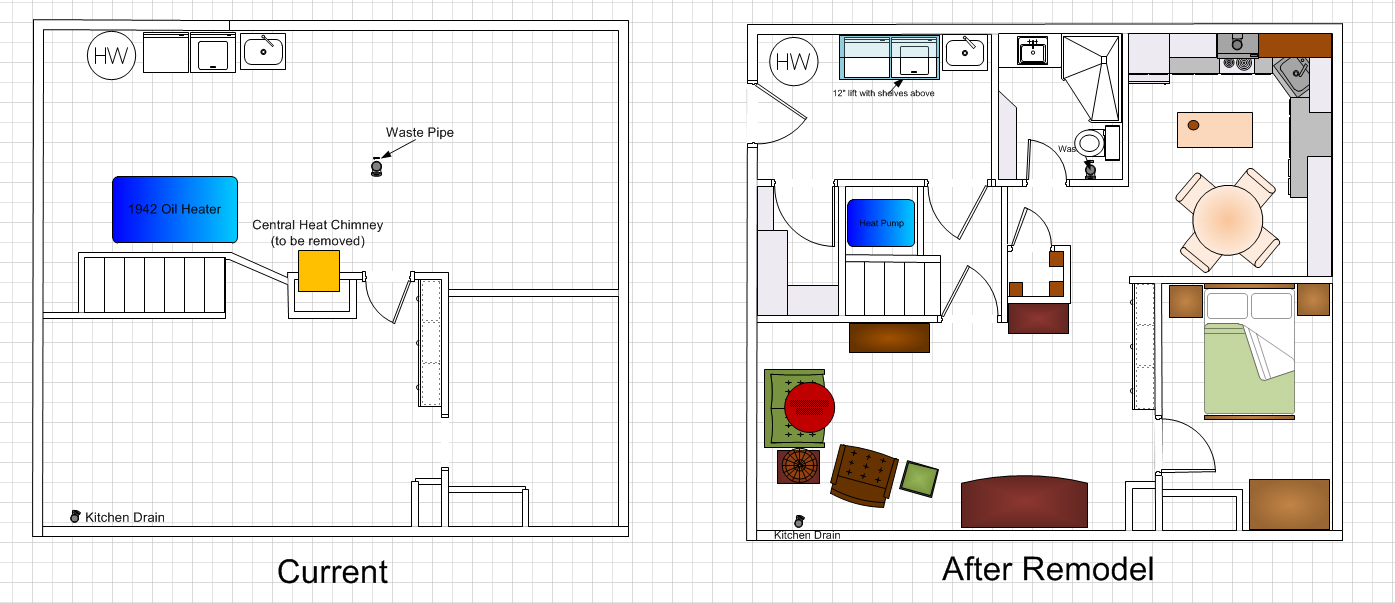
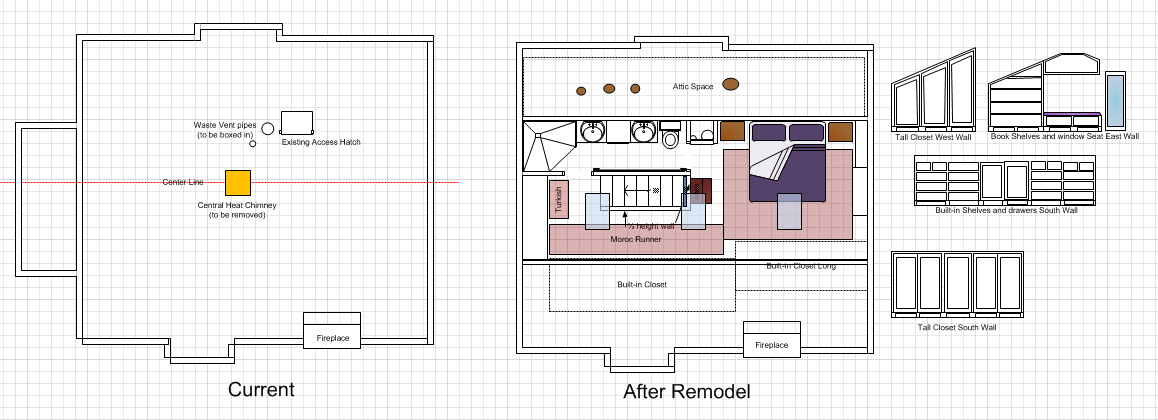
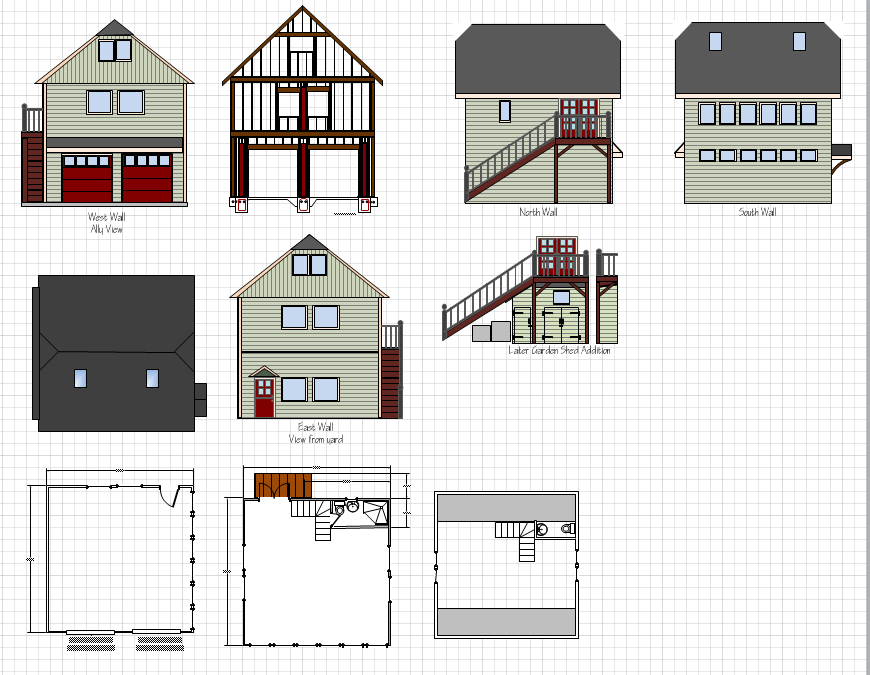
Obsessing Over a Possible House Remodel & Letting My OCD Shine Bright
We are currently going through a make/buy decision concerning our house in Seattle. Meaning, do we spend $200-$250K plus, months of time, and lots of sweat equity on updating our house, adding a garage/shop and dining room, and refitting the basement into an apartment for my mom. Or, do we spend $5K getting the house ready to sell and find another house that has what we want already done and complete. Do we keep the house as a rental and build an entirely new one…? We have met with our estate agent, a builder, a draftsman, an architect, a landscape company, a second builder, and now a third builder in our quest, but really are not any closer to making a decision. As said before, Stamps-With-Foot and I are going over it all and trying to decide what is best for our finances, future possible family expansion, and quality of life.
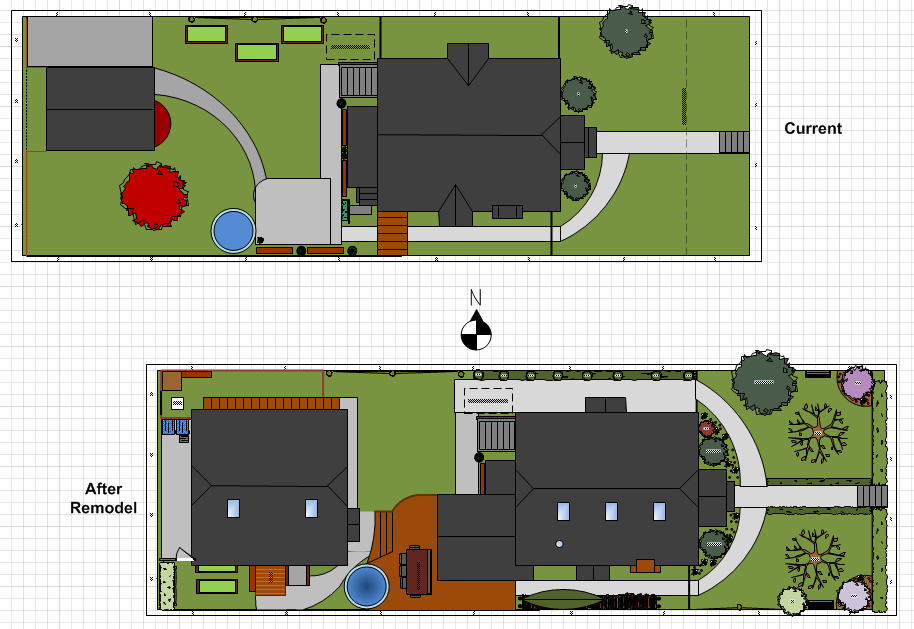
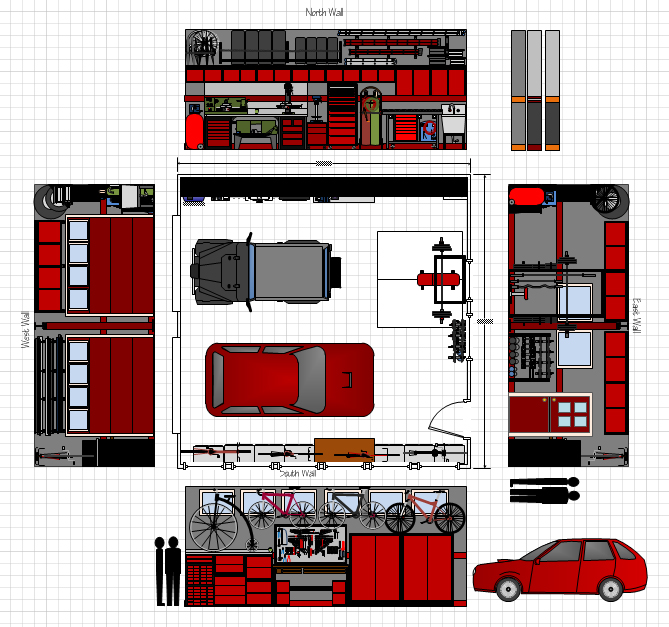
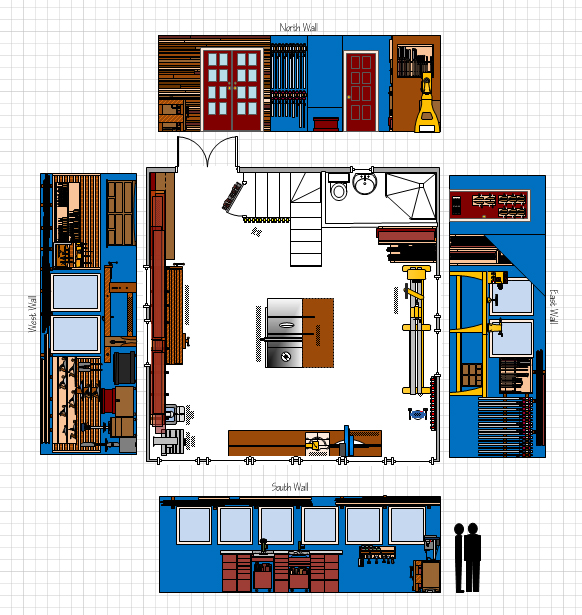
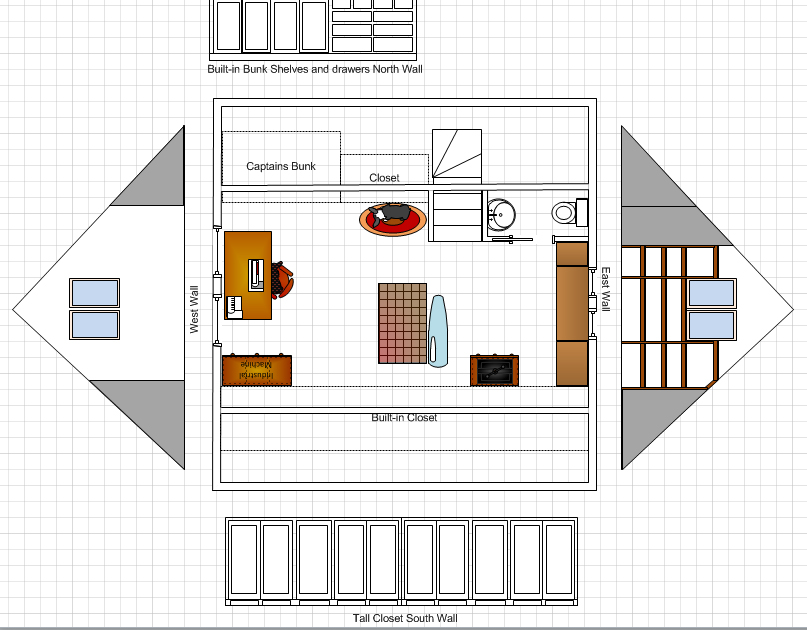
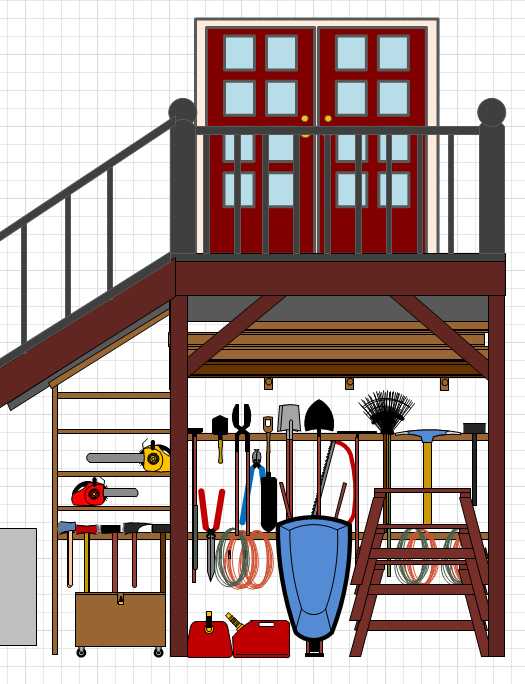
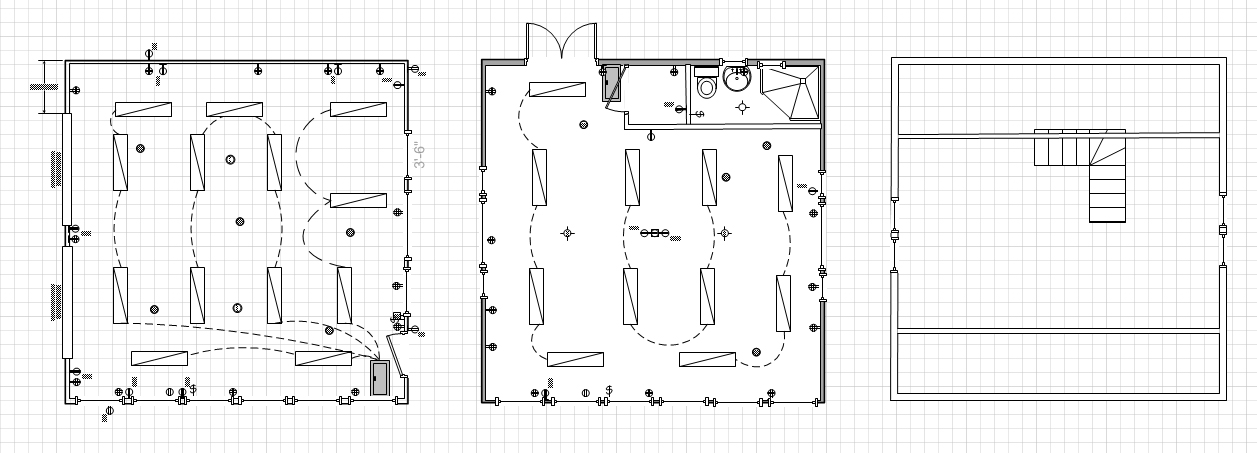
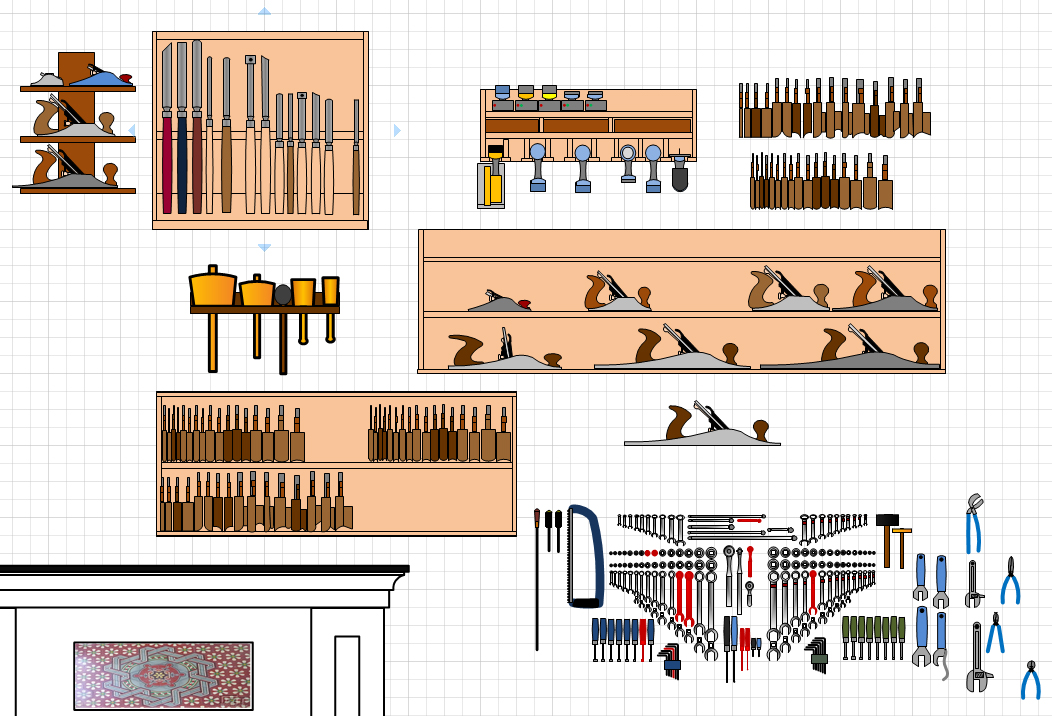
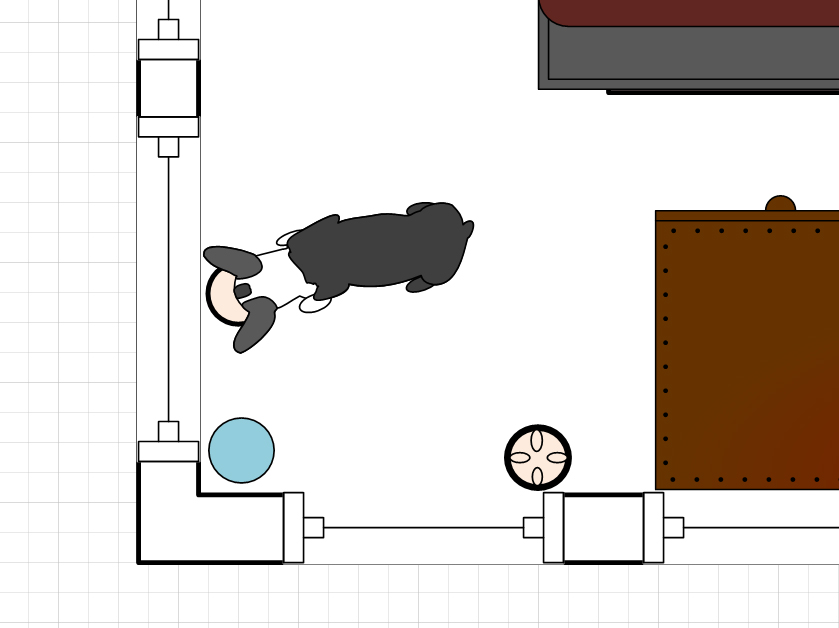
I drew our lot and house just after we moved in and have spent more than a few hours modeling all our crap – to scale – and seeing how it would all fit in the possible expansion of our existing house with the new garage build. Part of this on-going decision process is looking at all the possibilities and modifying the existing drawings into a “someday-maybe state”. I have a touch of OCD… If I am working on something or especially in the planning stages, I will drill WAY DOWN into the project. Evidenced by the below images and the included timeline.
I have modeled sewing machines, yard tools, bikes, my 1986 Jeep, my wife’s Subaru WRX, hand tools, bikes, , machine tools, trees, bushes, furniture, lathes, saws, wiring diagrams, rugs, even our puppies… all to scale… I may have a problem.


Blanket Chest Rebuild
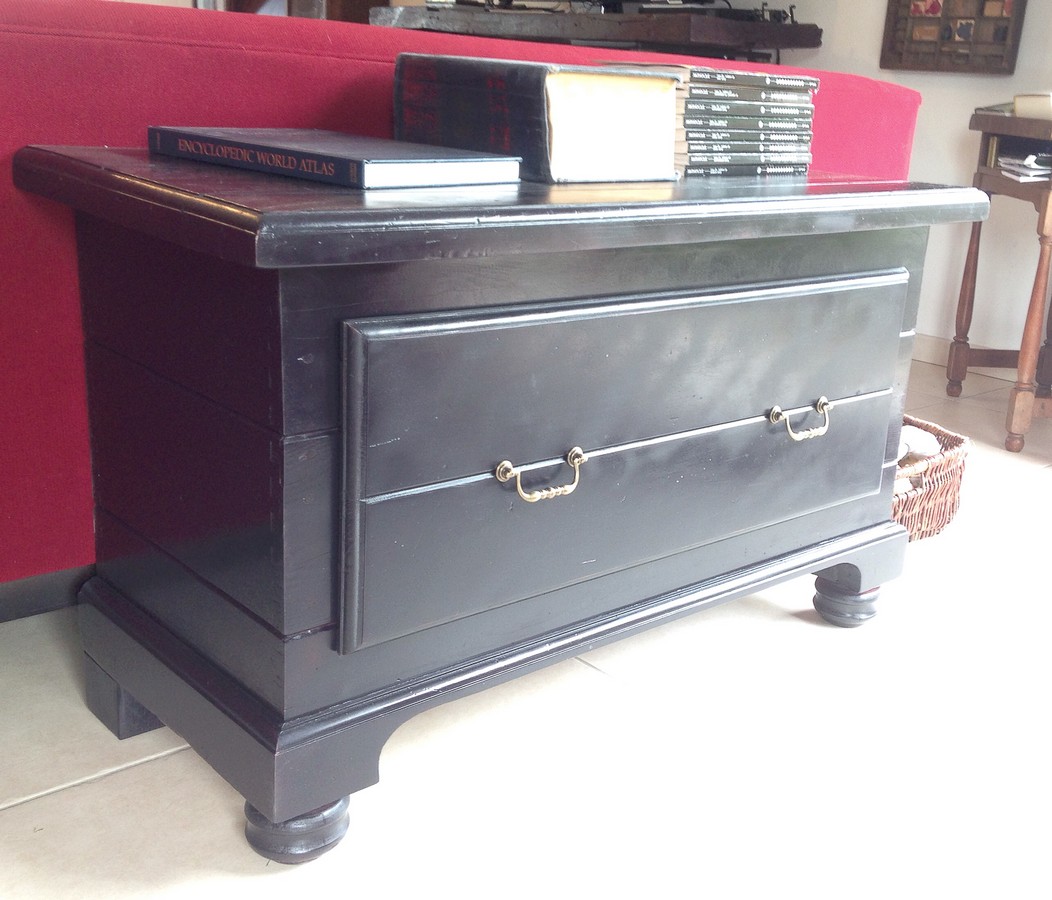
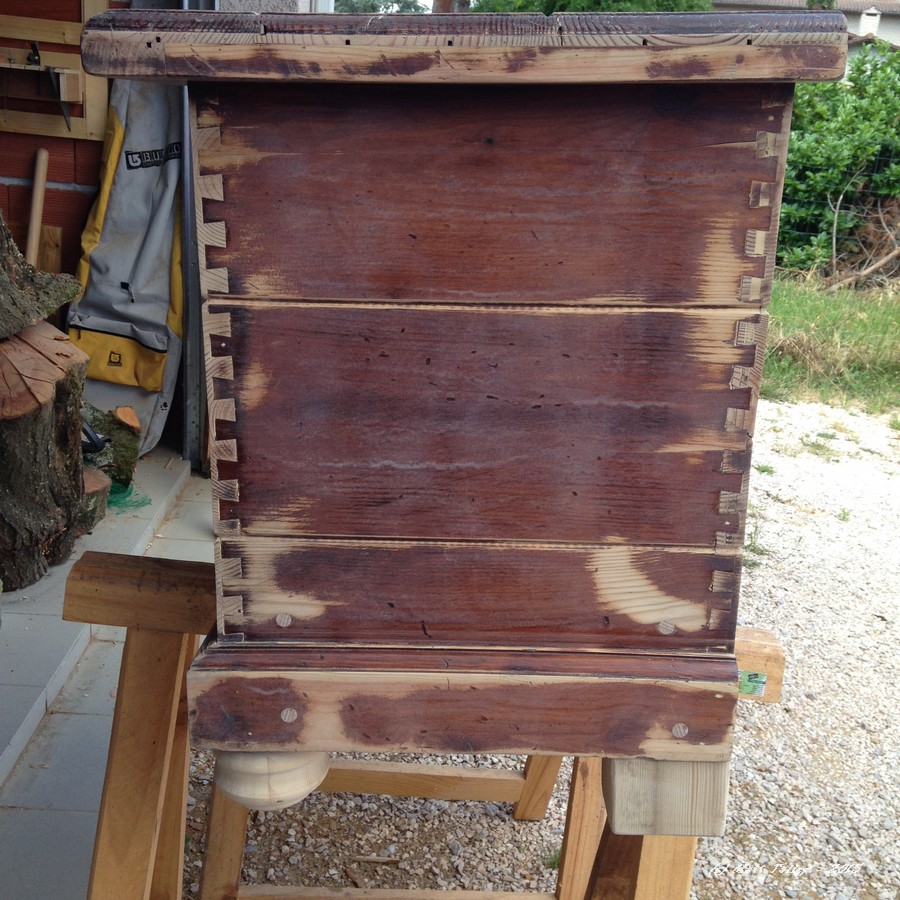
Early last year, Stamps-With-Foot and I bought a few pieces of furniture from an English couple moving out of France. One of the pieces was a pine drawer-front blanket chest that someone in the UK had built in their garage out of decking material. It was constructed with dovetails, screws, and lots of glue, so it was a stout little piece and for $50, I couldn’t pass it up. The finish was originally 1980’s fabulous stain and it was semi-sloppily finished with a brushed on polyurethane topcoat, but all and all not so bad as to ruin the chest. Just right for a little refinishing.
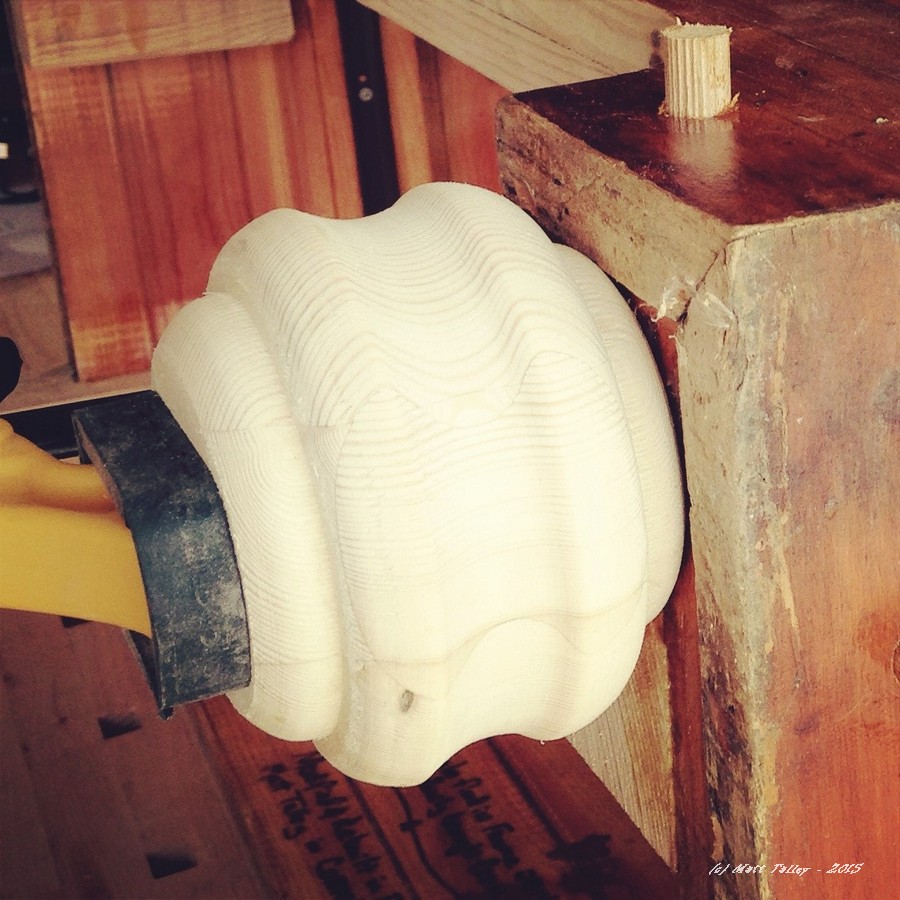
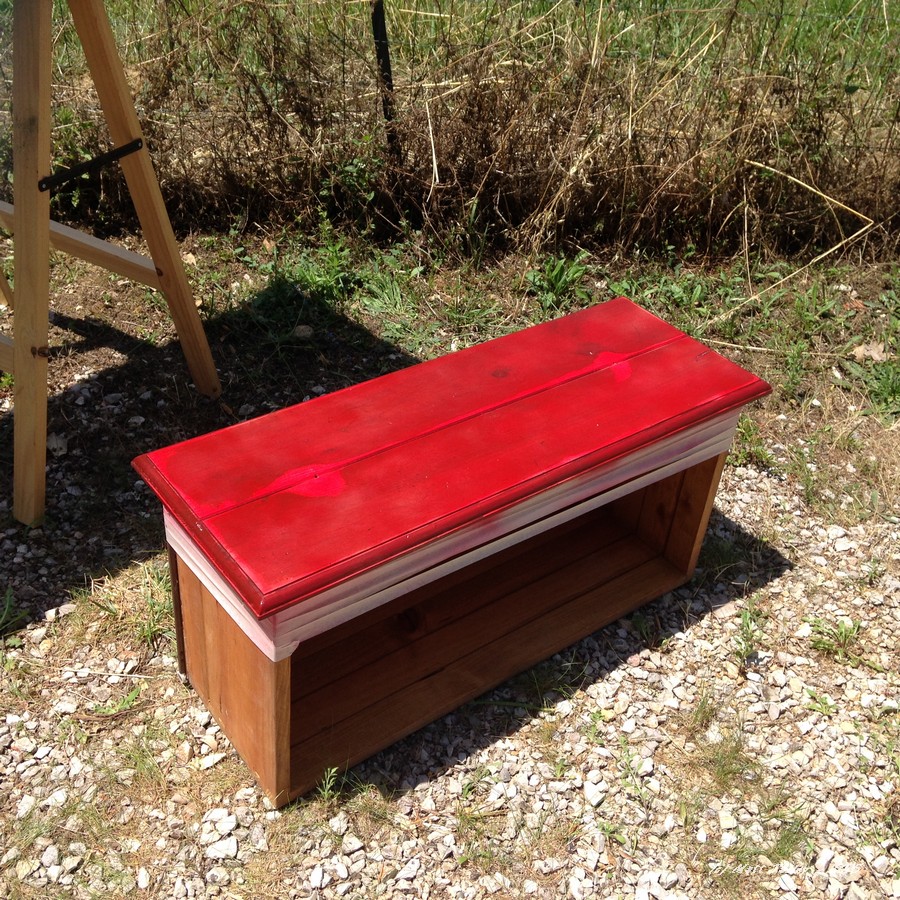
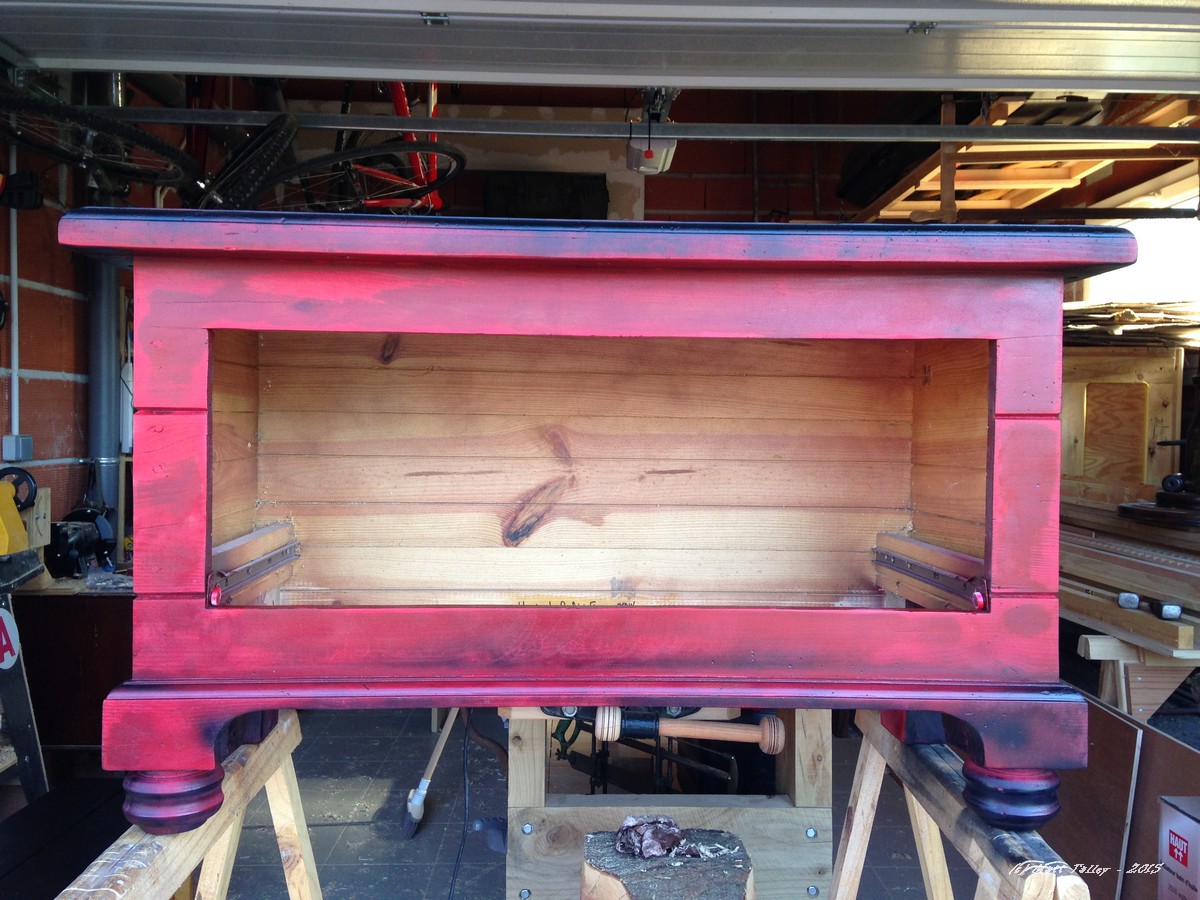
It sat in the house for a year or so, covered with a runner, before I dragged it into the GROP and tore into it. I cut the funky curved feature off the base, added some corner reinforcement, re-worked the drawer slides, removed the fat awkward drawer knobs, turned and added bun feet to the front, and installed square feet on the rear (going for the 17th century Furniture of Necessity look). I sanded the whole thing down to remove some of the gloppy poly and painted it with an undercoat of red and an overcoat of flat black – also period appropriate. When the top coat gets a ding, the red shows through. I have a number of chairs and other chests done in the same manner. I added brushed antiqued solid brass handles and called it done.
The chest now sits behind the couch, near the door for the back garden and holds a couple blankets for TV watching comfort and two cotton hammocks for lounging the yard.
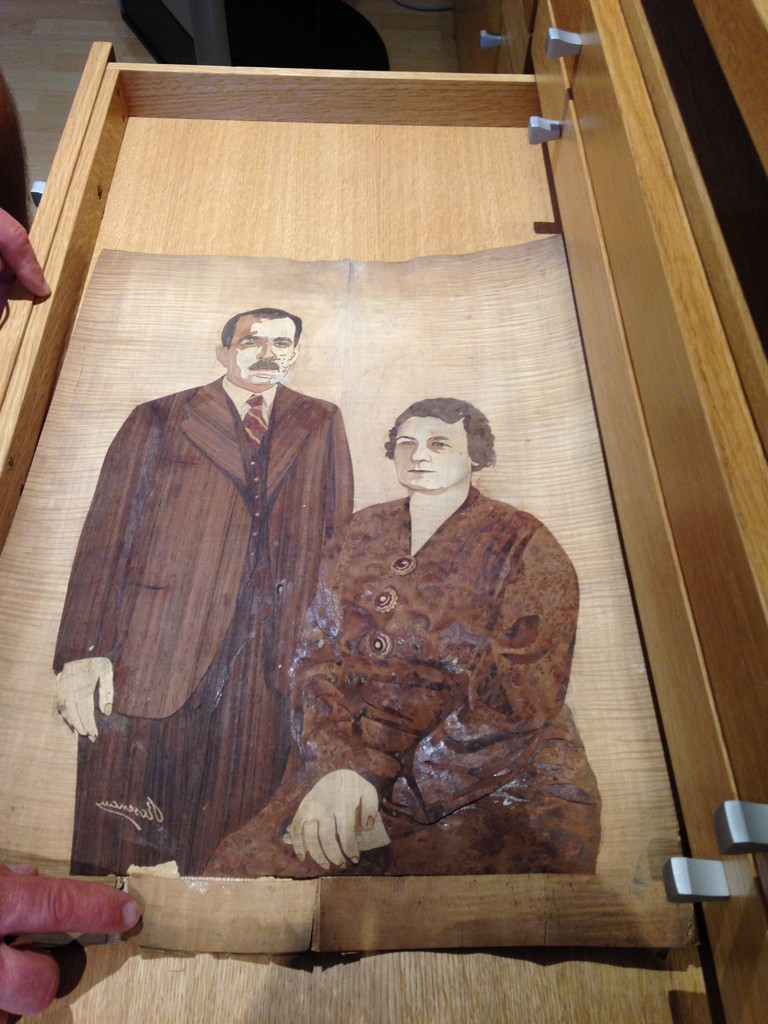
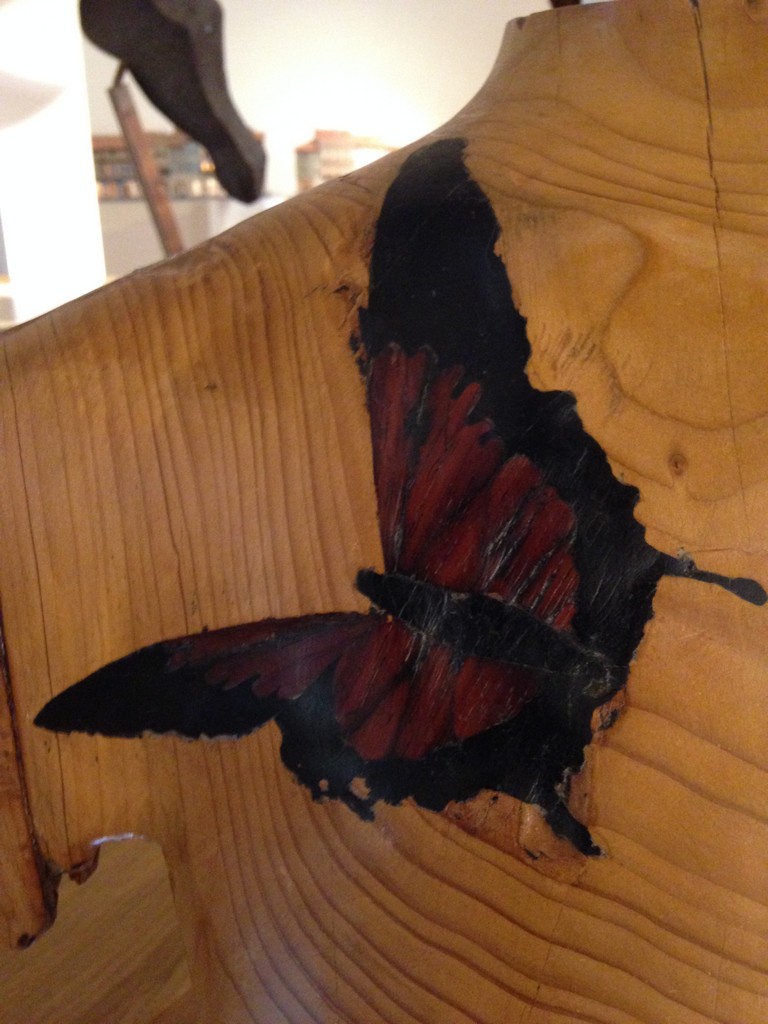
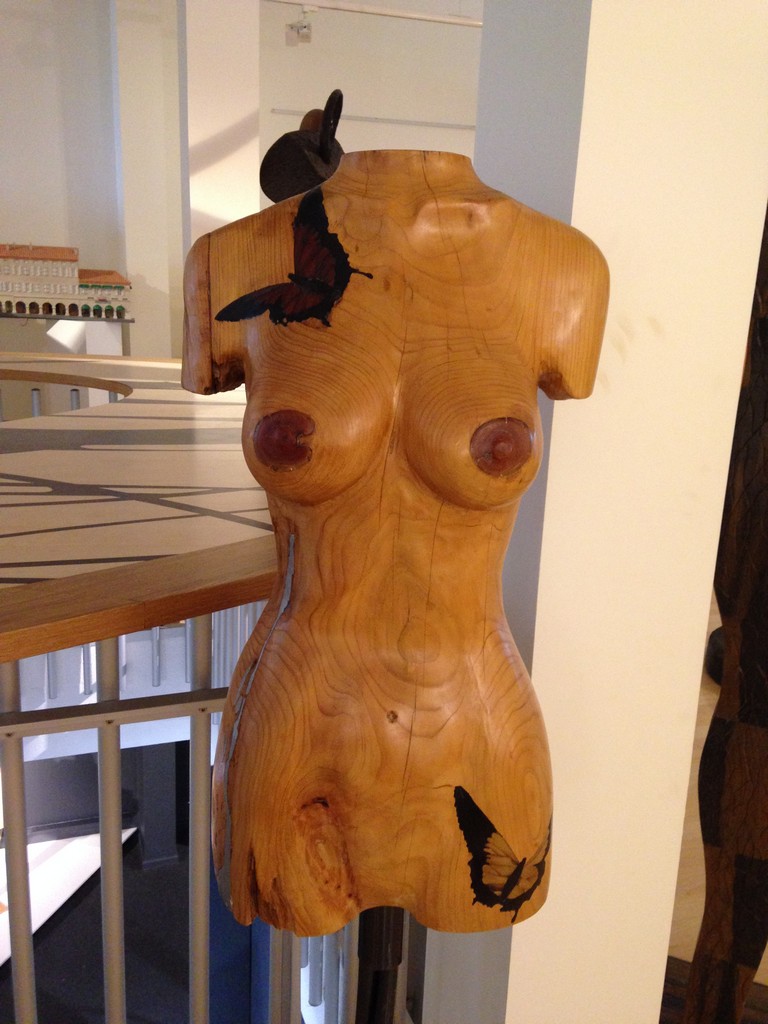
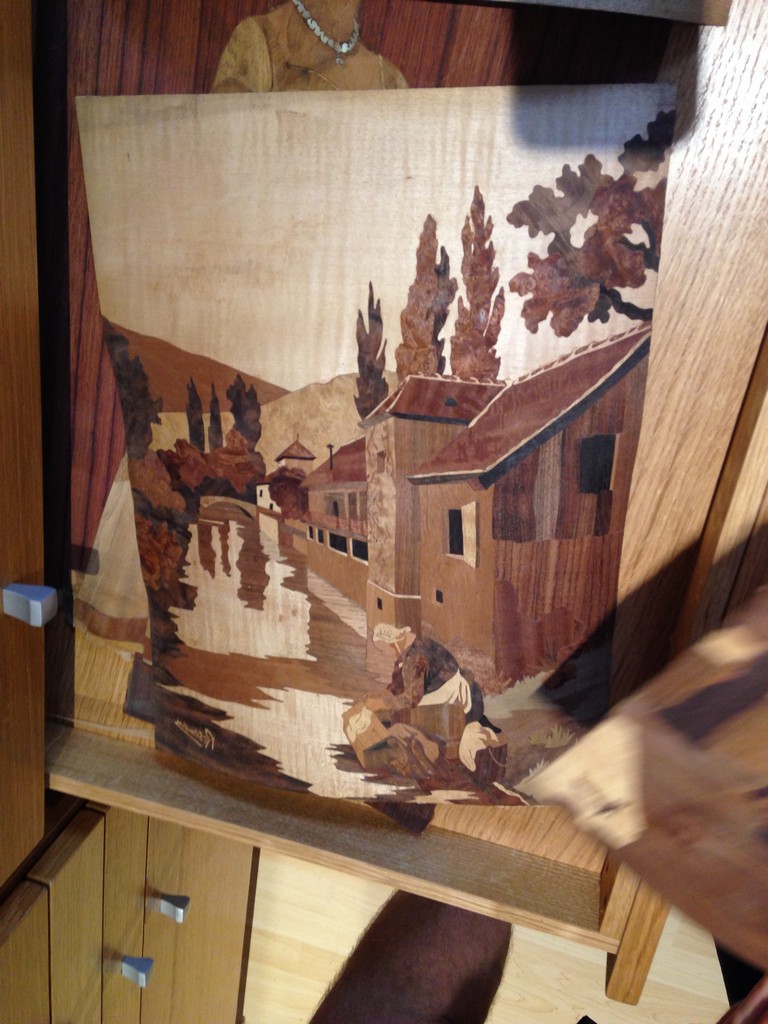
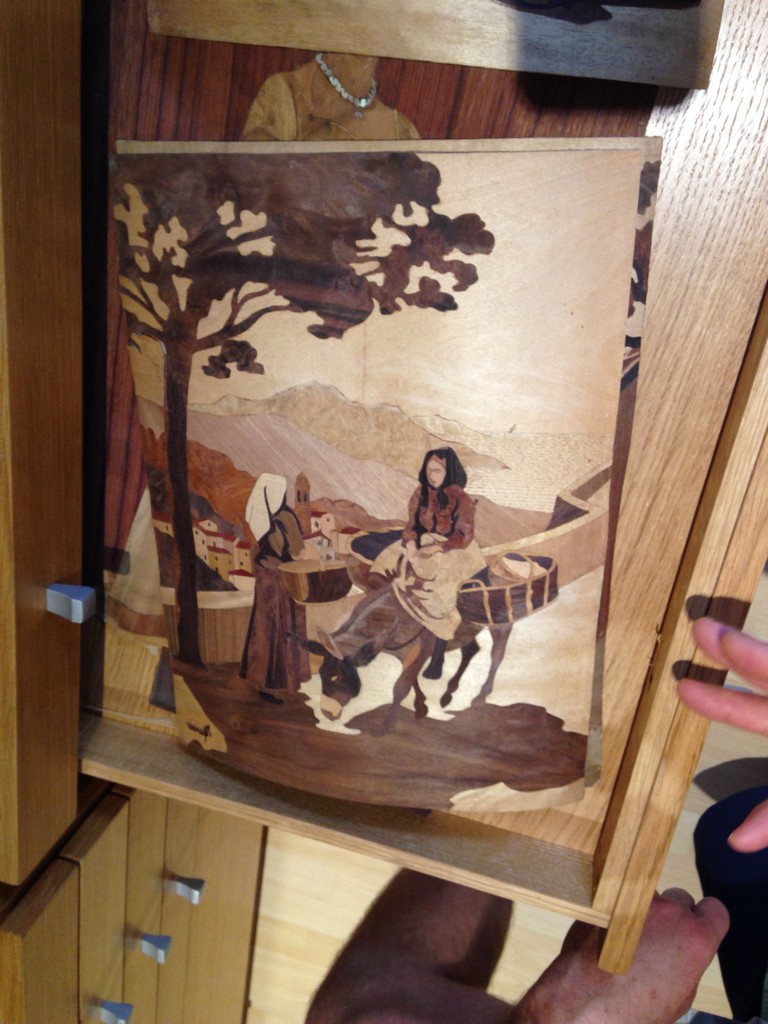
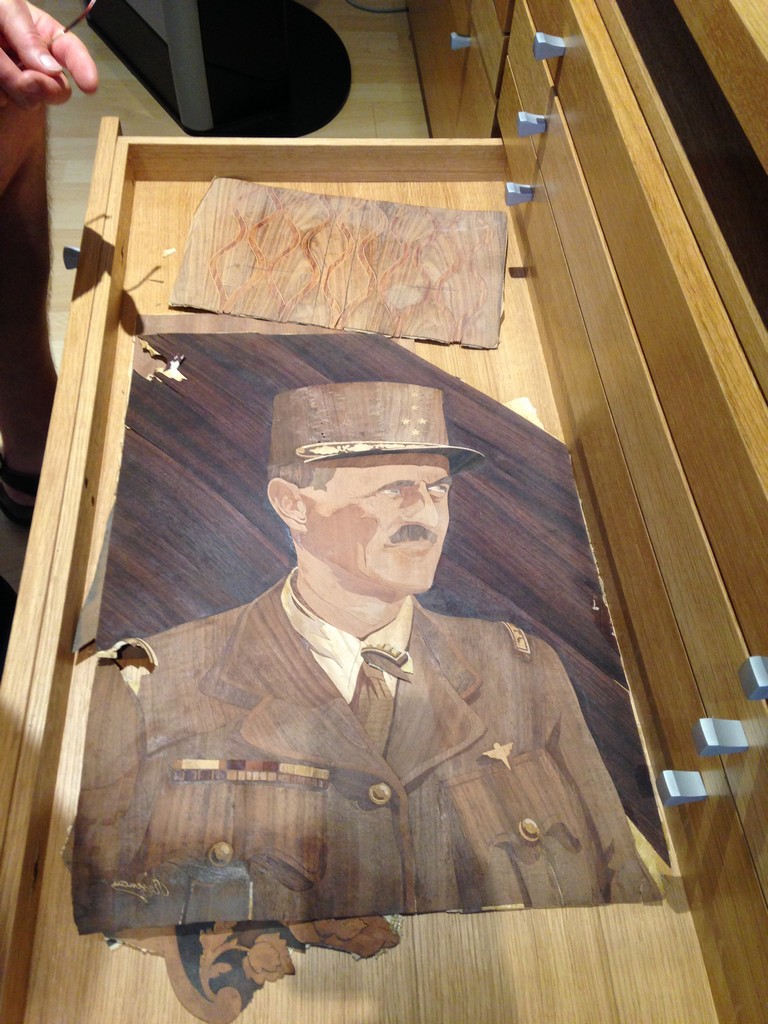
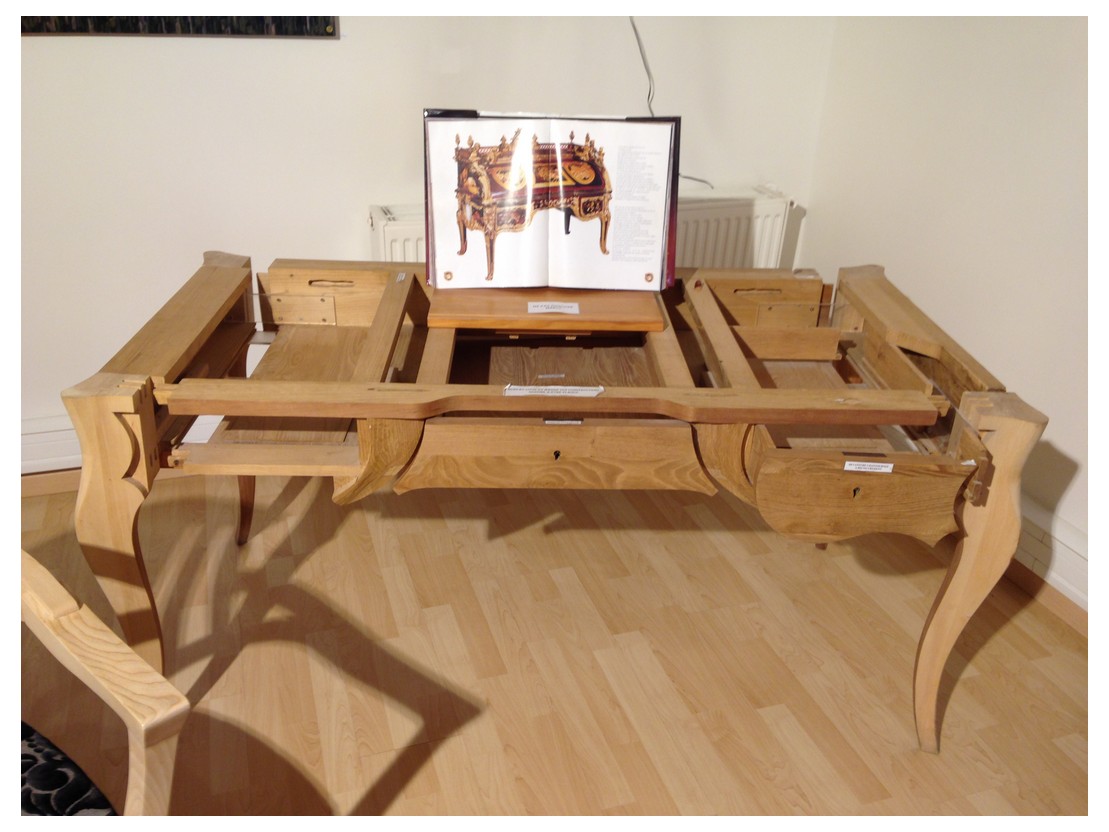
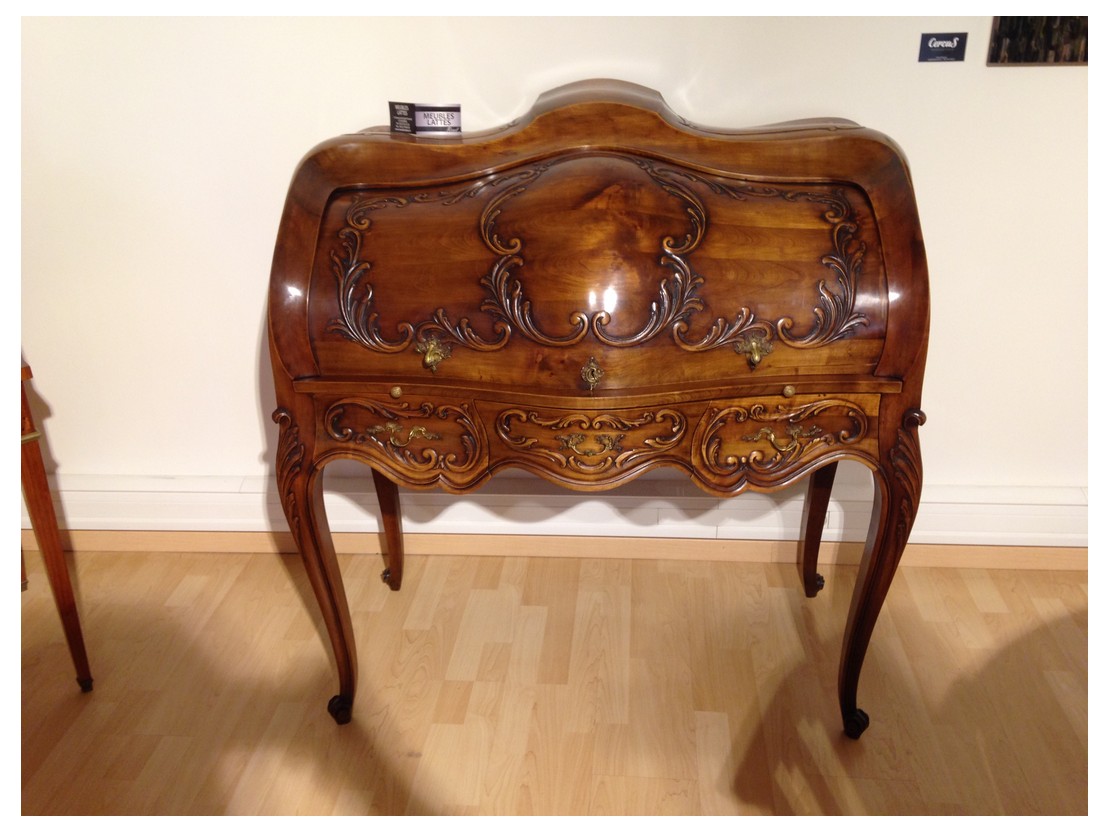
Musée du bois et de la Marqueterie in Revel, France
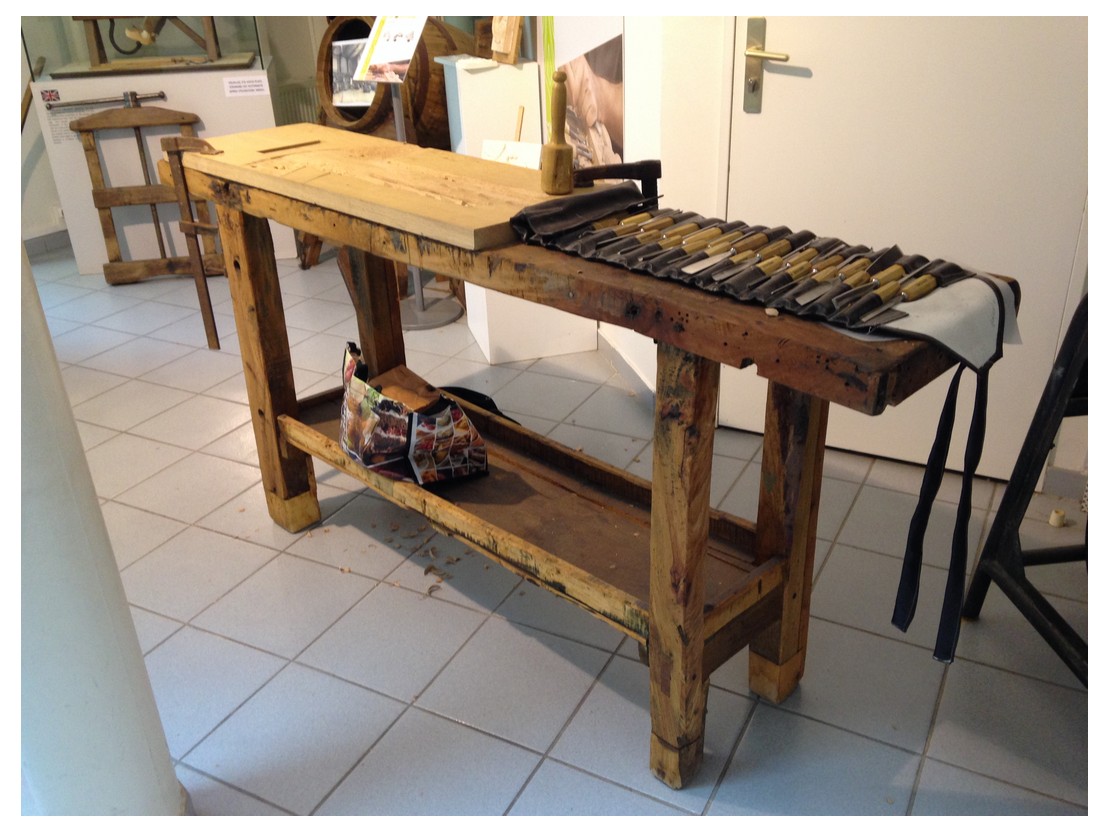
Last summer My Father-in-law, my son, and I made a road trip to the Musée du bois et de la Marqueterie (Museum of Wood and Marquetry) in Revel, France (about an hour from our house if you don’t get lost or almost run out of gas…). The town is one of the noted centers of high quality furniture production and has historically specialized in wood marquetry. It goes back to 1888, when Alexandre Monoury – a master cabinetmaker – left the workshops of Versailles and settled in Revel. Under his influence, several workshops were set up there and many of those origional shops are still going strong today.
The museum highlights the work of the area, new and old, and we spent a couple of hours marveling at the tools, example pieces and shear artistry of furniture, sculptures and marquetry examples on the second floor of the facility.
As a note – this part of France is stunning with sunflower and wheat fields(the Tour du France rides through or by every year) and the town has an stunning 13th century market square and a beautiful central market hall with a quadrangle of historic buildings around it that are home to restaurants, a fabulous bakery/pastry shop and antique shops.


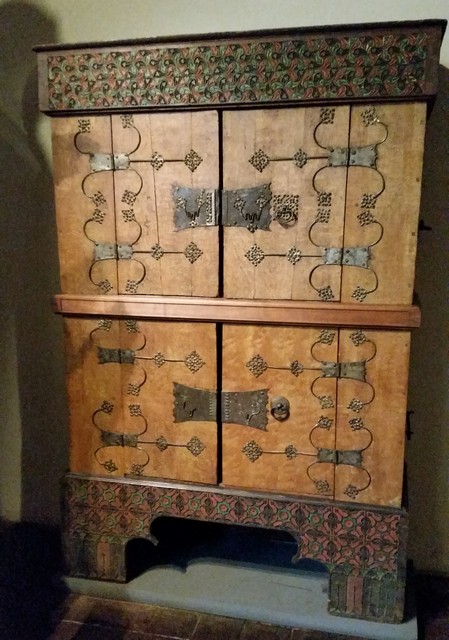
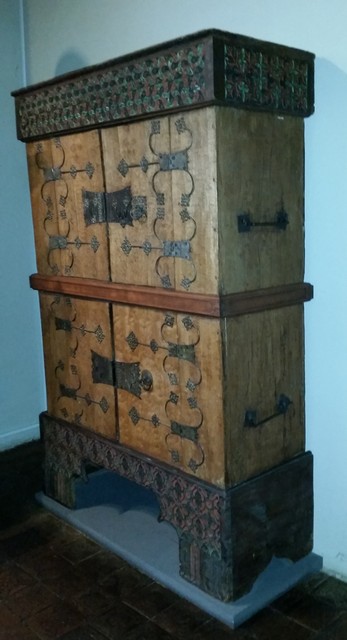
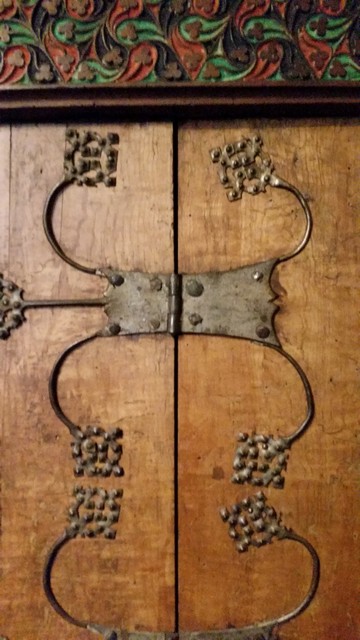
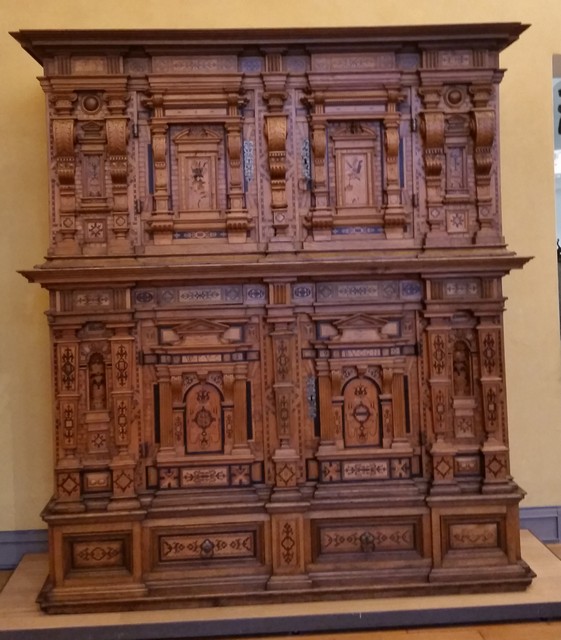
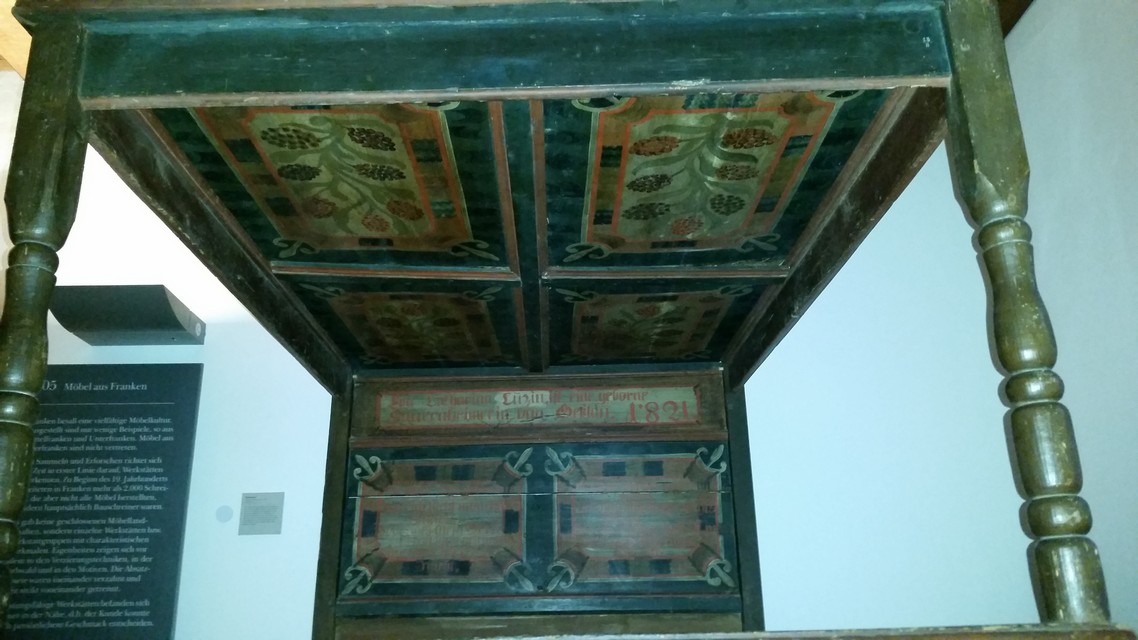
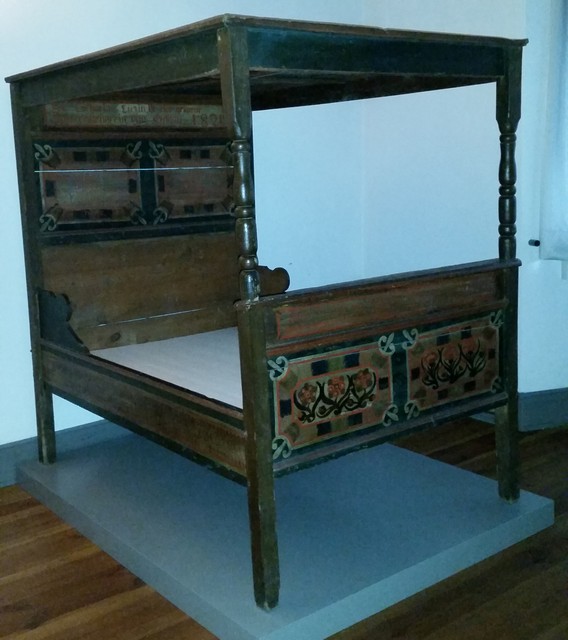
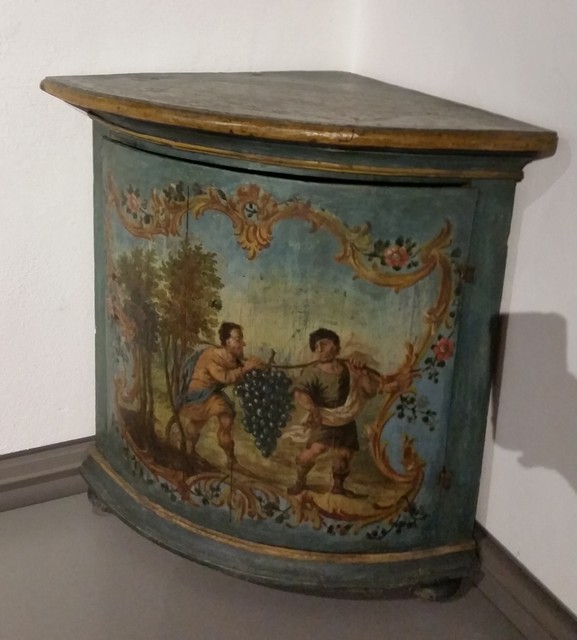
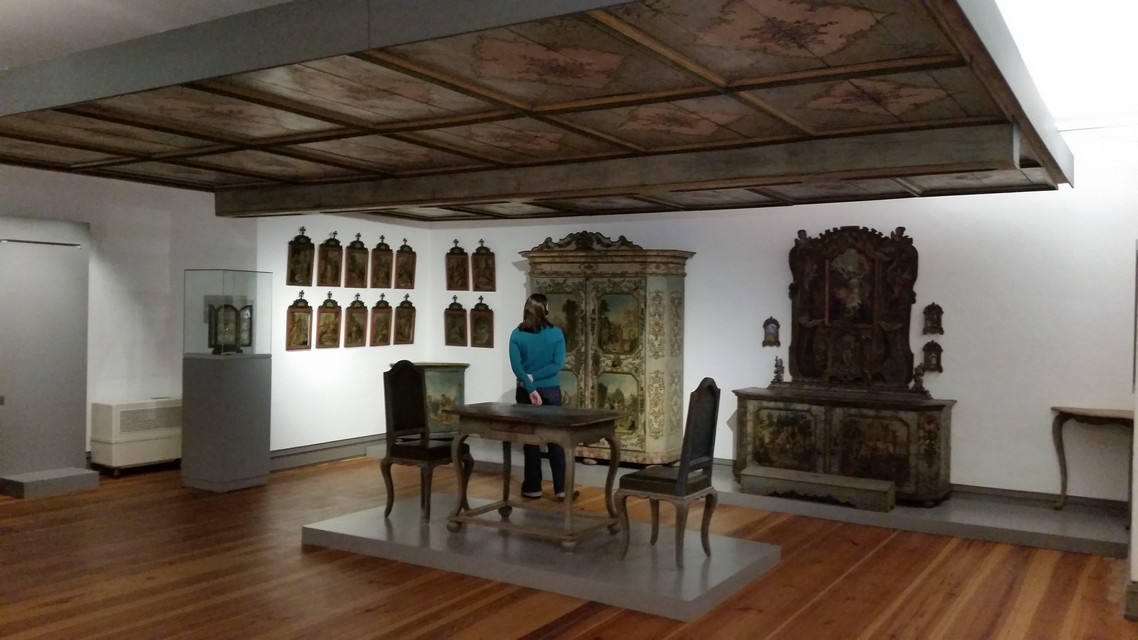
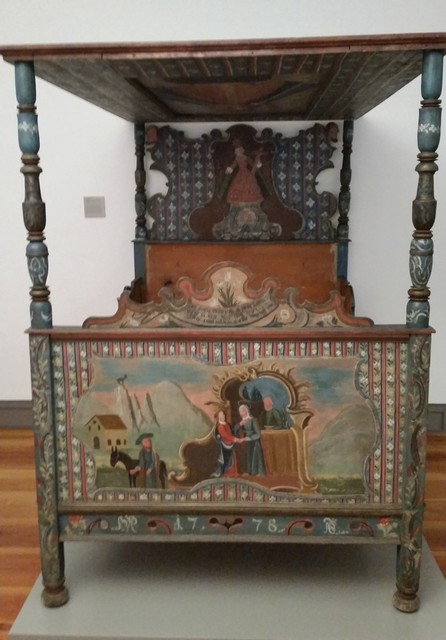
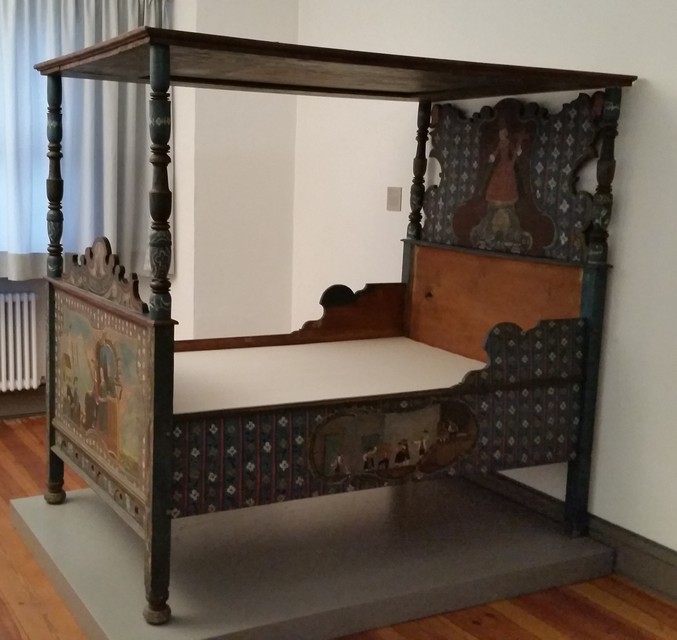
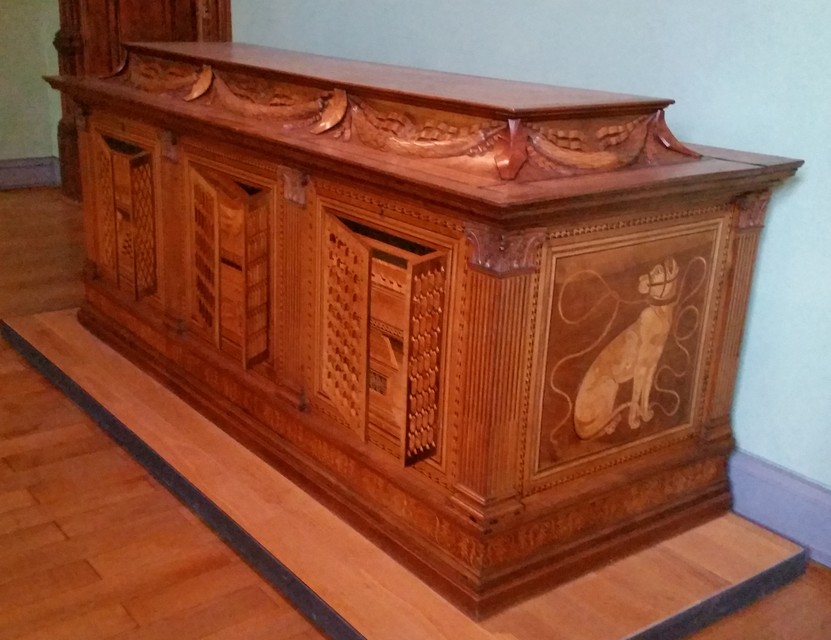
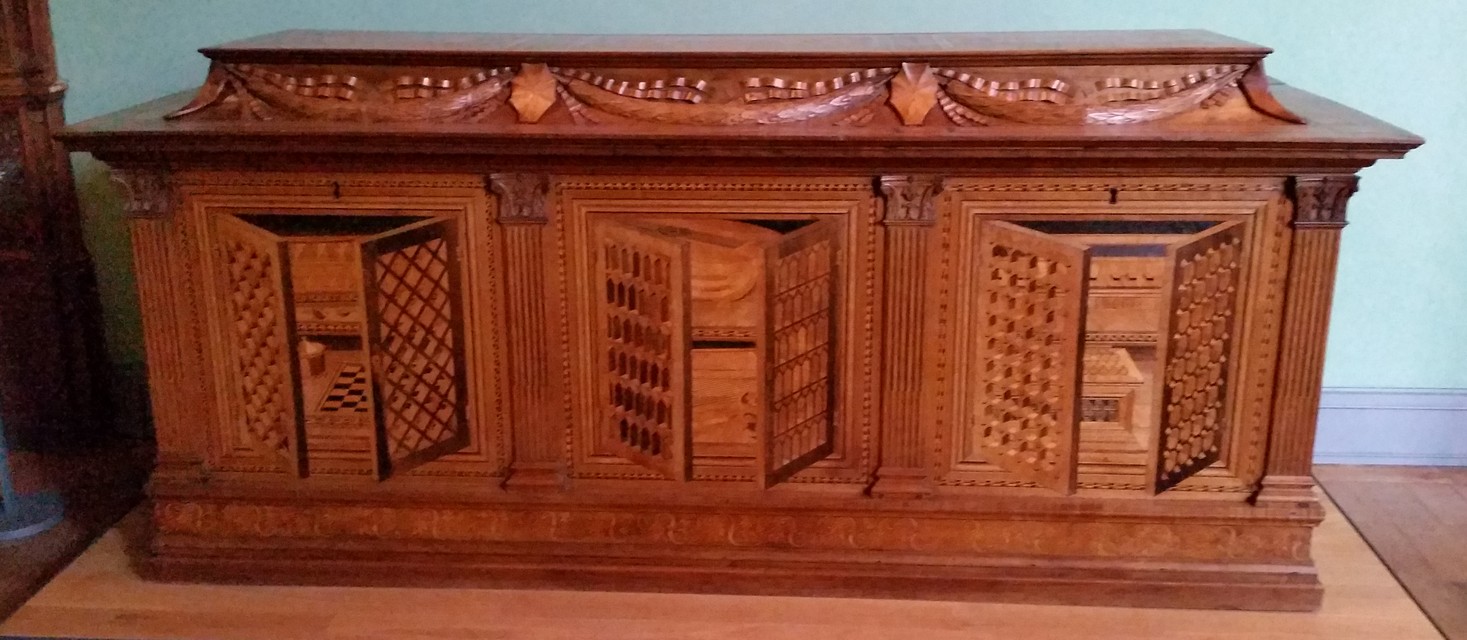
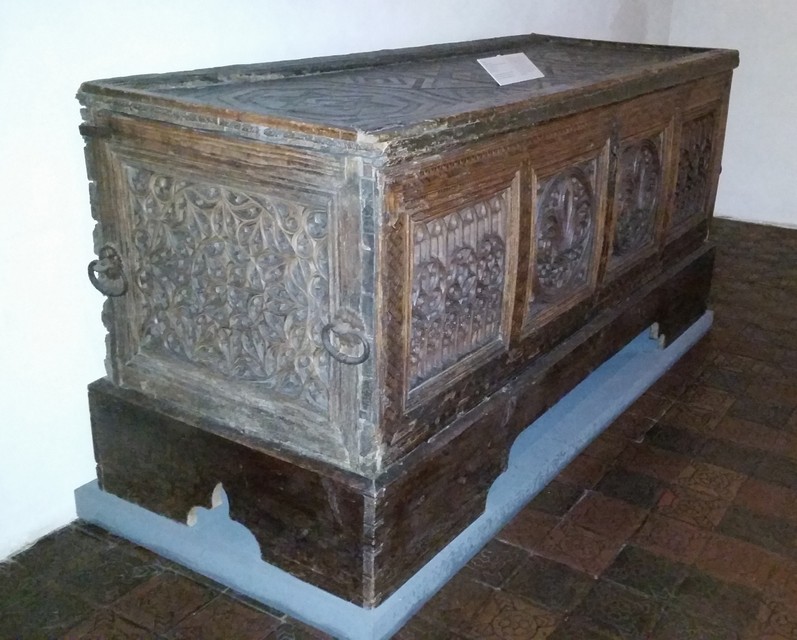
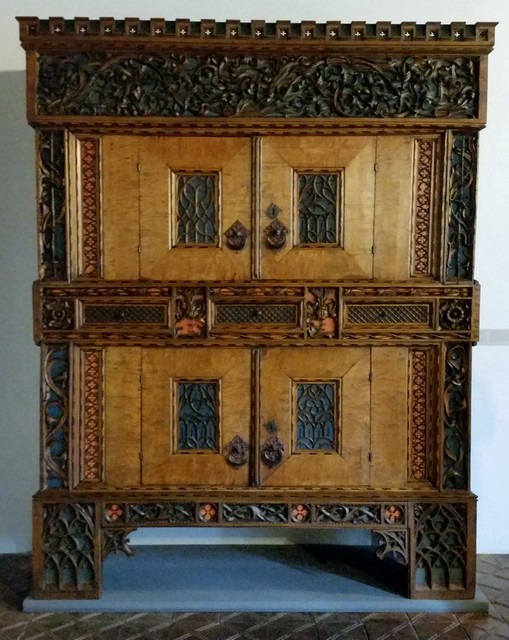
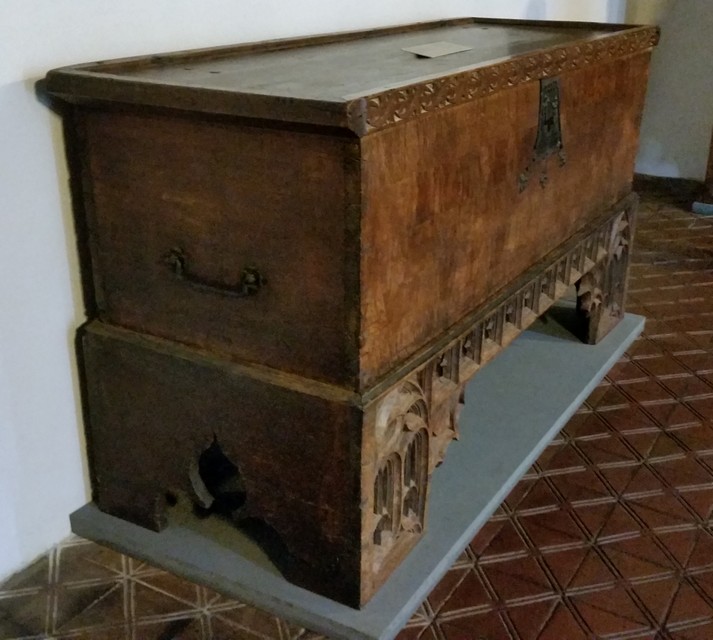
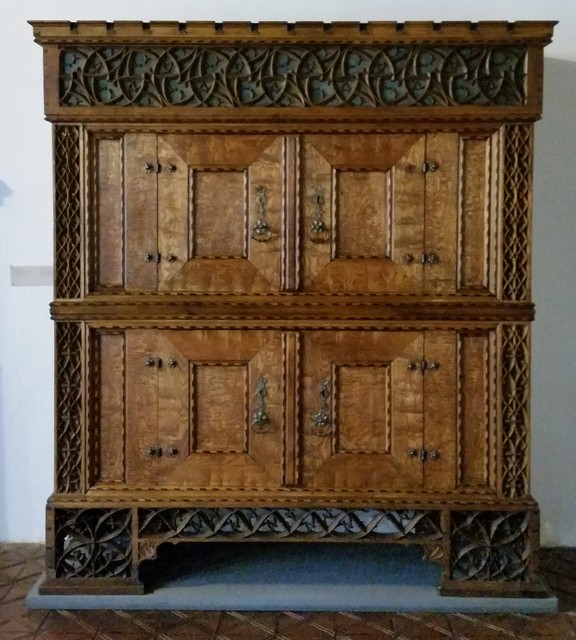
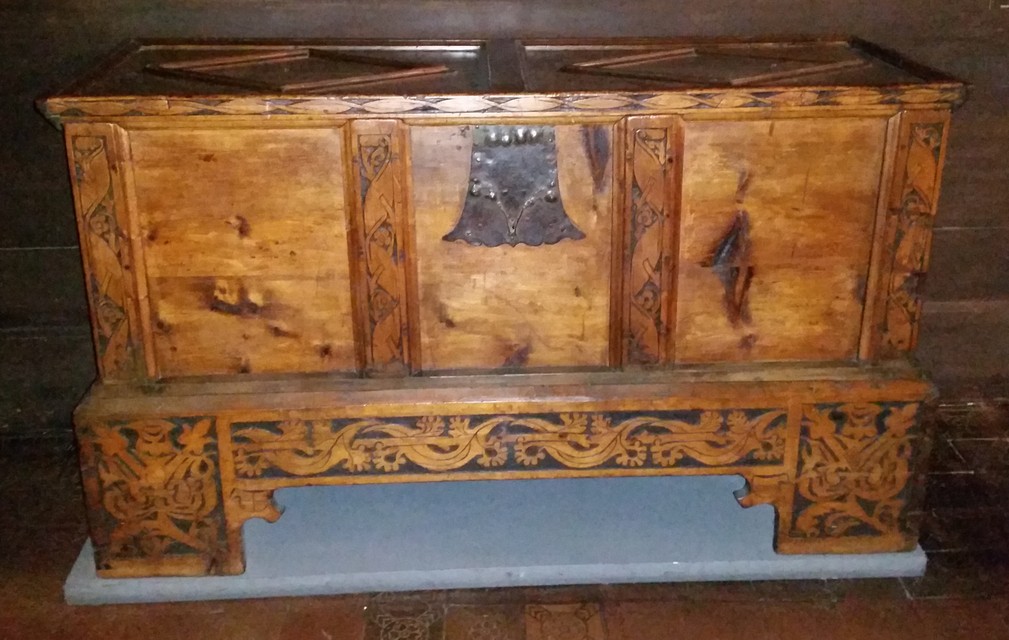
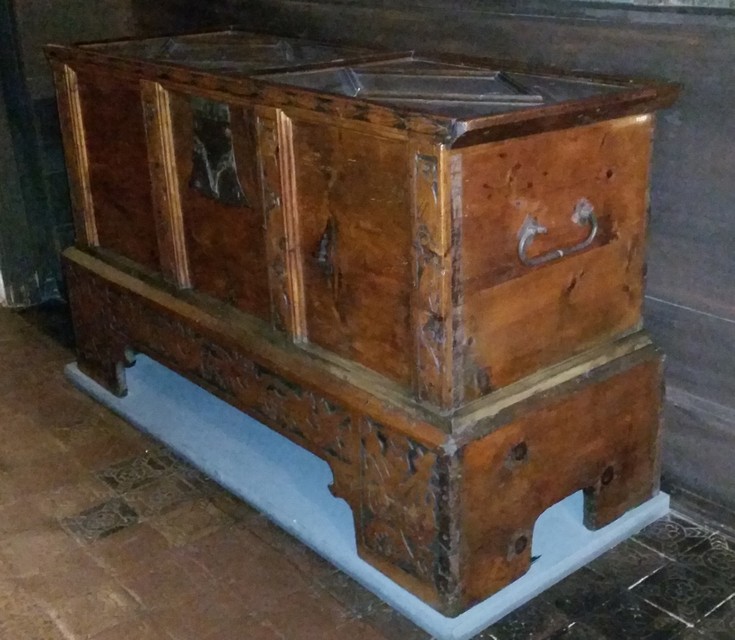
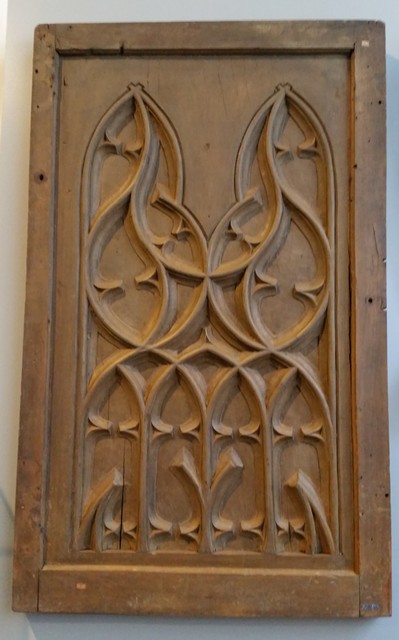
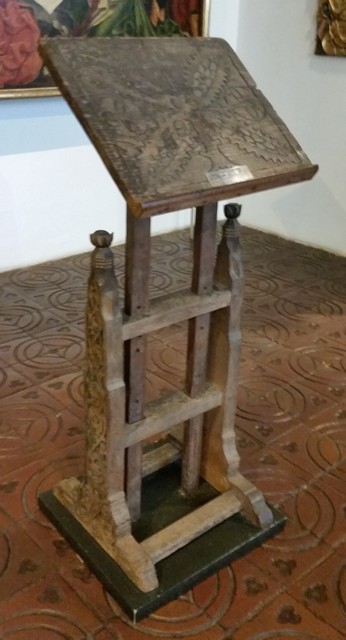
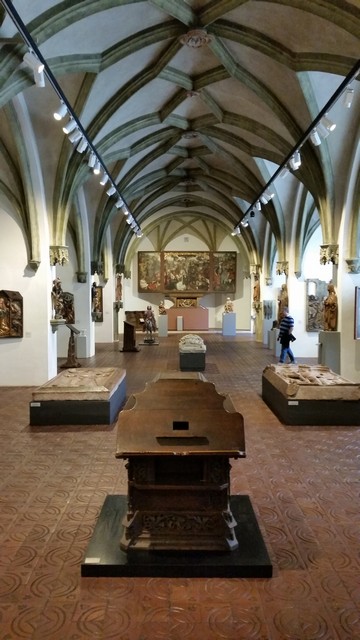
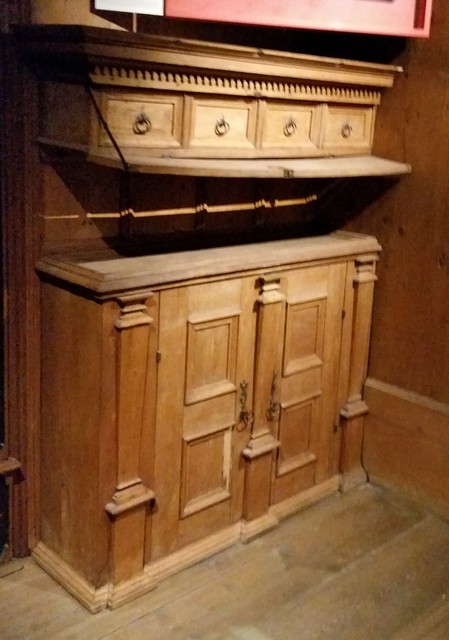
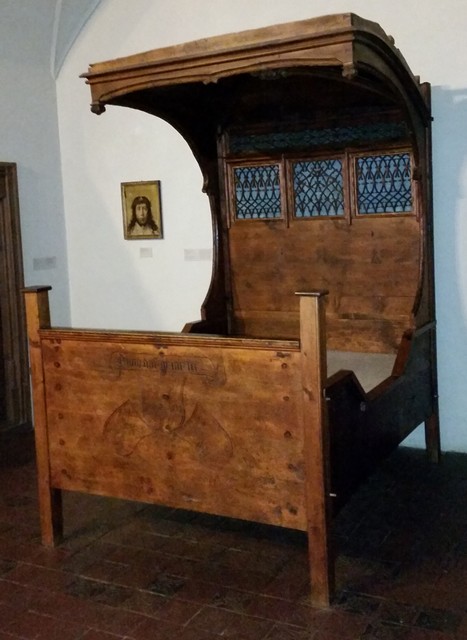
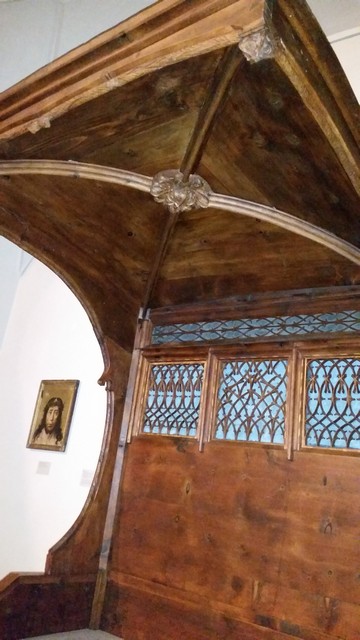
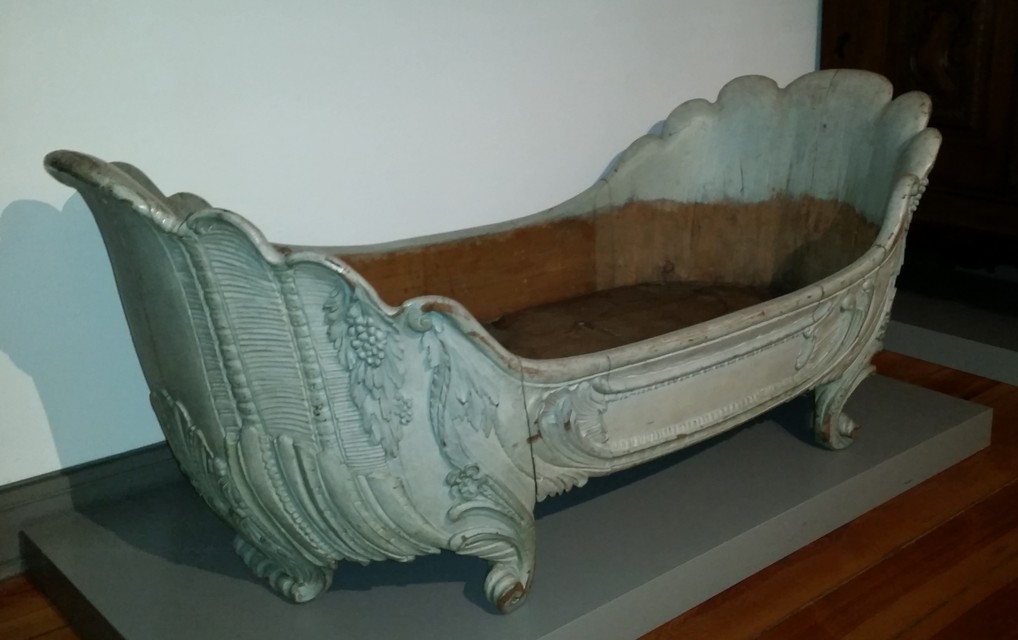
Historic Furnishings from the Bavarian National Museum in Munich
Stamps-With-Foot and I had a long weekend in Munich last month and we spent the better part of a day in the Bavarian National Museum (Bayerisches Nationalmuseum) looking at cool old stuff. Their furnishings collection is impressive, with rebuilds of entire rooms from castles, hunting lodges and ale houses from 1400-1800. My wife gave me free reign to snap pictures to my little heart’s content so what follows is a collection of chests, cabinets, beds, and other furniture from their collection. I also love wood carvings and bronze, so expect a sampling of those as well. There were a lot of images to load and I put up smallish images for the sake of speed, so if you see one that you REALLY like and want more detail, let me know and I will send you a full sized image and all of the notes that were attached to the piece.


Let down by an online tool seller with GIANT balls.
So, I am a little tweaked… I got a small bonus at work and sent a little money to my mom and daughter, got something for my wife, paid to have a tree taken out, sent Heifer and MSF some funds, paid off my last student loan (FREEDOM!!), put a little money back for a rainy day, and with the last bit decided to do a little something small just for me: I bought a few beech molding planes and 3 mortise chisels from a guy with a web store in the Scotland. I will call him UK Tool Guy. I have bought twice from him before and it all went really smooth and my purchases were exactly as expected. I bought a toothing plane from him at a good price that was in perfect working order and arrived exactly as pictured on his site.
My experience this time around was different. The order part was normal, but when I received my stuff it was all kinds of wrong. Painted parts, broken pieces, condition received was NOT as advertised, etc… I spent 4 hours cleaning and fixing and will have to spend another 4-5 repairing 2 chisels and 2 of the planes. 8-9 hours is a lot of time to unexpectedly fix stuff that I just bought. I am not super-important in the grand scheme of things, but my time is worth something to me.
Anyway, I took a few pictures and wrote the guy to let him know about the issues, asking about the possibility of some remuneration. He sends me back a mail offering me a little credit instead of a refund. I take him up on it, not knowing what the shipping will be I choose a couple of items from his web store that equals to less than £50 (~$78) that he offered up. I think my time and frustration was worth more, but I didn’t press the point.
He sent me a response that informed me that I had gone over budget and that he would “…let me off for now…” Seriously‽‽ Was this guy born with an extra set of balls? This is the third time I have done business with him. I check his site regularly for stuff I am looking for – I am even on his MF mailing list. The bottom line is that I got an unexpected crappy deal, I was gracious and completely undemanding and he will “…let me off for now…”. It took over three weeks for him to send the stuff two new items out. So much for the “Shortly” time frame he referenced in his last mail. I believe that this is the last time I will be doing business with the UK Tool Guy
For the sake of Transparency, I have included the whole chain I sent below – only deleting names and contact info.
___________________________________________________________________________
Hi Matt
Thanks for your response.
Those two items actually come to £63.50 with postage which is a bit over
£50 but I’ll let you off for now, we can maybe adjust slightly with any
future order. I will get these off to you shortly.
THANKS
> On 17 March 2015 at 11:20, drivenoutside wrote:
Hi _____,
Sorry, I didn’t mean to come off as someone that can’t be pleased. It is
not that at all and my two previous purchases were really spot on.
Thank you for your immediate response and offer for credit. I would love
to have the boxwood rule and the upholstery hammer if you are OK with that.
Thank you and regards,
Matt
> On March 16, 2015 at 4:18 AM UK Tool Guy wrote:
Hi Matt
Thanks for your e-mail and I am sorry you had so much to complain about.
Not that it is an excuse on my part but I have a funny feeling I didn’t
pack your order up as otherwise I would have picked up on some if not all
of these points as I check everything properly when I am packing it. I
understand your frustrations when you get something that is not quite what
you were expecting and once again I am sorry for this. Rather than
refunding you some monies why don’t you instead have a look at the site and
see if there is something there around the £50 mark including postage that
you might like FREE. If there is just drop me an e-mail with the product
number so I can remove it off the site and send it over to you.
THANKS
> On 15 March 2015 at 20:36, drivenoutside wrote:
Hi _____,
I received the molding planes and chisels a couple of weeks ago, but as I
travel a good bit for work, I just this weekend had the time to open the
packaging up and take a look. What I found was a little surprising as I
have ordered a couple of planes from you before and condition was spot on
as advertised. I did not expect like-new condition as some of this
material is over 200 years old, but some of it was not as stated.
Two of the collars on the sash chisels are cracked, one completely. I am
going to have to tear them apart and replace the collars. I guess I will
either see if I can source from Marples or turn down some brass stock on
the lathe.
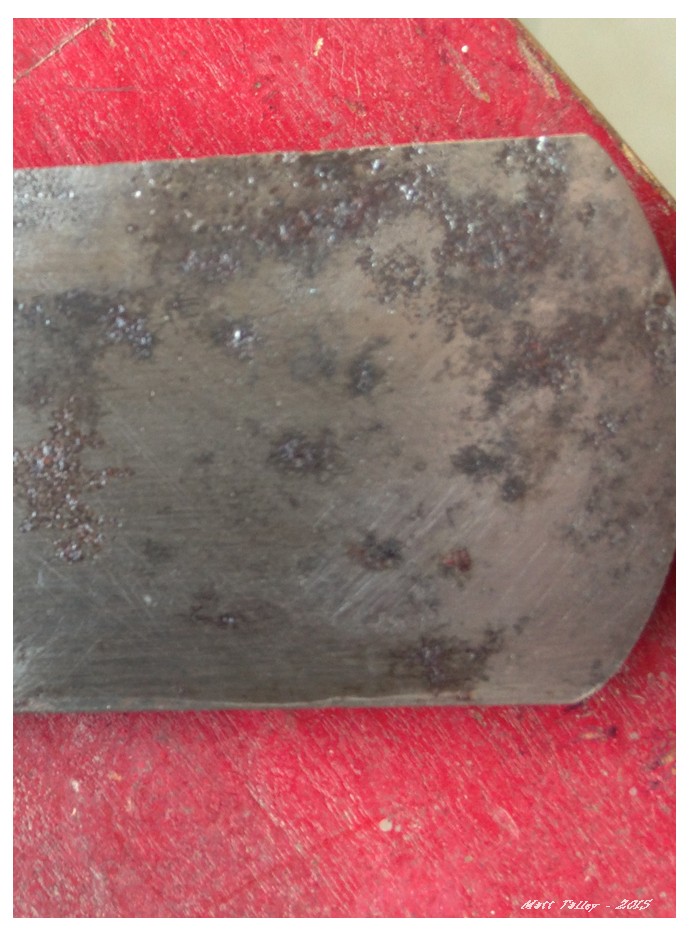
I spent most of yesterday flattening, polishing, sharpening, and oiling
the plane blades. There is a good deal of pitting on some of them and I
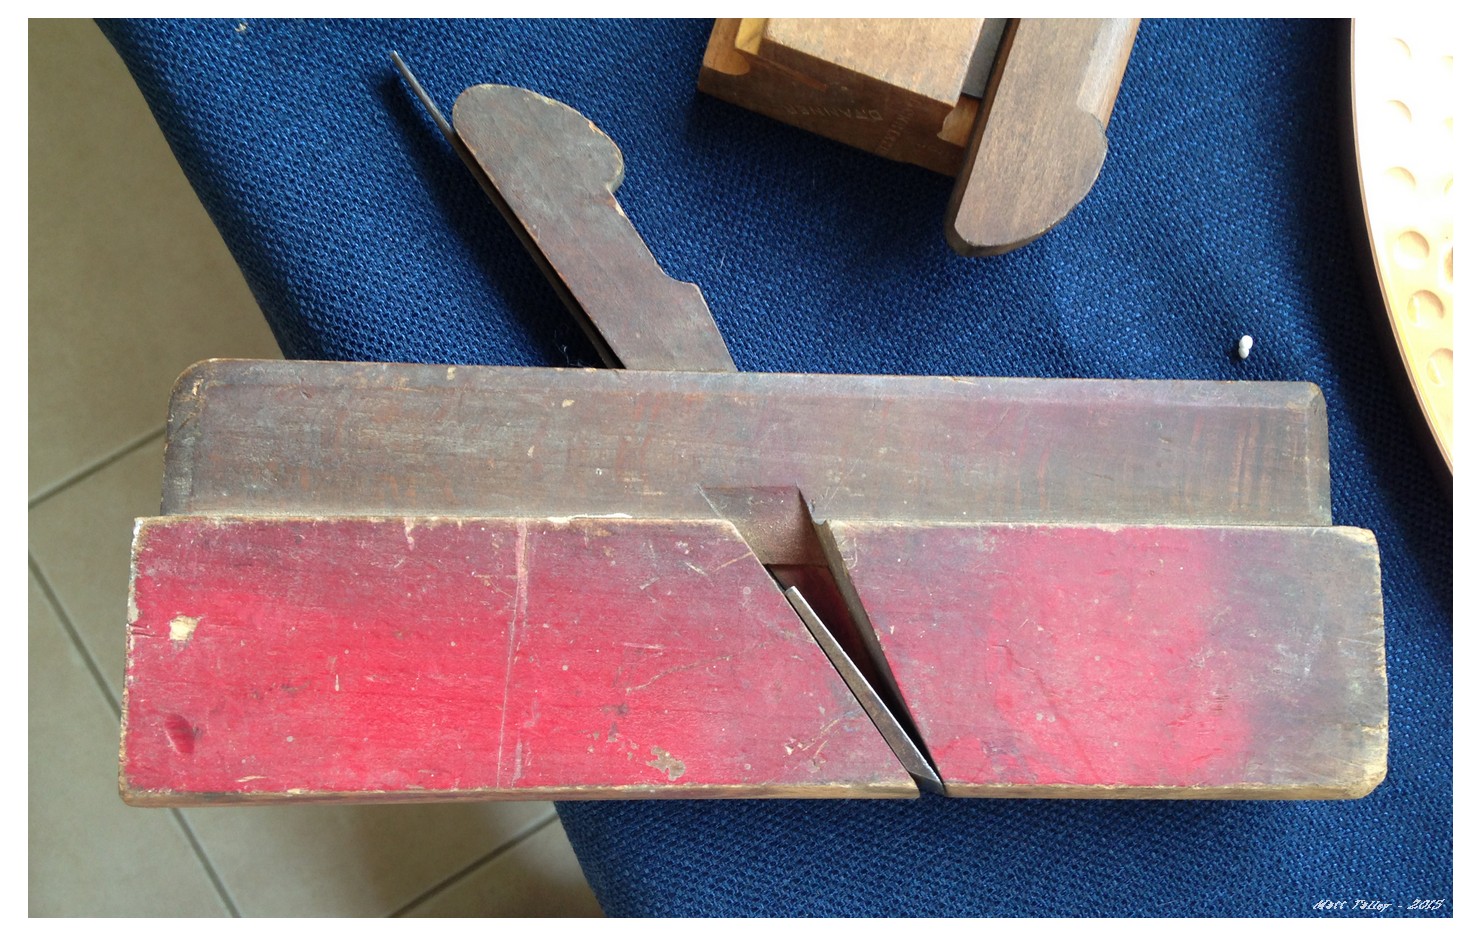
will need to replace two. Most of the plane bodies were fine, but the #12
was painted red and the #16 had a screw holding a crack in the body
together. I drilled it, filled with hide glue and inserted a beech dowel.
The #1 round’s wedge is cracked in half and has been glued back together
by a previous owner. I am going to have to make a copy of it and replace.
When I unwrapped the #9 there was wood worm in the packaging. Not just old
holes, but a live worm in the plastic. There was damage to the plane and
the wedge. I took the whole lot to our local vet and had her x-ray the box
4 times. It is a Luthier’s trick and it kills any worm/moth larva.
Take a look at the attached pictures and let me know what you think and if
you think it is fair to refund me a little of the purchase price and
shipping.
Thanks,
Matt

On 23 February 2015 at 15:51, drivenoutside wrote:
Hi _____,
The ship to address is: __________
My phone number is: ___________
Please send me the tracking number so that if there is a problem with the
shipper or customs, I can call right away
Thank you again,
Matt
——– Original message ——–
From: UK Tool Guy
Date:02/22/2015 2:30 PM (GMT+02:00)
To: Driven Outside
Cc:
Subject: Re: Tool Order
Hi Matt
Just written out your invoice for the tools ordered. The grand total
including postage comes to £metric shit-ton. An invoice / receipt will be included with the tools. I’m in the shop today until 4:30pm if you want to ring with card details for payment.
MANY THANKS
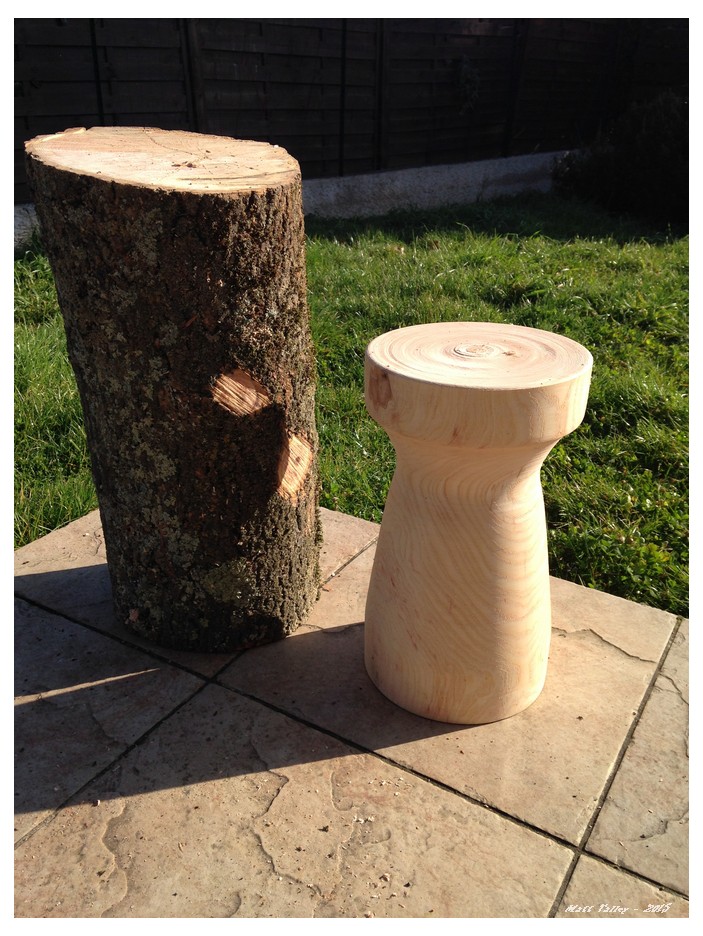
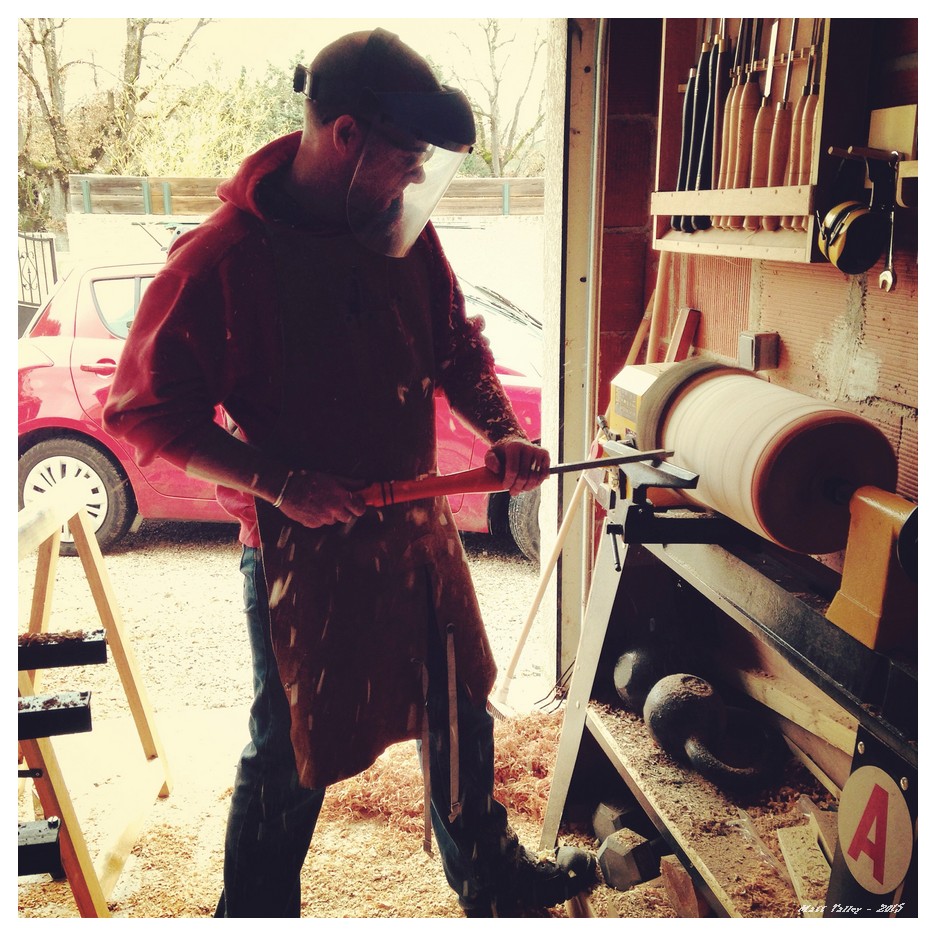
New stools from an oak tree
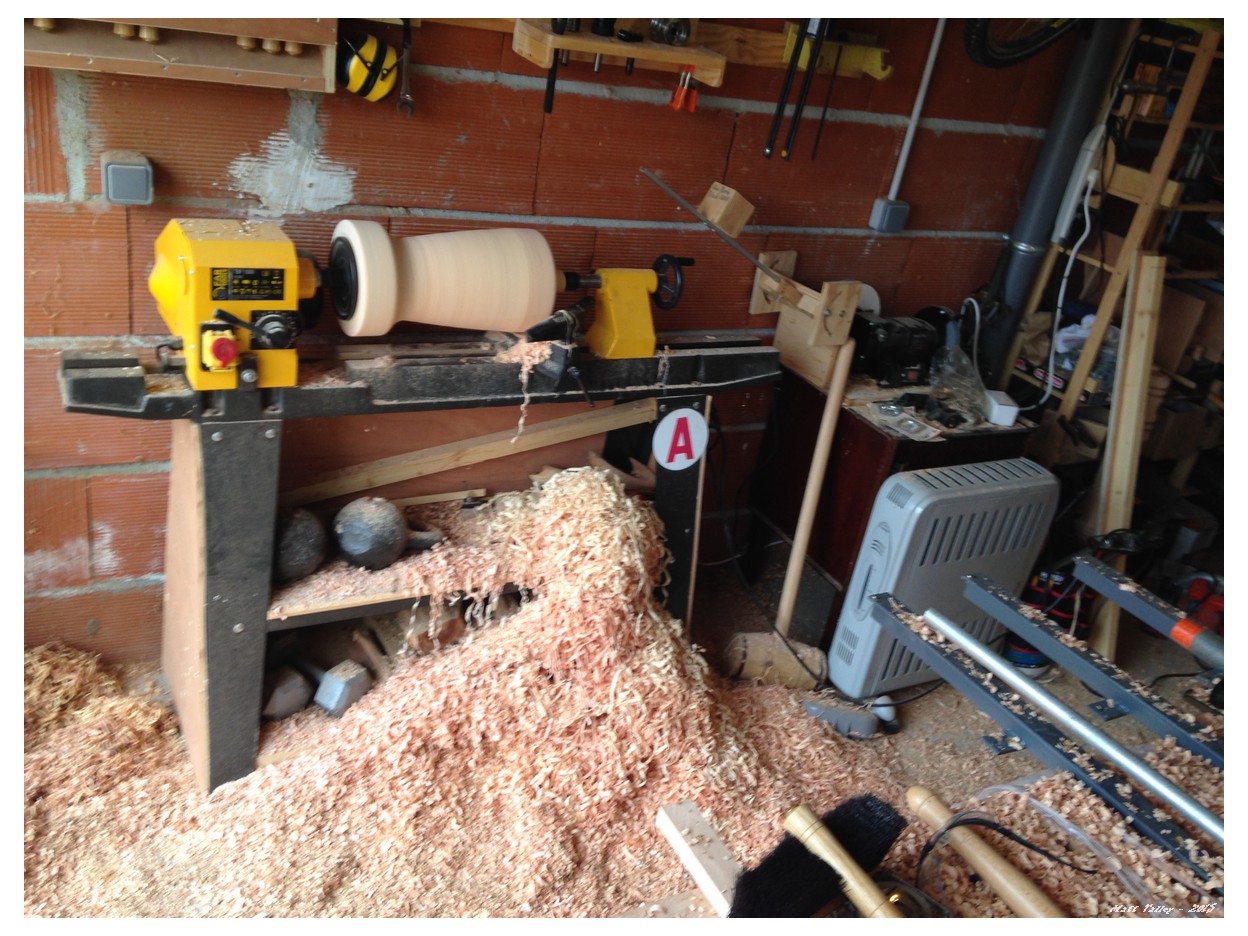
This weekend I finished up a “little” lathe project I started in early February – I made a couple of stools out of a hunk of oak tree that was cut after a storm in our village. They are about 15.5″ (39cm) tall and 10″ (26cm) around and getting it that way pushed my Chinese lathe to its absolute max. It walked all over the floor when I first started it up – hence the kettle bells thrown on the middle shelf to add mass. It super did not like the out of balance logs. It would have been fine at a slower speed, but the slowest my lathe goes is 400 RPM and that is too fast for this size project. I managed, but there was lots of starting and stopping.
I really like both how the turned out and how comfy they are to sit on – just the right height for a quick stop-and-rest. I will add bow-tie joint if needed as they dry out and split, maybe out of some walnut that I have. They will make a nice addition to my home office.

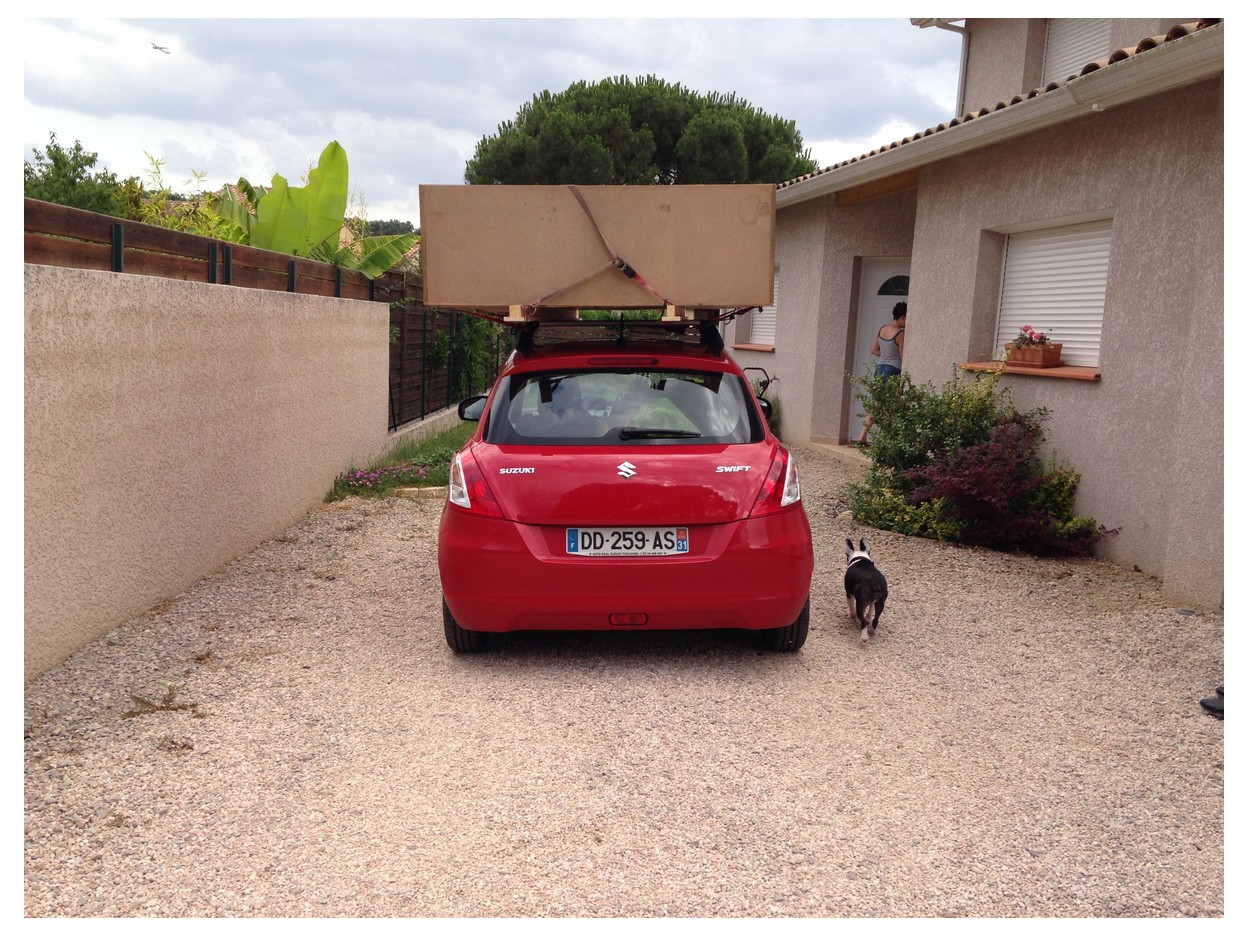
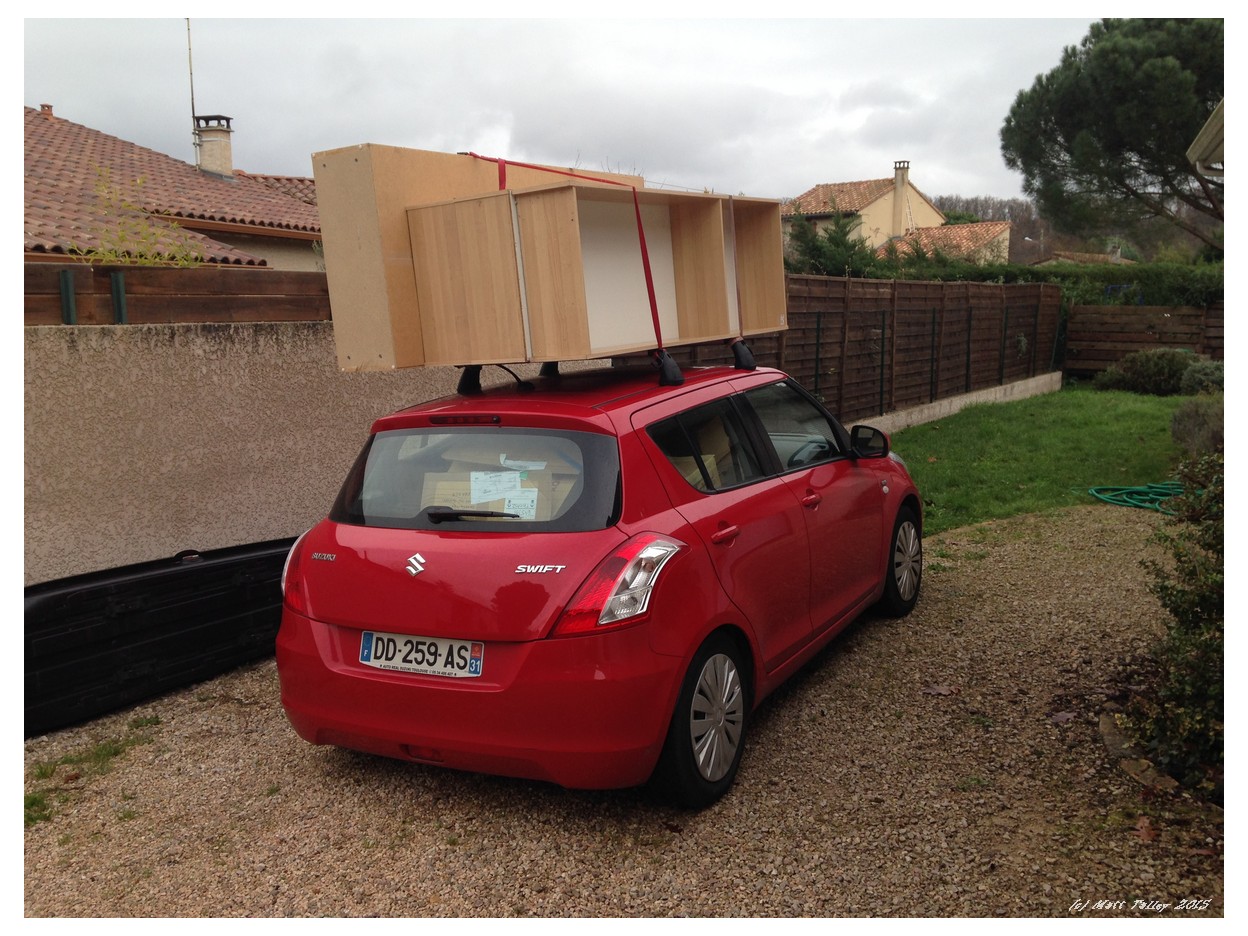
No Truck Required
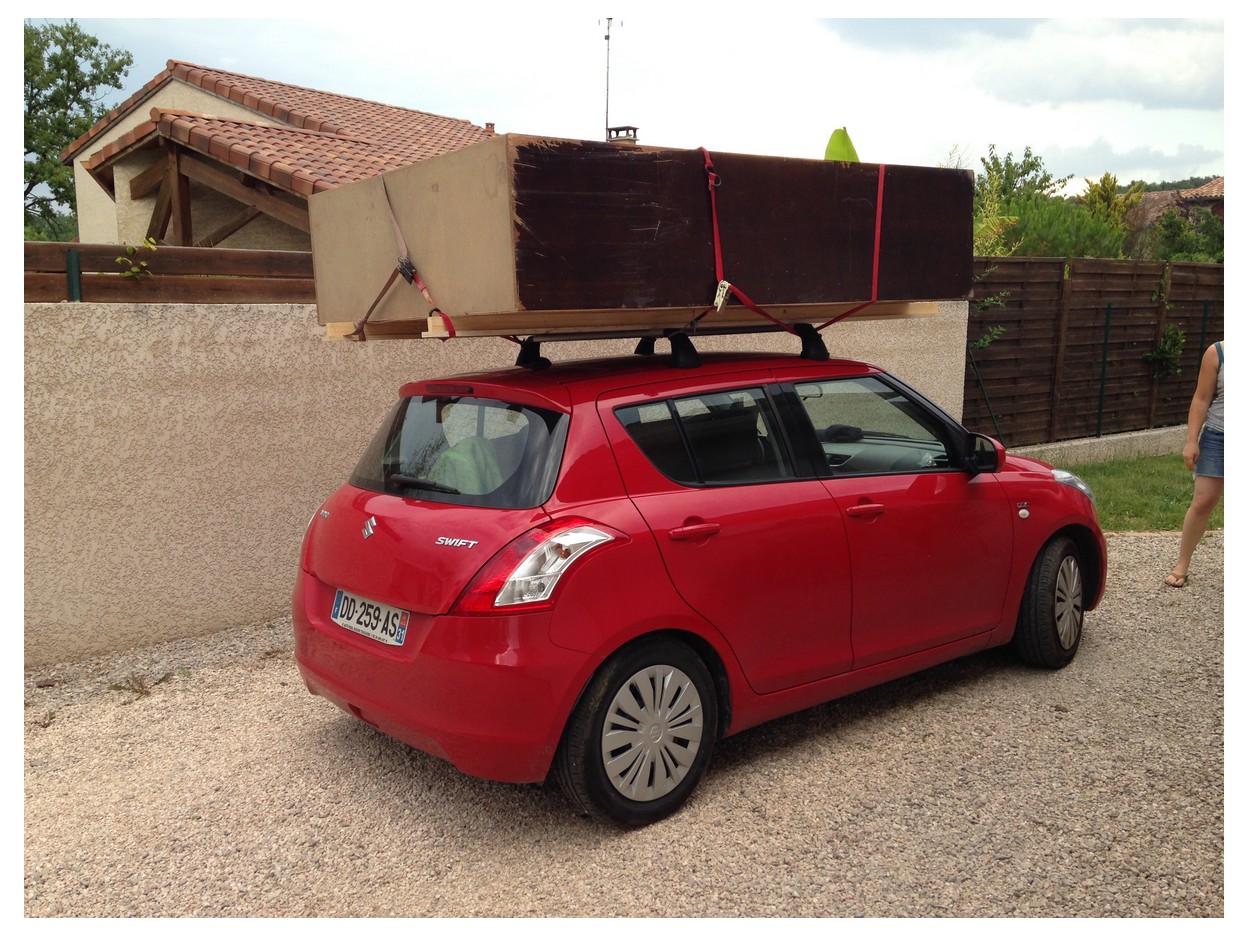
When we left Seattle for Southern France, I sold my truck and it felt like I lost a hand. I toyed with the idea of bringing mine over, but it would have been impossible to park and the money that I would have had to spend for gas would have been astronomical. My very first vehicle was a truck and I have never not had a truck to drive. There have been other vehicles, but I have always had a pick-up.
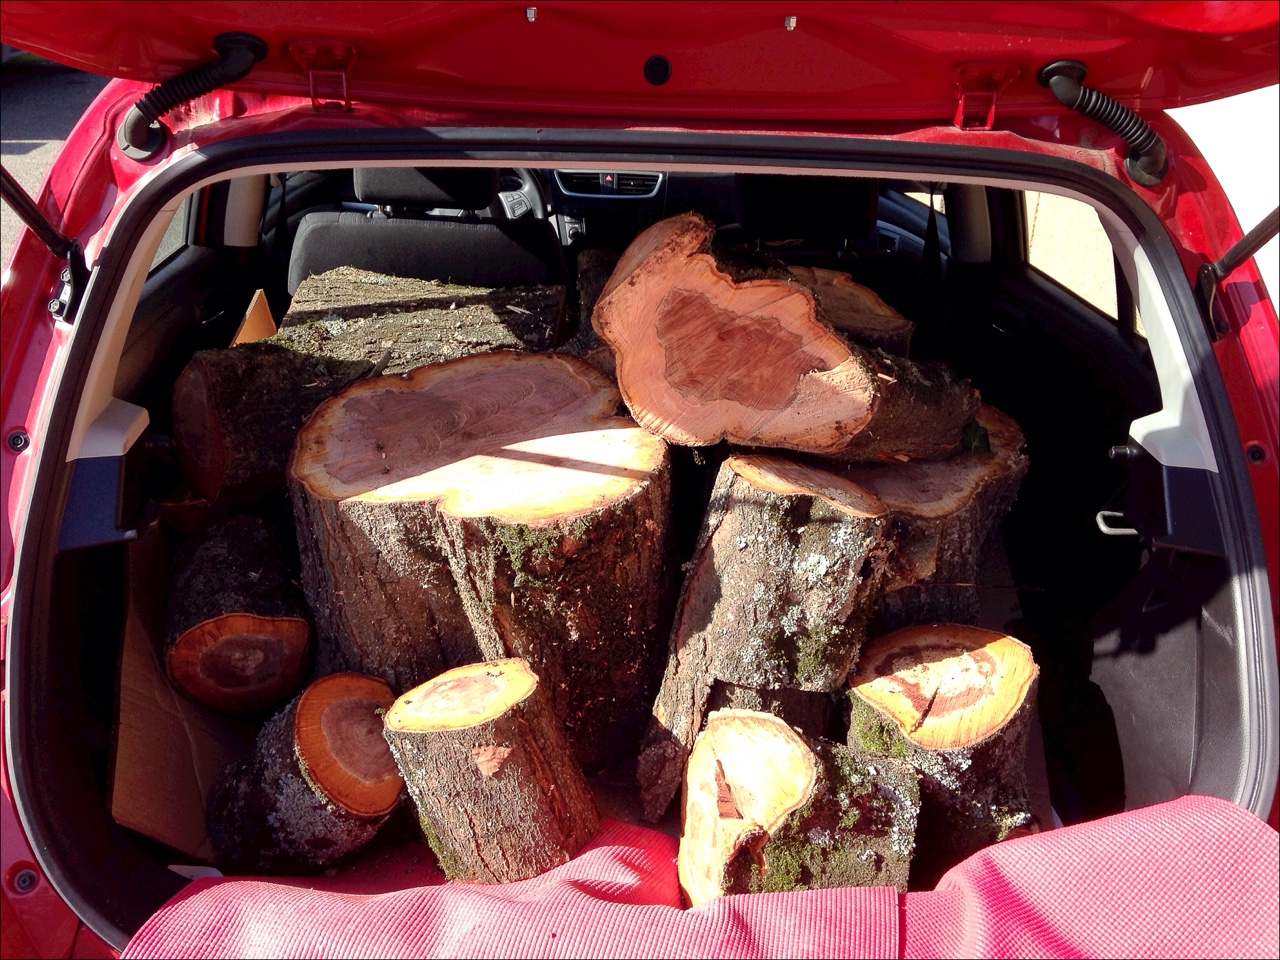
I didn’t really plan to do much heavy hauling during our time in Toulouse, so we got a 5-door diesel Suzuki Swift and I added a roof rack – just in case I needed to road trip with a bike or grab the odd 2X4 at the lumber yard… Reality is often brighter and more interesting than the initial plan. We have abused our little Suzuki. I have treated it like a farm hauler and overloaded it again and again. The rack has a 100 pound weight limit, yeah about that… In my own experience, 250 pounds has ridden just fine. I still miss my truck, but we are making due.
All the things I have hauled in or on the car that have been questionable:
400 pound wood lathe
The cut rounds from 4 trees (to date)
A 200 pound 7′ X 6′ x 2′ Wardrobe
3 large work benches
9 bookshelves
~1500 books in boxes
10+ sheets of plywood
Enough lumber to build a garden shed
2 beds
9 rolled carpets
A buffet hutch
A garden table, 2 side tables, 8 chairs, and a umbrella
250 pounds of gravel for lathe ballast
A huge antique armoire
300 pounds of wet lumber
A Canoe that was wider than the roof
5 people and all their crap


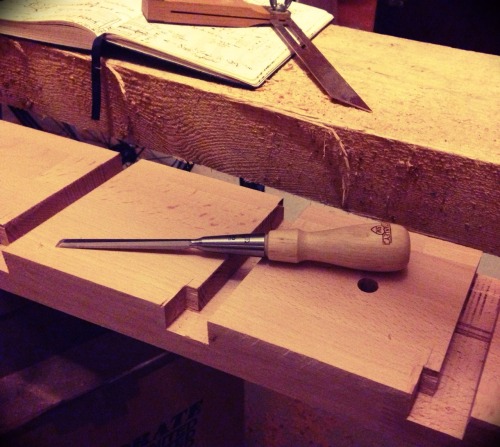
Workbench Progress
Progress on the Cornebarrieu Bench is coming along. It has been slow going – I have been swamped with work, travel, lack of allowance (I spent it on Christmas and a classic fiddle/violin…), more work, etc…
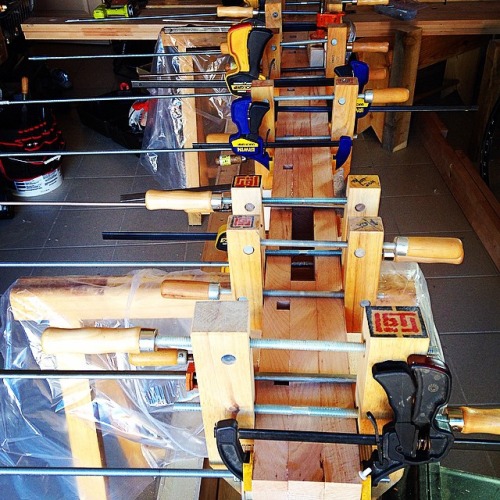
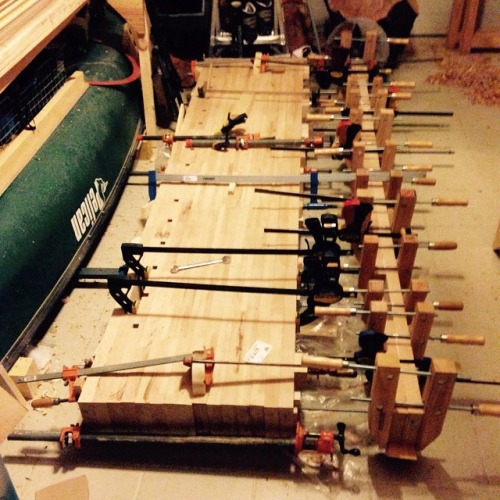
Stamps-With-Foot gave me a gift card for our local Home Center/hardware big-box as a Christmas present that took care of the price for the last section of the top. I got a lot accomplished this last two weeks:
- The final sections of the top were glued up just before New Years eve- using every single clamp I brought to France and more than a little ingenuity.
- Installed (2 hours of cutting, drilling and chiseling) a pricey German-made cast iron end vice that I got on 65% sale – was missing two small metric bolts and the wood handle.
- Made final leg cuts: the tenons that go inside the bench top.
- Put 5/16 oak dowels in to the pieces that have cracked, even a little, to make sure that the cracks do not spread.
- Gave all the base parts an 80 grit sanding.
- Really like the sawmill marks on some of the pieces. Am going to put clear poly on the base instead of milk paint to preserve the marks.
- The legs and stretchers shrunk and warped just a touch in the six months since I cut them even though I had it all clamped together. It will be fine and could have been worse.
- Made the first dry-fit of the base to the top: Everything lined up , fit perfectly, and is as square as I could ask for.
- Drilled holes for connector bolts and lag screws.
- Installed base shelf cleats
- Cut the 12 sections of 5/8″ tongue & groove pine that will be the base shelf

Before I head to the US in a couple of weeks, I hope to have installed the end-vise block, given the base a 120 grit sanding, polyurethane the base &shelf, cut the hole for the leg vise screw and the rectangle cut for the vices’ parallel guide. I also want to install the leg vise nut in a pocket behind the leg while the bench is upside down.
Free Wood is the Best Wood!
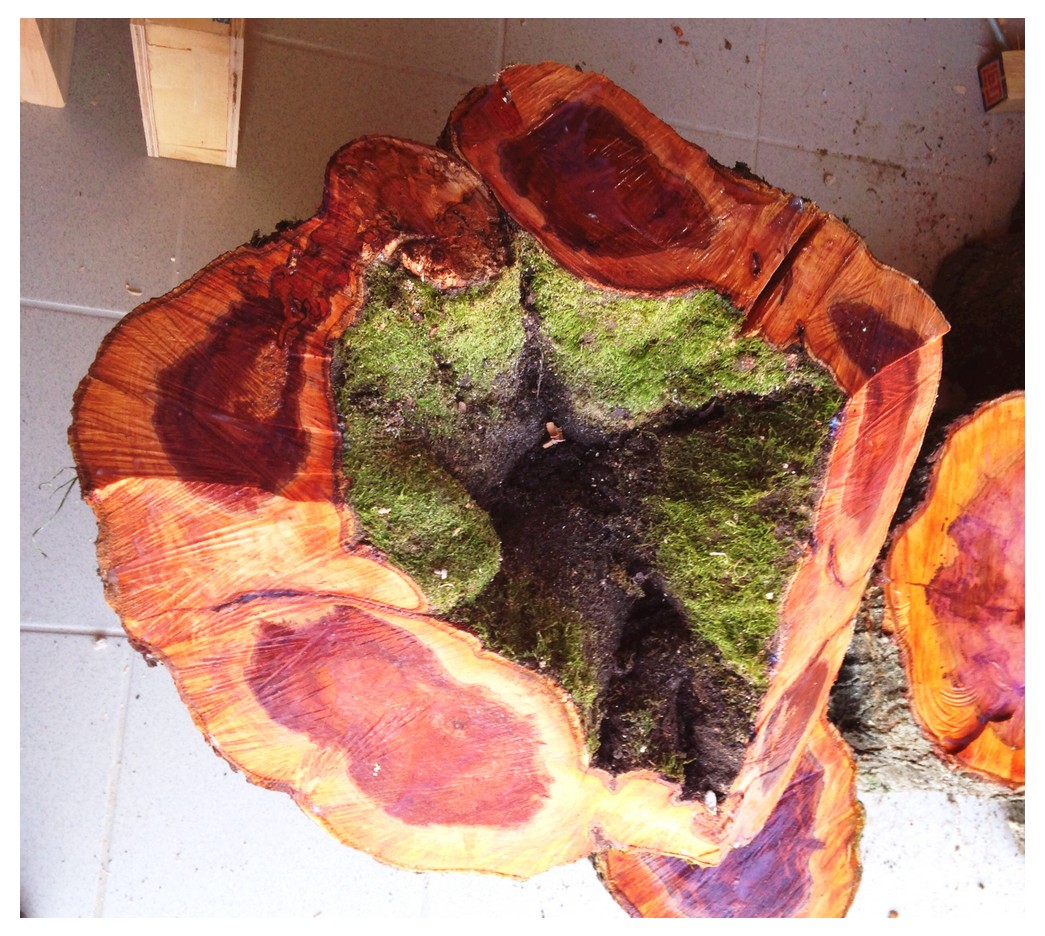
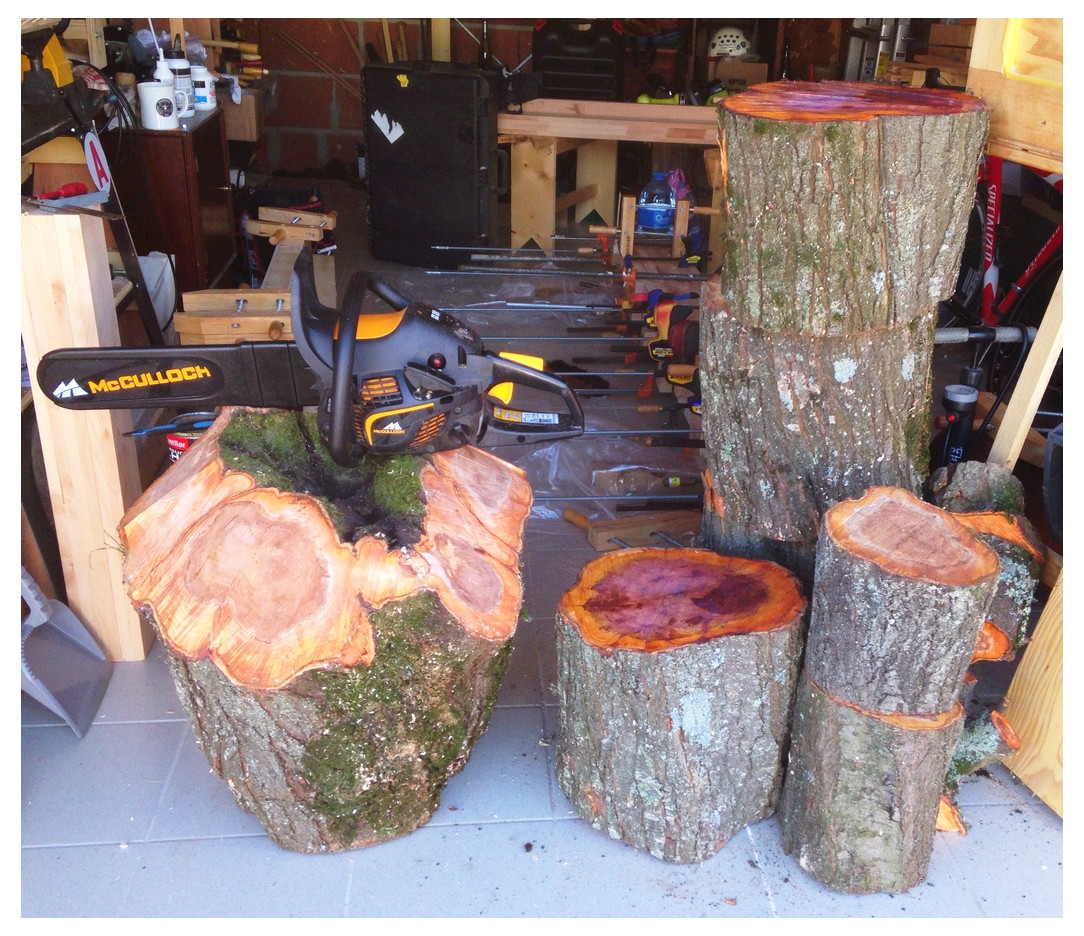
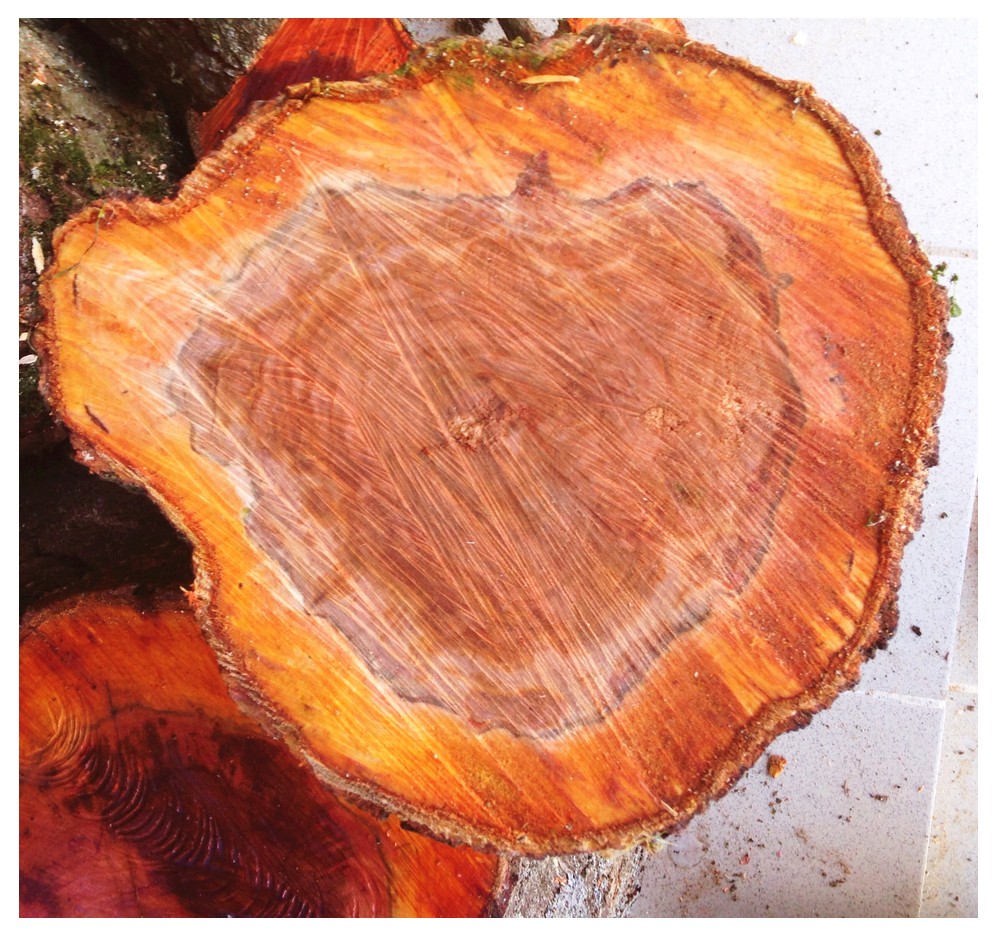
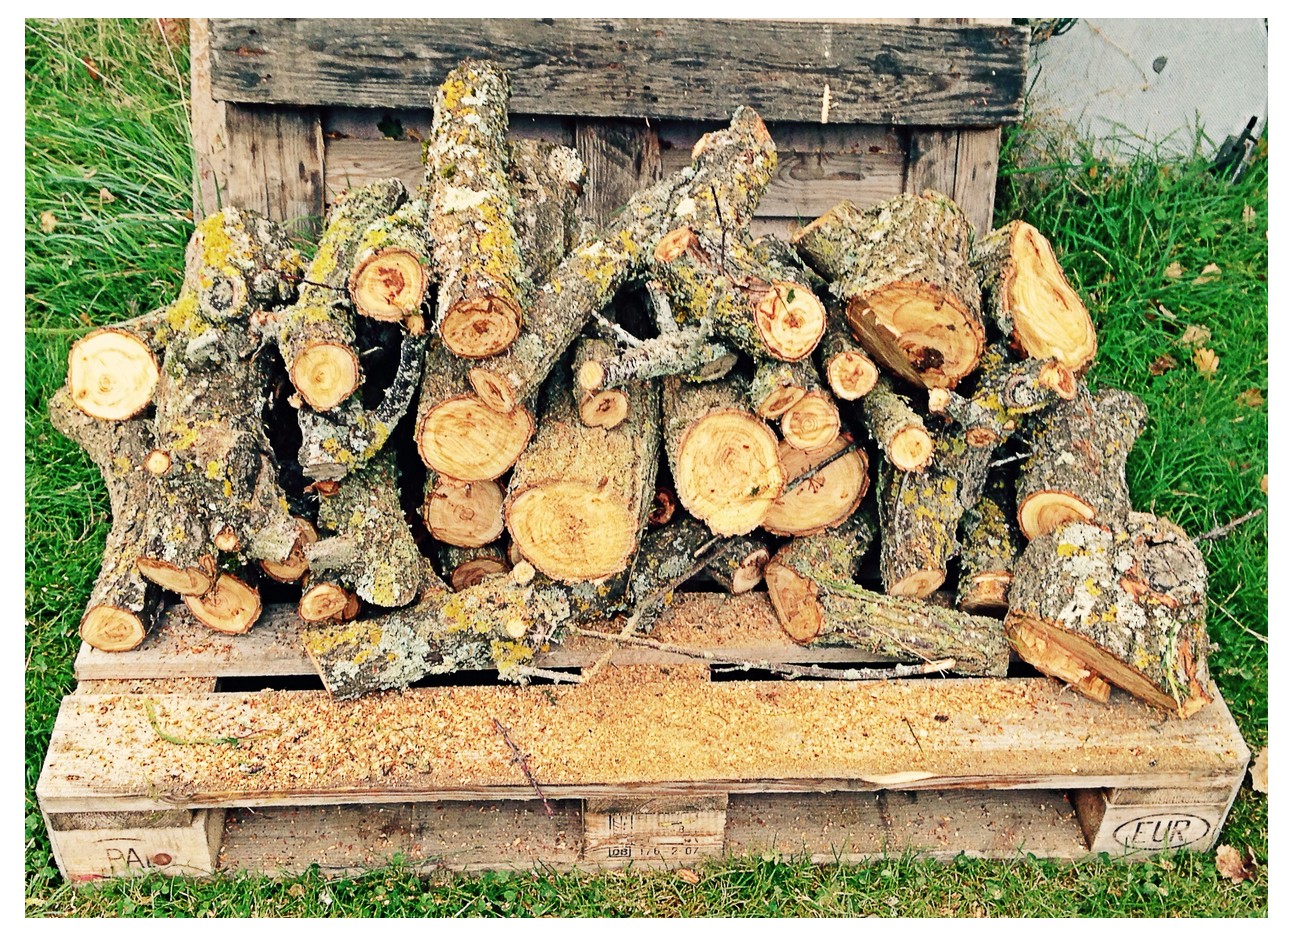
Prospects for Fall wood-turning are looking up! I am 98% done with the Chinese lathe build-up into a proper tool. I am waiting on the arrival (had to resort amazon.uk.co as there are not turning shops in a 100 mile radius?!) of two huge bowl gouges and I will be set up to make shavings all winter. I was also given a free electric oil-filled heater for the garage, which should keep things toasty! On the raw material front: I am taking an old apricot tree out of a small orchard for some friends a few villages away tomorrow (National Holiday) and I am really excited to turn some bowls and jar tops out of it. A few weeks ago, I mentioned the project to a friend of my wife’s and a couple of hours later she called and said that her husband was cutting an old ornamental cherry down and would I like the wood? Like the Pope wants Jesus, I did!! I went over with the chainsaw and helped him take it down and to cut a few larger limbs and the trunk into sections. Some of the images below are what it looked like inside the tree just after my chainsaw went through. We were stunned. Not just the center was beautiful – a fire purple, but there are bright reds and oranges in the outer wood as well. The tree had over 70 rings and grew next to a couple of big cedars so the rings are real tight and as I had to sharpen my chain twice during the cutting, the wood is VERY hard and dense.
It took two loads in the car to get it all home. I sealed the ends right away and stacked everything in the GROP near the lathe. They had cut a plum down earlier this week and I scored two 12” rounds from that as well – the ones with the flame purple center in the pictures below. I told the couple that I would make them a vessel or large bowl out of a hunk of the tree in trade for the lumber.
Fast forward to this past Saturday: I rough turned 6 bowls (one not pictured) in about 2.5 hours from the large limbs. The trunk sections will be cut into starting next weekend. I will let the small pieces dry for 4-6 months and then finish turning them. The larger bowls from the trunk will take a year to dry.
Am feeling reasonably optimistic about upcoming projects ![]()


Update 11-9-14:
Well, the apricot tree wood harvesting didn’t quite go as planned. I had chainsaw issues right away – needed to tear it down before the first cut and unclog the chain oil hole. Holy crap the wood was hard. It had 65+ growth rings that were stacked in tight. It was slow going with a couple stops to sharpen my chain. The clincher though was that there were two twisting veins of rot that went from crown to root ball with lots of bug damage spidering out from the rot as well. Dammit! There was was maybe 12” of trunk that I can spin a bowl out of. Per my agreement with the owner, I cut up the other trunk & big limb sections to a length that will fit in a fireplace and stacked it up for them. You win some you lose some. If not for this tree I wouldn’t have the amazing wood from the ornamental cherry and plum tree and maybe karma will smile on me the next time I lug my saw into a field.


Making Little Stuff Around the House
I have been remiss in posting for the last couple of weeks – my J-O-B has been sort of nuts and I have been trying to stay on top of things and stay employed 🙂 I have been putting around in the shop here and there at night before and after dinner though. Recently I have completed:
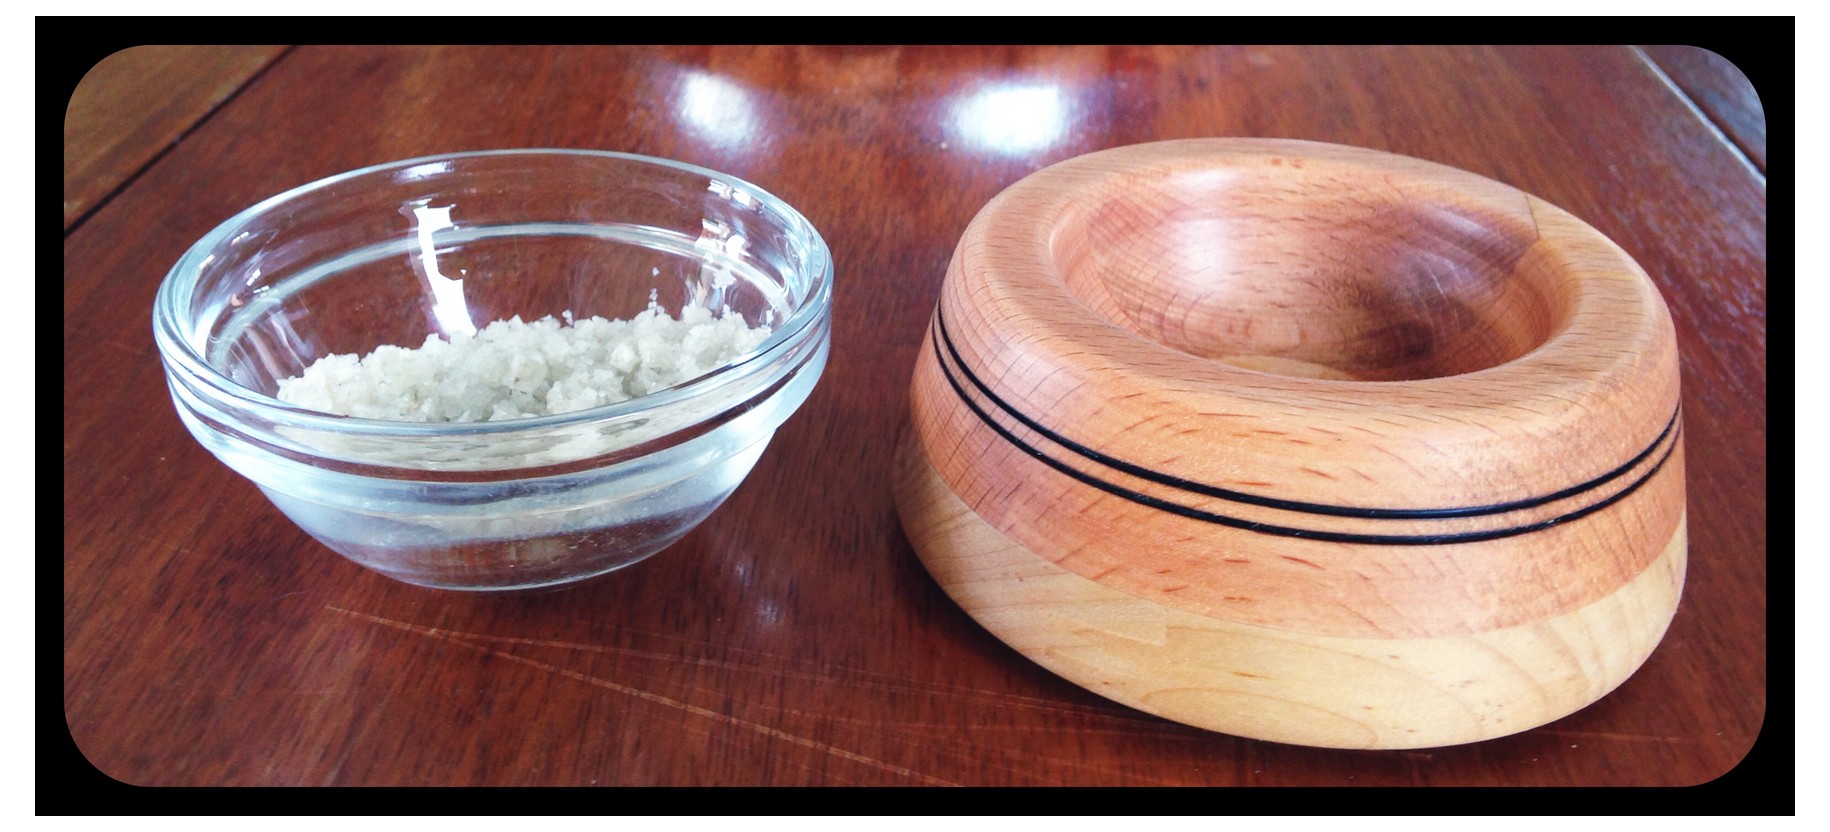
- A salt cellar for my wife made from scrap red and white oak because I was tired of seeing the IKEA glass dish on the table.
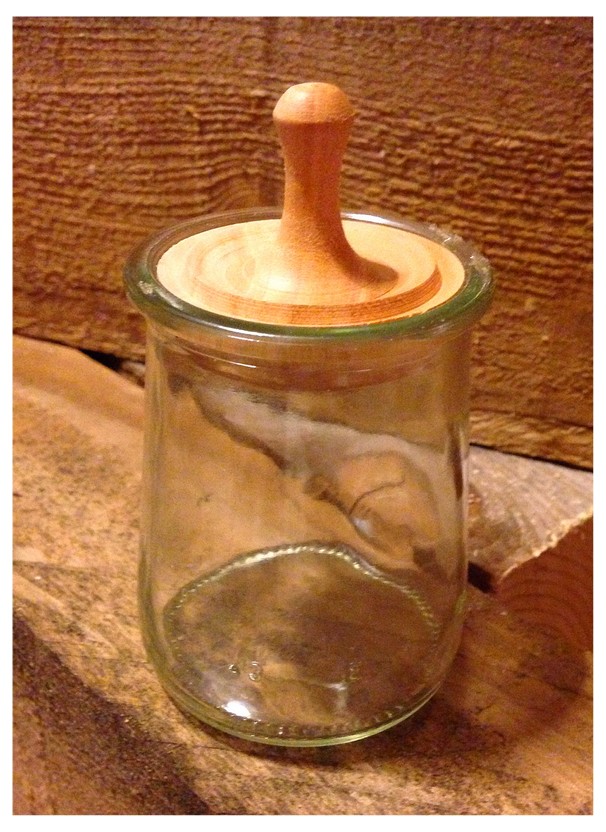
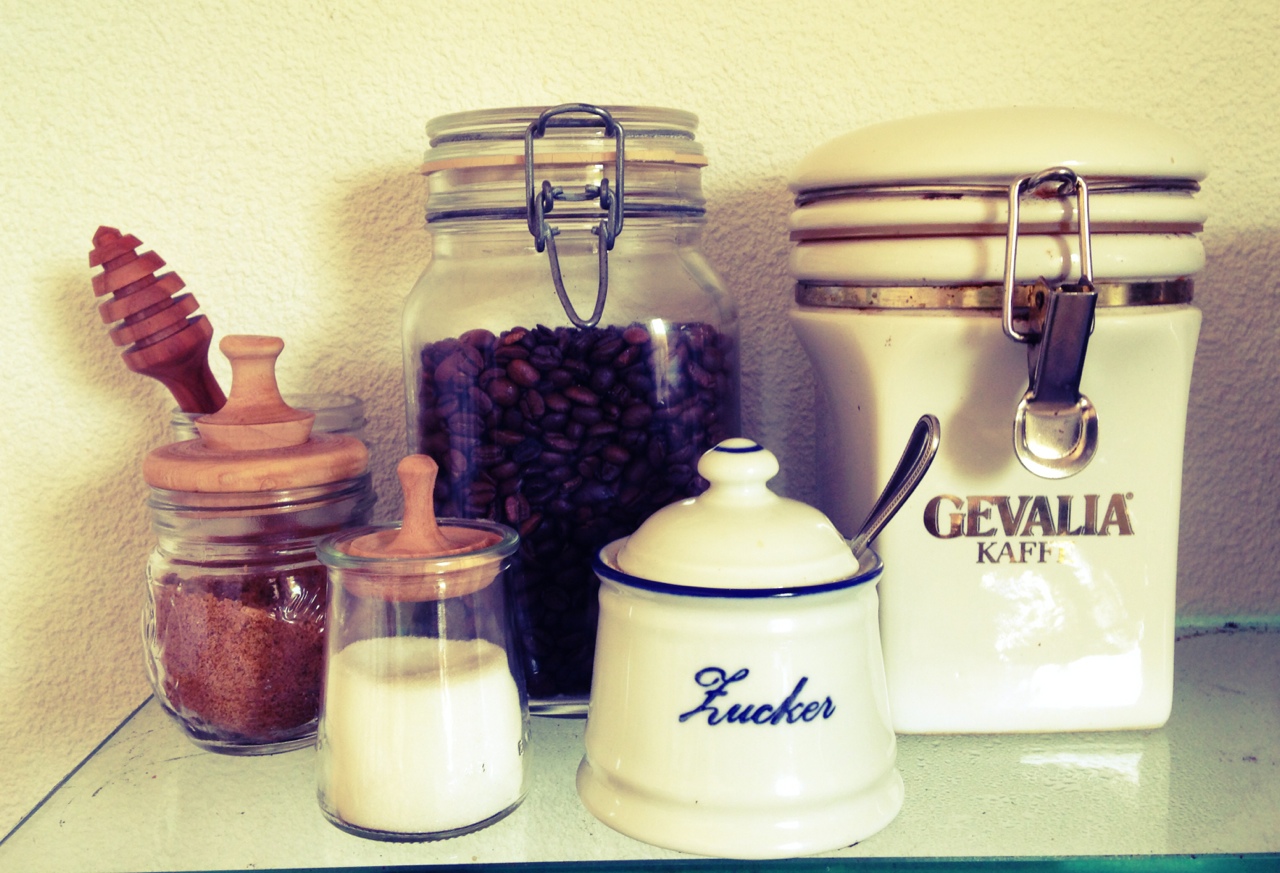
- A jar lid or two for the kitchen.
- There have been a couple of honey dippers for turned gifts.
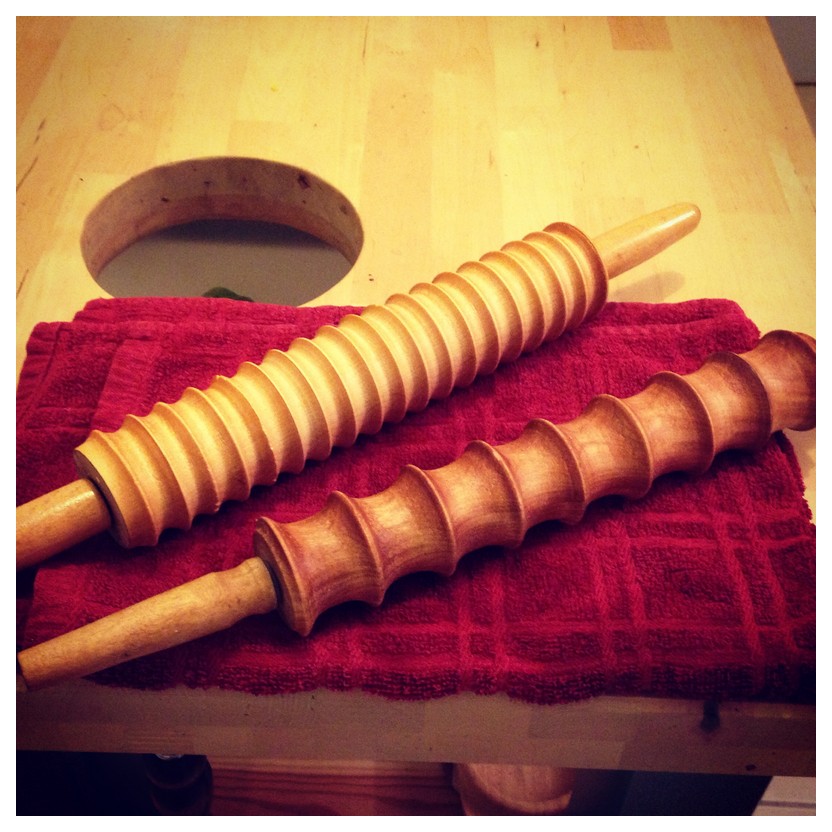
- Specifically for my wife, I made rolling pins for fettuccine and ravioli pasta (or pie crust if my sweet bride happened to want to bake me a lattice top apple pie…) We had a friend who is a food blogger come over that LOVED them and I think that I am going to do one or two for her as well.
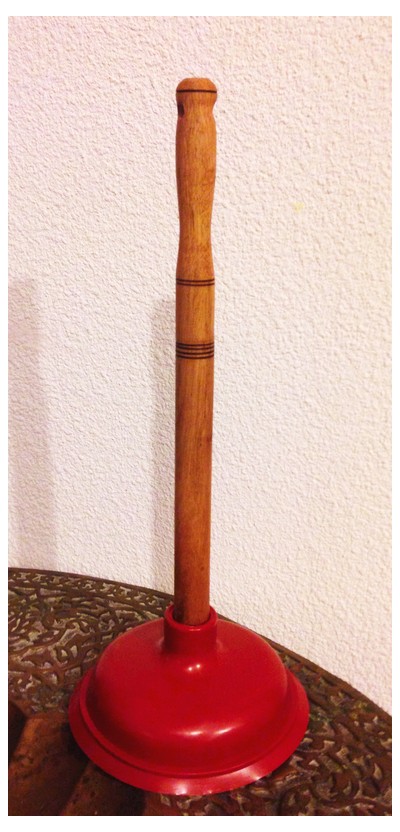
- I added some wood-bling to a plunger handle – Why have mass-produced stuff sitting around like everyone else when 8 minutes of lathe time and a little oil/wax turns the mundane into the custom.
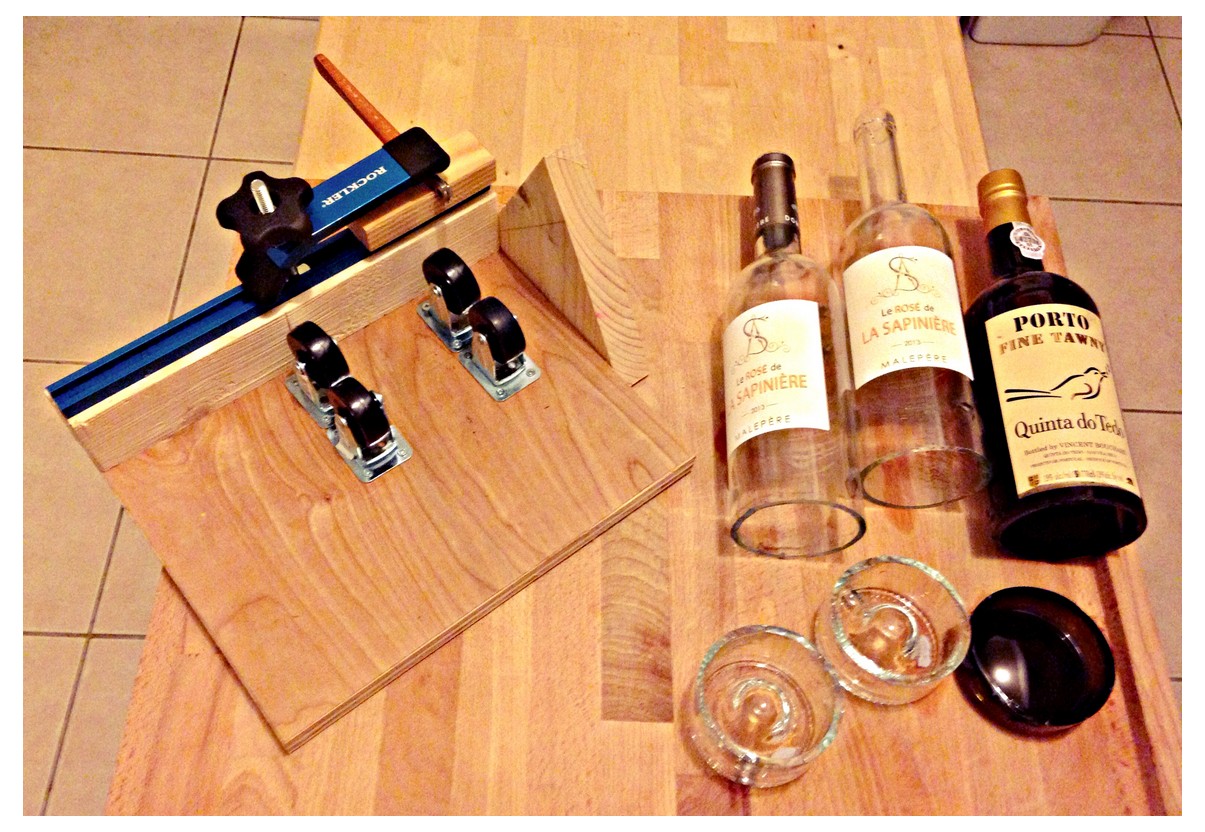
- A glass bottle cutter so I can take the pile of bottles we generate and make candle covers, tumblers, and glass funnels for my wife and for Christmas gifts. It was a non-specific request from her that has won me brownie-points.
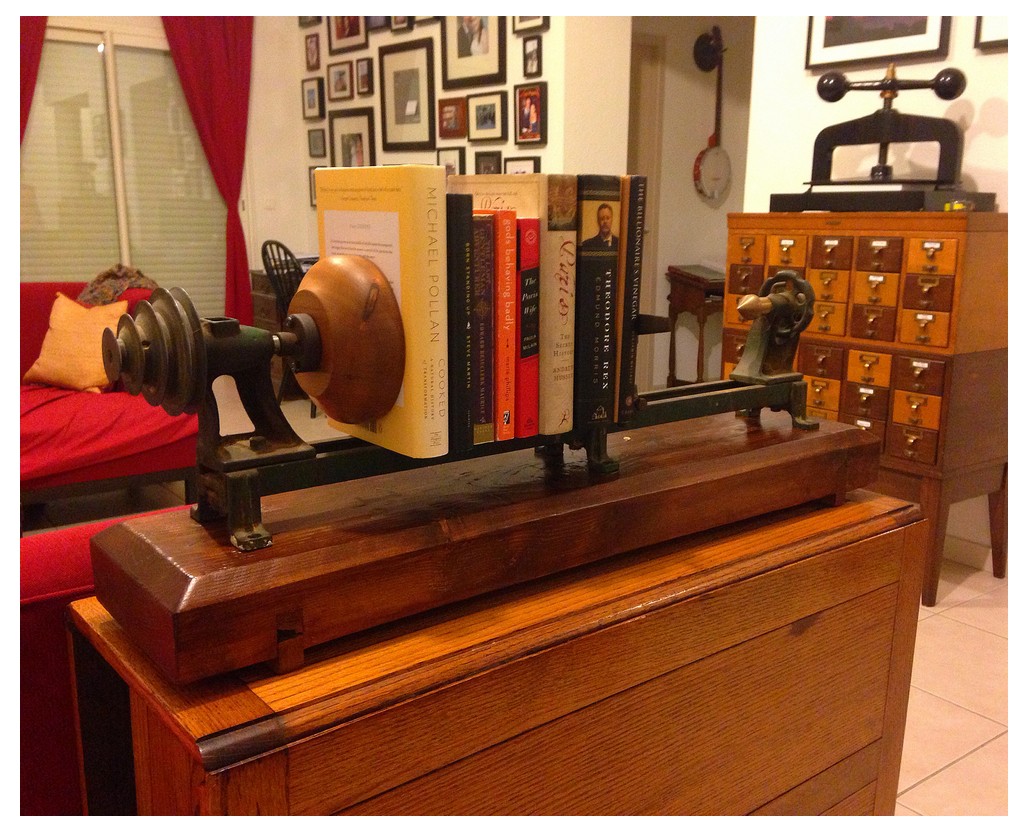
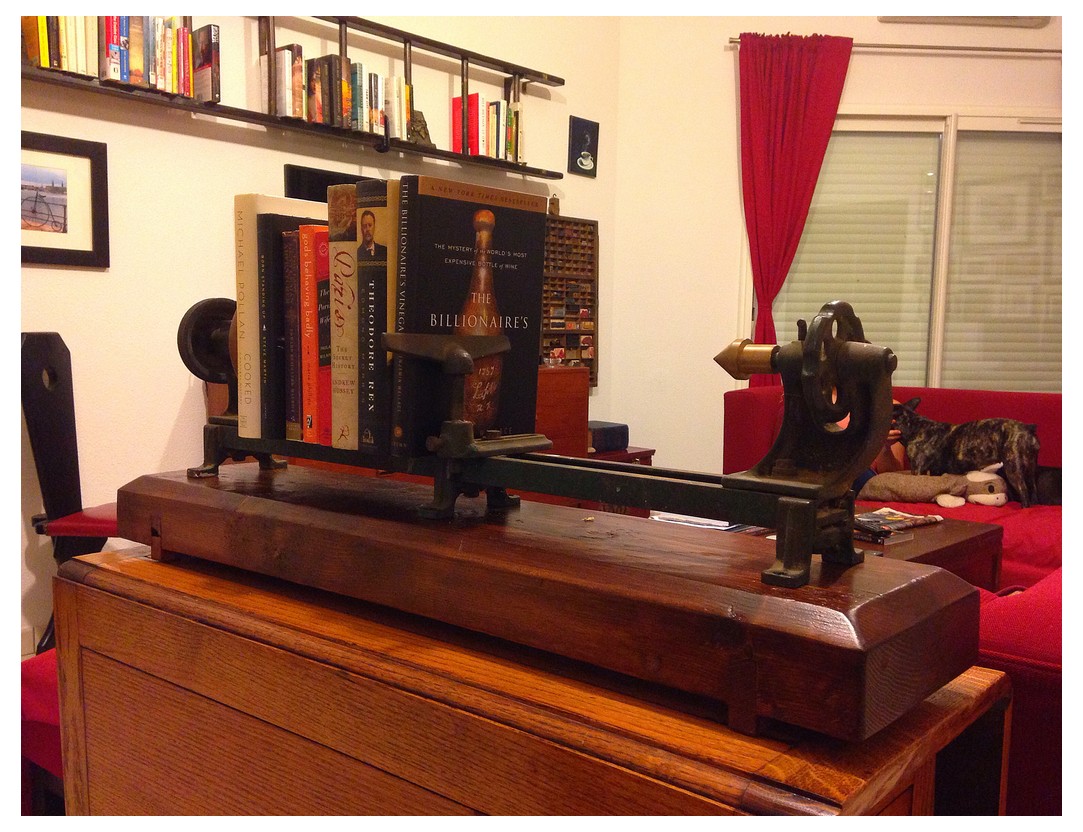
- A book shelf made from a small 1931 cast-iron lathe and a hunk of reclaimed barn/house beam from here in France. I cleaned both the beam and lathe up a little, added a little stain to the wood, light sanding, and a coat of poly. I mortised in a couple of reclaimed oak runners to serve as feet and the keep the ends of the beam from splitting. The lathe was then bolted down and I added one of my bowls to give the books a proper purchase. The tool rest is turned and mounted on the other side to keep the books upright. I think it looks awesome and everyone who have come over in the last month has either asked where I got it of how I thought of it. Make my ego swell a bit….

Reusing/remaking old tools
I love me some old tools. I love looking at them, touching their surfaces, using them… Most of my hand planes, some of my chisels, and all of my molding planes are older them my grandfather. I will push people down in a junk/antique shoppe to get to a wooden plane or socket chisel peeping out from behind a Paint-By-Numbers masterpiece.
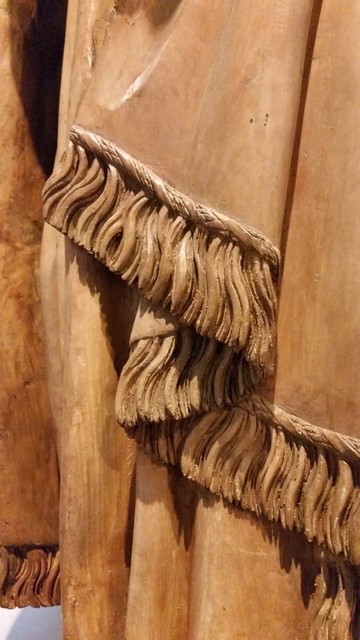
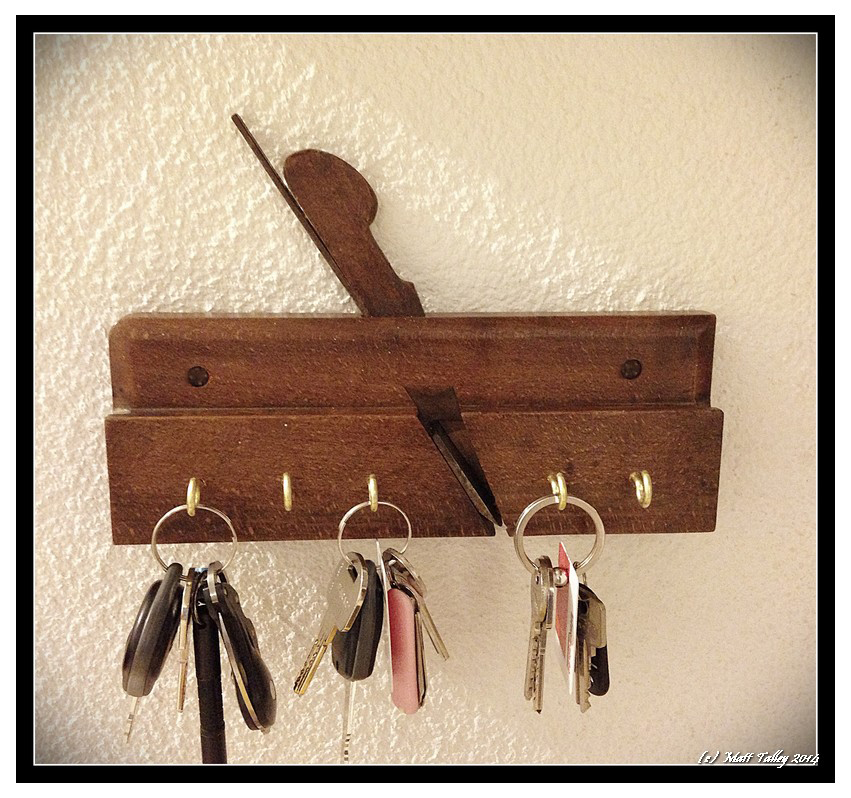
Occasionally, I find a beautiful tool that is beyond repair and cannot be brought back to life. I lament its loss. There have been a couple of pieces lately that I just couldn’t let go into the burn pile or let sit to languish as food for wood-worms. The molding plane pictured below was/is a 1860s-ish Gleave #8 round and was split and has warped at the split to the point that there was no bringing it back from the dead. So I cleaned it up, applied a little walnut oil, and added a VERY pitted iron to make a key holder for our living room. It subtly tells first-time visitors that a carpenter/Ébéniste lives here.
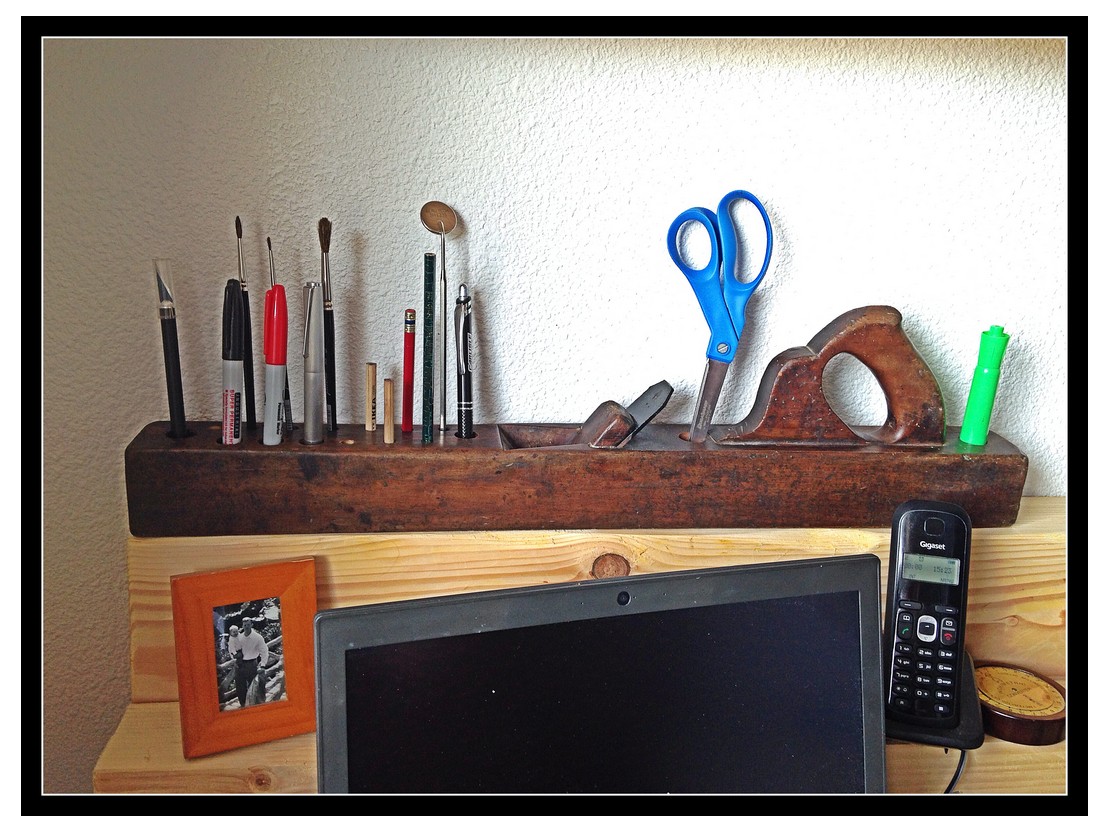
The 23″ walnut joiner plane, also below, was the property of a C. Wanger, and used just outside the village of Cornebarrieu, France. It bears the marks of his hand on the foreend and his thumb and index fingers have left deep indentions on the tote. It has been repaired a couple of times, the wedge has been cut off and worms got to it years ago. The poor thing is now held together with hope, spit, and a little epoxy. I loved the size and color, so I turned it into a desk organizer for my office.
Before you all start collecting scrap so you can roast me alive for desecrating beautiful tools, know that I rescued them from a fiery fate and have given these tools a useful and meaningful after-life.
Need a trash can lid? Make it on the Lathe
We have a Art Deco flower pot in the guest bathroom that is used as a trash can. is about 9″ high and 8″ in diameter, so it doesn’t hold a lot. However, our new puppy is VERY interested in the contents of that vessel. To stem any possible and eventual messes, I took some pine scrap, chucked it up in the lathe and made a heavy wooden lid. I stained and finished to match the pot. Simple fast jobs like this make it so I can buy new tools without my sweet wife flipping out.