Using My Dad’s Tools

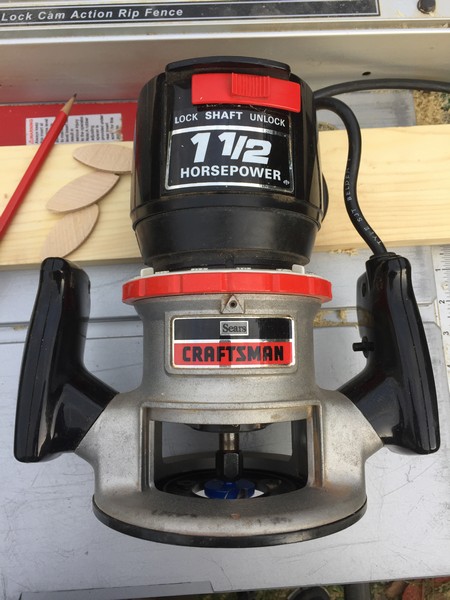
In 1982 or 1983 my dad made me a ball, bat, and glove rack for Christmas. I was super into baseball and it was cool to have your gear up on the wall ready and waiting for you to be able to grab it all and run out the door to a game at a moments notice. Getting the pocket for the ball cut correctly and rounding over all the edges and corners took him forever. He decided that he HAD to have a router and for that same Christmas, my mom bought him a Craftsman 1-1/2 HP, Model #315.17492 Double Insulated router. He was as happy as a puppy with a new bone and looked for stuff to round over, “ease the edge…” everywhere in our lives for months. He was so proud of that router and for years a wood project around the house wasn’t complete until it had been kissed by a 1/4′ shank bit, whirling at 25,000 RPM.

When my dad passed, I got all his tools and the router was part of the deal. I have used it for years and while it is a little funky to adjust and has a base that isn’t perfectly round, it still does a fine job of “easing the edge” on shelves and cabinets. For the most part I use a 1/2 or 3/4 round-over bit in it and use my trim router for 1/4 and 1/8 round overs. Technology has much improved since the early ’80s and I have other routers to do fancy stuff these days but, Daddy’s still gets used a good bit.

I few years ago I had a garage break-in and a bunch of tools were stolen. I lost a lot of Daddy’s wrenches, power tools, my grandfather’s chisels, all sorts of stuff, but the big funky router happened to be in the basement where I had left it sitting for weeks on a long undone project. I am thankful it didn’t end up in a pawnshop somewhere and I am still able to use it to do a little work and connect with my dad, all these years later, just by using the router that he so badly wanted. I used Daddy’s router today, while building a walk-in closet for my wife. I thought about my dad, his smile, his quiet manner, and his patient love for his small son.

Matt Talley_Dads router_2016_1

Rebuilding Daddy’s Bookcase

In 1969 or 1970, my father helped my grandfather build a rental house that my grandparents saw income from for the next 24 years. He came home at the end of the project with a truck bed full of spare/cut lumber and building supplies. Lumber was not wasted in our house. We didn’t go and buy a new 2X4 for a project… We rummaged through the cut-off bin or wood storage shelves for a piece that was the right size or that could be cut, planed, or trimmed to work – Wood was not wasted or thrown away in the Talley house! It is a lesson that I have taken to heart and most of the things I build for my own home are made, at least partially, out of used or recycled materials.

Anyway, Daddy took some of the lumber and built a set of bookshelves that in the next nine years held everything from encyclopedias to technical manuals. Four 12-inch shelves sat on a box base that my father stained and varnished with whatever color he had left over from the rental kitchen cabinet build. It sat in our living room and in the shop. In 1980 we moved back to Houston and somehow my aunt and uncle ended up with the shelves. They put them in their living room, knocked the bottom shelf back, drilled a hole for a cable and sat their 19″ TV on the base. It remained in their home until 2010, when my uncle passed away. My mother asked to have the shelf unit back and brought it to me when she moved to Seattle. It is the only object that I own that my father built with his own hands and I feel so very lucky and proud to have it.

I decided immediately give it an update to make it an everyday part of our home: add a little something here and there to update it and make it that much more useful. Plans are one thing and actually doing the work is quite another – it sat relegated in my overcrowded shop for almost a year before I finally got a chance to work on it. I put the knocked out shelf back, glued all the joints, added reinforcement and screws to hold it all together, and built a base with turned wooden bun feet for it to stand on. The original base box was 12″ X 30″ and I wanted to both maximize the space and add my own signature to the piece. I carefully cut an 8″ X 24″ opening in the front and added rails for a drawer. It was amazing working on the piece. I found my father’s 42 year old pencil marks, a divot from a hammer, saw marks, and I found part of a fingerprint from when it was stained – just on the inside of the bottom. Finding and touching these this tangible proof of my late father brought me more joy than I have words to describe.

I also added a face frame, edge trip, and crown mounding. The piece was sanded down with 120 grit, then all the holes and gaps were filled, sanded with 120 again and then with 220 grip. I then primed with two coats and finished it with 3 coats of white Benjamin Moore ultra-tough cabinet paint.

I think it turned out really nice and I think my dad would be really proud of the work that I did to it. I am taking the original brass corner trim and a piece of original shelving and turning it into a picture frame to hold my favorite picture of my father. I think that he would approve of that as well…

Sawdust and paint fumes

It has been roughly eight months since my shop was robbed.  It is just now that I have found the will and desire to start building furniture again.  I have let projects and repairs pile up and let my garage shop digress into a sawdust filled junk-room.  There have been parts for Adirondack lawn chairs in my basement and shop since December.  I finally got around to gluing them up and screwing the pieces together when my son was here this summer.   That little project led me to start cleaning the shop and find all the stuff that has been waiting on me.  I dabbled with a couple of boxes, then started making pieces and organizing tools and supplies to tackle the larger stuff.  Below is a list of current projects that are in work:

  1. Painting the Adirondack chairs
  2. Re-build of my father’s 1971 bookshelves
  3. Kitchen cabinet doors
  4. Misc. Lathe tasks
  5. Kitchen cabinet pullouts
  6. Camp Kitchen box build and paint
  7. Campaign furniture for luxury car camping
  8. Hall mirror
  9. Copy of a 12th Century Abby oak door
  10. Fireplace surround and mantle
  11. New Kitchen cabinet pulls and knobs
  12. Garden tool shed
  13. Christmas gifts
  14. Garden table

The above are started and in-work.  I have plans to also build the below items soon:

  1. Small basement work bench (reloading and winter projects)
  2. Rebuild bookcase in master bedroom
  3. Murphy bed for my home office
  4. Box ceiling for master bedroom
  5. Home office bookshelves
  6. Chicken coop
  7. Ornamental planter box
  8. Cookbook shelf in kitchen
  9. Rebuild my standing desk
  10. Basement stairs rebuild