My Wife’s Prized Chandelier Almost Made Me Poop Myself

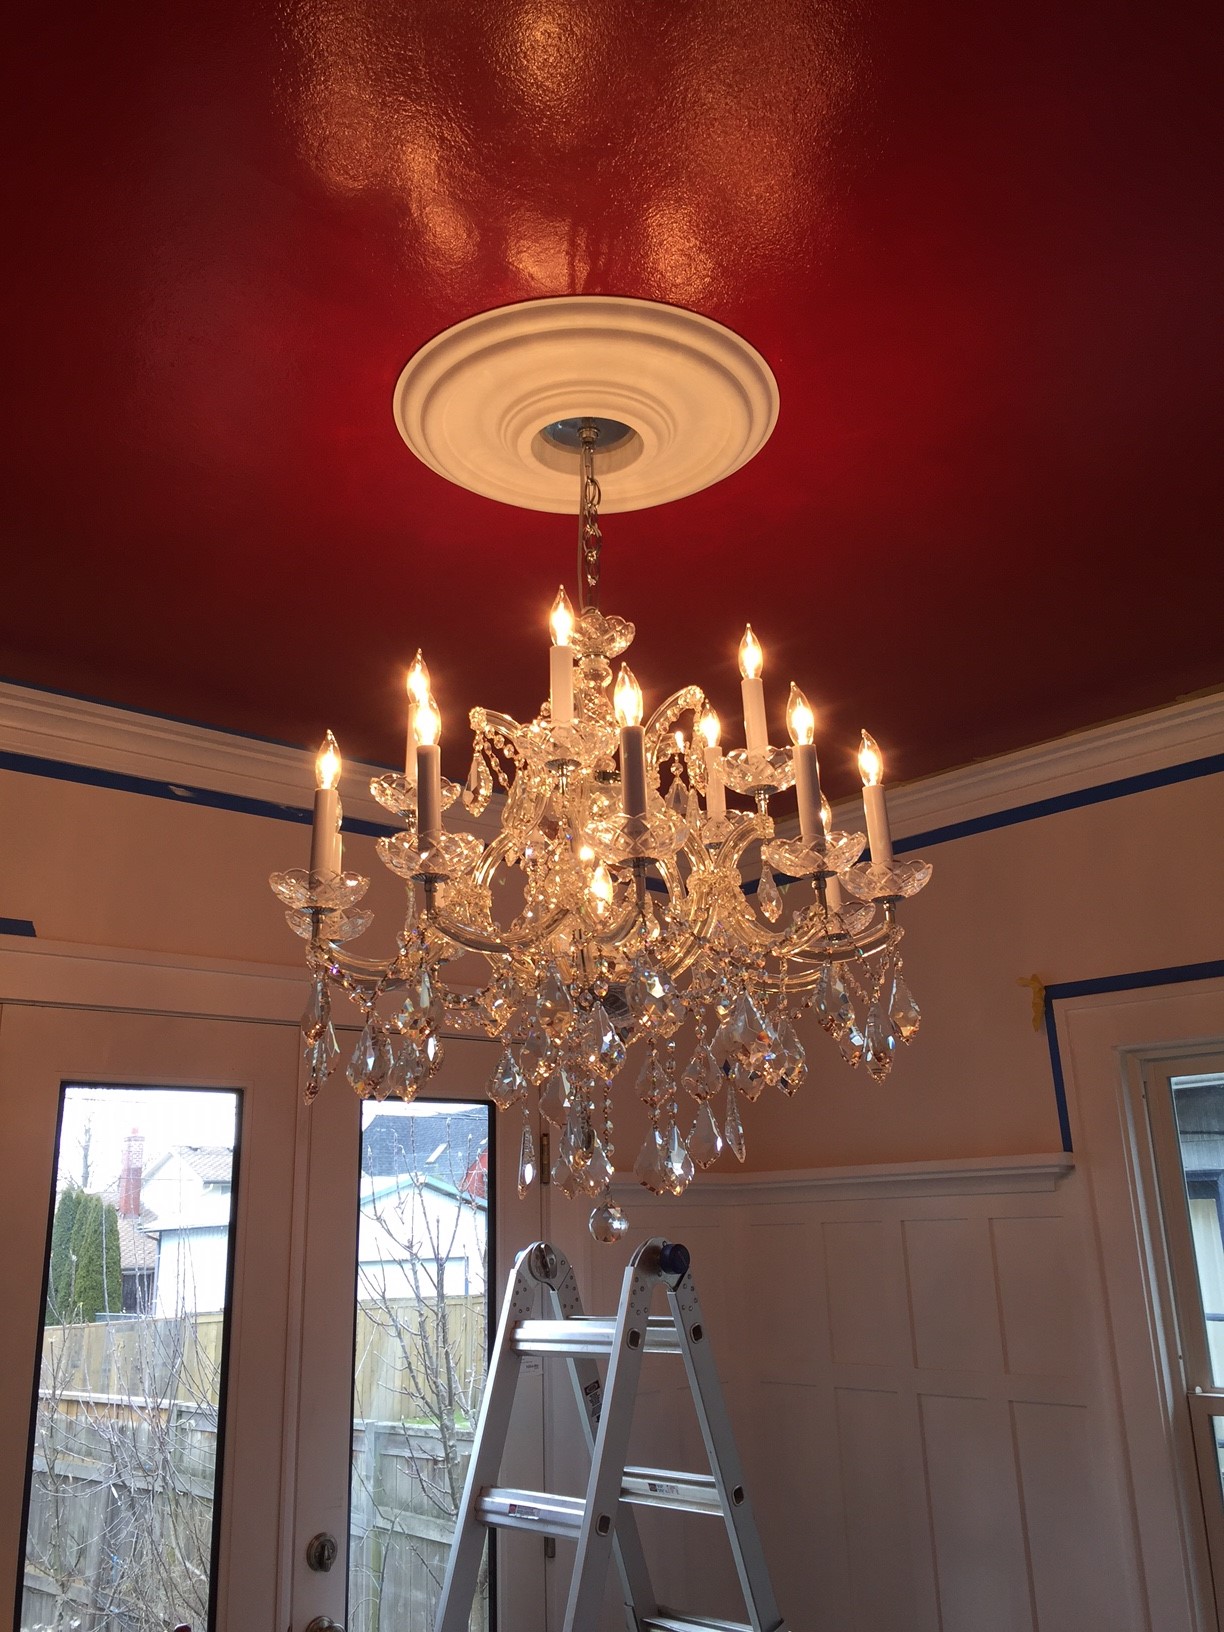
We are in the house remodel home stretch. Just small trim details left on the main floor. One of them being my wife’s chandelier installation. I had planned to install the kitchen floor this past weekend, but Stamps-With-Foot had other plans. She sat me down over coffee Saturday morning and made it clear that my plan was out and that her sparkly lamp was in. Always a fan of choosing my battles wisely – into the dining room I went.

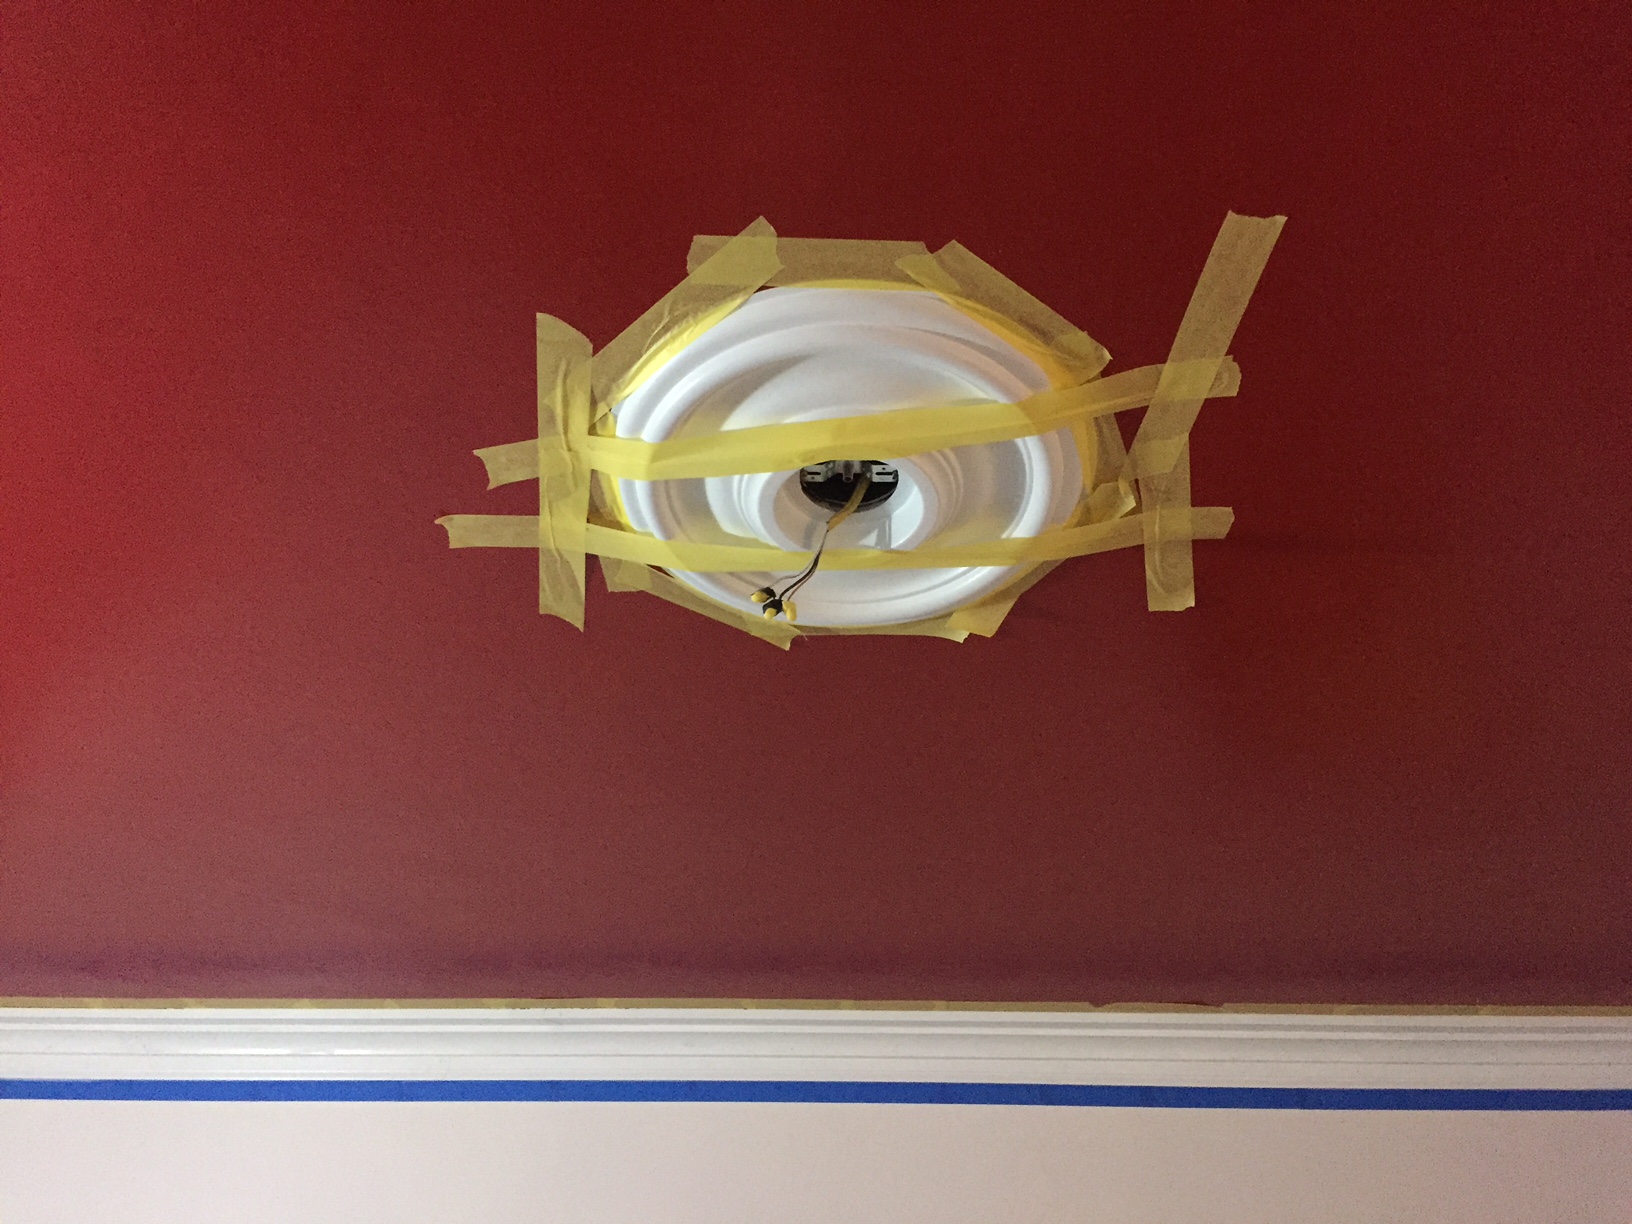
I needed to caulk the new dining room crown molding and prep it for paint before I could install the ceiling medallion/escutcheon for the light. It took two passes and some light sanding, but all the cracks and gaps are filled and we were ready to hang the crystal and steel behemoth around 4:00pm on Saturday. I had my wife sitting in the attic holding the chandelier by its safety cable while I wired it to the ceiling junction box. Like in a really bad sit-com, there was a “ping” noise, the safety wire popped, and the stupid-expensive hunk of cut glass and metal headed to the floor. It happened like it was all in slow motion. Now this thing is not small. It is not light. It did not come with handles. From the top of a six-foot ladder, I instinctively reached way out and grabbed her prized chandelier as it fell. I teetered for a second on the top of the ladder, having flashes of crashing to earth and how many stitches I would be getting, before the ladder stopped moving and I was able to slowly walked the beast down to the floor. I did have to check my britches as it was a rough couple of seconds, anything could have happened. Thankfully, just one single tiny glass bit cracked in half from the jolt – super glue will be the answer. The ceiling medallion also popped loose and I had to pull it down, remove the adhesive and remount it, afterward clamping it to the electrical box and taping the edges to the ceiling so that the glue would set up overnight.

After getting the medallion in the air, I went to Home Depot, purchased some 1/8” stainless steel cable and with a swaging tool -everyone should have their own… 🙂 , I remade the safety cable. After waiting until the next morning, I spent an hour installing the beast. My wife danced around with giddy joy when I flipped the switch after all twenty of the 45watt bulbs were installed. Happy wife, happy life…

I will be done painting the trim this week, the blue and yellow tape will come down,  and then the dining room is 100% done. On to the Kitchen.

matt-talley-chandileir-install_2017-1 matt-talley-chandileir-install_2017-2 matt-talley-chandileir-install_2017-3

From Trash to Basement Built-in

I was at one of the architectural salvage places in the SODO area of Seattle one fine summer day 3 years ago and as I was leaving with whatever small treasure I had found (picture Sméagol with his Precious…), I spied a bit of white cabinetry and what looked like a paneled cabinet door in their free/meant-for-the-dumpster pile so I went over and looked to see if I could salvage a bit of whatever it was.  The hope was for a door that I could re-purpose or some cool hardware left intact, but I struck gold!  Some idiot used a pry-bar and a Sawzall to rip a built-in painted hutch out of a house’s wall during a remodel.  It was taken to the salvage shop without a back, one side missing, no top, zero trim left, and with rough recent tool/pry marks all over it.  All the shelves were there and the door that I had seen was one of four heavily painted paneled oak doors.  I saw some promise and had an exact spot for it, so I piled the wreckage in the back of my truck, roped it down, and sped away before someone could tell me no.

It languished in the basement for part of a year before I tightened the joints, squared it all up, made a back from pine bead-board, built a matching side panel, reinforced the structure and installed it on one of our basement den walls.  What used to be the open counter-top space between the original built-in base and top, became storage for boots or snowboards or books (which is what is there now).

I wanted to include Stamp-With-Foot in the project, so I took her with me to pick out some trim.  She found a section of fancy scalloped-cut chair rail/case molding that she REALLY liked and I went home and used it in a custom buildup: adding a section of ripped down base molding and a length of popular wood that I ran over with two different router bits to make the top trim.

After getting the piece installed, I realized that I would have a 5″ gap of dead space between the inside top of the cabinet and the finished top, so I rabbited in two shelf lips and built matching hatch covers to provide storage for long or seldom used items in the top of the cabinet.  The hatches were finished with brass ring pulls from a local boat supply hardware shop.  After some light sanding, Stamps-With-Foot and I put two coats of white cabinet paint on it and I had The Ruminator help me install antiques glass pulls and keyed latches while he was visiting for Christmas.   The piece looks like it was built with the house, the top is already filled with mountaineering books, and is a fantastic addition to our basement and home.

Wooden Nightstand Build

My sweet sweet wife has issues with the color green – most shades. While living in Hamburg, we had a tiny bedroom that Stamps-With-Foot wanted to paint “sage green.” She bought the paint at Max Barr (a Teutonic version of Home Depot) brought it home and painted a little swatch on the wall. It was kinda dark, so she painted the whole wall. Still kinda dark. She then painted the whole room. I came home and my bedroom was Olive Drab, Army Green… It took me two coats of primer and three coats of paint to banish the darkness.

Flash forward a few years to Seattle. We have replaced all of our MDF particle board IKEA crap furniture with real wood pieces with the exception of our night stands. I hate them. Hate. I traded my mother a couple bookshelves for a former dressing table/vanity that was deeply scratched in places and had a couple of drawers that wouldn’t budge. It was in two pieces already and I shortened the legs, stripped off some of the old finish and prepped them for paint. Stamps-With-Foot wanted the pieces to match our 1930’s bedroom set, which has a sage green accent color. The plan is to have the bodies painted green, use a soft sunflower yellow for the accent and to completely strip the top and drawer fronts and coat them with a polyurethane so that the natural color and grain would pop. I had primed them, sanded, primed again, and grabbed some color swathes for her to choose from. She chose a fine green and I had it custom mixed at my local Benjamin Moore store (friends don’t let friends buy paint at Home Depot). I had two smooth coats sprayed on before my sweet wife decided they were the wrong color green. I tried in vain to talk her out of making me swap the color. I tried really hard – I even mentioned the Hamburg incident. No dice, the color WOULD be changed.

I showed up at the paint store with a picture frame for them to color-match, ignored their snickers, bought all new paint, went home, sanded, and resprayed both pieces with two coats of the “new” green. I painted the accent color and rubbed the color into the cracks before washing it off the high spots. The tops were polyurathaned, drawers were fixed, dividers installed, fronts refinished, 100+ year old glass knobs bought/installed, and then I carried them up to our Master Suite and my sweet bride gushed over them. Her delight made my heart happy.

In my heart of hearts I know she is still second guessing the 2nd color choice, but I have sworn to myself that if she changes her mind again she will be banned from deciding house/furniture/accent colors for the term of one year and that I will turn the basement into a mountain chalet-themed man cave- which might happen anyway, I am just really looking for an excuse to belay my guilt.

Lawn Furniture done!

As I mentioned in a previous post, there had been parts for Adirondack lawn chairs all over the house and shop for 9+ months waiting on me to gather the will to glue them up and drive some weatherproof screws home.  The Ruminator and I put together when he was here this summer – he supervised while waxing poetic about dressing up like a viking – and I spent a combined 12 hours priming and painting them candy apple red.

Since I don’t want to repaint them every spring I used an oil-based exterior paint.   Holy crap, it was hard to find!   It seems that everyone has switched to latex based paint for homeowner use (ease of use, easy cleanup, better for the environment, etc…) and I had to resort to having gloss deck and concrete paint custom mixed.  It went on like glass though and should be impervious to our rainy long winter weather for three or four years.  My sweet wife super loves them and could barely wait until they were dry before giving them a proper, reading a book in the sun, test.

Below is a gallery of the whole build process: